Build Progressive Web Apps with React
How to transform a React application into a progressive web application with great performance — deep tutorial. How to transform a React application into a progressive web app
Progressive Web Apps (PWA) are something that almost everyone in mobile app development is talking about. And though PWAs have been around for a while now, they have been gaining more and more attention every day.
Originally introduced by Google in 2015, PWA is an app that can contain features such as offline capability, push notifications, greater performance and speed, and local caching of assets.
With the help of PWA technology, even web developers can build great mobile apps using their own web stack. You don’t need to learn Java, Objective-C, Swift, or React Native. You can build PWAs with Angular, Vue, or React!
In this post, you will get to see how to turn a simple Web App built with React into a Progressive Web App! You will learn how to run the app completely offline, how to cache assets, how to use Workbox to create service workers, and finally how to install the PWA into your smartphone!
Prerequisites
Before getting started, let’s make sure that we have gathered all the “ingredients” required to cook this app.
First, make sure that you have the latest version of Node installed. Then, if you don’t already have a code editor installed, then go get one. I personally recommend the VS Code.
Instead of wasting time and text space on building a whole new web app, I am going to use one that I have already created. This app is going to be a simple Todo App built using React with Firebase and Redux.
If you are impatient and just want to get started with the PWA stuff, you clone the full web app using Git as shown below:
$ git clone https://github.com/rajatk16/firedux-todo.git
$ cd firedux-todo
$ npm install
This set of commands will download the project folder, and install the node modules.
It goes without saying that since we are building a React Progressive Web App, we need to have the React CLI installed on the system as well.
It’s also recommended to use Bit for the application’s components so that you won’t have to rewrite them in your next app. Instead, just share them with Bit and make them reusable from any other app you have no or in the future.
Service Workers
Service workers are what make Progressive Web Apps so amazing. Basically, a service worker is a script that is run by the browser in the background. It does not interact with the actual app and even the usual user won’t know anything about it.
Let’s take a look at the code in the index.js file of our app.
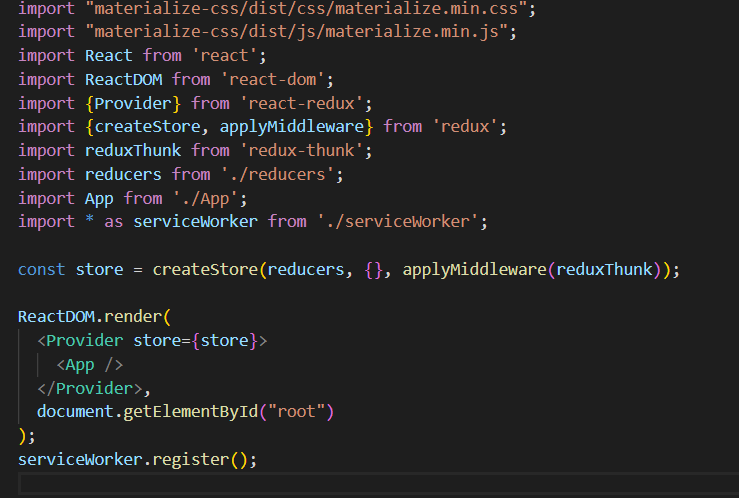
The final line of code says serviceWorker.register();. The older version of the Create-React-App CLI used to do it for us. But with version 2.0, the service worker is unregister();ed by default. So make sure that you make the change to the code in your future PWAs.
React uses a “cache-first” strategy so that all the assets generated by the app get saved. Take a look at the register function of serviceworker.js file as shown below:
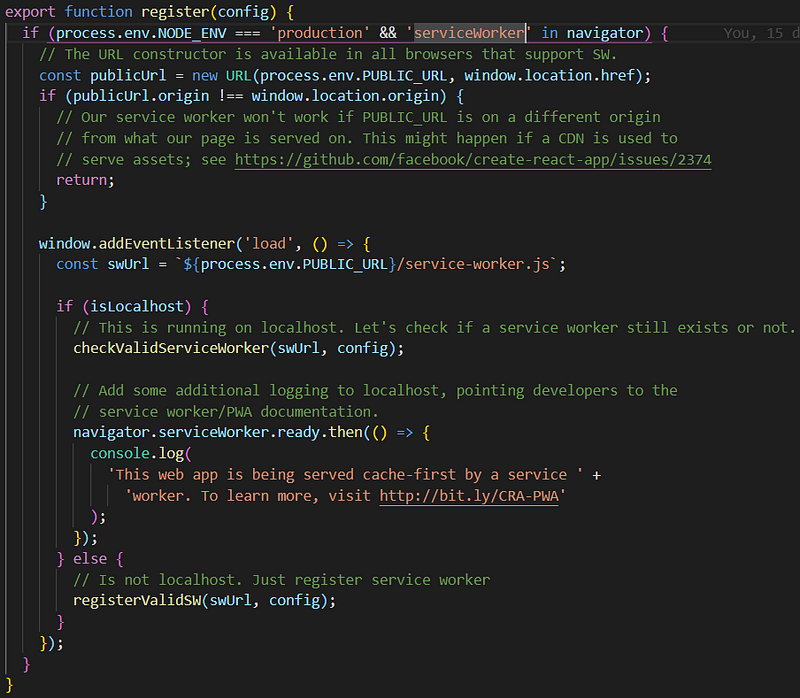
Here, the code says that the service worker will only register if the app is in production mode. You can change the code so that the service worker will worker will register in development mode, but that is usually not a good idea as it will cause problems with caching.
So what we can do is build a production version of the app and serve it as shown below:
$ yarn global add serve
$ yarn build
$ serve -s build
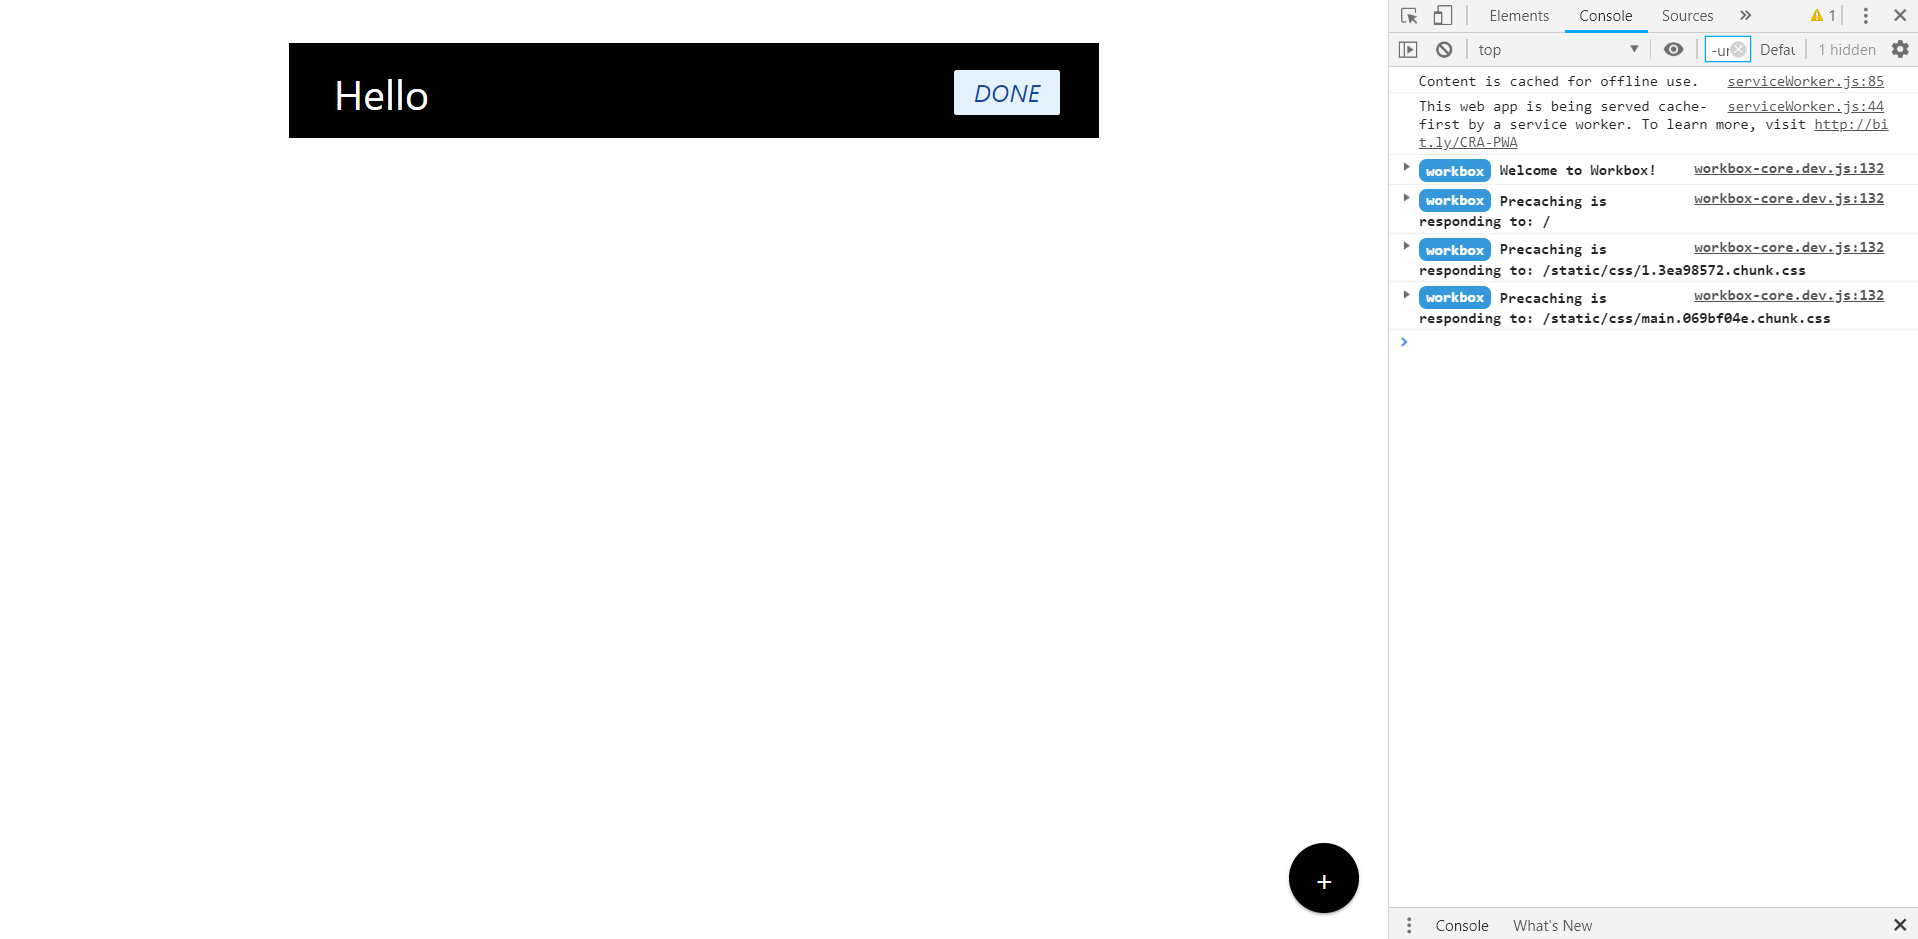
This will run the app on localhost:5000 in the browser. If you open the Developer tools and go to the console tab, you should get a couple of messages from Workbox about the pre-cache status of your app’s assets.
Create-React-App’s default service worker will only cache the static assets, so if you turn off your internet and refresh the browser, the app’s UI will load because it is a static asset. But the task, which is being fetched from Firebase will not load.

Updating the Service Worker
It is more difficult to debug a PWA than a regular app because of how they get cached the browser.
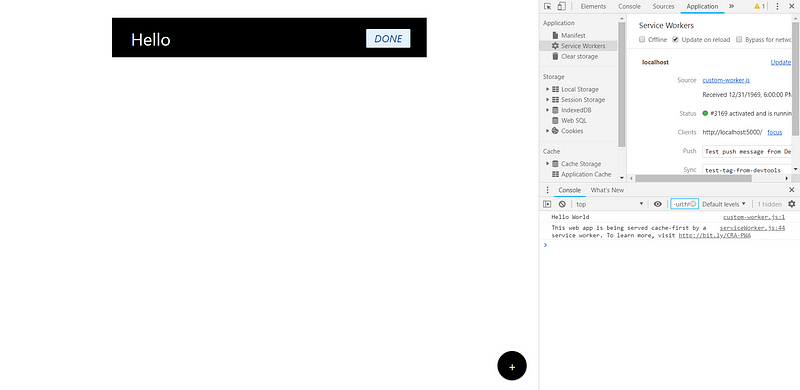
In Chrome’s DevTools, you will see a tab named Application. Inside you can see all the info related to the service worker of our app.
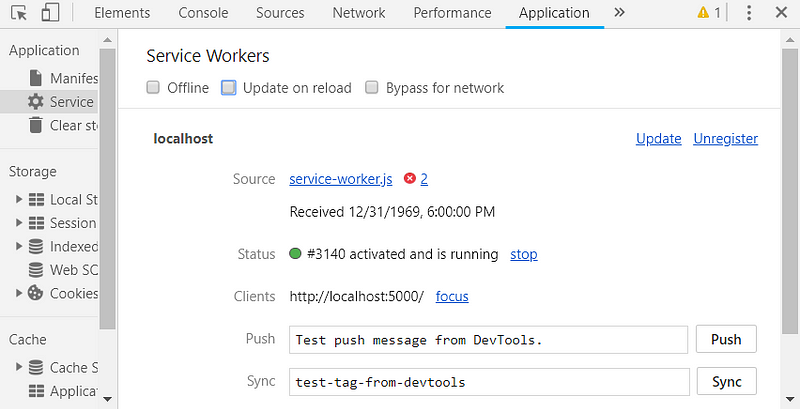
There are two ways by which we can update the service worker. One is by clicking on the “Update on Reload” option at the top, the other is by manually updating the service worker using the update link. You can also unregister the service worker and reload the browser to update the service worker.
Normally if you make any changes to your app, you would need to rebuild the production version of the app and re-launch it on the browser in order to see the changes.
But things get a little more complicated in case of Progressive Web Apps. That is because the service worker has cached the previous version’s assets, and we need to update the service worker, close all browser tabs that have the app opened in them, and open the app again to see the changes.
Try to change the name of the app from the generic “React App” that we see on the tab to something like “Firedux Todo”. To do this, you will first need to go to public/index.html, change title tag’s content to Firedux Todo, and rebuild the production version of the app as shown below:
$ yarn build
$ serve -s build
Then reopen the app in the browser. If the app’s title has not changed, then try to update the service worker and see if it works.
Creating Custom Service Workers
Create-React-App’s default service worker is good for caching static assets, but we want to do much more than that. For that, we need to disregard the default service worker and create one of our own.
The simplest way to do that is to go to the public folder in our app’s directory and create a new service worker file. I am going to name it customWorker.js. For now, let’s add a simple console log to check if it works.
console.log("Hello World");
The React App is still going to choose its default service worker. To fix this, open the src/serviceworker.js and at line 34 you will find the following code:
window.addEventListener('load', () => {
  const swUrl = `${process.env.PUBLIC_URL}/service-worker.js`;
Replace the service-worker.js with the name of our custom service worker.
Run yarn build and serve -s build again to create a new production build and serve it. Reopen the app on chrome and check the console to see if you get the Hello World message printed.
If you get any errors, try to unregister the service worker and reload the browser.
This is a very manual way of using custom service workers in our app. The drawback of this method is that our app can no longer use Workbox. Workbox provides us a with a lot of cool features so it would be better to be able to keep Workbox and create custom service workers. So lets undo all the changes that we made in this section and start over.
Now add a new developer dependency called react-app-rewired which will help us rewrite the webpack config and take be able to use the Workbox.
$ yarn add -D react-app-rewired
Then open the package.json file and rewrite the scripts as shown below:
"scripts": {
  "start": "react-app-rewired start",
  "build": "react-app-rewired build",
  "test": "react-app-rewired test",
  "eject": "react-app-rewired eject"
}
Then create a new file named config.js in the root of the project directory. We will import the workbox-webpack-plugin and map over all the plugins till we get to the GenerateSW plugin, which we will then replace with InjectManifest plugin from Workbox.
const WorkboxWebpackPlugin = require('workbox-webpack-plugin')
module.exports = function override(config, env) {
  config.plugins = config.plugins.map(plugin => {
    if(plugin.constructor.name === 'GenerateSW') {
      return new WorkboxWebpackPlugin.InjectManifest({
        swSrc: './src/sw.js',
        swDest: 'service-worker.js'
      })
    }
    return plugin
  })
  return config
}
We then need to create the sw.js file in the src folder. Inside, we will define the actual custom service worker. I will simply add a console log and call skipWaiting and clientsClaim, ensuring that the service worker gets installed on all the open clients.
console.log("Hello World")
workbox.skipWaiting()
workbox.clientsClaim()
Do not add the last two lines if you are going to write a complex service worker, which you probably are.
Rebuild the production version of the app and serve it on the browser. You should then get the Hello World message printed in the console.
Pre-Cache the Static Assets
Our custom service worker now gets loaded onto the app, but its not really doing anything. In this section, we will write the code that will precache the static assets of the app.
The service worker will use a list of files from the _precacheManifest, which is generated automatically by the InjectManifest webpack plugin and cache those files at the correct route. So in the sw.js file, remove the console.log function and write the following at the end.
workbox.precaching.precacheAndRoute(self.__precacheManifest || [])
Rebuild the production version of the app and serve it on the browser. Then in the DevTool’s console tab, you will see that the pre-cache is responding to all the static assets of the app.
To verify if the precaching is working, go offline and reload the browser. The app should still reload. The only difference here is that none of the Todos will get loaded because it is not a static asset.
Listening for Install and Activate Events in a Service Worker
The code inside a service worker is purely event based. Two such events are the install and activate events. These events are executed code when the PWA gets installed on a device for the first time.
Inside the src/sw.js file, add an EventListener for the install and activate event as shown below:
self.addEventListener('install', event => {
  console.log('install')
})
self.addEventListener('activate', event => {
  console.log('activate')
})
After rebuilding and reserving the app, you will get to see the console print out install and activate in the browser’s console. If you don’t see these messages in the console, thats because the service worker is already installed and activated. You can try unregistering the service worker and reload the browser.
We can do more than just console out messages inside these callbacks. We can clean up old caches and interact with the local storage or indexedDB. Lets start with a setTimeout wrapped inside a Promise.
self.addEventListener('install', event => {
  const asyncInstall = new Promise(resolve => {
    console.log("Waiting to resolve...")
    setTimeout(resolve, 5000)
  })
  event.waitUntil(asyncInstall)
})
It is important that whatever Promise we pass to the waitUntil actually resolves or rejects. If we didn’t resolve in the timeout here, it would wait forever to install the service worker. Then it would never activate. The service worker would never work.
Caching Third Party Resources
Our custom service worker is currently caching only static assets that are included in the React App. So, if you have resources from a third party like Bootstrap, they won’t be included in the cache as they are not available at webpack compile time.
To fix this, we need to change the service worker to add caching for those by assets by using workbox’s registerRoute method, and a regular expression to match the entire URL of the asset. We will pick the staleWhileRevalidate cache strategy.
Inside src/sw.js file, we can define and register a new route for the service worker. The first argument to registerRoute is either a string that matches the resource that we are trying to cache or a RegExp that matches it. We will say that anything that starts with https and ends with min.css or min.js. The second argument to register a route tells workbox what strategy to use when caching that resource.
workbox.routing.registerRoute(
  new RegExp('https:.*min\.(css|js)')
  workbox.strategies.staleWhileRevalidate()
)
If we check the cache on the application tab, we will get to see that the assets are put into the runtime cache instead of the pre-cache. To fix this, we can give a name to the cache by adding the cacheName option as shown below:
workbox.routing.registerRoute(
  new RegExp('https:.*min\.(css|js)')
  workbox.strategies.staleWhileRevalidate({
    cacheName: 'cache'
  })
)
Tip: Use Bittoreuse and sync components between apps. Share components as a team to build together, and build multiple React apps faster. Give it a try.
The web manifest is a JSON file that contains a couple of things that the browser will use to know about our app. It will also tell the browser how it should acts when the PWA gets added installed on the device.
If your PWA does not have a manifest, then the Chrome browser will not show the Add to Home Screen Prompt.

The Create React App CLI writes a default manifest file for us inside the public folder and until now we have left it alone. Let’s make a few changes to it in order to build a better PWA.
Adding Custom Icons
The main goal behind build Progressive Web Apps is to be able to add the web app on the home screen of iOS and Android devices. To do this, we need to create a very crucial thing that is called Icon. If our PWA does not have an icon, then it will be harder to display it on the device’s home screen.
Open the manifest.json file from the public folder. You will notice that it already has a icons defined and points to the favicon.ico as the current icon of the app.
We need to add a few different sizes of the icon to this file as shown below:
"icons": [
    {
      "src": "favicon.ico",
      "sizes": "64x64 32x32 24x24 16x16",
      "type": "image/x-icon"
    },
    {
      "src": "icon1.png",
      "sizes": "120x120",
      "type": "image/png"
    },
    {
      "src": "icon2.png",
      "sizes": "144x144",
      "type": "image/png"
    },
    {
      "src": "icon3.png",
      "sizes": "152x152",
      "type": "image/png"
    },
    {
      "src": "icon4.png",
      "sizes": "167x167",
      "type": "image/png"
    },
    {
      "src": "icon5.png",
      "sizes": "180x180",
      "type": "image/png"
    },
    {
      "src": "icon6.png",
      "sizes": "192x192",
      "type": "image/png"
    },
    {
      "src": "icon7.png",
      "sizes": "512x512",
      "type": "image/png"
    }
],
You can resize your desired icon to these sizes here:
To keep things simple, add the icons in the public folder itself. Then in order for the iOS devices to properly detect these icons, open the index.html file and add the following links to the head section.
<link rel="apple-touch-icon" sizes="120x120" href="icon1.png">
<link rel="apple-touch-icon" sizes="144x144" href="icon2.png">
<link rel="apple-touch-icon" sizes="152x152" href="icon3.png">
<link rel="apple-touch-icon" sizes="167x167" href="icon4.png">
<link rel="apple-touch-icon" sizes="180x180" href="icon5.png">
<link rel="apple-touch-icon" sizes="192x192" href="icon6.png">
<link rel="apple-touch-icon" sizes="512x512" href="icon7.png">
Finally rebuild the app and serve it on the browser by running the commands:
$ yarn build
$ serve -s build
Open the browser’s DevTools and go to the Application tab. Then if you click on the Manifest, you should see the new icons updated as shown below:

Changing the Name and Short Name
Aside from icons, the manifest also describes the app’s name and a short name. The short name can only be 12 characters long and it will be used when we install the app on a mobile’s home screen. If you do not specify a short name, then the browser will automatically truncate the name of the app and use it.
The name on the other hand, can be as long as 45 characters and is used when you install the PWA on your Chrome browser through the Chrome Web Store.
Let’s set the short_name of the app as Firedux and the actual name of the app as Firedux-Todo as shown below:
"short_name": "Firedux",
"name": "Firedux-Todo",
Rebuild and serve the PWA on the browser. Then back in the DevTool’s Application tab, you should see the Name and Short name change accordingly.

Installing the App on Android/iOS device
To show how a PWA can be installed on a mobile device, lets take a look at a real Progressive Web App — Flipkart.
When you open the Flipkart URL on your mobile’s browser, you will get something like this:

When you open the browser’s menu, you will see the option Add to Home Screen.
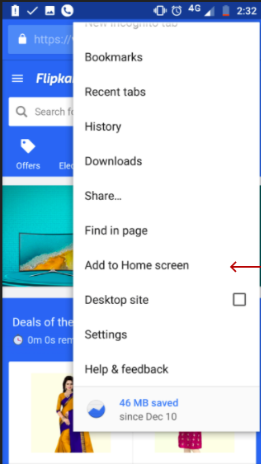
Note: If you get a prompt as shown below, you will know that you are adding a PWA to your home screen.

Once your PWA is installed, it will appear on your home screen like this:
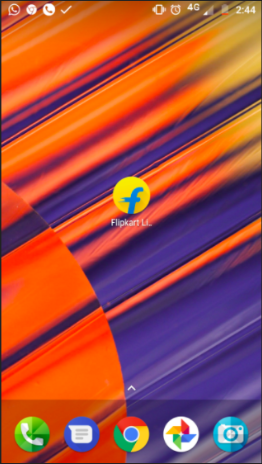
Just like a Native App, your PWA will also be available in the device’s app drawer. When you open the PWA, you will notice that is exactly like what you saw on your web browser. The only difference is that in the PWA, there is no URL bar.
Let’s go back to my Todo App, if you install this app on your mobile device, you should get something like this:

Changing the Status Bar Color of the App
As you can see in the above image, the status bar of the app is black (#000000). We can change this and the background color of the app through the manifest.json file.
At the bottom of the manifest file you will see the following things:
"start_url": ".",
"display": "standalone",
"theme_color": "#000000",
"background_color": "#ffffff"
If you make any changes to the theme_color and background_color here, then you see them reflected into the application after you rebuild it and serve it again.
You will also find a meta tag inside the public/index.html file named theme_color. Make your changes to this tag’s content as well.
<meta name="theme_color" content="#5A78AF">
For iOS devices, we need to do little more due to a number of restriction place by Apple. Go to the public/index.html add the following meta tag in the head section of the file.
<meta name="apple-mobile-web-app-status-bar-style" content="default">
Auditing with Lighthouse
The Chrome browser comes with built-in app auditing tool called Lighthouse, that we can use to score our web app.
Once you feel like your PWA is ready to be deployed, open the Chrome browser’s DevTools and go the Audits section.
Lighthouse can be used to score the app on many different aspects such as Performance, Progressive Web App, Best practices, Accessibility, and SEO.
Lighthouse will run a number of tests on the app. On the PWA front, it will run the app as if it was running on a mobile browser. Finally, you will get a report that will tell how good your app has fared.
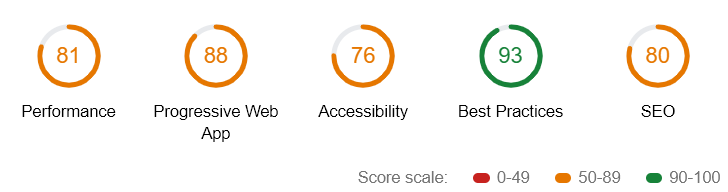
As you can see, the app that we have been working on till now scored 88/100, which is not so good. A good app should have a score of 90 and above.
But that is fine because this is just an app that I was building to show you how to do things. It is not a production level app.
Also, lighthouse does more than just score our app. It also gives us helpful pointers that we can use to improve our applications.
Conclusion
Progressive Web Apps are growing in popularity every day. Starbucks, Twitter, Pinterest, and Flipkart are just some of the companies that have shifted from native apps to PWA and reported a considerable increase in user engagement.
We saw some of the important steps that one needs to take in order to build a Progressive Web App in React. PWAs are really cool and with the increased support from Apple, they can do much more for us than they could previously.
For example, PWAs can also easily access device features such as the camera and the address book. If you want to do the same thing with React Native, you would have to install additional libraries.
Another great thing about PWAs is the ability to send push notifications. Push notification is a message that pops up on the user’s device and can be triggered locally by an open application or “pushed” from the server to the user, even if the app is currently not running. Push notifications allow users to opt-in to timely updates and also allow you to effectively re-engage with customized content.
Originally published by Rajat S at https://blog.bitsrc.io
#reactjs #web-development