In this tutorial, you learn how to:
- Create a web API project.
- Add a model class.
- Create the database context.
- Register the database context.
- Add a controller.
- Add CRUD methods.
- Configure routing and URL paths.
- Specify return values.
- Call the web API with Postman.
- Call the web API with jQuery.
At the end, you have a web API that can manage “to-do” items stored in a relational database.
Overview
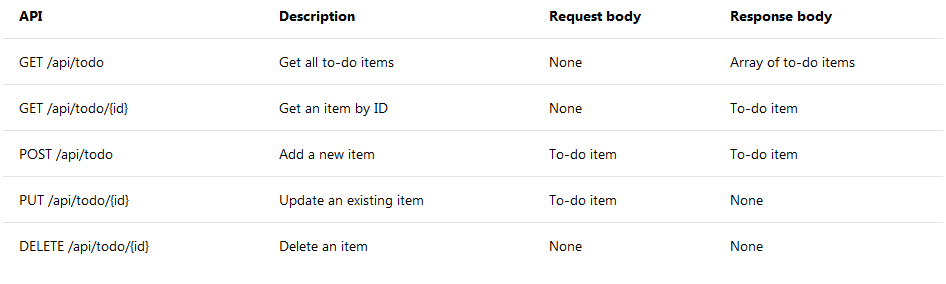
This tutorial creates the following API:
The following diagram shows the design of the app.

Prerequisites
Visual Studio
Visual Studio 2019 with the ASP.NET and web development workload
Visual Studio Code
C# for Visual Studio Code (latest version)
Visual Studio for Mac
Visual Studio for Mac version 7.7 or later
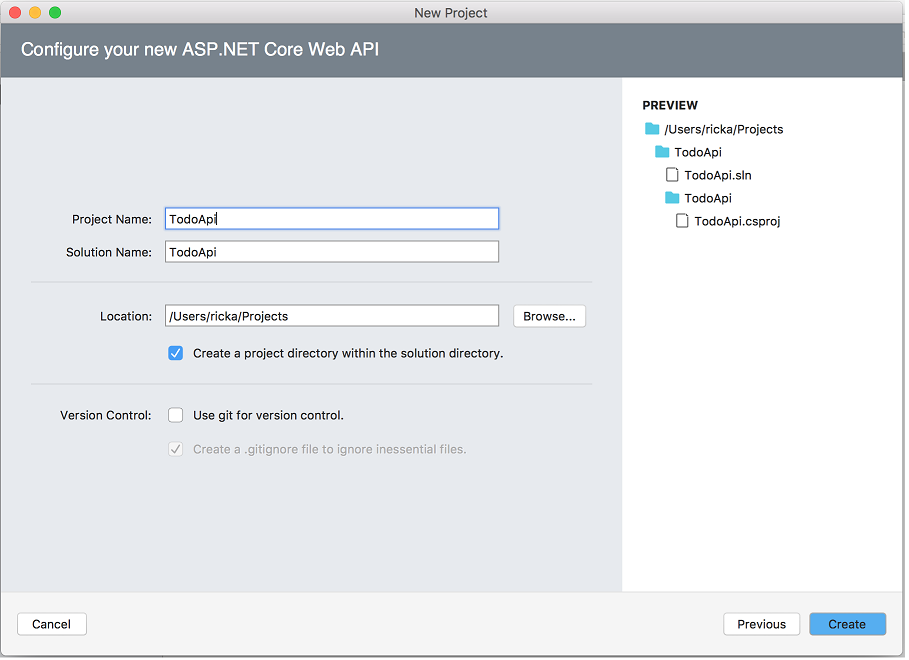
Create a Web API project
Visual Studio
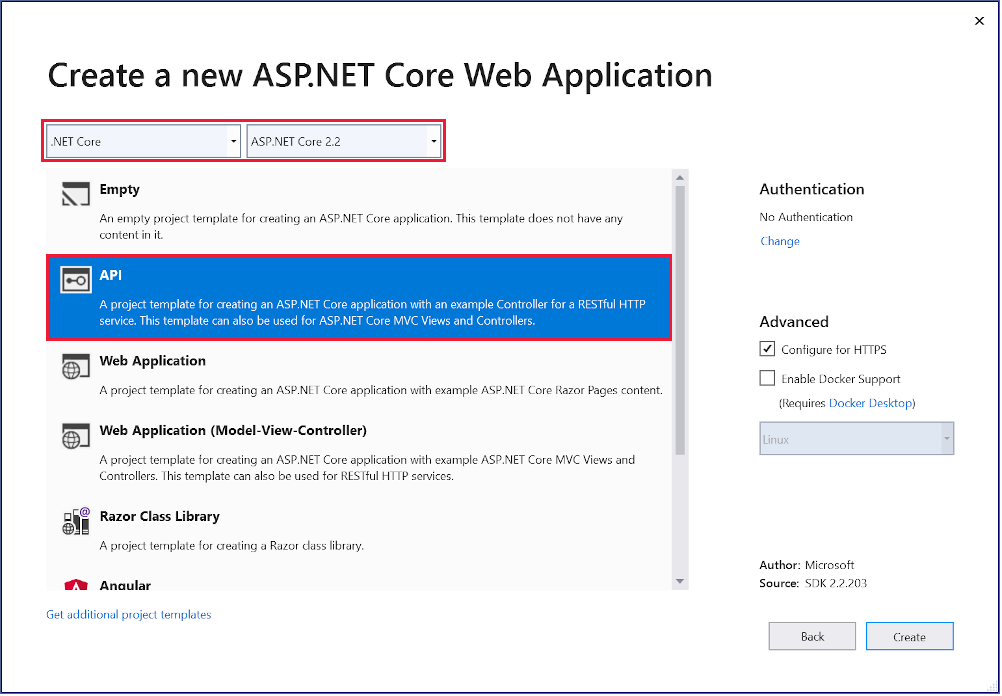
- From the File menu, select New > Project.
- Select the ASP.NET Core Web Application template. Name the project TodoApi and click OK.
- In the New ASP.NET Core Web Application - TodoApi dialog, choose the ASP.NET Core version. Select the API template and click OK. Do not select Enable Docker Support.
Visual Studio Code
Open the integrated terminal.
Change directories (cd) to the folder which will contain the project folder.
Run the following commands:
console
dotnet new webapi -o TodoApi
code -r TodoApi
These commands create a new web API project and open a new instance of Visual Studio Code in the new project folder.
When a dialog box asks if you want to add required assets to the project, select Yes.
Visual Studio for Mac
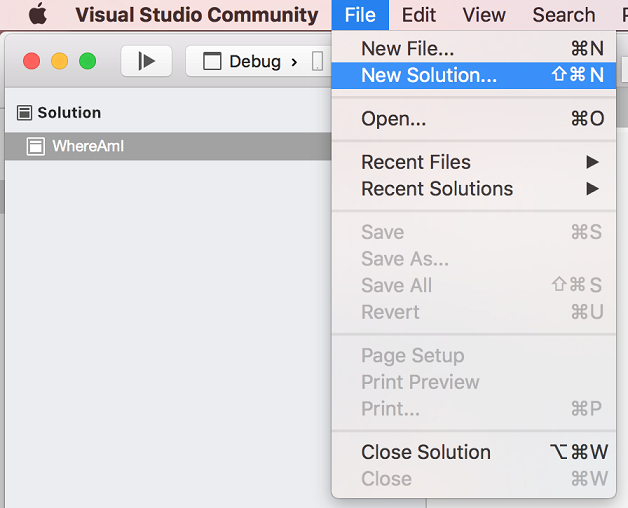
- Select File > New Solution.
- Select .NET Core App > ASP.NET Core Web API > Next.
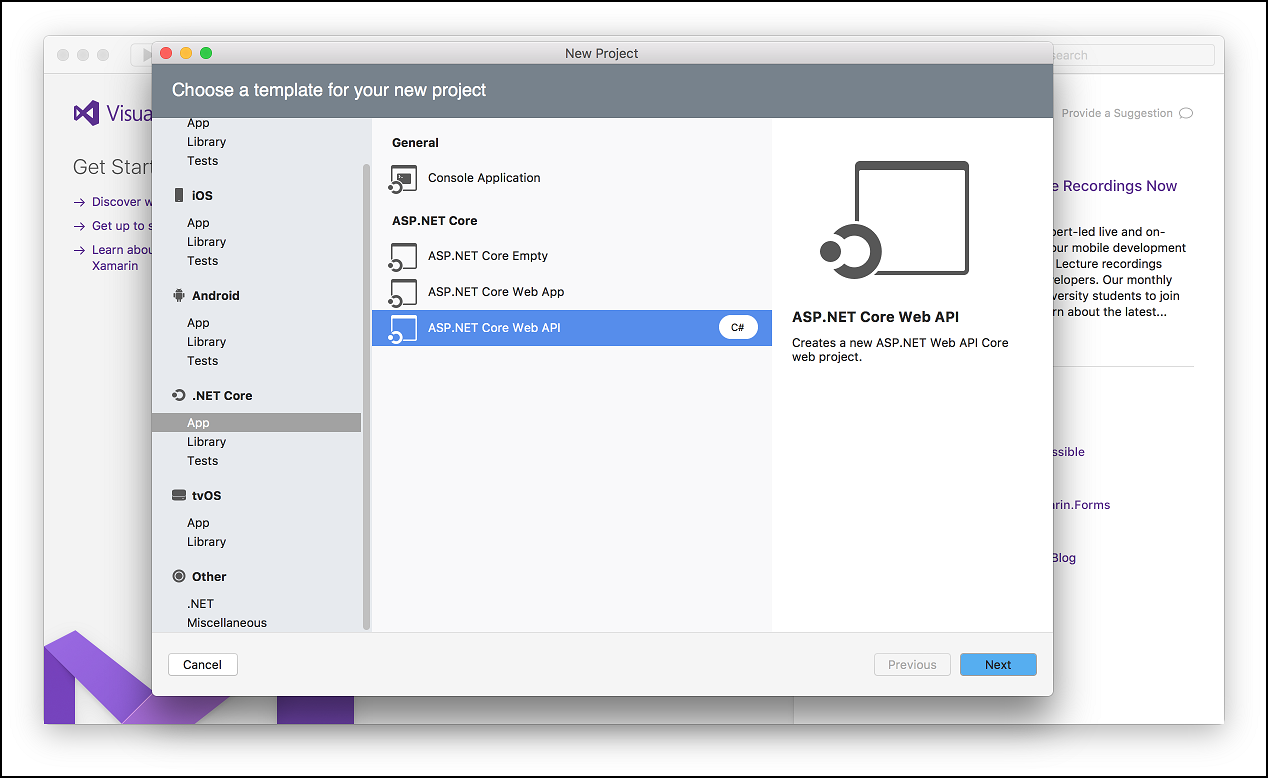
- In the Configure your new ASP.NET Core Web API dialog, accept the default Target Framework of *.NET Core 2.2.
- Enter TodoApi for the Project Name and then select Create.
Test the API
The project template creates a values API. Call the Get method from a browser to test the app.
Visual Studio
Press Ctrl+F5 to run the app. Visual Studio launches a browser and navigates to [https://localhost:/api/values](https://localhost:/api/values), where `` is a randomly chosen port number.
If you get a dialog box that asks if you should trust the IIS Express certificate, select Yes. In the Security Warning dialog that appears next, select Yes.
Visual Studio Code
Press Ctrl+F5 to run the app. In a browser, go to following URL: https://localhost:5001/api/values.
Visual Studio for Mac
Select Run > Start With Debugging to launch the app. Visual Studio for Mac launches a browser and navigates to [https://localhost:](https://localhost:), where `` is a randomly chosen port number. An HTTP 404 (Not Found) error is returned. Append /api/values to the URL (change the URL to [https://localhost:/api/values](https://localhost:/api/values)).
The following JSON is returned:
JSON
["value1","value2"]
Add a model class
A model is a set of classes that represent the data that the app manages. The model for this app is a single TodoItem class.
Visual Studio
- In Solution Explorer, right-click the project. Select Add > New Folder. Name the folder Models.
- Right-click the Models folder and select Add > Class. Name the class TodoItem and select Add.
- Replace the template code with the following code:
Visual Studio Code
- Add a folder named Models.
- Add a
TodoItemclass to the Models folder with the following code:
Visual Studio for Mac
- Right-click the project. Select Add > New Folder. Name the folder Models.

- Right-click the Models folder, and select Add > New File > General > Empty Class.
- Name the class TodoItem, and then click New.
- Replace the template code with the following code:
C#
namespace TodoApi.Models
{
    public class TodoItem
    {
        public long Id { get; set; }
        public string Name { get; set; }
        public bool IsComplete { get; set; }
    }
}
The Id property functions as the unique key in a relational database.
Model classes can go anywhere in the project, but the Models folder is used by convention.
Add a database context
The database context is the main class that coordinates Entity Framework functionality for a data model. This class is created by deriving from the Microsoft.EntityFrameworkCore.DbContext class.
Visual Studio
Right-click the Models folder and select Add > Class. Name the class TodoContext and click Add.
Visual Studio Code/ Visual Studio for Mac
Add a TodoContext class to the Models folder.
Replace the template code with the following code:
C#
using Microsoft.EntityFrameworkCore;

namespace TodoApi.Models
{
    public class TodoContext : DbContext
    {
        public TodoContext(DbContextOptions options)
            : base(options)
        {
        }

        public DbSet TodoItems { get; set; }
    }
}
Register the database context
In ASP.NET Core, services such as the DB context must be registered with the dependency injection (DI) container. The container provides the service to controllers.
Update Startup.cs with the following highlighted code:
C#
// Unused usings removed
using Microsoft.AspNetCore.Builder;
using Microsoft.AspNetCore.Hosting;
using Microsoft.AspNetCore.Mvc;
using Microsoft.EntityFrameworkCore;
using Microsoft.Extensions.Configuration;
using Microsoft.Extensions.DependencyInjection;
using TodoApi.Models;

namespace TodoApi
{
    public class Startup
    {
        public Startup(IConfiguration configuration)
        {
            Configuration = configuration;
        }

        public IConfiguration Configuration { get; }

        // This method gets called by the runtime. Use this method to add services to the
        //container.
        public void ConfigureServices(IServiceCollection services)
        {
            services.AddDbContext(opt =>
                opt.UseInMemoryDatabase("TodoList"));
            services.AddMvc().SetCompatibilityVersion(CompatibilityVersion.Version_2_2);
        }

        // This method gets called by the runtime. Use this method to configure the HTTP
        //request pipeline.
        public void Configure(IApplicationBuilder app, IHostingEnvironment env)
        {
            if (env.IsDevelopment())
            {
                app.UseDeveloperExceptionPage();
            }
            else
            {
                // The default HSTS value is 30 days. You may want to change this for
                // production scenarios, see https://aka.ms/aspnetcore-hsts.
                app.UseHsts();
            }

            app.UseHttpsRedirection();
            app.UseMvc();
        }
    }
}
The preceding code:
- Removes unused
usingdeclarations. - Adds the database context to the DI container.
- Specifies that the database context will use an in-memory database.
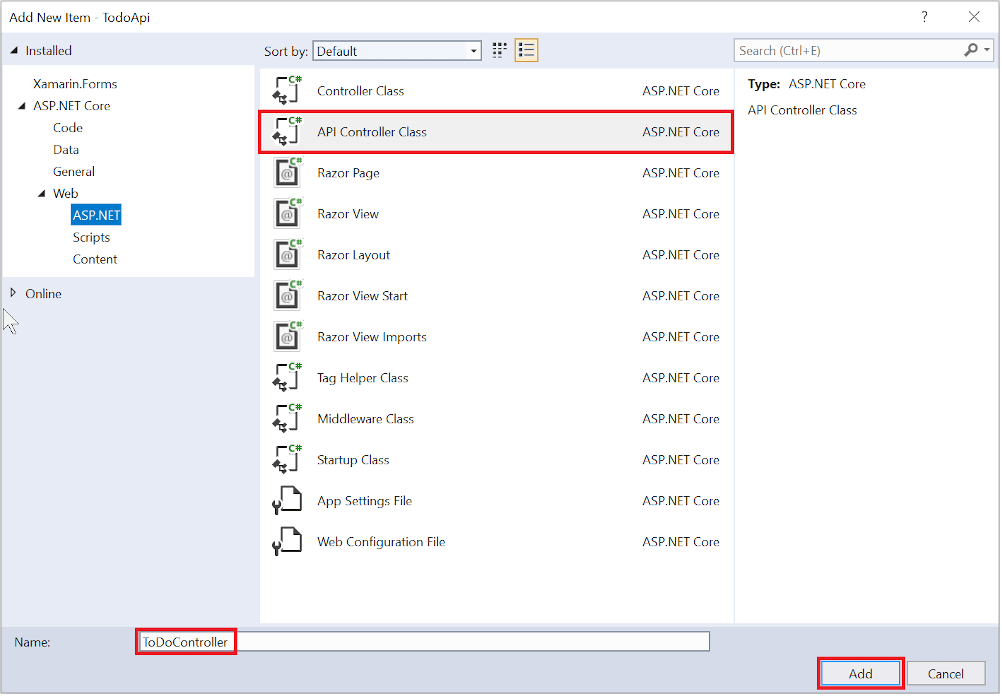
Add a controller
Visual Studio
- Right-click the Controllers folder.
- Select Add > New Item.
- In the Add New Item dialog, select the API Controller Class template.
- Name the class TodoController, and select Add.
Visual Studio Code/ Visual Studio for Mac
In the Controllers folder, create a class named TodoController.
Replace the template code with the following code:
C#
using Microsoft.AspNetCore.Mvc;
using Microsoft.EntityFrameworkCore;
using System.Collections.Generic;
using System.Linq;
using System.Threading.Tasks;
using TodoApi.Models;

namespace TodoApi.Controllers
{
    [Route("api/[controller]")]
    [ApiController]
    public class TodoController : ControllerBase
    {
        private readonly TodoContext _context;

        public TodoController(TodoContext context)
        {
            _context = context;

            if (_context.TodoItems.Count() == 0)
            {
                // Create a new TodoItem if collection is empty,
                // which means you can't delete all TodoItems.
                _context.TodoItems.Add(new TodoItem { Name = "Item1" });
                _context.SaveChanges();
            }
        }
    }
}
The preceding code:
- Defines an API controller class without methods.
- Decorates the class with the [ApiController] attribute. This attribute indicates that the controller responds to web API requests. For information about specific behaviors that the attribute enables, see Create web APIs with ASP.NET Core.
- Uses DI to inject the database context (
TodoContext) into the controller. The database context is used in each of the CRUD methods in the controller. - Adds an item named
Item1to the database if the database is empty. This code is in the constructor, so it runs every time there’s a new HTTP request. If you delete all items, the constructor createsItem1again the next time an API method is called. So it may look like the deletion didn’t work when it actually did work.
Add Get methods
To provide an API that retrieves to-do items, add the following methods to the TodoController class:
C#
// GET: api/Todo
[HttpGet]
public async Task>> GetTodoItems()
{
    return await _context.TodoItems.ToListAsync();
}

// GET: api/Todo/5
[HttpGet("{id}")]
public async Task> GetTodoItem(long id)
{
    var todoItem = await _context.TodoItems.FindAsync(id);

    if (todoItem == null)
    {
        return NotFound();
    }

    return todoItem;
}
These methods implement two GET endpoints:
GET /api/todoGET /api/todo/{id}
Test the app by calling the two endpoints from a browser. For example:
[https://localhost:/api/todo](https://localhost:/api/todo)[https://localhost:/api/todo/1](https://localhost:/api/todo/1)
The following HTTP response is produced by the call to GetTodoItems:
**JSON**
[
  {
    "id": 1,
    "name": "Item1",
    "isComplete": false
  }
]
Routing and URL paths
The [[HttpGet]](https://docs.microsoft.com/en-us/dotnet/api/microsoft.aspnetcore.mvc.httpgetattribute) attribute denotes a method that responds to an HTTP GET request. The URL path for each method is constructed as follows:
- Start with the template string in the controller’s
Routeattribute:
C#
namespace TodoApi.Controllers
{
    [Route("api/[controller]")]
    [ApiController]
    public class TodoController : ControllerBase
    {
        private readonly TodoContext _context;
- Replace
[controller]with the name of the controller, which by convention is the controller class name minus the “Controller” suffix. For this sample, the controller class name is TodoController, so the controller name is “todo”. ASP.NET Core routing is case insensitive. - If the
[HttpGet]attribute has a route template (for example,[HttpGet("products")]), append that to the path. This sample doesn’t use a template. For more information, see Attribute routing with Http[Verb] attributes.
In the following GetTodoItem method, "{id}" is a placeholder variable for the unique identifier of the to-do item. When GetTodoItem is invoked, the value of "{id}" in the URL is provided to the method in itsid parameter.
C#
// GET: api/Todo/5
[HttpGet("{id}")]
public async Task> GetTodoItem(long id)
{
    var todoItem = await _context.TodoItems.FindAsync(id);

    if (todoItem == null)
    {
        return NotFound();
    }

    return todoItem;
}
Return values
The return type of the GetTodoItems and GetTodoItem methods is ActionResult type. ASP.NET Core automatically serializes the object to JSON and writes the JSON into the body of the response message. The response code for this return type is 200, assuming there are no unhandled exceptions. Unhandled exceptions are translated into 5xx errors.
ActionResult return types can represent a wide range of HTTP status codes. For example, GetTodoItem can return two different status values:
- If no item matches the requested ID, the method returns a 404 NotFound error code.
- Otherwise, the method returns 200 with a JSON response body. Returning
itemresults in an HTTP 200 response.
Test the GetTodoItems method
This tutorial uses Postman to test the web API.
- Install Postman
- Start the web app.
- Start Postman.
- Disable SSL certificate verification
- From File > Settings (*General tab), disable SSL certificate verification.
- Warning
- Re-enable SSL certificate verification after testing the controller.
- Create a new request.
- Set the HTTP method to GET.
- Set the request URL to
[https://localhost:/api/todo](https://localhost:/api/todo). For example,[https://localhost:5001/api/todo](https://localhost:5001/api/todo). - Set Two pane view in Postman.
- Select Send.

Add a Create method
Add the following PostTodoItem method:
C#
	// POST: api/Todo
[HttpPost]
public async Task> PostTodoItem(TodoItem item)
{
    _context.TodoItems.Add(item);
    await _context.SaveChangesAsync();

    return CreatedAtAction(nameof(GetTodoItem), new { id = item.Id }, item);
}
	```

The preceding code is an HTTP POST method, as indicated by the [[HttpPost]](https://docs.microsoft.com/en-us/dotnet/api/microsoft.aspnetcore.mvc.httppostattribute) attribute. The method gets the value of the to-do item from the body of the HTTP request.

The `CreatedAtAction` method:

*   Returns an HTTP 201 status code, if successful. HTTP 201 is the standard response for an HTTP POST method that creates a new resource on the server.
*   Adds a `Location` header to the response. The `Location` header specifies the URI of the newly created to-do item. For more information, see [10.2.2 201 Created](https://www.w3.org/Protocols/rfc2616/rfc2616-sec10.html).
*   References the `GetTodoItem` action to create the `Location` header's URI. The C# `nameof` keyword is used to avoid hard-coding the action name in the `CreatedAtAction` call.
*   C#
// GET: api/Todo/5
[HttpGet(“{id}”)]
public async Task> GetTodoItem(long id)
{
var todoItem = await _context.TodoItems.FindAsync(id);
if (todoItem == null)
{
    return NotFound();
}

return todoItem;
}
### Test the PostTodoItem method

*   Build the project.
*   In Postman, set the HTTP method to `POST`.
*   Select the **Body** tab.
*   Select the **raw** radio button.
*   Set the type to **JSON (application/json)**.
*   In the request body enter JSON for a to-do item:
*   JSON
{
“name”:“walk dog”,
“isComplete”:true
}
```
- Select Send.
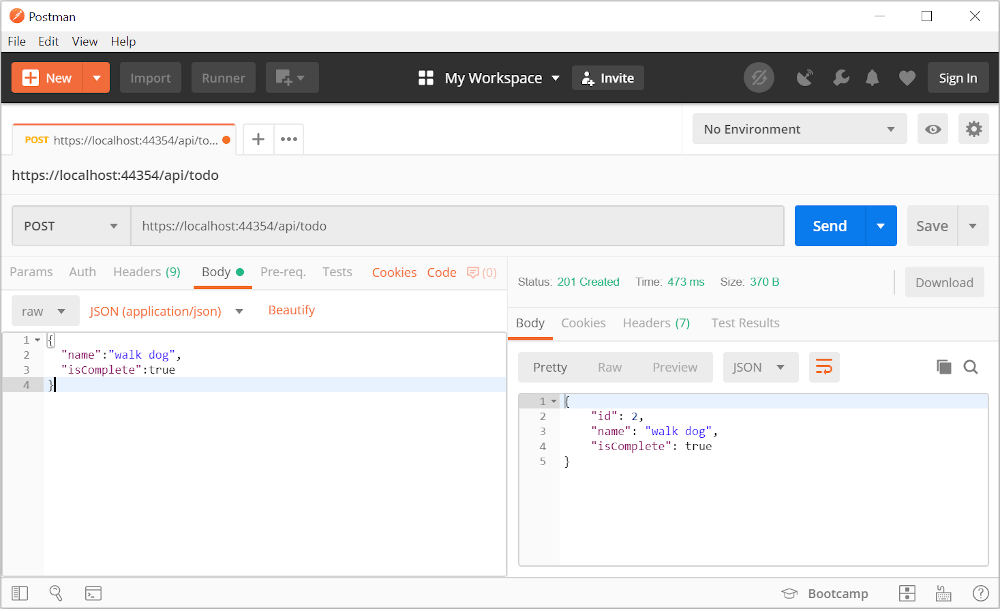
- If you get a 405 Method Not Allowed error, it’s probably the result of not compiling the project after adding the
PostTodoItemmethod.
Test the location header URI
- Select the Headers tab in the Response pane.
- Copy the Location header value:
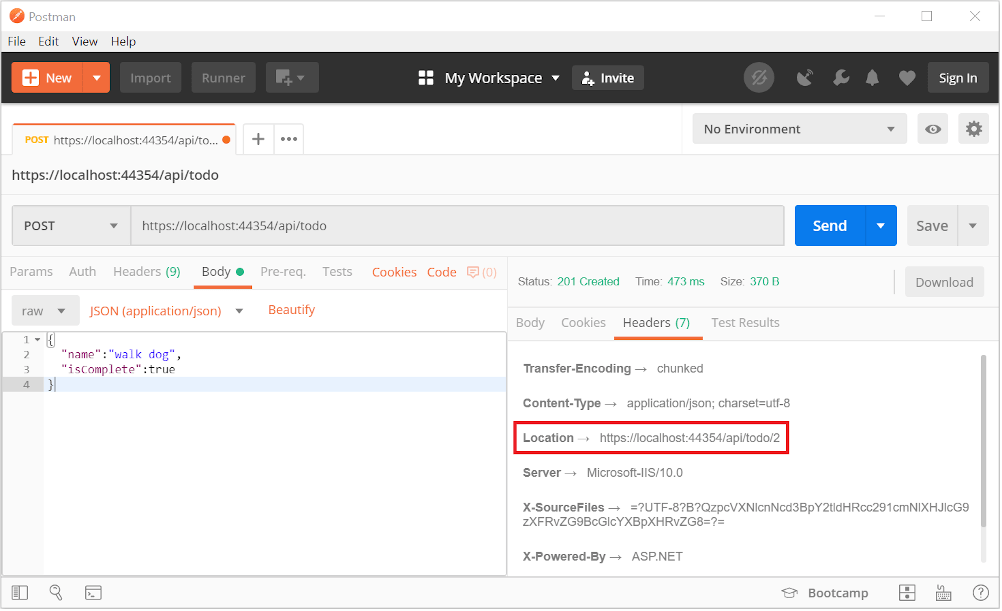
- Set the method to GET.
- Paste the URI (for example,
[https://localhost:5001/api/Todo/2](https://localhost:5001/api/Todo/2)) - Select Send.
Add a PutTodoItem method
Add the following PutTodoItem method:
C#
// PUT: api/Todo/5
[HttpPut("{id}")]
public async Task PutTodoItem(long id, TodoItem item)
{
if (id != item.Id)
{
return BadRequest();
}
_context.Entry(item).State = EntityState.Modified;
await _context.SaveChangesAsync();
return NoContent();
}
```
`PutTodoItem` is similar to `PostTodoItem`, except it uses HTTP PUT. The response is [204 (No Content)](https://www.w3.org/Protocols/rfc2616/rfc2616-sec9.html). According to the HTTP specification, a PUT request requires the client to send the entire updated entity, not just the changes. To support partial updates, use [HTTP PATCH](https://docs.microsoft.com/dotnet/api/microsoft.aspnetcore.mvc.httppatchattribute).
If you get an error calling `PutTodoItem`, call `GET` to ensure there is an item in the database.
### Test the PutTodoItem method
This sample uses an in-memory database that must be initialed each time the app is started. There must be an item in the database before you make a PUT call. Call GET to insure there is an item in the database before making a PUT call.
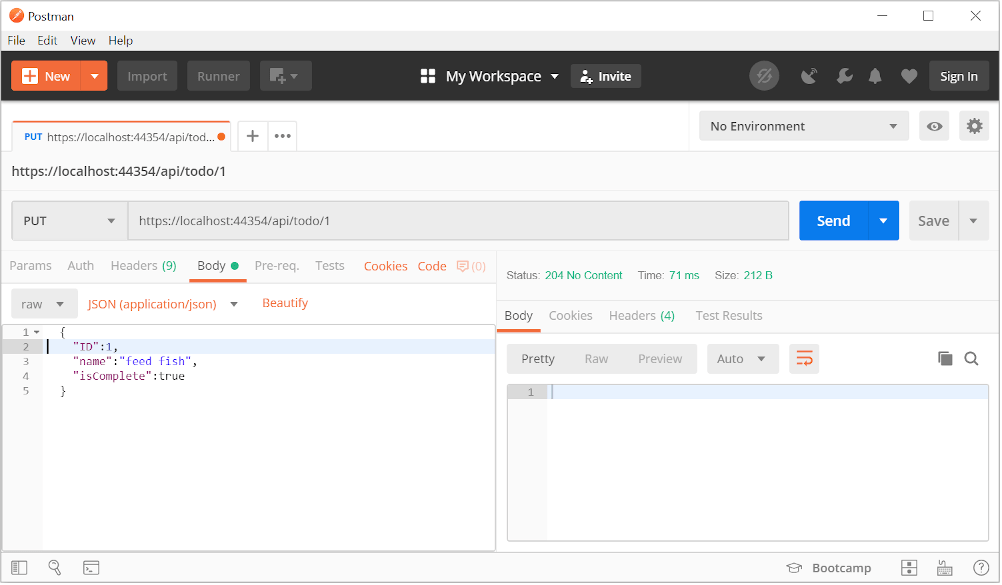
Update the to-do item that has id = 1 and set its name to "feed fish":
`JSON`
  {
"ID":1,
"name":"feed fish",
"isComplete":true
}
```
The following image shows the Postman update:
Add a DeleteTodoItem method
Add the following DeleteTodoItem method:
C#
	// DELETE: api/Todo/5
[HttpDelete("{id}")]
public async Task DeleteTodoItem(long id)
{
    var todoItem = await _context.TodoItems.FindAsync(id);

    if (todoItem == null)
    {
        return NotFound();
    }

    _context.TodoItems.Remove(todoItem);
    await _context.SaveChangesAsync();

    return NoContent();
}
	```

The `DeleteTodoItem` response is [204 (No Content)](https://www.w3.org/Protocols/rfc2616/rfc2616-sec9.html).

### Test the DeleteTodoItem method

Use Postman to delete a to-do item:

*   Set the method to `DELETE`.
*   Set the URI of the object to delete, for example `[https://localhost:5001/api/todo/1](https://localhost:5001/api/todo/1)`
*   Select **Send**

The sample app allows you to delete all the items, but when the last item is deleted, a new one is created by the model class constructor the next time the API is called.

## Call the Web API with jQuery

In this section, an HTML page is added that uses jQuery to call the web api. jQuery initiates the request and updates the page with the details from the API's response.

Configure the app to [serve static files](https://docs.microsoft.com/en-us/dotnet/api/microsoft.aspnetcore.builder.staticfileextensions.usestaticfiles#Microsoft_AspNetCore_Builder_StaticFileExtensions_UseStaticFiles_Microsoft_AspNetCore_Builder_IApplicationBuilder_) and [enable default file mapping](https://docs.microsoft.com/en-us/dotnet/api/microsoft.aspnetcore.builder.defaultfilesextensions.usedefaultfiles#Microsoft_AspNetCore_Builder_DefaultFilesExtensions_UseDefaultFiles_Microsoft_AspNetCore_Builder_IApplicationBuilder_):

`C#`
public void Configure(IApplicationBuilder app, IHostingEnvironment env)
{
if (env.IsDevelopment())
{
app.UseDeveloperExceptionPage();
}
else
{
// The default HSTS value is 30 days. You may want to change this for
// production scenarios, see https://aka.ms/aspnetcore-hsts.
app.UseHsts();
}
app.UseDefaultFiles();
app.UseStaticFiles();
app.UseHttpsRedirection();
app.UseMvc();
}
```
Create a wwwroot folder in the project directory.
Add an HTML file named index.html to the wwwroot directory. Replace its contents with the following markup:
HTML
    To-do CRUD


    # To-do CRUD

    ### Add


        ### Edit


            ✖


            Is Complete
            Name


	```

Add a **JavaScript** file named _site.js_ to the _wwwroot_ directory. Replace its contents with the following code:

`JavaScript`
const uri = "api/todo";
let todos = null;
function getCount(data) {
const el = $(“#counter”);
let name = “to-do”;
if (data) {
if (data > 1) {
name = “to-dos”;
}
el.text(data + " " + name);
} else {
el.text("No " + name);
}
}
$(document).ready(function() {
getData();
});
function getData() {
$.ajax({
type: “GET”,
url: uri,
cache: false,
success: function(data) {
const tBody = $(“#todos”);
  $(tBody).empty();

  getCount(data.length);

  $.each(data, function(key, item) {
    const tr = $("")
      .append(
        $("").append(
          $("", {
            type: "checkbox",
            disabled: true,
            checked: item.isComplete
          })
        )
      )
      .append($("").text(item.name))
      .append(
        $("").append(
          $("Edit").on("click", function() {
            editItem(item.id);
          })
        )
      )
      .append(
        $("").append(
          $("Delete").on("click", function() {
            deleteItem(item.id);
          })
        )
      );

    tr.appendTo(tBody);
  });

  todos = data;
}
});
}
function addItem() {
const item = {
name: $(“#add-name”).val(),
isComplete: false
};
$.ajax({
type: “POST”,
accepts: “application/json”,
url: uri,
contentType: “application/json”,
data: JSON.stringify(item),
error: function(jqXHR, textStatus, errorThrown) {
alert(“Something went wrong!”);
},
success: function(result) {
getData();
$(“#add-name”).val(“”);
}
});
}
function deleteItem(id) {
$.ajax({
url: uri + “/” + id,
type: “DELETE”,
success: function(result) {
getData();
}
});
}
function editItem(id) {
$.each(todos, function(key, item) {
if (item.id === id) {
$(“#edit-name”).val(item.name);
$(“#edit-id”).val(item.id);
$(“#edit-isComplete”)[0].checked = item.isComplete;
}
});
$(“#spoiler”).css({ display: “block” });
}
$(“.my-form”).on(“submit”, function() {
const item = {
name: $(“#edit-name”).val(),
isComplete: $(“#edit-isComplete”).is(“:checked”),
id: $(“#edit-id”).val()
};
$.ajax({
url: uri + “/” + $(“#edit-id”).val(),
type: “PUT”,
accepts: “application/json”,
contentType: “application/json”,
data: JSON.stringify(item),
success: function(result) {
getData();
}
});
closeInput();
return false;
});
function closeInput() {
$(“#spoiler”).css({ display: “none” });
}
```
A change to the ASP.NET Core MVCproject’s launch settings may be required to test the HTML page locally:
- Open Properties\launchSettings.json.
- Remove the
launchUrlproperty to force the app to open at index.html—the project’s default file.
There are several ways to get jQuery. In the preceding snippet, the library is loaded from a CDN.
This sample calls all of the CRUD methods of the API. Following are explanations of the calls to the API.
Get a list of to-do items
The jQuery ajax function sends a GET request to the API, which returns JSON representing an array of to-do items. The success callback function is invoked if the request succeeds. In the callback, the DOM is updated with the to-do information.
JavaScript
	$(document).ready(function() {
  getData();
});

function getData() {
  $.ajax({
    type: "GET",
    url: uri,
    cache: false,
    success: function(data) {
      const tBody = $("#todos");

      $(tBody).empty();

      getCount(data.length);

      $.each(data, function(key, item) {
        const tr = $("")
          .append(
            $("").append(
              $("", {
                type: "checkbox",
                disabled: true,
                checked: item.isComplete
              })
            )
          )
          .append($("").text(item.name))
          .append(
            $("").append(
              $("Edit").on("click", function() {
                editItem(item.id);
              })
            )
          )
          .append(
            $("").append(
              $("Delete").on("click", function() {
                deleteItem(item.id);
              })
            )
          );

        tr.appendTo(tBody);
      });

      todos = data;
    }
  });
}
	```

### Add a to-do item

The [ajax](https://api.jquery.com/jquery.ajax/) function sends a `POST` request with the to-do item in the request body. The `accepts` and `contentType` options are set to `application/json` to specify the media type being received and sent. The to-do item is converted to JSON by using [JSON.stringify](https://developer.mozilla.org/docs/Web/JavaScript/Reference/Global_Objects/JSON/stringify). When the API returns a successful status code, the `getData` function is invoked to update the HTML table.

`JavaScript`
function addItem() {
const item = {
name: $(“#add-name”).val(),
isComplete: false
};
$.ajax({
type: “POST”,
accepts: “application/json”,
url: uri,
contentType: “application/json”,
data: JSON.stringify(item),
error: function(jqXHR, textStatus, errorThrown) {
alert(“Something went wrong!”);
},
success: function(result) {
getData();
$(“#add-name”).val(“”);
}
});
}
```
Update a to-do item
Updating a to-do item is similar to adding one. The url changes to add the unique identifier of the item, and the type is PUT.
JavaScript
	$.ajax({
  url: uri + "/" + $("#edit-id").val(),
  type: "PUT",
  accepts: "application/json",
  contentType: "application/json",
  data: JSON.stringify(item),
  success: function(result) {
    getData();
  }
});
	```

### Delete a to-do item

Deleting a to-do item is accomplished by setting the `type` on the AJAX call to `DELETE` and specifying the item's unique identifier in the URL.

`JavaScript`
$.ajax({
url: uri + “/” + id,
type: “DELETE”,
success: function(result) {
getData();
}
});
```
#web-development #asp-net