Laravel Broadcast Redis Socket io Tutorial
0 What this is about
This is a step by step configuration guide that aims to help to understand how broadcasting with Redis and Socket.IO works. We are going to cover internal mechanics of each of the components, and following the theory implement the configuration.
1 Architecture overview

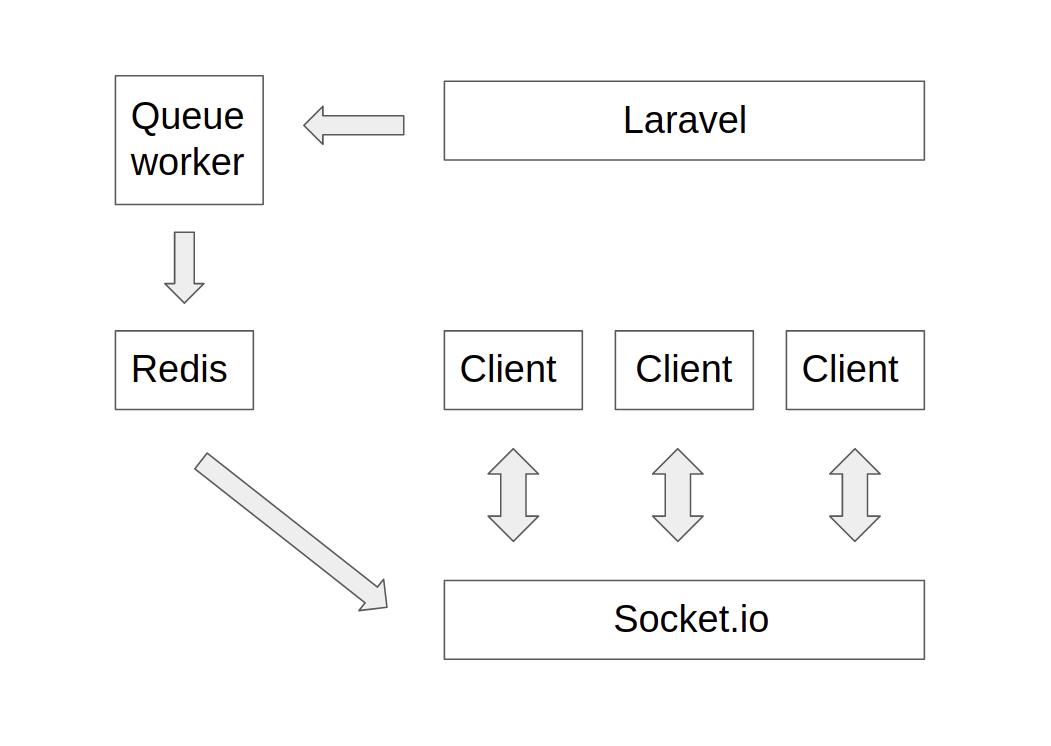
When you dispatch an event (event(new Event())) that implements [ShouldBroadcast](https://github.com/laravel/framework/blob/v6.12.0/src/Illuminate/Contracts/Broadcasting/ShouldBroadcast.php) interface, Laravel is going to create and dispatch a Job that will be tasked with broadcasting the event, and will be executed by the Queue Worker. It just means that another PHP process is going to broadcast your event. It is a way to take some load of the application and return response faster.
Your event can as well implement [ShouldBroadcastNow](https://github.com/laravel/framework/blob/v6.12.0/src/Illuminate/Contracts/Broadcasting/ShouldBroadcastNow.php), which will skip the Queue. Same will happen if in your .env you have QUEUE_CONNECTION=sync; sync here means that no external process needs to run in order to process Jobs (and, in effect, broadcast events).
Since we are using Redis as our broadcast driver (BROADCAST_DRIVER=redis in .env), Queue Worker is going to use [RedisBroadcaster](https://github.com/laravel/framework/blob/v6.12.0/src/Illuminate/Broadcasting/Broadcasters/RedisBroadcaster.php) class to broadcast the event. We can peek inside the class to see that it will use Redis [publish](https://redis.io/commands/publish) command (its wrapped in something called Lua script but this is not important here).
Publish command is part of [Pub/Sub](https://redis.io/topics/pubsub) feature of Redis. It publishes a message (in our case its stringified event that we are broadcasting) on a channel (that we define in broadcastOn method in our event class), and anyone that is subscribed to that channel is going to receive it. It is going to be a Socket.IO server who will be the subscriber.
As the Socket.IO server we’ll use [laravel-echo-server](https://github.com/tlaverdure/laravel-echo-server). It’s a Node.js server that can connect to Redis, and can establish a WebSocket connections with clients. It will take the broadcast event from Redis and send it to connected clients. As well, it is able to receive events directly from any connected client, and broadcast it to other connected clients.
Finally, on the Client we are going to install [socket.io-client](https://github.com/socketio/socket.io-client) and [laravel-echo](https://github.com/laravel/echo). The first of the two is the important one, which will connect to our Socket.IO server. The second one is a helper library that makes it easy to listen to the events. Sufficient to say, it’s an official Laravel package to work with WebSockets.
2 Implementation
0 Laravel
We will start with completely clean Laravel installation composer create-project laravel/laravel app. ATM the latest version is [v6.8.0](https://github.com/laravel/laravel/releases/tag/v6.8.0), and we are going to use it. Let’s go ahead and generate an event php artisan make:event TestEvent, and make it broadcastable by adding ShouldBroadcast interface (it will be already imported in the class). We’ll set the channel to be Public rather than Private for now.
// app/Events/TestEvent.php
class TestEvent implements ShouldBroadcast
{
    ...
    public function broadcastOn()
    {
        return new Channel('test');
    }
}
We can already try broadcasting. Let’s make a helper route that will just dispatch the event, and hit that route.
// routes/web.php
Route::get('/fire', function () {
    event(new \App\Events\TestEvent());
    return 'ok';
});

Nothing happened, or at least it looks like it. Let’s peek inside our .env. We have by default QUEUE_CONECTION=sync, and BROADCAST_DRIVER=log. So in fact, our event was already broadcast by Laravel (QUEUE_CONECTION=sync), and it was broadcast to our log file (BROADCAST_DRIVER=log). Here it is:
// storage/logs/laravel.log
[2020-01-22 09:38:27] local.INFO: Broadcasting [App\Events\TestEvent] on channels [test] with payload:
{
    "socket": null
}
Now, this is not very useful. Let’s go ahead and add Redis. We can skip the Queue configuration for now and let Laravel broadcast events directly to Redis.
1 Redis
Depending on your OS you’ll install Redis differently. In case of Ubuntu, just execute sudo apt install redis-server in your terminal. As well, you might need to install additional tools to let Laravel connect to Redis . Our .env has already Redis defaults set, so we can just set BROADCAST_DRIVER=redis. When we fire the event now, it will be broadcast to Redis server. We can use Redis debugging command, [MONITOR](https://redis.io/commands/MONITOR), to see the event. To access Redis let’s execute redis-cli in terminal (again, Ubuntu, if you’re on different OS you’ll need to check yourself how to access Redis CLI). Let’s run MONITOR first and fire the event later. We should see something like this:

Looks a bit gibberish due to the Lua script, but on the last line we can see “publish” “test” “{\”event\”:\”App\\\\Events\\\\TestEvent\”,\”data\”:{\”socket\”:null},\”socket\”:null}” . So Redis published our stringified event as message on channel test . Let’s move to set up subscriber of this message.
2 Socket.io — server
Lets just follow the docs and install laravel-echo-server globally npm install -g laravel-echo-server. If you don’t like to install it globally, it’s fine to install it just in our project too (but pay attention that laravel-echo-server executable won’t be available globally). Next we’ll init it in our project’s dir. Use dev mode for easier debugging, the rest options can stay default for now.

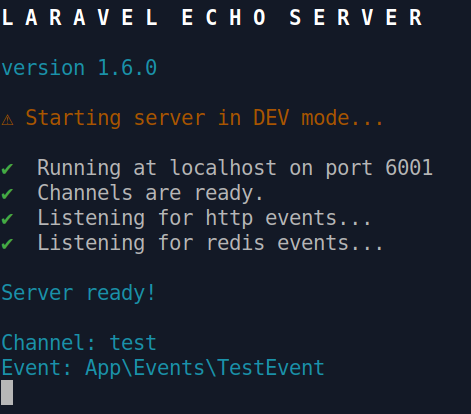
That’s it, we can already run it withlaravel-echo-server start. Now let’s fire the event, and we should see it reaching our server.

There’s not much to add here. If you’re wondering how laravel-echo-server knows to which channels it should be subscribed to receive our events (as I mentioned, in Redis Pub/Sub messages are published on channels, and only channel’s subscribers are going to receive them), it just uses [PSUBSCRIBE](https://redis.io/commands/psubscribe) command which allows to subscribe to all channels that match given pattern, and as the pattern it uses * to simply subscribe to all channels.
3 Socket.IO — client
On the client we’ll need two packages. Let’s run inside our project’s dir npm i socket.io-client laravel-echo. We haven’t run npm install yet, so let’s go ahead and do this. Meanwhile it runs, let’s configure these packages in resources/js/bootstrap.js :
// resources/js/bootstrap.js
...
import Echo from "laravel-echo"
window.io = require('socket.io-client');

window.Echo = new Echo({
    broadcaster: 'socket.io',
    host: window.location.hostname + ':6001' // this is laravel-echo-server host
});
Once it’s done, we can compile npm run dev, and prepare a view. We can adapt welcome.blade.php (by default there is already / route set up that returns that view). I cleaned it up from what we don’t need, and added script tags:
// resources/views/welcome.blade.php
<!DOCTYPE html>
<html lang="{{ str_replace('_', '-', app()->getLocale()) }}">
    <head>
        <meta charset="utf-8">
        <meta name="viewport" content="width=device-width, initial-scale=1">
        <title>Laravel</title>
    </head>
    <body>

    <script src="{{ asset('/js/app.js') }}"></script>
    <script>
        Echo.channel('test')
            .listen('TestEvent', e => {
                console.log(e)
            })
    </script>

    </body>
</html>
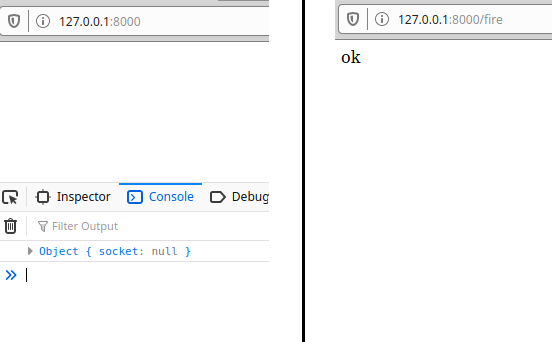
As you can see, we set up Echo to listen to TestEvent on channel test . Looks like our event should be able to make it all the way to the client now. Let’s open / (welcome.blade.php) in one tab, and then hit /fire in another tab:


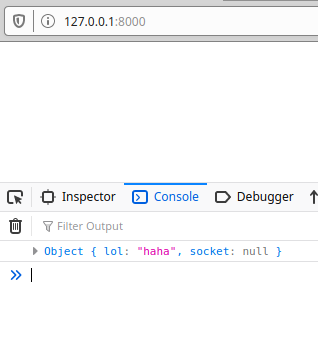
You can add broadcast data by adding public properties to your event class:
class TestEvent ...
{
    public $lol = 'haha';
    ...
4 Authentication — Private Channels
We were using just Channel in out event class broadcastOn method, remember? If we want to use PrivateChannel, we’ll need to configure a bit more. Clients that want to receive events from Private Channels will need to be authenticated.
At the very top of Broadcasting doc page you’ll see that we should uncomment App\Providers\BroadcastServiceProviderin config/app.php. Let’s do that now. BroadcastServiceProvider will register broadcasting auth routes, web/channels.php. There, we need to define a route for every private channel, and implement auth logic. First argument is authenticated user, second is a slug (if any).
// routes/channels.php
Broadcast::channel('test', function ($user) {
    return true; // just allow all authenticated users
});
We’ll need CSRF token too, let’s add it to welcome.blade.php. While we here, lets change JS code: use private instead of channel. Same in the event’s class.
// resources/views/welcome.blade.php
<!DOCTYPE html>
<html lang="{{ str_replace('_', '-', app()->getLocale()) }}">
    <head>
        <meta charset="utf-8">
        <meta name="viewport" content="width=device-width, initial-scale=1">
        <title>Laravel</title>

        <meta name="csrf-token" content="{{ csrf_token() }}">
    </head>
    <body>

    <script src="{{ asset('/js/app.js') }}"></script>
    <script>
        Echo.private('test')
            .listen('TestEvent', e => {
                console.log(e)
            })
    </script>

    </body>
</html>
// app/Events/TestEvent.php
...
class TestEvent implements ShouldBroadcast
{
    ...
    public function broadcastOn()
    {
        return new PrivateChannel('test');
    }
}
If your Laravel app is not running on localhost , you’ll have to change authHost in laravel-echo-server.json accordingly (this configuration file should be located at the root of our project’s dir).
Now if you open / in your browser, you should see in laravel-echo-server console Client can not be authenticated, got HTTP status 403
Let’s “log in” in app/Providers/AppServiceProvider.php :
// app/Providers/AppServiceProvider.php
use App\User;
use Illuminate\Support\Facades\Auth;
...
class AppServiceProvider ...
{
    public function boot()
    {
        $user = factory(User::class)->make();
        Auth::login($user);
    }
}
Now you’ll be authenticated and will be able to receive broadcast events on this channel.
5 Queue
We skipped this in the beginning, and its fine if you want to skip it altogether. In case you don’t, I’ll cover it here.
Since we are using Redis already, let’s use it for the Queue too. Set QUEUE_CONNECTION=redis in .env . If you fire the event now /fire , you won’t see it anywhere. Run php artisan queue:work and you should see following:

Now the event is processed, and it should make it all way to all connected clients.
I hope you enjoyed this guide, and have a firm understanding about Laravel broadcasting with Redis and Socket.IO now. Let’s finish with an inspirational quote, thanks to an handy command that thoughtful creators of Laravel included in the framework:

#php #laravel # socket io
