Implement a React App with Astro and Cloud Functions
Learn how to build a React blog application and integrate Astro and Cloud Functions to make it more performant and scalable. By extending React with Astro and Cloud Functions, we will create a more performant and scalable blog application.
Hey there, fellow developer! I’m super excited to walk you through a journey where we’ll delve into the realms of React, Astro, and Cloud Functions. You might be wondering why we’re combining these three seemingly different technologies. Well, that’s because when used together, they can help us build incredibly efficient, scalable, and performance-focused web applications.
In this article, we’ll demonstrate how to build a React blog application and integrate Astro and Cloud Functions to make it more performant and scalable.
Let’s get the ball rolling, shall we?
Contents:
- Prerequisites
- Overview of React
- Getting to know Astro
- Understanding Cloud Functions
- Building the React app
- Integrating Astro into the React app
- Performance comparison: React vs. React-Astro
- Adding Cloud Functions to the React-Astro app
- Performance comparison: React vs. React-Astro-Cloud Functions
Prerequisites
For the tutorial portion of this article, you’ll need the following installed locally on your computer to set up your local environment:
- Node.js and npm: if you don’t already have Node installed, visit the official Node.js website
- Google Cloud SDK: if you don’t already have this installed, follow the instructions in the official documentation
Overview of React
You’ve probably heard of React, right? React is that awesome JavaScript library developed by Facebook that has taken the world of frontend development by storm. It’s popular for building user interfaces, especially for single-page applications.
React allows us to create reusable UI components, making our code DRY (don’t repeat yourself), and making our lives a lot easier. So, React is the base upon which we’re going to build our application.
Getting to know Astro
Now, let’s talk about Astro. It’s a fresh entrant in the frontend development scene and has been generating quite a buzz. Why, you ask? Well, Astro is unique because it allows you to write less JavaScript, delivering lightning-fast performance.
Astro renders your pages to static HTML and CSS at build time, only loading JavaScript as needed. Sounds cool, right? That’s why we’re integrating Astro into our React project — to make it even more efficient!
Understanding Cloud Functions
Up next are Cloud Functions. They are a part of the serverless architecture that allows our applications to be more scalable and easier to manage. With Cloud Functions, we don’t need to worry about managing servers. Instead, we can focus on our application’s functionality.
It’s like having our cake and eating it too! We’ll be using Cloud Functions in our project to handle server-side logic.
Building the React app
Now that our local environment is ready, let’s build a simple React application. This application will be our foundation, and we’ll later extend it with Astro and Cloud Functions.
We’ll be creating some reusable components and managing the state using Hooks. So, roll up your sleeves, and let’s get coding!
To create the blog application, use the following command:
npx create-react-app react-blog --template typescriptWe’ll create a simple app that fetches blog posts from an API and displays them. Update the App.js file with the code snippets below:
import React, { useEffect, useState } from 'react';
import axios from 'axios';

type Post = {
   id: string,
   title: string,
   body: string
  }

function App() {
  const [posts, setPosts] = useState<Post[]>([]);

  useEffect(() => {
    axios.get('https://jsonplaceholder.typicode.com/posts')
      .then(res => {
        setPosts(res.data);
      });
  }, []);

  return (
    <div className="App">
      <h2>My Blogs</h2>
      {posts.map(post => (
        <div key={post.id }>
          <h2>{post.title}</h2>
          <p>{post.body}</p>
        </div>
      ))}
    </div>
  );
}

export default App;
In this code, we’re using the useState and useEffect Hooks to fetch and display blog posts from the JSONPlaceholder API. Now, run the application:
npm run startNext, navigate to localhost:3000 on your browser to test it out. It’s also helpful to open the Performance tab in Chrome DevTools to test the application:
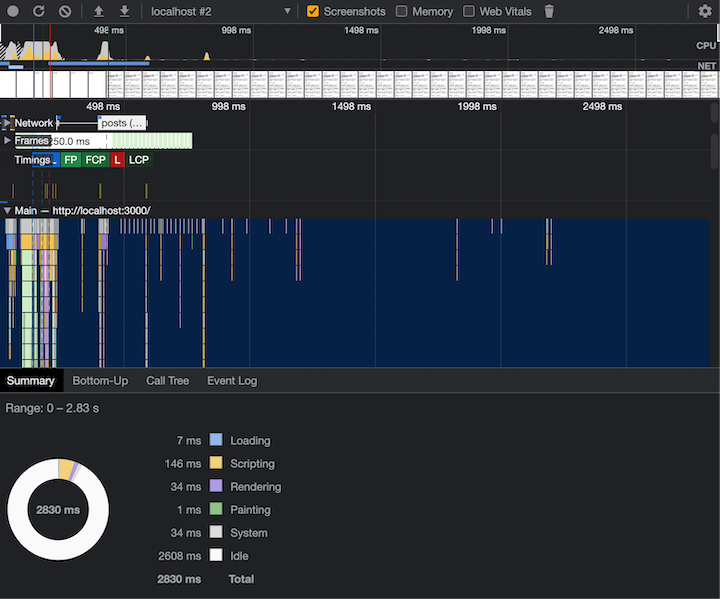
Here we see the startup time of our React application, 498ms. The length of the startup time was influenced by the API request made to an external API.
Integrating Astro into the React app
Here comes the exciting part of this project! We’ll integrate Astro into our React application. This will involve modifying the project structure and updating the code to leverage Astro’s capabilities. You’ll be amazed at the performance gains we’ll achieve with this integration!
To get started, follow the below steps:
Step 1
Install Astro as a dev dependency and the @astrojs/react integration, like so:
npm install @astrojs/react && npm install astro -DStep 2
Create an astro.config.mjs file in the root directory of your React project and add the React Astro integration with the configuration below:
import { defineConfig } from 'astro/config';
import react from "@astrojs/react";

// <https://astro.build/config>
export default defineConfig({
  integrations: [react()]
});
Then, update your tsconfig.json to add the configurations below:
{
  "compilerOptions": {
       ...
       "target": "es6",
       "jsx": "react-jsx",
       "jsxImportSource": "react"
   }
   ...
}
These configurations allow TypeScript to understand and transform the JSX syntax in your React code during the compilation process, ensuring that the resulting JavaScript is compatible with React’s rendering mechanism.
Step 3
Update the package.json file to add and update the scripts to run the application with Astro:
...
"scripts": {
    "dev": "astro dev",
    "start": "astro dev",
    "build": "astro build",
    "preview": "astro preview",
    "astro": "astro"
  },
  ...
Next, create a components/Post.tsx component in the src folder and add the below code:
interface Post {
  id: number;
  title: string;
  body: string;
}

interface PostsProps {
  posts: Post[];
}

export default function Posts({ posts }: PostsProps) {
  return (
    <div className="App">
      <h1>My Blogs</h1>
      {posts.map((post) => (
        <div key={post.id}>
          <h2>{post.title}</h2>
          <p>{post.body}</p>
        </div>
      ))}
    </div>
  );
}
Here, we define a Post interface with id, title, and body properties and a PostsProps interface with a posts property, which is an array of Post objects. The Posts component takes posts as a prop and renders a list of blog posts, each with its own title and body.
Now, create a pages directory in the src folder, which is responsible for managing routing, data retrieval, and the overall layout of each page within an Astro website. In the pages directory, create an index.astro file and render the Posts component, like so:
---
import axios from "axios";
import Post from "../components/Posts";
const { data } = await axios.get("<https://jsonplaceholder.typicode.com/posts>");
---

<html lang="en">
  <head>
    <meta charset="UTF-8" />
    <meta http-equiv="X-UA-Compatible" content="IE=edge" />
    <meta name="viewport" content="width=device-width, initial-scale=1.0" />
    <title>My blog app</title>
  </head>
  <body>
    <Post posts={data} />
  </body>
</html>
Here, we import the Axios library to handle HTTP requests and then use it to fetch data from an external API. The fetched data contains information about blog posts. Inside the <body> tag, we use the Post component and pass the fetched data as a prop (posts). The Post component will then render the blog posts on the page.
Now that we have extended the React application with Astro, it’s time to test it. In your terminal, run npm run dev to start the Astro dev server, and visit http://localhost:3000 in your browser. You should see a list of blog posts as in your previous React application, but this time the application is rendered using Astro.
Performance comparison: React vs. React-Astro
Now that our extended React application is up and running, let’s take a moment to appreciate the performance improvements.
Astro renders our page to static HTML and CSS at build time, which is much faster than client-side JavaScript:
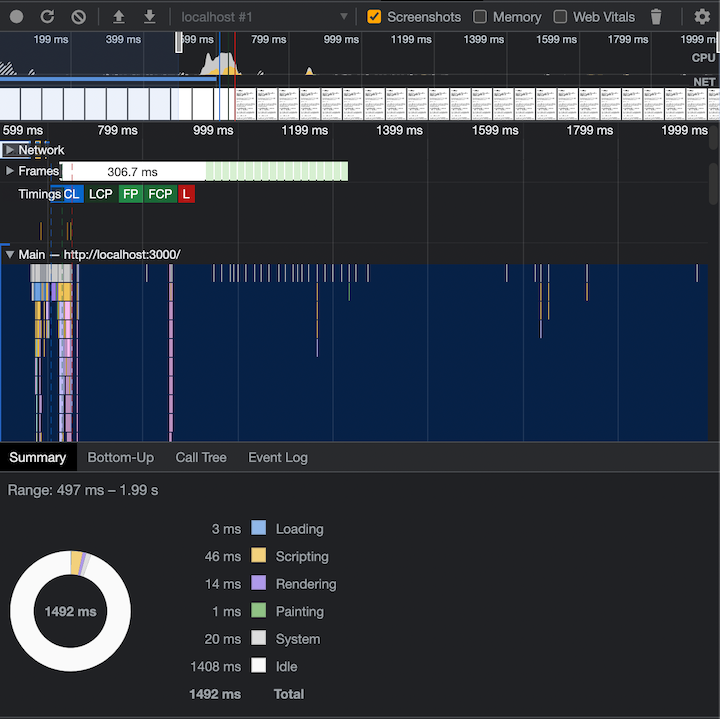
According to the Performance tab in Chrome DevTools, adding Astro to our React app resulted in a startup time of 199ms (vs. 498ms for our initial React app). This startup time includes sending a request to the external API to fetch the blog posts.
Adding Cloud Functions to the React-Astro app
Let’s extend our React app further by adding Cloud Functions to handle various server-side tasks, freeing our client-side code from these responsibilities. To get started, create a new folder for the cloud function and initialize the gcloud CLI:
mkdir astro-functions && cd astro-functions gcloud init
The above command sets the default configuration to active. For existing configurations, you can reinitialize the active one. Simply switch to another and reinitialize it, or create a new configuration.
If you have not previously been authorized access to Google Cloud, you’ll need to log in and grant access through a web browser or choose an existing account. Once these steps are completed, running the above command will assign the specified account as the account property in the configuration:

If you only have access to one project, including the default project, it will automatically be selected for you. Otherwise, you can choose one from a list of projects where you have owner, editor, or viewer permissions. The project property in the configuration will be set to the selected project:
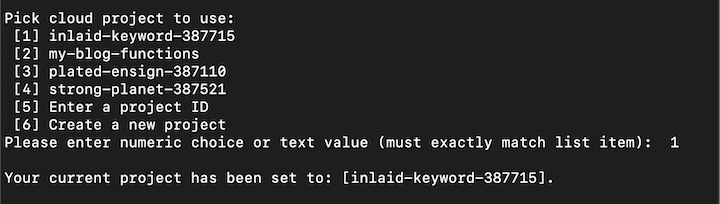
N.B., if you have access to more than 200 projects, you’ll be prompted to enter a project ID, create a new project, or list projects
Once you’ve selected your project, run npm init and follow the prompts to create a package.json file in the function directory and install the axios package:
npm install axiosNext, create a file named index.js in the astro-functions folder and add the following Cloud Functions code:
const axios = require('axios');

exports.fetchPosts = async (req, res)=>{
   try {
     const posts = await axios.get('https://jsonplaceholder.typicode.com/posts');
     res.send(posts.data);
   }catch (error) {
     res.status(500).send(error)
   }
}
Now, deploy Cloud Functions by running the following command:
gcloud functions deploy fetchPosts \
--runtime=nodejs20 \
--region=<REGION> \
--source=. \
--entry-point=fetchPosts \
--trigger-http \
--allow-unauthenticated
The --runtime nodejs20 flag specifies the runtime as Node.js 20, indicating the version to be used. The --trigger-http flag denotes the function that will be triggered by HTTP requests and the --allow-unauthenticated flag lets you call functions that have not been authenticated.
Replace <REGION> with your preferred Cloud Functions region. Once the deployment is completed, you’ll see the Cloud Functions httpsTrigger URL in the following format:
https://REGION-PROJECT_ID.cloudfunctions.net/fetchPostsNow, let’s update our React-Astro application to send requests to our Cloud Function instead of the external API:
---
import axios from "axios";
import Post from "../components/Posts";
const { data } = await axios.get("https://REGION-PROJECT_ID.cloudfunctions.net/fetchPosts");
---

<html lang="en">
  <head>
    <meta charset="UTF-8" />
    <meta http-equiv="X-UA-Compatible" content="IE=edge" />
    <meta name="viewport" content="width=device-width, initial-scale=1.0" />
    <title>My blog app</title>
  </head>
  <body>
    <Post posts={data} />
  </body>
</html>
Here, we updated the Astro code to send a request to the Google Cloud Functions.
Performance comparison: React vs. React-Astro-Cloud Functions
Now that we’ve further extended our React application by adding Cloud Functions, let’s take another look at the Performance tab of Chrome DevTools:
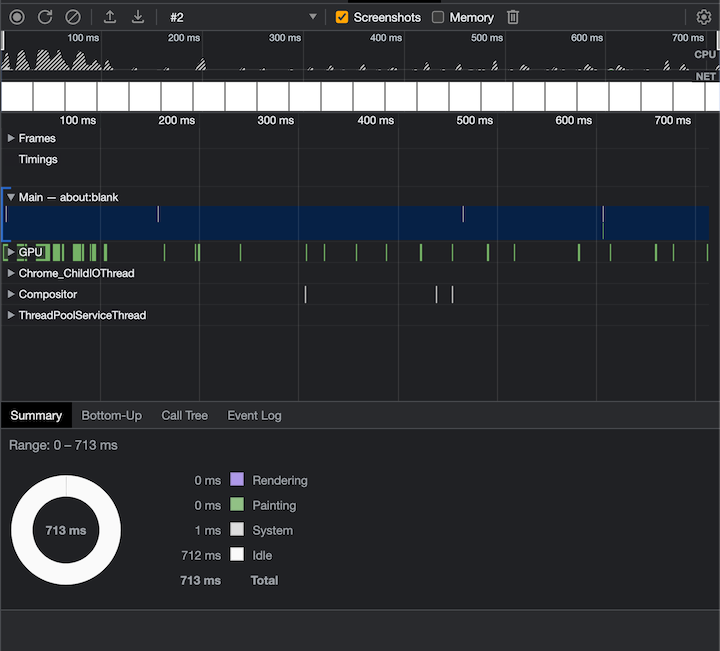
Cloud Functions offloads the task of fetching posts from the client to the server, further improving performance and resulting in a startup time of 100ms vs. 199ms for our React-Astro app and 498ms for our initial React app.
Conclusion
By extending React with Astro and Cloud Functions, we’ve created a more performant and scalable blog application. Isn’t it exciting to see how these technologies work together to provide a better user experience?
I hope you’ve enjoyed this journey as much as I have. Remember, with these tools in your developer toolkit, there’s no limit to what you can build! Happy coding!
Source: https://blog.logrocket.com
#react #astro #cloud