JavaScript Prototypes - What you Need to Know!
There are different ways to interpret the prototype concept in JavaScript, but it can be explained very easily in one sentence:
“In JavaScript, prototypes are objects that facilitate linking of objects and delegation of methods or properties”
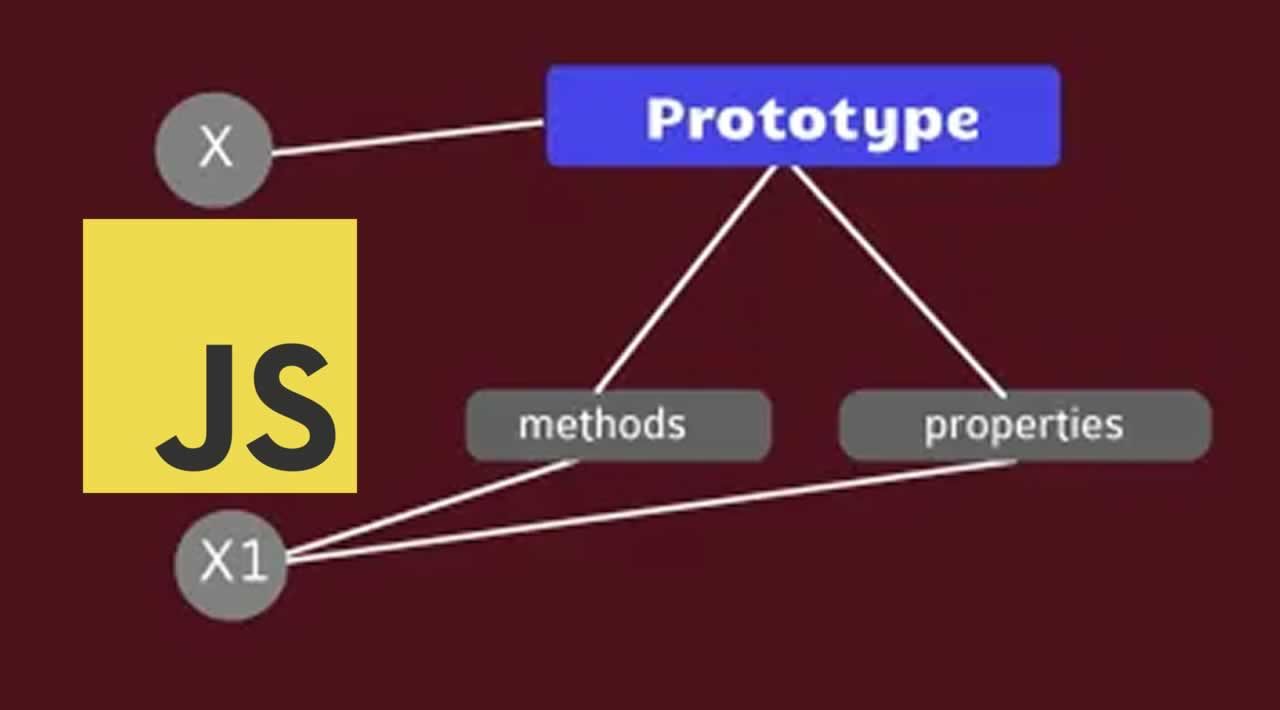
That’s really it. The most confusing part about the prototype concept is just the terminology, but the concept itself is pretty straightforward. The diagram below demonstrates the idea in more detail:

Prototypes and prototype chains in JavaScript
- The boxes represent objects
- The arrow shows the link direction:
alinks tob, andblinks tom - The links form the prototype chain for these objects
mis the mother object which contains all the methods common to all objects in JavaScript[[p]]is the internal property of an object that points to another object. Confusingly enough, this property is known as the[[prototype]]in the specification- In this diagram,
bis known as the prototype ofa, andmthe prototype ofb. - Property and method look up follows the prototype chain. That is, if you want to look up a property in
a, JavaScript will first look ataitself. If it cannot find it there, it will then look atb. If it can’t find it inb, then it will look inm, and eventually if it can’t find it inm, it will returnundefinedbecausemis the ‘mother object’ and is not linked to any other object. - But if you want to look up a property in
b, JavaScript will not look intoa. It will follow the link direction and if it can’t find it inb, it will look inm, and will returnundefinedif it cannot find it inm. - The
mobject is a special object which comes fromObject.prototype. But don’t worry about it now, we have enough prototype jargon lying around already :)
That was the Prototype concept in a nutshell. Now let’s dive in and learn how we can link objects.
Linking Objects
When you create any object, behind the scenes JavaScript links your object to the ‘mother object’ automatically:
var user = {
  name: 'AJ'
};
Roughly speaking, this is what happens behind the scenes:

creating a plain old JavaScript object
- The
userobject gets linked to the ‘mother’ object - Object
mis known as the prototype ofuser - You can get the prototype of
userusing theObject.getPrototypeOfmethod, that is:Object.getPrototypeOf(user) - The ‘mother’ object is the
prototypeproperty of theObjectconstructor function object (WO!) - You can double check the prototype of
userusing:Object.getPrototypeOf(user) === Object.prototype // -> true
As you can see, the terminology can get very confusing, so let’s not get caught up with the jargon here. What’s important is that fact that objects can be linked to each other and an object can delegate responsibilities to other objects. That is the core of the idea and don’t let the jargon confuse you.
Now that you know a little bit about what happens behind the scenes, let’s create our own objects and link them together. In JavaScript there are two main ways to link objects. The first one has been available since ES5 and that is Object.create. Let’s create two objects a and b, and link a to b. Because we are linking a to b, object b will be the prototype of a:
// a -> b: b is the prototype of a.
// defining object `b` who is going to be the prototype of `a`
var b = {
  hello: function () {
    return 'hello';
  }
};
// create `a` and link it to `b`
var a = Object.create(b);
That’s all it takes to link a to b. So now if we call a.hello(), first JavaScript will look at a, and because the hello method doesn’t exist on a, it will then look at b and it will invoke the method. Also remember that b is automatically linked to the ‘mother’ object, so when we call, a.toString(), JavaScript will look up all the way from a to m and then it will invoke the method using the implementation in m. You can override any method, so let’s provide our own toString method for a:
a.toString = function () {
  return 'I am a.';
};
So now when we call a.toString we get back I am a. Now let’s look at the other common way to link objects.
The other way of linking objects is using constructor function objects. We are going to do the same example as above, but instead we are going to use a more common way of creating it. So first, let’s create the prototype object, that is object b. The funny thing is, to create this object first you need to create a function:
var F = function () {};
Then, you need to get access to a special property on the function, which is created when you create any function in JavaScript. This property, not surprisingly, is called prototype:
var b = F.prototype;
b.hello = function () {
  return 'hello';
};
Now that we have a prototype object, we can create object a by invoking the F function using the new keyword:
var a = new F();
Because this pattern is so common, you don’t need to create a reference to F.prototype. You can just add methods to F.prototype and then create an object using the function:
var F = function () {};
F.prototype.hello = function () {
  return 'hello';
};
var a = new F();
// a -> F.prototype -> Object.prototype -> null
// a ->       b     ->          m       -> null
a.hello(); // -> 'hello'
That’s it! Now we have linked a to b and b is the prototype of a. It might look a little bit weird but that’s the mechanism that JavaScript uses to link objects. Maybe now it makes more sense why the m object is Object.prototype. The reason is that Object is a function who, just like any other function, has a property called prototype. So when you create a plain old object for example, it gets linked to Object.prototype. It is equivalent to the following:
var myObj = Object.create(Object.prototype);
// or
var myObj = new Object();
// Object.getPrototypeOf(myObj) === Object.prototype // -> true
The great thing is that this mechanism is consistent throughout JavaScript and that explains a lot of things about JavaScript. Let’s explore those in the next section.
Prototype Objects Inside JavaScript
JavaScript internally has several functions that it uses as constructors. The most common ones are:
BooleanNumberStringObjectFunction
Note that all of these functions, correspond to the fundamental data types in JavaScript:
- Primitive Data Types:
- boolean
- number
- string
- Non-primitive Date Types
- object (functions are objects too)
The most important point here is that all the methods that are available on the data types come from the value of the prototype property of the constructor function. Also note that constructor functions always start with an uppercase letter. Let’s look at some examples.
You know that strings are primitive values, yet you can call methods on strings:
var str = 'hello';
str.replace('o', 'oo'); // -> helloo
First of all, how can we call the replace method on the string, if str is a primitive value? Second of all, where does the replace method come from? In order to answer the first question, we need to learn how JavaScript can coerce one type to another. When you create a primitive string value and assign it to the variable str, nothing happens until you use the dot operator on the reference. Then JavaScript coerces the primitive string to the equivalent object by wrapping it with the corresponding constructor function. So in this case, roughly speaking, JavaScript does the following to the primitive value:
var str = new String('hello');
And that’s why you can call the method on str because it is an object for a short period of time until it is garbage collected. Now, that we know what happens behind the scenes, it might be easier to answer the second question: where does the replace method come from? The answer is, it comes from String.prototype and if you think about it, the answer is consistent to what we learned in the previous section. And since JavaScript is dynamic, you can add a method to String.prototype object and magically all the pre existing strings in your code, will have a new method. This is not generally recommended, but let’s demonstrate this by adding a new method on String.prototype called first that returns the first character of a given string:
String.prototype.first = function () {
  return this.charAt(0);
};
str.first(); //-> 'h'
As you can see, this mechanism is consistent across JavaScript, that is, for anything out there in JavaScript, there is a constructor function that has a prototype property that contains the methods and properties to be used by all the instances. If you understand this concept, you will understand the core of JavaScript and how it works. Below are some more objects with their corresponding prototype chains:
Array
const nums = [1,2,3];
// nums -> Array.prototype -> Object.prototype -> null
You can get the list of properties on Array.prototype with:
Object.getOwnPropertyNames(Array.prototype);
//->
/*
["length", "constructor", "toString", "toLocaleString", "join", "pop", "push", "reverse",
"shift", "unshift", "slice", "splice", "sort", "filter", "forEach", "some", "every",
"map", "indexOf", "lastIndexOf", "reduce", "reduceRight", "copyWithin", "find",
"findIndex", "fill", "includes", "entries", "keys", "concat", "values"]
 */
It is interesting to note here that Arrays have their own toString method that is different from Object.prototype.toString method.
Promise
const myPromise = new Promise((resolve, reject) => {
  resolve('hello')
});
// myPromise -> Promise.prototype -> Object.prototype -> null
Date
const today = new Date();
today.getTime(); // -> 1467023558413
// today -> Date.prototype -> Object.prototype -> null
Now that we have a better understanding of the prototype concept in JavaScript, let’s dive deeper and explore more interesting topics.
Inheritance
You can mimic the classical inheritance model in JavaScript with prototype objects. We are just going to demonstrate that here and we won’t dive into it since the classical inheritance model does not really fit JavaScript but we are just going to show that here because many seem to use this pattern. After that we will demonstrate functional mixins which are much more flexible and dynamic way of achieving inheritance in JavaScript.
For this example, we are going to have a Person base type, and create a Worker, Designer, and Developer type which all would inherit from Person. First, let’s draw a simple diagram to understand the relationship between these types:
var developer = new Developer();
/*
 * null
 *  ↑
 * Object.prototype
 *  ↑
 * Person.prototype
 *  ↑
 * Worker.prototype
 *  ↑
 * Developer.prototype
 *  ↑
 * developer
 */
A Developer has all the methods of:
- a developer
- a worker
- a person
Note that all we need to do is to link some objects and these objects are the prototype property of each constructor function. That’s what makes delegation possible and efficient in terms of memory usage:
function Person () {}
Person.prototype.walk = function () {
  return 'walking ...';
}

function Worker() {}
Worker.prototype = Object.create(Person.prototype);

Worker.prototype.work = function () {
  return 'working ....';
}

function Developer () {}
Developer.prototype = Object.create(Worker.prototype);
Developer.prototype.code = function () {
  return 'coding ....';
}

var dev = new Developer();
dev.code(); // 'coding ...'
dev.work(); // 'working ...'
dev.walk(); // 'walking ...'
Also note that you can just simply link objects together, and it would have the same effect:
var person = {
  walk() { return 'walking...';}
};

var worker = Object.create(person);
worker.work = function () {
  return 'working';
}

var dev = Object.create(worker);
dev.code = function () {
  return 'coding...';
}
dev.code(); // 'coding ...'
dev.work(); // 'working ...'
dev.walk(); // 'walking ...'
The difference is that we only have one instance of the developer and we don’t have a function to create more instances of a Developer for us. You could wrap this in a function, but JavaScript already has a mechanism and that is linking prototype objects and using constructor functions.
Another important thing to remember is using the new keyword. Almost in all cases, you want to hide that away and not force the consumers of your API to use new to create instances:
function Developer (name) {
  if (!(this instanceof Developer)) {
    return new Developer(name);
  }
  this.name = name;
}
By doing that, consumers won’t have to call the constructor with new which eliminates the possibility of this to be bound to the global object. The other important thing to note is how this is bound when the function is invoked with the new keyword. When the constructor function is invoke with the new keyword, the context object, this always refers to the instance. In the example above, we assign the name property of the instance to what is passed. Each instance will get their own names but they will all share the same prototype that enables them to efficiently call methods without the need of copying methods to each instance.
That’s pretty much all you need to know to be able to use prototype objects. However, you should be aware of great libraries out there, such as Stampit that are much more powerful and flexible than the classical approach and allow you to do much more. In the next section we will explore the effect of inheritance through functional mixins.
Functional Mixins Over Inheritance
The core idea behind mixins is that you can augment an existing entity with another. Now this entity can be anything, a plain object, a function, or a prototype object. You can either mixin objects with each other or mixin an object with functions. In this section we are going to focus on functional mixins since they are very flexible and convenient when working with JavaScript. In addition, functional mixins are very different than classical inheritance and introduce a different a way of thinking.
The idea behind functional mixins is very simple: you define a bunch of functionalities, and you specify the context to which these functions apply. Let’s look at a very simple example:
/*
 * Define functionalities
 * Grouped by `fns` here.
 */
function fns() {
  this.getName = function() {
    return this.name;
  };
}

/* Define Type */
function Person(name) {
  if (!(this instanceof Person)) {
    return new Person(name);
  }
  this.name = name;
}

/* Apply the functionalities to the
prototype object of Person */
fns.call(Person.prototype);

/* make an instance of Person */
const person = Person('AJ');

/* call methods */
person.getName(); //-> 'AJ'
In the example above, we first create a function that contains the functionalities of a type. Then we define the type and finally we apply the functionalities to the type by calling the fns function in the context of the type’s prototype object. That’s all it takes to add functionalities to the type. Now the interesting thing to note here is that you can create more functions and group other pieces of functionalities and then apply it to the type. In order to demonstrate that, let’s redo the example in the previous section with this functional mixins.
If you remember from the previous section, we created the Developer type that had the functionalities of a Person, Worker, and Developer. So, let’s define the functionalities for each of these first:
/* Define Person's functionalities */
function personFns() {
  this.walk = function () {
    return 'Walking ...';
  };
  this.getName = function () {
    return this.name;
  };
}

/* Define Worker's functionalities */
function workerFns() {
  this.work = function () {
    return 'Working ...';
  };
}

/* Define Developer's functionalities */
function developerFns() {
  this.code = function () {
    return 'Coding ...';
  };
}
Now that we have defined the groups of functionalities, then, we need to define the Developer type:
/* Define the Developer type */
function Developer(name) {
  if (!(this instanceof Developer)) {
    return new Developer(name);
  }
  this.name = name;
  this.toString = function () {
    return this.name;
  };
}
After that, we need to apply each functionalities to the Developer’s prototype:
/* apply each functionalities to
Developer's prototype */
[personFns, workerFns, developerFns].forEach(fn => {
  fn.call(Developer.prototype);
});
Now we can create an instance of the Developer and call any of the methods:
/* create an instance and call methods */
const dev = Developer('AJ');
console.log(dev.getName());
console.log(dev.walk());
console.log(dev.work());
console.log(dev.code());
console.log('Dev is: ' + dev);
After running the code above you should get the following output:
AJ
Walking ...
Working ...
Coding ...
Dev is: AJ
And that’s how you can use functional mixins to augment a type. Also note that the context object this, always refers to the created instance object. Now that we have learned what functional mixins are, let’s see how we can improve the performance by forming a closure around the mixins to cache the result of the first definition call:
const personFns = (function() {
  function walk() {return 'Walking...';}
  function getName() {return this.name;}
  return function() {
    this.walk = walk;
    this.getName = getName;
    return this;
  };
}());

const workerFns = (function() {
  function work() {return 'working...';}
  return function() {
    this.work = work;
    return this;
  };
}());

const developerFns = (function() {
  function code() {return 'coding...';}
  return function() {
    this.code = code;
    return this;
  };
}());
All we did here was wrapping each function with a closure, the rest of the code is the same. Now, the effect that this has on performance is noticeable because when the outer function is called, there result is always cached because the inner function references the outer function methods.
Classes
The class keyword was introduced in ES2015 and is a syntactic sugar for constructor functions. It should not confuse you, JavaScript does not have classes, it’s merely for convenience and standardizing inheritance. Let’s look at an example:
class Car {
  constructor(name) {
    this.name = name;
  }
  move() {
    return 'moving...';
  }
}

const toyota = new Car('Toyota');
toyota.move();
The code above, for all intents and purposes, is equivalent to the following:
function Car(name) {
  this.name = name;
}
Car.prototype.move = function move() {
  return 'moving...';
};

const toyota = new Car('Toyota');
toyota.move();
We are not going to talk a lot about classes here, since learning classes is a matter of learning the syntax. It’s more important to learn the prototype concept than the class syntax.
#javascript #web development #coding