Getting started with Smoke Testing
This may sound familiar: someone pushed code to production and now a critical feature is broken. How can you prevent this from happening in the future?
In this tutorial, you’ll learn about smoke testing and how it helps catch bugs. You’ll then smoke test a web application on a schedule, and send alerts when tests fail. Let’s get started!
Table of Contents
- What is smoke testing?
- Why should you care?
- Set up your project
- Create a smoke test
- Review test code
- Run your test locally
- Run tests in GitHub Actions
- Set up alerts with Slack
- Conclusion
1. What is smoke testing?
The term “smoke test” originated in hardware repair. A device was turned on, and would fail the smoke test if it caught on fire. 🔥Smoke testing is sometimes called “build verification testing”.
When applied to web applications, smoke tests verify that the most important functionality is working. For example, smoke tests on Netflix might include signing in and playing a video.
By design, smoke tests do not cover every permutation and edge case. They instead check that your application isn’t so broken that additional testing would be a waste of time.
2. Why should you care?
Smoke tests provide a lot of value relative to the effort needed to create them. According to Microsoft, smoke tests are “the most cost-effective method for identifying and fixing defects in software” after code reviews.
Just a few tests of critical features like sign in can significantly improve quality. Testing what users do most often helps ensure that your application’s main use cases are supported.
Smoke tests also give your team the confidence to ship new code. Changes to your codebase often have unintended and unknown consequences. Smoke tests provide additional peace of mind that your application won’t break when you release that awesome new feature.
If you run smoke tests on production, you can also catch bugs that earlier tests missed. Even small differences between environments like staging and production can cause issues. Smoke tests can identify these issues before a customer does.
In short, smoke tests give you another layer of protection against a bad user experience. A smoothly running application helps your team, your company, and your customers be more successful. ✨
3. Set up your project
Now that we’ve learned what smoke testing is, let’s build a smoke testing pipeline!
This tutorial assumes you understand the command line, have Node.js and npm installed, and know the basics of JavaScript and Git.
You can set up your tests inside an existing project, or create a new one. To create a new project, run the following in the command line.
mkdir smoke_tests
cd smoke_tests
If you haven’t already, initialize your project so that you can install Node.js packages.
npm init -y
Now let’s install the tools we need to create our smoke tests. This tutorial will create Playwright and Jest tests on a web application. Playwright is a library built by Microsoft to automate Chromium, Firefox, and WebKit browsers. Jest is a framework for creating and running JavaScript tests.
To quickly create and run our tests, we will use the open source QA Wolf library that I help maintain. QA Wolf converts your browser actions to Playwright/Jest test code. It also runs your tests in a CI provider like GitHub Actions.
If you prefer to use another test framework, you can still follow this tutorial to run your tests in CI and set up alerts.
To set up your project for smoke tests, run the following in your project directory.
npm init qawolf
You will be prompted to specify the directory where your tests will be saved. Press Enter to use the default directory .qawolf, or type a different name.
? rootDir: Directory to create tests in (.qawolf)
You will then see a note in the command line indicating whether your tests will use TypeScript. Our example project does not have a “tsconfig.json” file, so our tests will not use TypeScript.
TypeScript ✖️ tsconfig.json not found
The final step is to choose your CI provider. This tutorial will use GitHub Actions, but you can choose another provider if you like. Select your CI provider in the command line and press Enter.
? Choose CI Provider (Use arrow keys)
  Azure DevOps
  Bitbucket Pipelines
  CircleCI
❯ GitHub Actions
  GitLab CI/CD
  Jenkins
  Skip CI setup
The packages needed for smoke tests (Playwright, Jest, and QA Wolf) will then be installed.
Two files will also be created in your project. The first is a workflow file to run your tests in CI. Since we selected GitHub Actions, this file is saved at “.github/workflows/qawolf.yml”. We will discuss this file later.
There is also a configuration file created at “qawolf.config.js”. We will not need to edit this file, but you can learn more about it here.
After the dependencies finish installing, check that the installation was successful.
npx qawolf howl
4. Create a smoke test
Now that our project is set up, let’s create our first smoke test. In this tutorial we will create a smoke test on TodoMVC, a simple to do application. Specifically, we will test that we can
- create a todo item,
- complete it, and
- clear completed todos.
To create our test, we’ll use the npx qawolf create command. This command takes the URL of your application and an optional test name. Running this command will open a Chromium browser where your actions will be converted to Playwright/Jest code.
In the command line, run the following. You can optionally replace http://todomvc.com/examples/react with a different URL, and myFirstTest with a different name.
npx qawolf create http://todomvc.com/examples/react myFirstTest
Open your code editor and find your test file (“.qawolf/myFirstTest.test.js” in our example). This is where your test code will be created as you use the browser.
Once the Chromium browser has opened to TodoMVC, take the following actions.
- Click on the todo input to focus it
- Type “create test!”
- Press Enter
- Click to complete the todo
- Click “Clear completed” to clear completed todos
- In the command line, highlight
💾 Save and Exitand press Enter to save your test
The video below provides an example.
Create a smoke test
5. Review test code
Now let’s take a look at our test code. In your code editor, open your test file (“.qawolf/myFirstTest.test.js” in our example).
At the beginning of our test, we import qawolf. We also import element selectors from “.qawolf/selectors/myFirstTest.json”, which we will discuss in a bit.
const qawolf = require("qawolf");
const selectors = require("./selectors/myFirstTest.json");
The test then launches a Playwright browser, which in our case is a Chromium browser. It creates a new Playwright browserContext, which is an incognito browser session. QA Wolf is given access to the context so it can detect your actions. Finally, a new Playwright page is created, opening a new tab in the browser.
let browser;
let page;

beforeAll(async () => {
  browser = await qawolf.launch();
  const context = await browser.newContext();
  await qawolf.register(context);
  page = await context.newPage();
});
The test itself is contained in a Jest test block with the name you specified. The test first navigates to the TodoMVC URL. It then goes through the actions you took: create a todo item, complete it, and clear completed todos. Each action uses one of Playwright’s page methods, like click and type.
test('myFirstTest', async () => {
  await page.goto("http://todomvc.com/examples/react");
  await page.click(selectors["0_what_needs_to_b_input"]);
  await page.type(selectors["1_what_needs_to_b_input"], "create test!");
  await page.press(selectors["2_what_needs_to_b_input"], "Enter");
  await page.click(selectors["3_input"]);
  await page.click(selectors["4_button"]);
});
The first argument passed to each page method is an HTML selector. This selector tells Playwright what element to interact with, like the todo input or “Clear completed” button. These selectors are imported from the “.qawolf/selectors/myFirstTest.json” file, which looks like the following.
{
 "0_what_needs_to_b_input": "html=<div data-reactid=\".0\" qaw_innertext=\"todos\"><header class=\"header\" data-reactid=\".0.0\" qaw_innertext=\"todos\"><input class=\"new-todo\" placeholder=\"What needs to be done?\" value=\"\" data-reactid=\".0.0.1\" /></header></div>",
// ...
}
Every attribute of the element you interacted with, as well as those of its two ancestors, is stored in this file. When you run your test, it will do its best to find a good enough match to the specified HTML. By not relying on a single attribute, your tests are more robust to changes in your front end code.
Playwright page methods also support other types of selectors, such as CSS selectors or text selectors. For example, you can replace selectors["4_button"] in the last step with the CSS selector '.clear-completed'.
test('myFirstTest', async () => {
  // ...
  // change this
  await page.click(selectors["4_button"]);
  // to this (CSS selector)
  await page.click('.clear-completed');
});
You can optionally configure QA Wolf to use test attributes like data-qa in the generated code whenever possible. See this guide to learn more.
After the test finishes running, QA Wolf stops recording any videos of the browser if applicable. The browser is also closed.
afterAll(async () => {
  await qawolf.stopVideos();
  await browser.close();
});
Putting it all together, the complete test code looks like this.
const qawolf = require("qawolf");
const selectors = require("./selectors/myFirstTest.json");

let browser;
let page;

beforeAll(async () => {
  browser = await qawolf.launch();
  const context = await browser.newContext();
  await qawolf.register(context);
  page = await context.newPage();
});

afterAll(async () => {
  await qawolf.stopVideos();
  await browser.close();
});

test("myFirstTest", async () => {
  await page.goto("http://todomvc.com/examples/react");
  await page.click(selectors["0_what_needs_to_b_input"]);
  await page.type(selectors["1_what_needs_to_b_input"], "create test!");
  await page.press(selectors["2_what_needs_to_b_input"], "Enter");
  await page.click(selectors["3_input"]);
  await page.click(selectors["4_button"]);
});
If the test cannot complete the workflow, it will fail. You are welcome to edit your test code, such as by adding assertions. We won’t go into that in this tutorial, but here is a guide if you’d like to learn more.
Now that we understand our test code, let’s run our test!
6. Run your test locally
Let’s run our test locally to make sure it works. In the command line, run the following to run your test(s) with Jest.
npx qawolf test
You should see a Chromium browser open and run the test. Your test will run as fast as possible, so don’t be surprised if it runs quickly.
The video below provides an example.
7. Run tests in GitHub Actions
In this tutorial we’ll run our tests on a schedule, such as every hour. Running tests on a schedule ensures that your application is working on an ongoing basis. It can also expose periodic issues, or “flakes”, that only appear sometimes.
In this tutorial we use GitHub Actions to run our tests. GitHub Actions is a tool to automate software workflows, such as deploying a web service or testing an application.
Review workflow file
When we set up our project, a YAML file called “.github/workflows/qawolf.yml” was created. We’ll first briefly go through the different parts of this file. We will then update it so our tests run on a schedule.
The first line of the workflow file names our workflow. This is the name that will show up in GitHub Actions, and you can change it if you like.
name: qawolf
The on key then specifies what event should trigger our tests to run. By default, your tests will run whenever someone pushes to any branch. We will soon edit this to also run our tests on a schedule.
on:
  push:
    # test every branch
    # edit below if you only want certain branches tested
    branches: "*"
  # schedule:
  #   # test on schedule using cron syntax
  #   - cron: "0 * * * *" # every hour
The rest of the file defines what GitHub Actions should do when it runs. GitHub Actions will run whatever jobs are listed under the jobs key. In our case we have just one job that runs our tests.
Specifically, our test job installs dependencies, checks out our code, and runs our test command npx qawolf test. After the test(s) run, debug artifacts like console logs and videos are saved.
jobs:
  test:
    runs-on: ubuntu-18.04

    steps:
      - name: Install dependencies
        run: |
          sudo apt update
          # chromium dependencies
          sudo apt-get install libgbm1
          # webkit dependencies
          sudo apt-get install libwoff1 libopus0 libwebp6 libwebpdemux2 libenchant1c2a libgudev-1.0-0 libsecret-1-0 libhyphen0 libgdk-pixbuf2.0-0 libegl1 libgles2 libevent-2.1-6 libnotify4 libvpx5 libxslt1.1

      - uses: actions/checkout@v2

      - uses: actions/setup-node@v1

      - uses: actions/cache@v1
        with:
          path: ~/.npm
          key: ${{ runner.os }}-node-${{ hashFiles('**/package-lock.json') }}
          restore-keys: |
            ${{ runner.os }}-node-

      - run: npm install

      # - name: Start local server
      #   run: npm run start & npx wait-on http://localhost:3000

      - run: npx qawolf test --headless
        env:
          # configure tests with environment variables
          QAW_ARTIFACT_PATH: ${{ github.workspace }}/artifacts
          # you can also use GitHub secrets for environment variables
          # https://help.github.com/en/actions/automating-your-workflow-with-github-actions/creating-and-using-encrypted-secrets
          # LOGIN_PASSWORD: ${{ secrets.PASSWORD }}

      - name: Upload Artifacts
        if: always()
        uses: actions/upload-artifact@master
        with:
          name: qawolf
          path: ${{ github.workspace }}/artifacts
Run tests in GitHub Actions
Now that we understand our workflow file a bit better, let’s run it in GitHub Actions. If you have not already, create a Git repository for your project. Make sure to ignore node_modules/ in your ".gitignore" file.
git init
git add .
git commit -m "Initial commit"
Make sure you have created a repository for your project on GitHub. Then push your code to GitHub.
git remote add origin YOUR_REPOSITORY_URL
git push -u origin master
See this GitHub repository for an example.
Now go to your GitHub repository and click on the “Actions” tab, which is next to the “Pull Requests” tab.

GitHub Actions tab in repository
You will see that your tests are running. This is because our workflow file told GitHub to run our tests whenever anyone pushed to any branch. Click on the workflow run to view details. Note that the name will vary depending on your commit message.
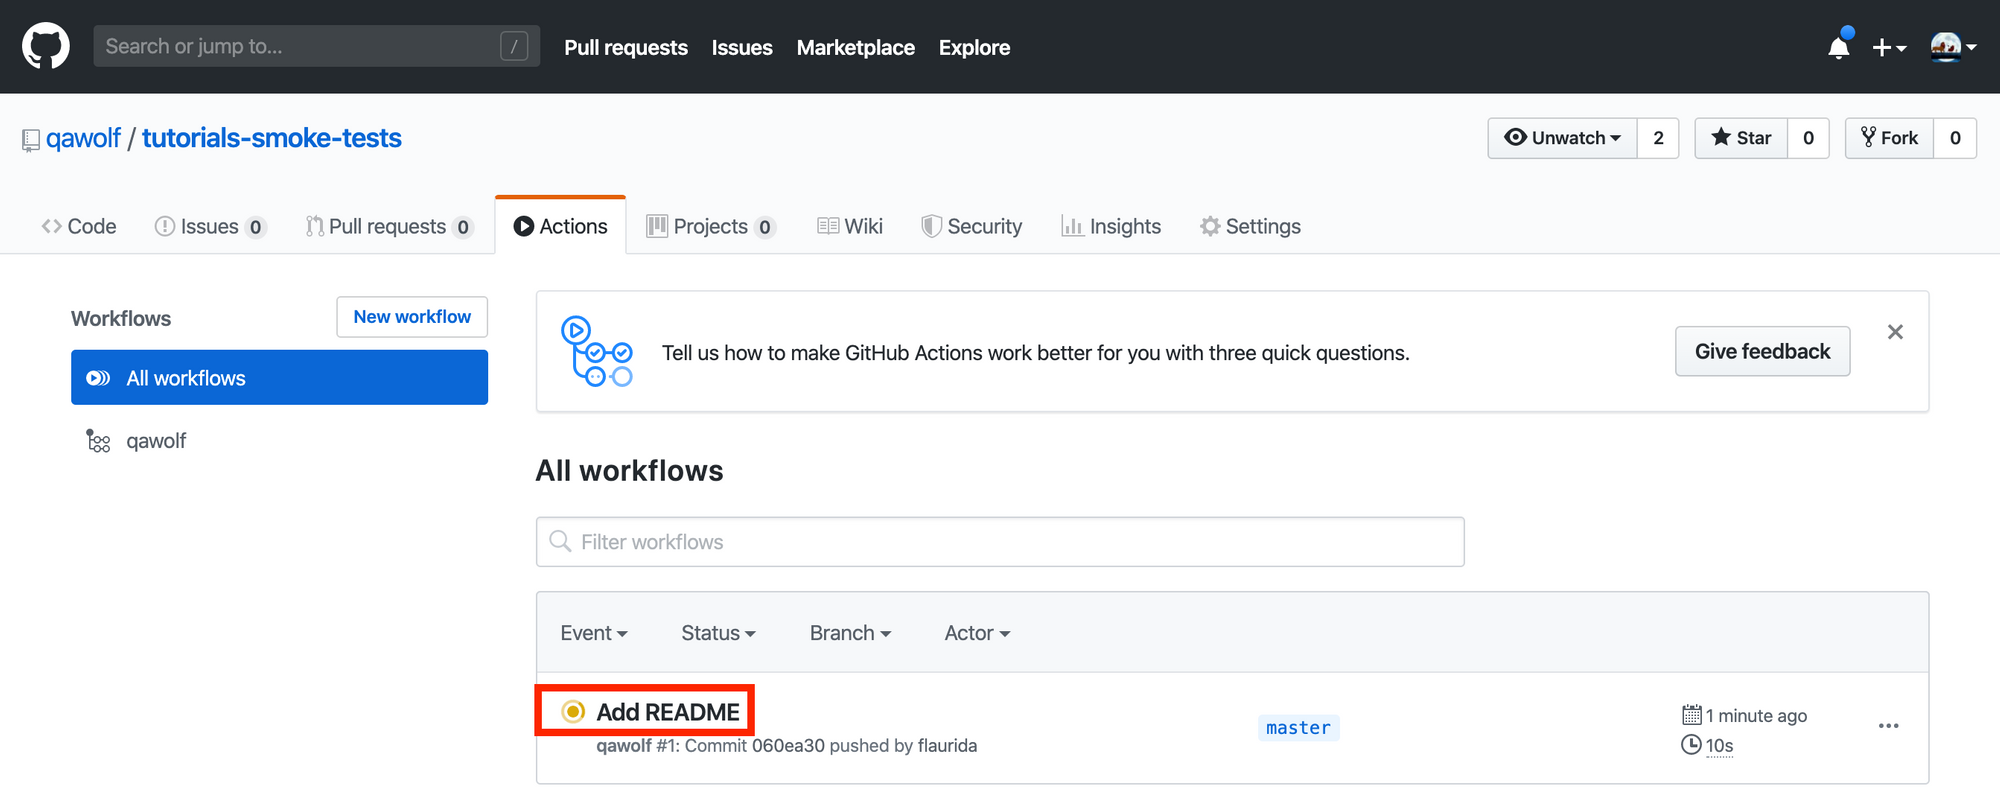
After your test runs, you should see a green check mark indicating that the workflow was successful. You should also see a link to download artifacts (video and logs) under “Artifacts”. Click on this link to download test artifacts.
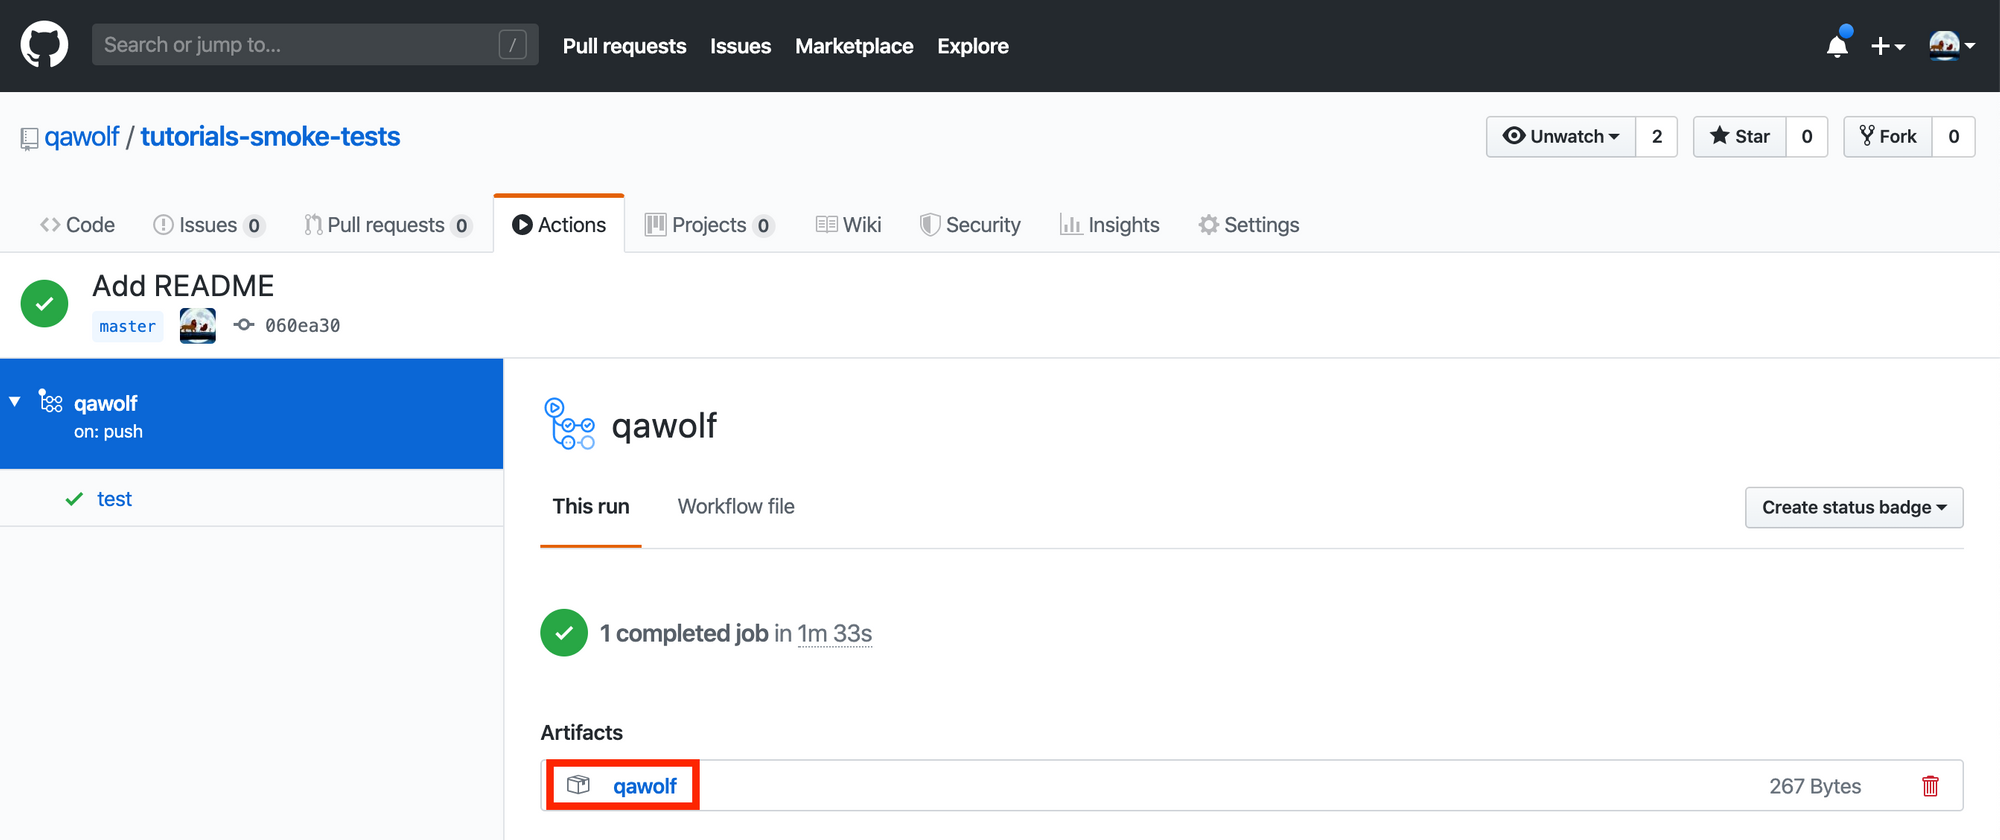
The artifacts are organized with one folder per test. In our example, we only have one test called “myFirstTest.test.js”. Open this folder to see browser logs in the file “logs_0_${timestamp}.txt” and a video “video_0_${timestamp}.mp4”. The 0 in the file names refers to the page index. If your test involved more than one page, there would be corresponding logs and videos for each additional page.
Now let’s update our workflow file to also run our tests on a schedule. In the “.github/workflows/qawolf.yml” file, comment in lines 7-9.
name: qawolf
on:
  push:
    # test every branch
    # edit below if you only want certain branches tested
    branches: "*"
  schedule:
    # test on schedule using cron syntax
    - cron: "0 * * * *" # every hour
These lines tell GitHub to run your tests on a schedule specified using cron syntax. The default value is "0 * * * *", which means run every hour on the hour. Update this value if you would like to use a different time interval.
We will change one more thing about our workflow file. GitHub Actions has a storage limit for artifacts, so we don’t want to upload them every time. Instead we will only upload logs and videos when the tests fail. Update line 51 from if: always() to if: failure().
# ...
      - name: Upload Artifacts
        if: failure()
        uses: actions/upload-artifact@master
        with:
          name: qawolf
          path: ${{ github.workspace }}/artifacts
Commit your changes and push them to GitHub.
git add .
git commit -m "Run tests on a schedule"
git push
Now your smoke tests will run every hour on GitHub Actions!
8. Set up alerts with Slack
The last piece of our pipeline is an alerting system that lets us know when our tests fail. In this tutorial we use Slack because it has a free plan. You can also use a service like PagerDuty, which will have a similar setup process.
If you do not already have a Slack account and workspace, create them now.
Create Slack webhook
We will now create a Slack webhook, which is a URL that allows us to send Slack messages programmatically. We will make a POST request to this URL when our tests fail.
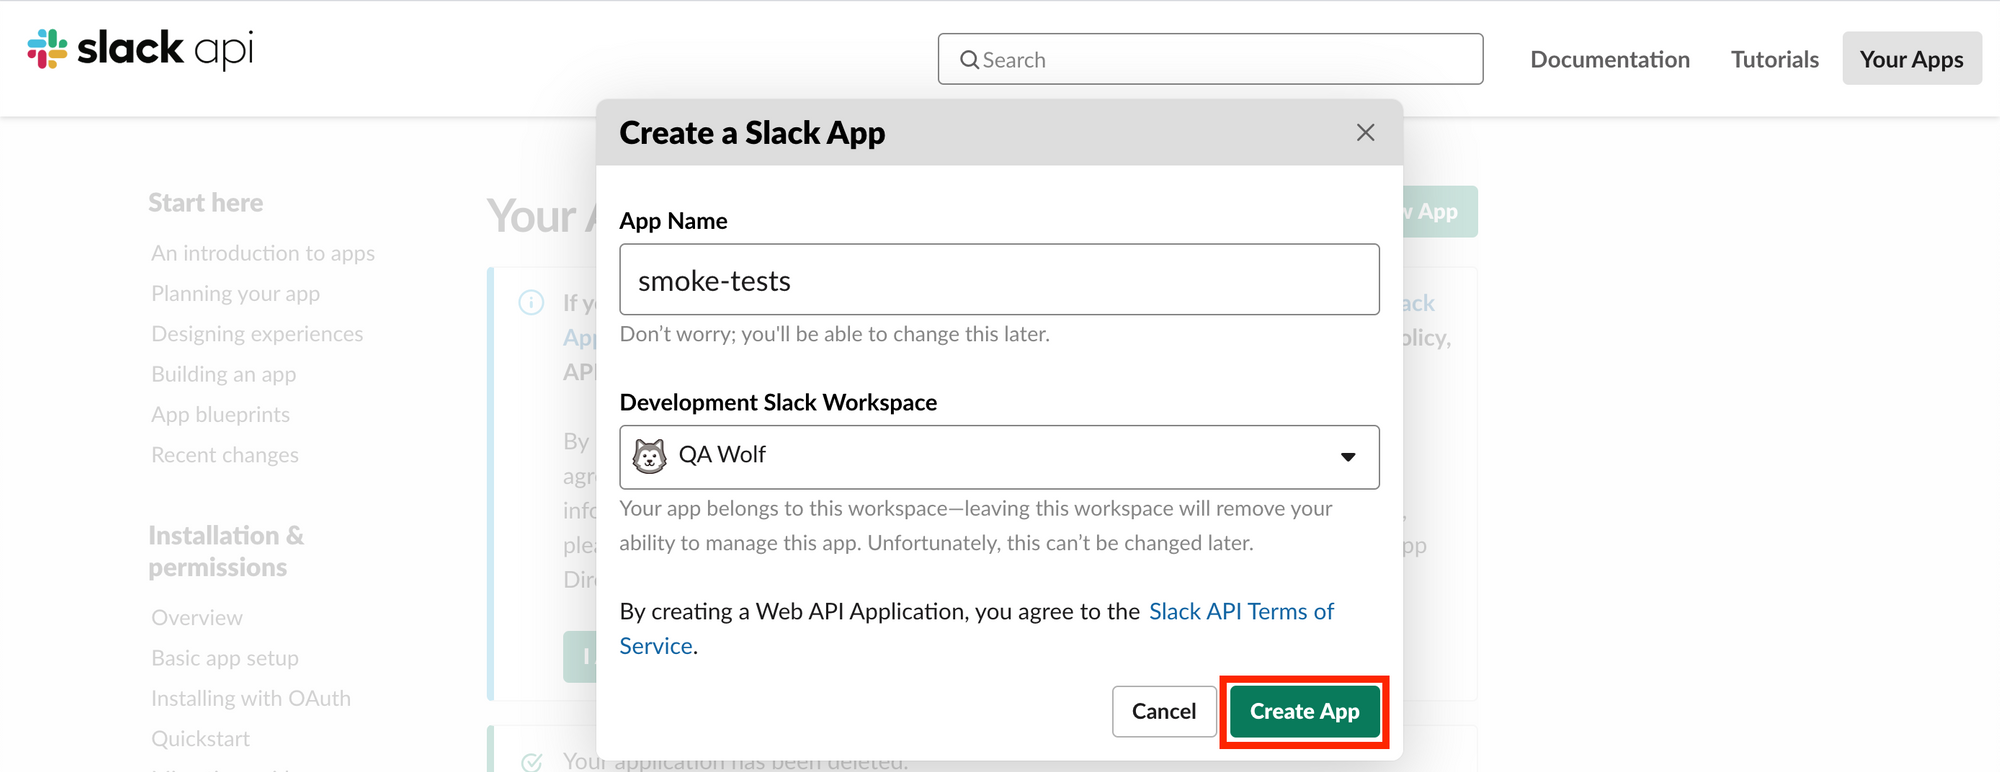
First we need to create a Slack app, which will be responsible for sending our alert messages. Get started by visiting the Slack API website. In the top right hand corner is a green button to “Create New App”.

Click on this button and you will be prompted to name your Slack app and choose a workspace. In our example, we call our app “smoke-tests”. After you have filled out the form, click the green “Create App” button.
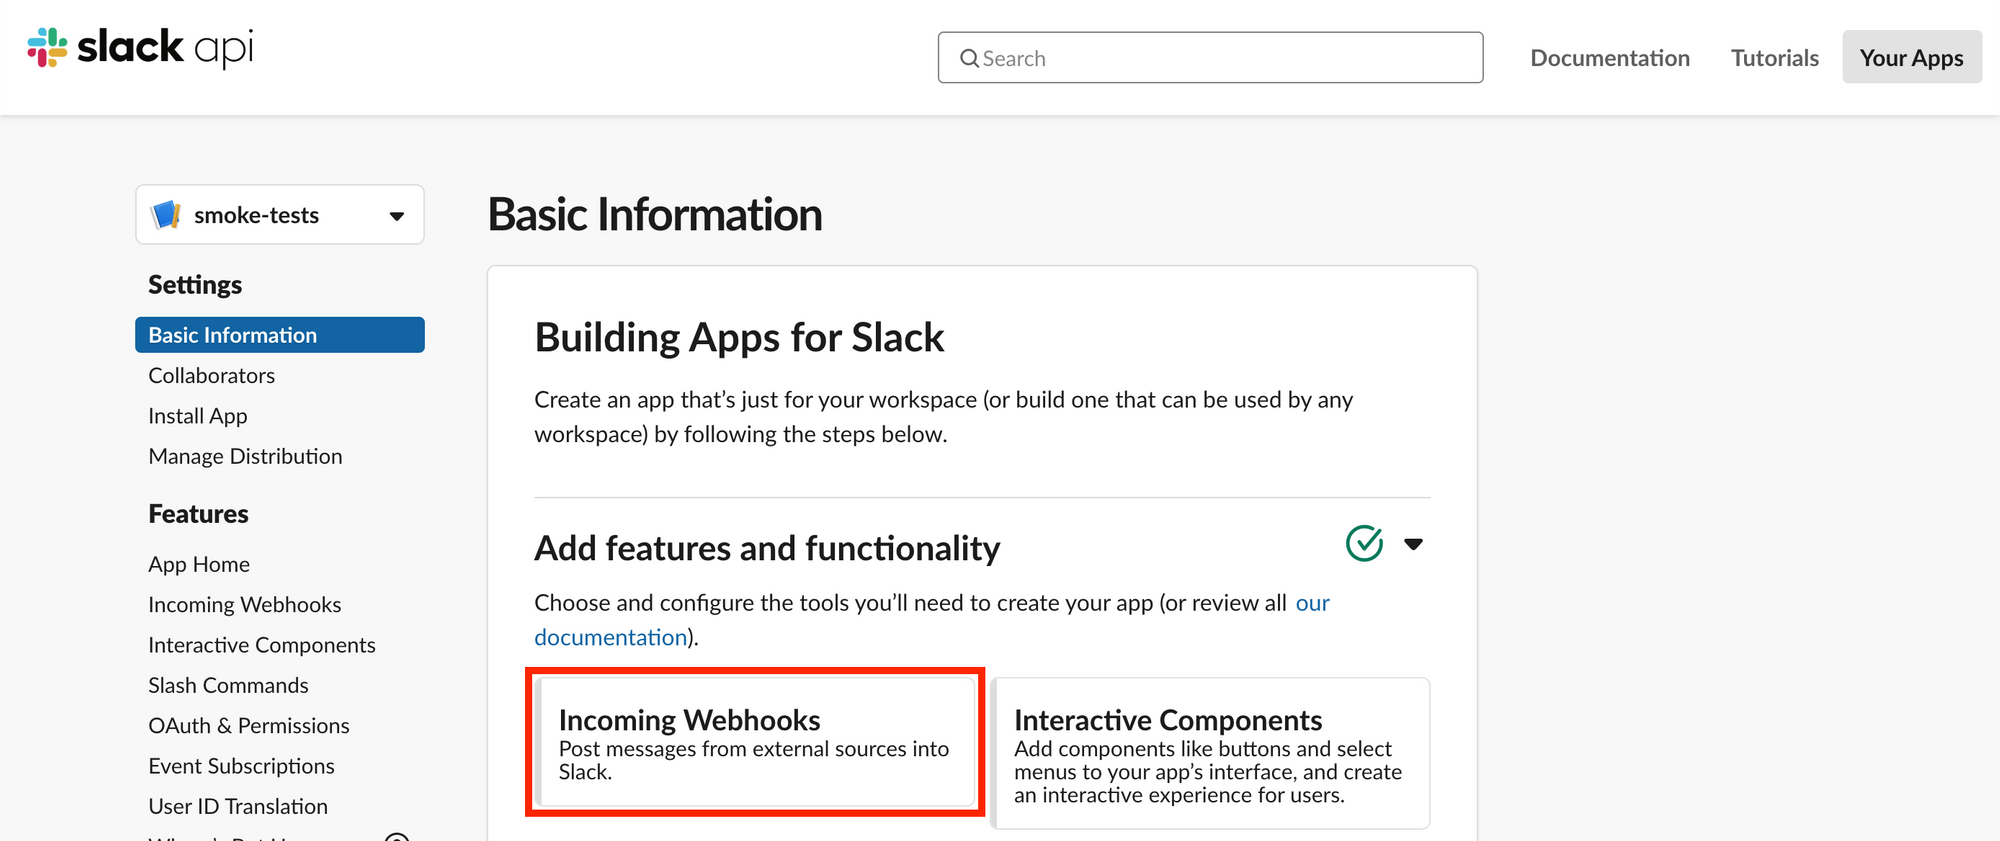
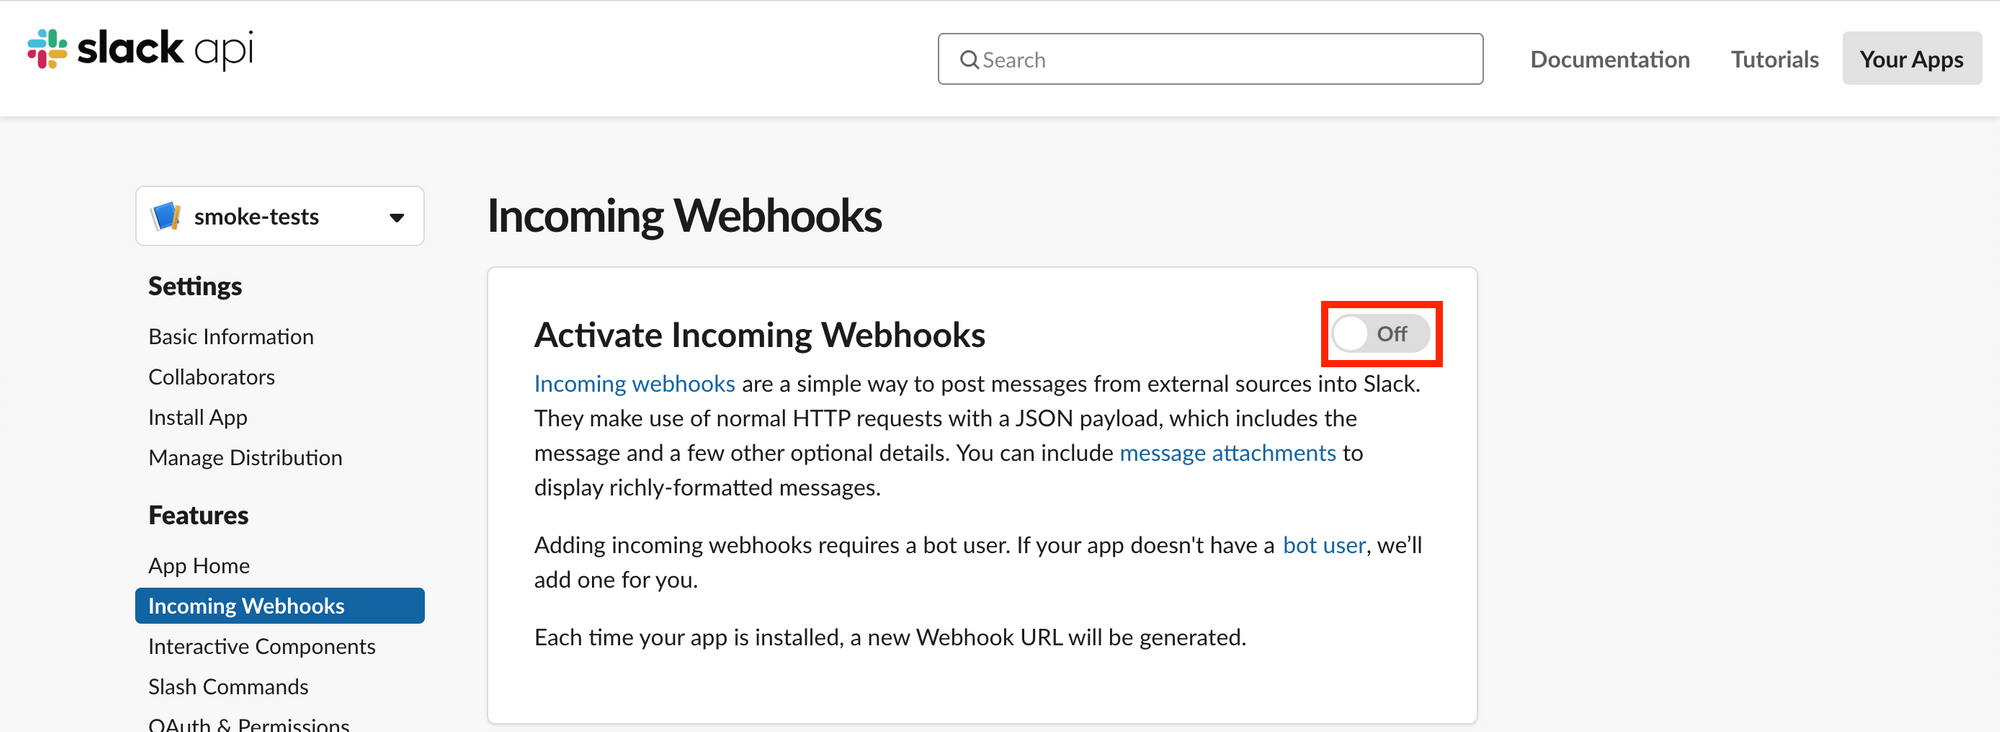
You should be redirected to your app’s page in Slack. Make sure you are on the “Basic Information” page under “Settings”. Under “Add features and functionality”, there is a link for “Incoming Webhooks”. Click on this link.
On the Incoming Webhooks page, click on the toggle to turn on incoming webhooks.
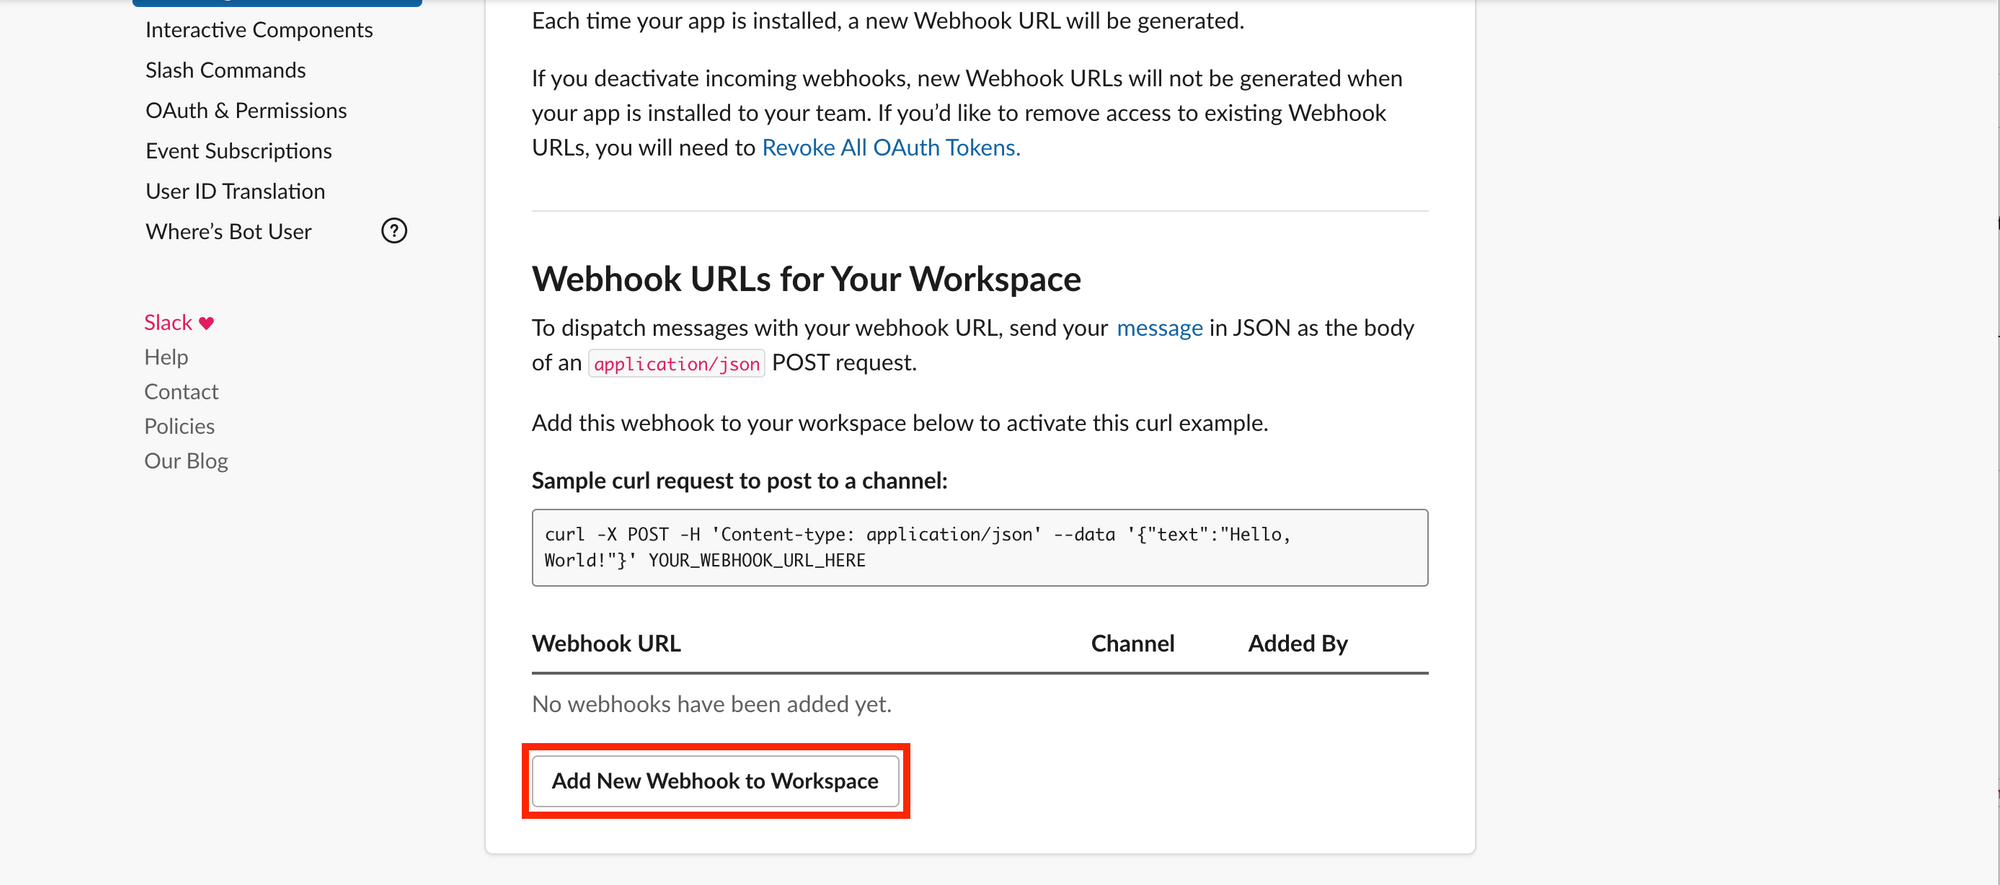
You will then be able to see the “Add New Webhook to Workspace” button at the bottom of the page. Click this button to add a new webhook. We will use this webhook to send a Slack message when our tests fail.
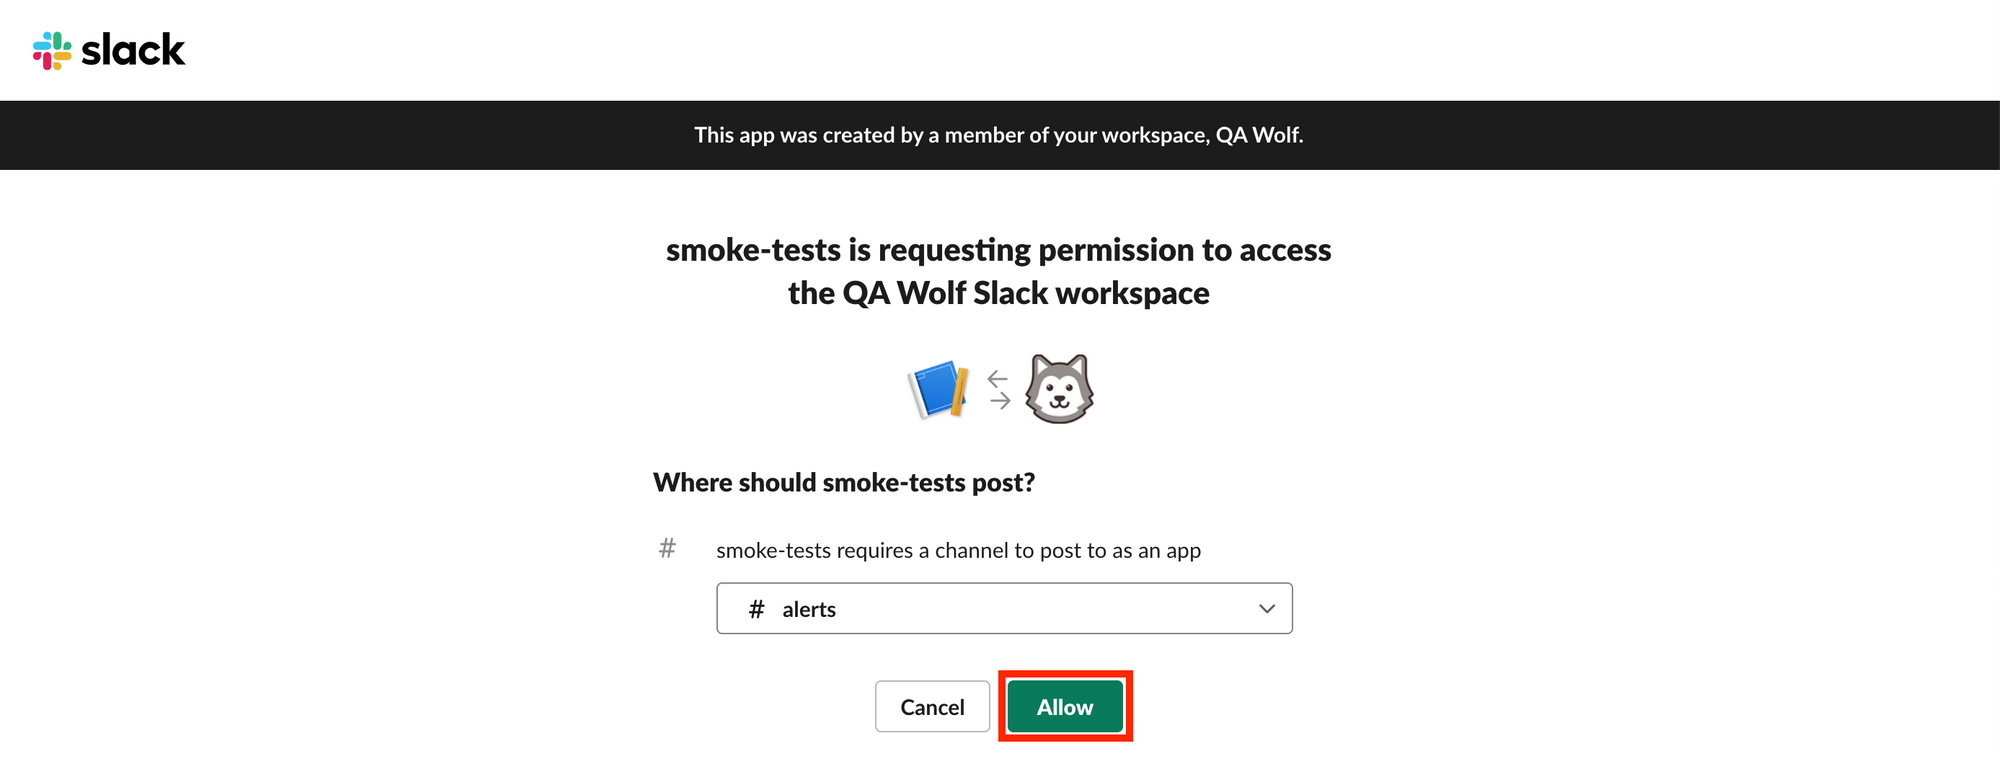
You will then be prompted to choose the channel where your messages will be posted. In our example, we select the “alerts” channel. After choosing your channel, click the green “Allow” button.
You will be redirected to the webhooks page. Under “Webhook URLs for Your Workspace”, you now should see your webhook URL.
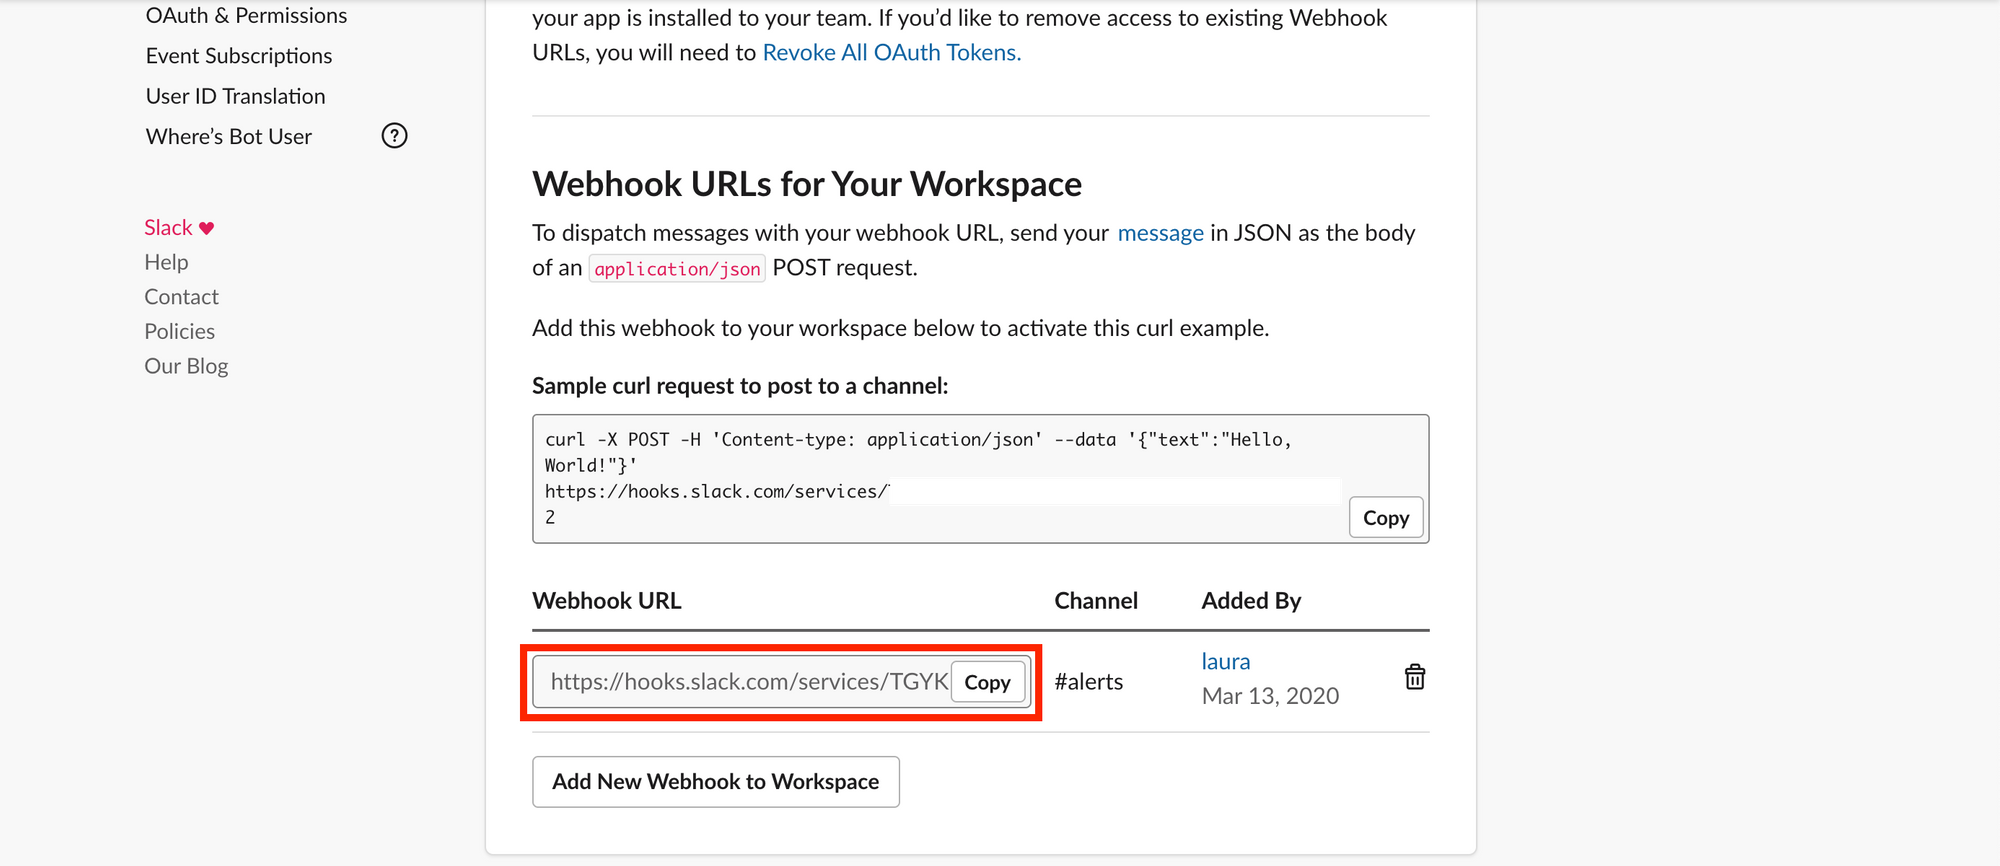
To test your webhook, copy the code under “Sample curl request to post to a channel”. It will look something like the following.
curl -X POST -H 'Content-type: application/json' --data '{"text":"Hello, World!"}' https://hooks.slack.com/services/SECRET
Paste this in the command line and press Enter. You will see the message “Hello, World!” posted to the channel you specified.
Send alert when tests fail
Now that we have our Slack webhook, we need to update our GitHub Actions workflow file. We will add a step that makes a POST request to our webhook when the tests fail.
Rather than paste our webhook URL into our workflow file directly, we will add it to our repository secrets. Secrets are encrypted environment variables that store sensitive information. Keeping our webhook URL secret prevents others from seeing it and potentially using it for evil. 😈
Add a new secret under your repository settings. Call your secret SLACK_WEBHOOK_URL, and set its value to your Slack webhook URL. The video below provides an example.
Now let’s update our workflow file. At the bottom of the “.github/workflows/qawolf.yml” file, add the following lines. These lines tell GitHub to make a POST request to your Slack webhook when your tests fail. We changed the value passed to "text" from “Hello, World!” to “Smoke tests failed!”, but you can use whatever message you like.
Note that we do not use the value of our Slack webhook URL directly, but instead replace it with ${{ secrets.SLACK_WEBHOOK_URL }}.
# ...
      - name: Upload Artifacts
        if: failure()
        uses: actions/upload-artifact@master
        with:
          name: qawolf
          path: ${{ github.workspace }}/artifacts

# add the following lines
      - name: Post Slack Message
        if: failure()
        run: |
          curl -X POST -H 'Content-type: application/json' --data '{"text":"Smoke tests failed!"}' ${{ secrets.SLACK_WEBHOOK_URL }}
If you would like to test that your webhook works, throw an error in your test file “.qawolf/myFirstTest.test.js”. Then push your changes to GitHub.
test("myFirstTest", async () => {
  await page.goto("http://todomvc.com/examples/react");
  await page.click(selectors["0_what_needs_to_b_input"]);
  await page.type(selectors["1_what_needs_to_b_input"], "create test!");
  await page.press(selectors["2_what_needs_to_b_input"], "Enter");
  await page.click(selectors["3_input"]);
  await page.click(selectors["4_button"]);
  // add this line
  throw new Error("demogorgon!");
});
Your test will fail, and a message will be posted in Slack. You will also be able to download artifacts.
After you are done testing your webhook, make sure to remove the error from your test code.
9. Conclusion
If you made it this far, congratulations! 🎉
In this tutorial we learned about smoke tests and built a smoke testing pipeline. Now you can be your team’s smoke testing hero! 🦸
Originally published by Laura Cressman at https://www.freecodecamp.org
#testing #webdev
