TL;DR:
In this article, you’ll learn how to build a travel reservation manager from scratch using Laravel. We’ll walk through every step of building the application and then add authentication using Auth0. You can follow along with the finished project in this GitHub repository.

Why Laravel
In the era of hot new frameworks and languages being released all the time, mentioning you’re a PHP developer usually results in some side-eye. But modern PHP has changed a lot from where it was ten years ago. Performance has improved significantly, new features have been added, and awesome frameworks and packages are always being released.
One of these frameworks is Laravel, an open-source PHP framework released in 2011 by Taylor Otwell. Since its release, it has become one of the most popular PHP frameworks and is showing no signs of slowing down. Let’s take a quick look at some of the awesome features that Laravel offers.
Laravel features
- Blade templating engine
- MVC Architecture
- Eloquent ORM
- Built-in testing
- Notification system
- Queues
- Middleware
- Event broadcasting
- Easy to use caching
- Extensive security and authentication
- Great documentation
- Large community
What better way to explore Laravel than to build an application from scratch and see it in action? Let’s get started!
Prerequisites
- Virtualbox to setup our environment (latest version)
- Vagrant (latest version)
- Node and NPM (latest versions) to install the front-end dependencies later
Installation
There are a couple of things you’ll need to do to get your development environment setup for your new Laravel project.
PHP
The Laravel installer requires PHP >= v7.1.3. If you don’t have PHP already installed, here are some useful links:
Windows
You can stop once you hit “Install Composer”, but you’ll be installing Composer in the next section so you can follow those instructions until the end now if you’d like.
You should have the following extensions enabled in your php.ini file:
extension=curl
extension=fileinfo
extension=gd2
extension=mbstring
extension=openssl
Mac
The PHP installation on Mac should be a little more straightforward. Here is a good installation guide for reference.
Composer
First, you’re going to install Composer, which is a PHP package manager. If you’re on Windows, you can proceed with the instructions from the PHP installation tutorial linked above.
Once that’s installed, you’ll need to add the ~/.composer/vendor/bin directory to your $PATH so that you can run the command from any folder. You can do this by running one of the following in the terminal (depending on your operating system):
Mac/Linux
export PATH=∼/.composer/vendor/bin:$PATH
Windows
This should already be done for you if you used the installer. Run composer -V in the terminal to check that it works. If not, in your terminal enter:
set PATH=%PATH%;%USERPROFILE%AppDataRoamingComposer\vendor\bin
If the installation was successful, running composer -V in the terminal will show the Composer version printed out.
Laravel installer
Next, use Composer to download the Laravel installer. Open the terminal in any directory and run:
composer global require laravel/installer
This will allow you to use the installer to create a new Laravel project from the command line. Let’s do that now. Navigate to where you want your new Laravel project to live and run:
laravel new travel-planet-crud
cd travel-planet-crud
This will create the project directory and install everything you need for a new Laravel 6.0 project.
Open up your code editor and find the file called .env. This is where you’ll store the private environment variables for your application. This file should never be committed to GitHub or any other source control, as its contents are considered secret. If you check your .gitignore file, you’ll see that .env is already included in the list of files to ignore.
In that .env file you should also see the value APP_KEY filled in with a random 32-character string. This is your application key that was automatically generated with the Laravel installer. If you don’t see this, run php artisan key:generate to create one.
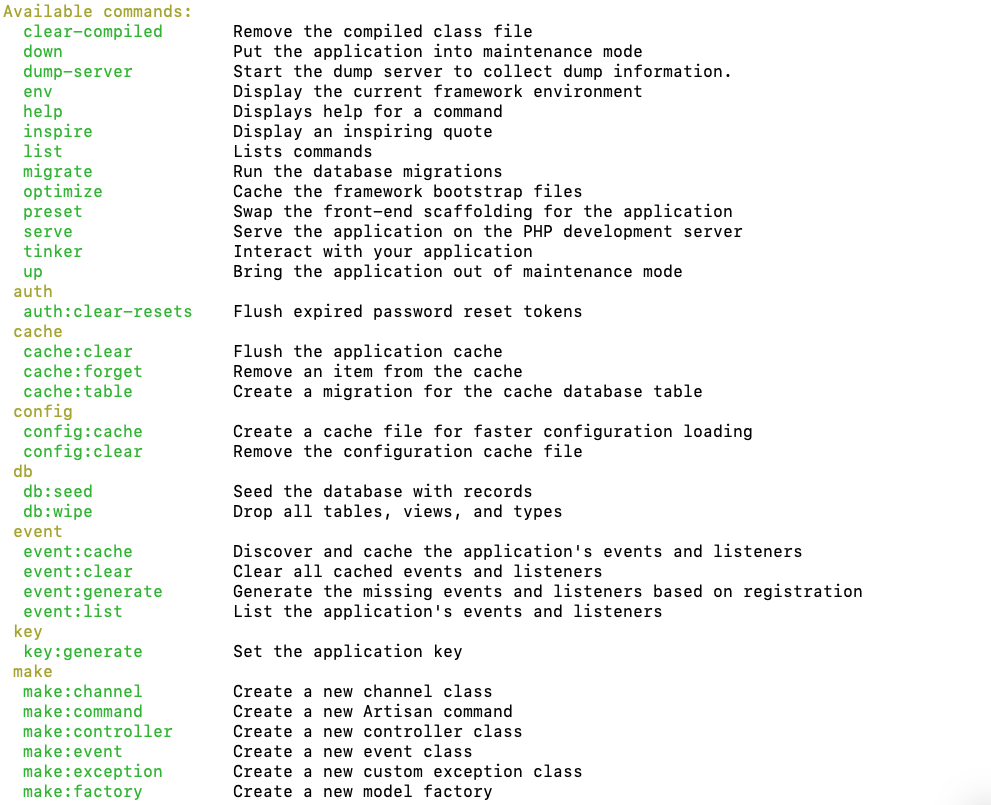
php artisanis included with Laravel and allows you to run commands that will assist you in Laravel development.
To see a list of all commands, run php artisan list.
You can now run php artisan serve, which will start a development server at http://localhost:8000.
This is great if you already have PHP and MySQL installed on your system, but if you don’t or you have incompatible versions for Laravel, then configuration can be a bit of a headache. To circumvent this, you can use Laravel Homestead.
Go ahead and stop the development server now with Ctrl + C.
Setting Up Homestead
For this application, you’re going to use the Laravel Homestead Vagrant box. This box will fulfill the system requirements needed to use Laravel, which will make setting up your environment a bit easier.
Make sure you have Virtualbox and Vagrant installed (see prerequisites) and then run the following in your terminal (in any directory) to add the Homestead box:
vagrant box add laravel/homestead
If you’re given a list of options, choose virtualbox. This will take a couple of minutes to download and install.
Laravel gives you the option to install Homestead system-wide, but that requires a little more setup. For this project, just install it in the project folder. Make sure you’re in the project root and run:
composer require laravel/homestead --dev
Now you’ll need to generate a Homestead.yaml file for configuration, which can be created by running:
Mac or Linux
php vendor/bin/homestead make
Windows
vendor\\bin\\homestead make
You should see Homestead Installed! if it was successful.
You may need to generate an SSH key to securely connect to your Homestead VM. GitHub has an awesome tutorial for checking if you already have one. The file you’re looking for is ~/.ssh/id_rsa.pub. If you do need to generate one, follow these instructions and then retry vagrant up.
Finally, you may need to add an entry to your /etc/hosts file so that your system knows to map the domain homestead.test to the development server IP address. You can follow these instructions in the Laravel docs to see how to do that for your system.
Now that your Vagrant box is configured, you can finally start it up!
vagrant up
Head to http://homestead.test to see your project in action.
Creating Routes
Creating your routes right away is a great way to map out your project. It will make you think about what views, controllers, and methods you’ll need.
What the application needs
For this project, a user should be able to:
- View a list of hotels
- Log in to their dashboard
- View all of their current reservations
- Create a new reservation at a specific hotel
- Edit an existing reservation
- Delete an existing reservation
- Log out of their dashboard
To achieve this, we need to create the following routes:
GET Requests
/— Show a homepage/hotels— Show a list of hotels/login— Lets a user login/logout— Lets a user logout/auth0/callback— Auth0 provided route to handle the login callback/dashboard— Show a user’s dashboard homepage/dashboard/reservations— Show a user’s reservations in their dashboard/dashboard/reservations/new— Show the page to create a reservation/dashboard/reservations/{id}— Show a single reservation/dashboard/reservations/{id}/edit— Show the page to edit a reservation
POST Requests
/dashboard/reservations— Creates a new reservation
PUT Requests
/dashboard/reservations/{id}— Update a specific reservation
DELETE Requests
/dashboard/reservations/{id}— Deletes a reservation
Open routes/web.php and replace it with this:
<?php

Route::view('/', 'home');
Route::get('/hotels', 'HotelController@index');
Route::get('/auth0/callback', '\Auth0\Login\Auth0Controller@callback' )->name('auth0-callback');
Route::get('/login', 'Auth\Auth0IndexController@login')->name('login');
Route::get('/logout', 'Auth\Auth0IndexController@logout')->name('logout')->middleware('auth');

Route::group(['prefix' => 'dashboard'], function() {
    Route::view('/', 'dashboard/dashboard');
    Route::get('reservations/create/{id}', 'ReservationController@create');
    Route::resource('reservations', 'ReservationController')->except('create');
});
Let’s pull one out to analyze the structure:
Route::get('/hotels', 'HotelController@index')
This will create a route at homestead.test/hotels that when hit, calls the index() function in the HotelController.php file.
A couple of other things to note here. The first route uses Route::view(), which just returns a simple view file, home.blade.php.
This is fine for the homepage since you don’t need to return any data to that page, but notice the next route calls the index method from HotelController. The hotel list page needs to list all the hotels saved in the database, so it needs a controller to handle getting and displaying that data.
The next three routes are from Auth0’s Laravel package to handle authentication, which we’ll dive into later.
The final routes are all for the dashboard. They’re wrapped in a group with the prefix dashboard. This will prepend dashboard/ to all those routes so that you don’t have to keep rewriting it.
Another thing to notice here is the use of Route::resource() for the reservation controller. This is a quick way to create all of the routes needed for a CRUD application.
In the example from the Laravel documentation with a resource photo controller, the resulting routes would look like this:
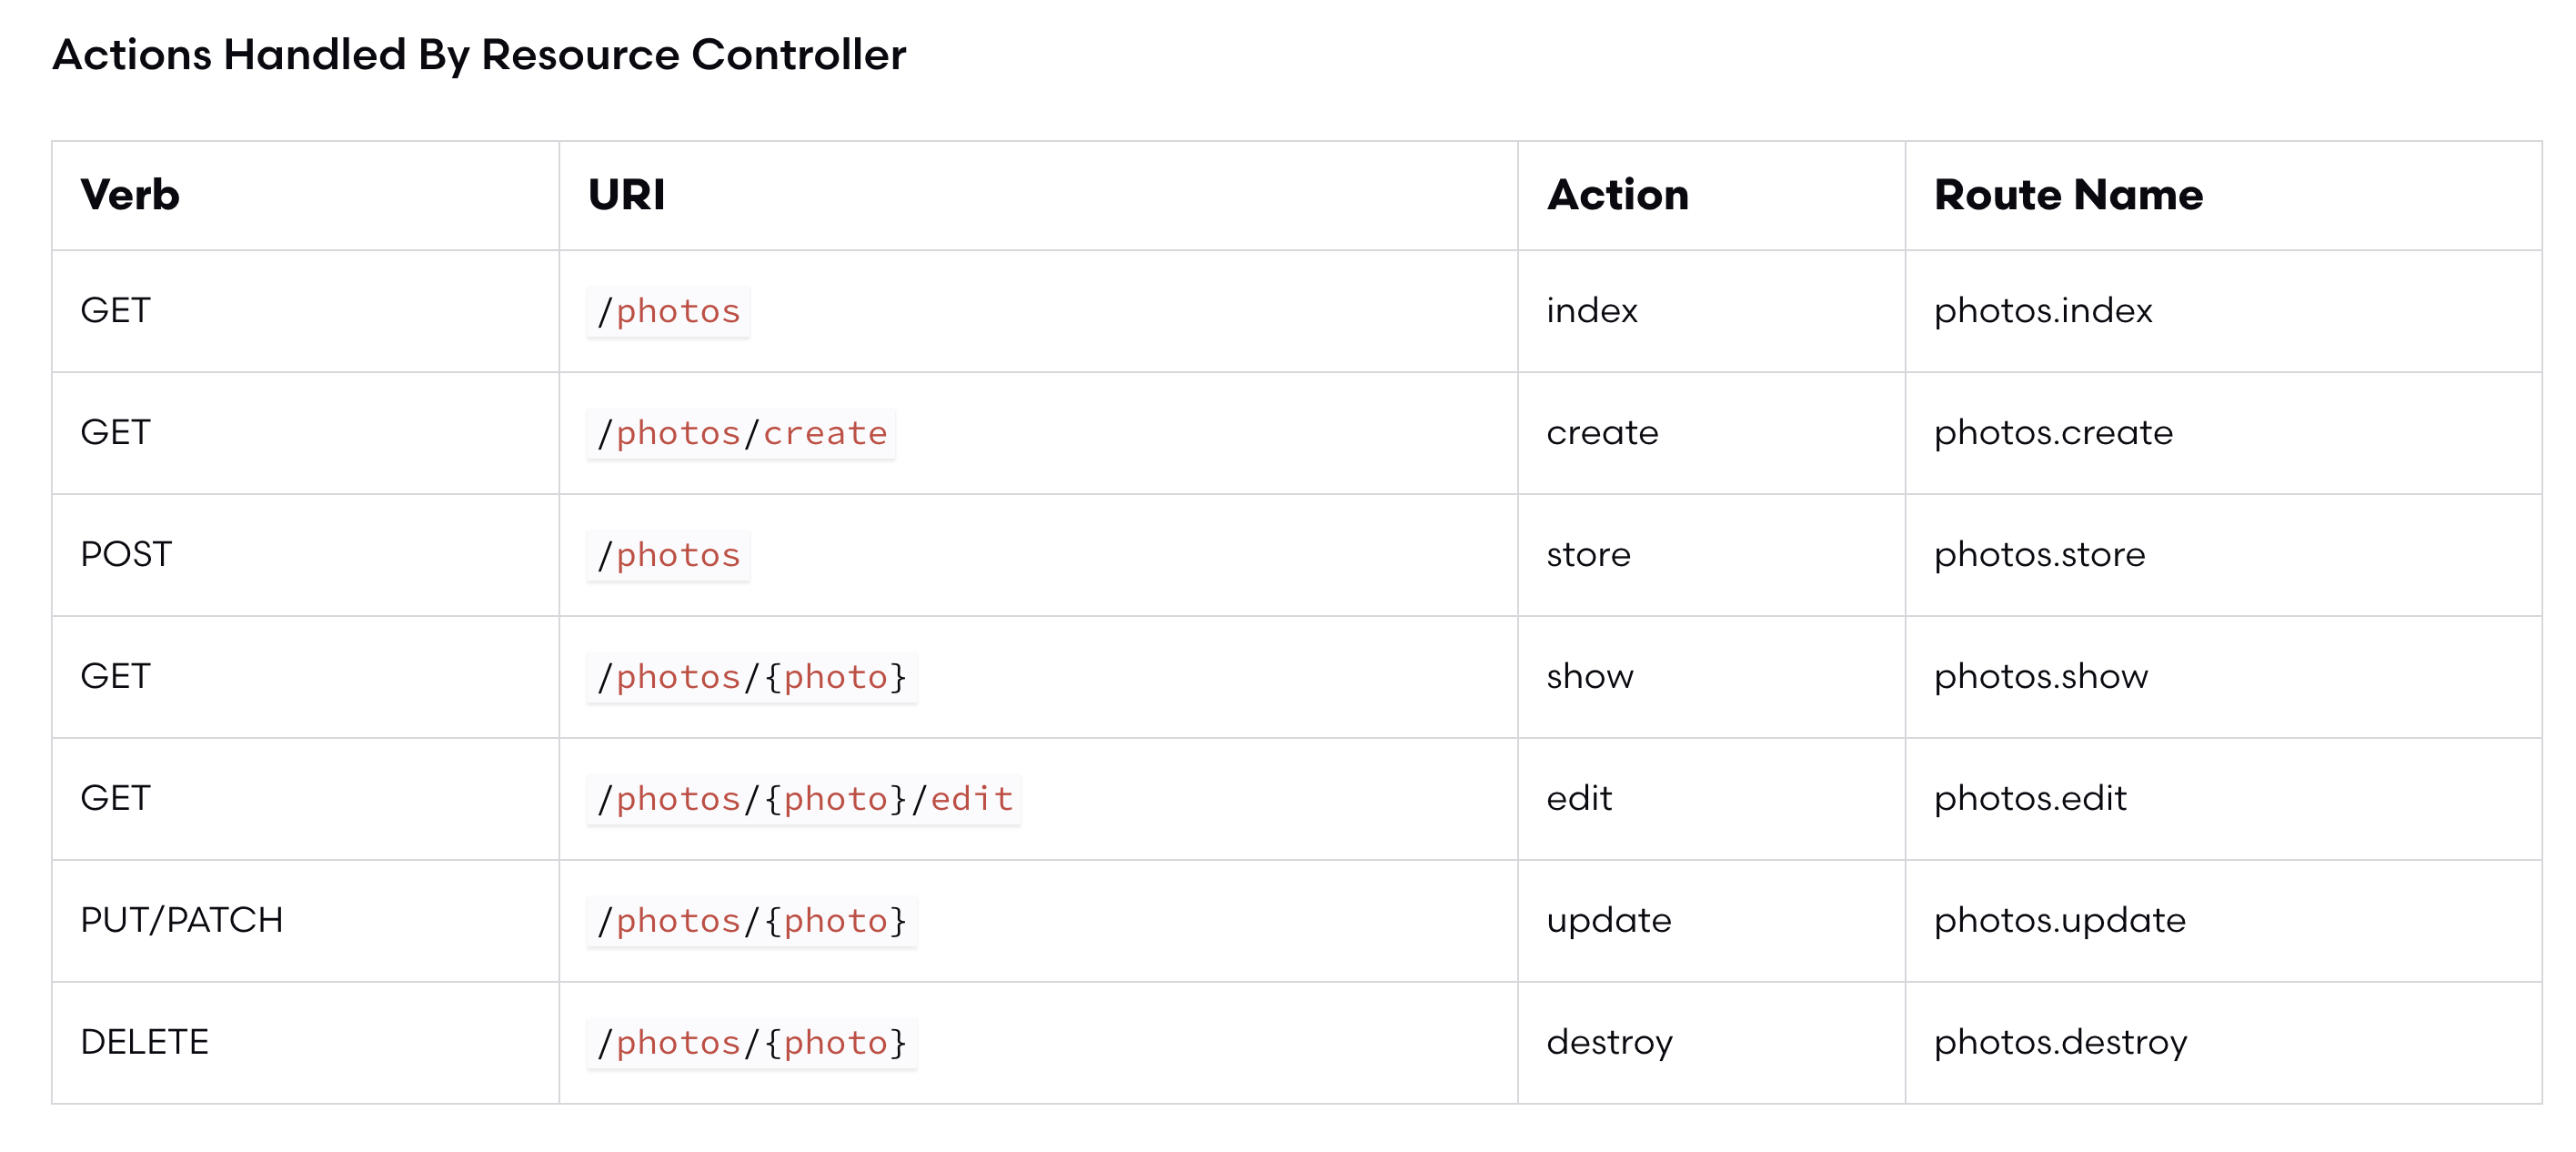
Once the controllers are filled out, this will make a little more sense. The last thing to be aware of is {id} being used in the GET route for creating a reservation. This situation is a little unique because the user will first have to select a hotel that they want to create a reservation for, so you need to pass along this hotel id when creating the route. Because there’s now a custom route for /create, you can just tell the resource controller to omit that by adding except('create').
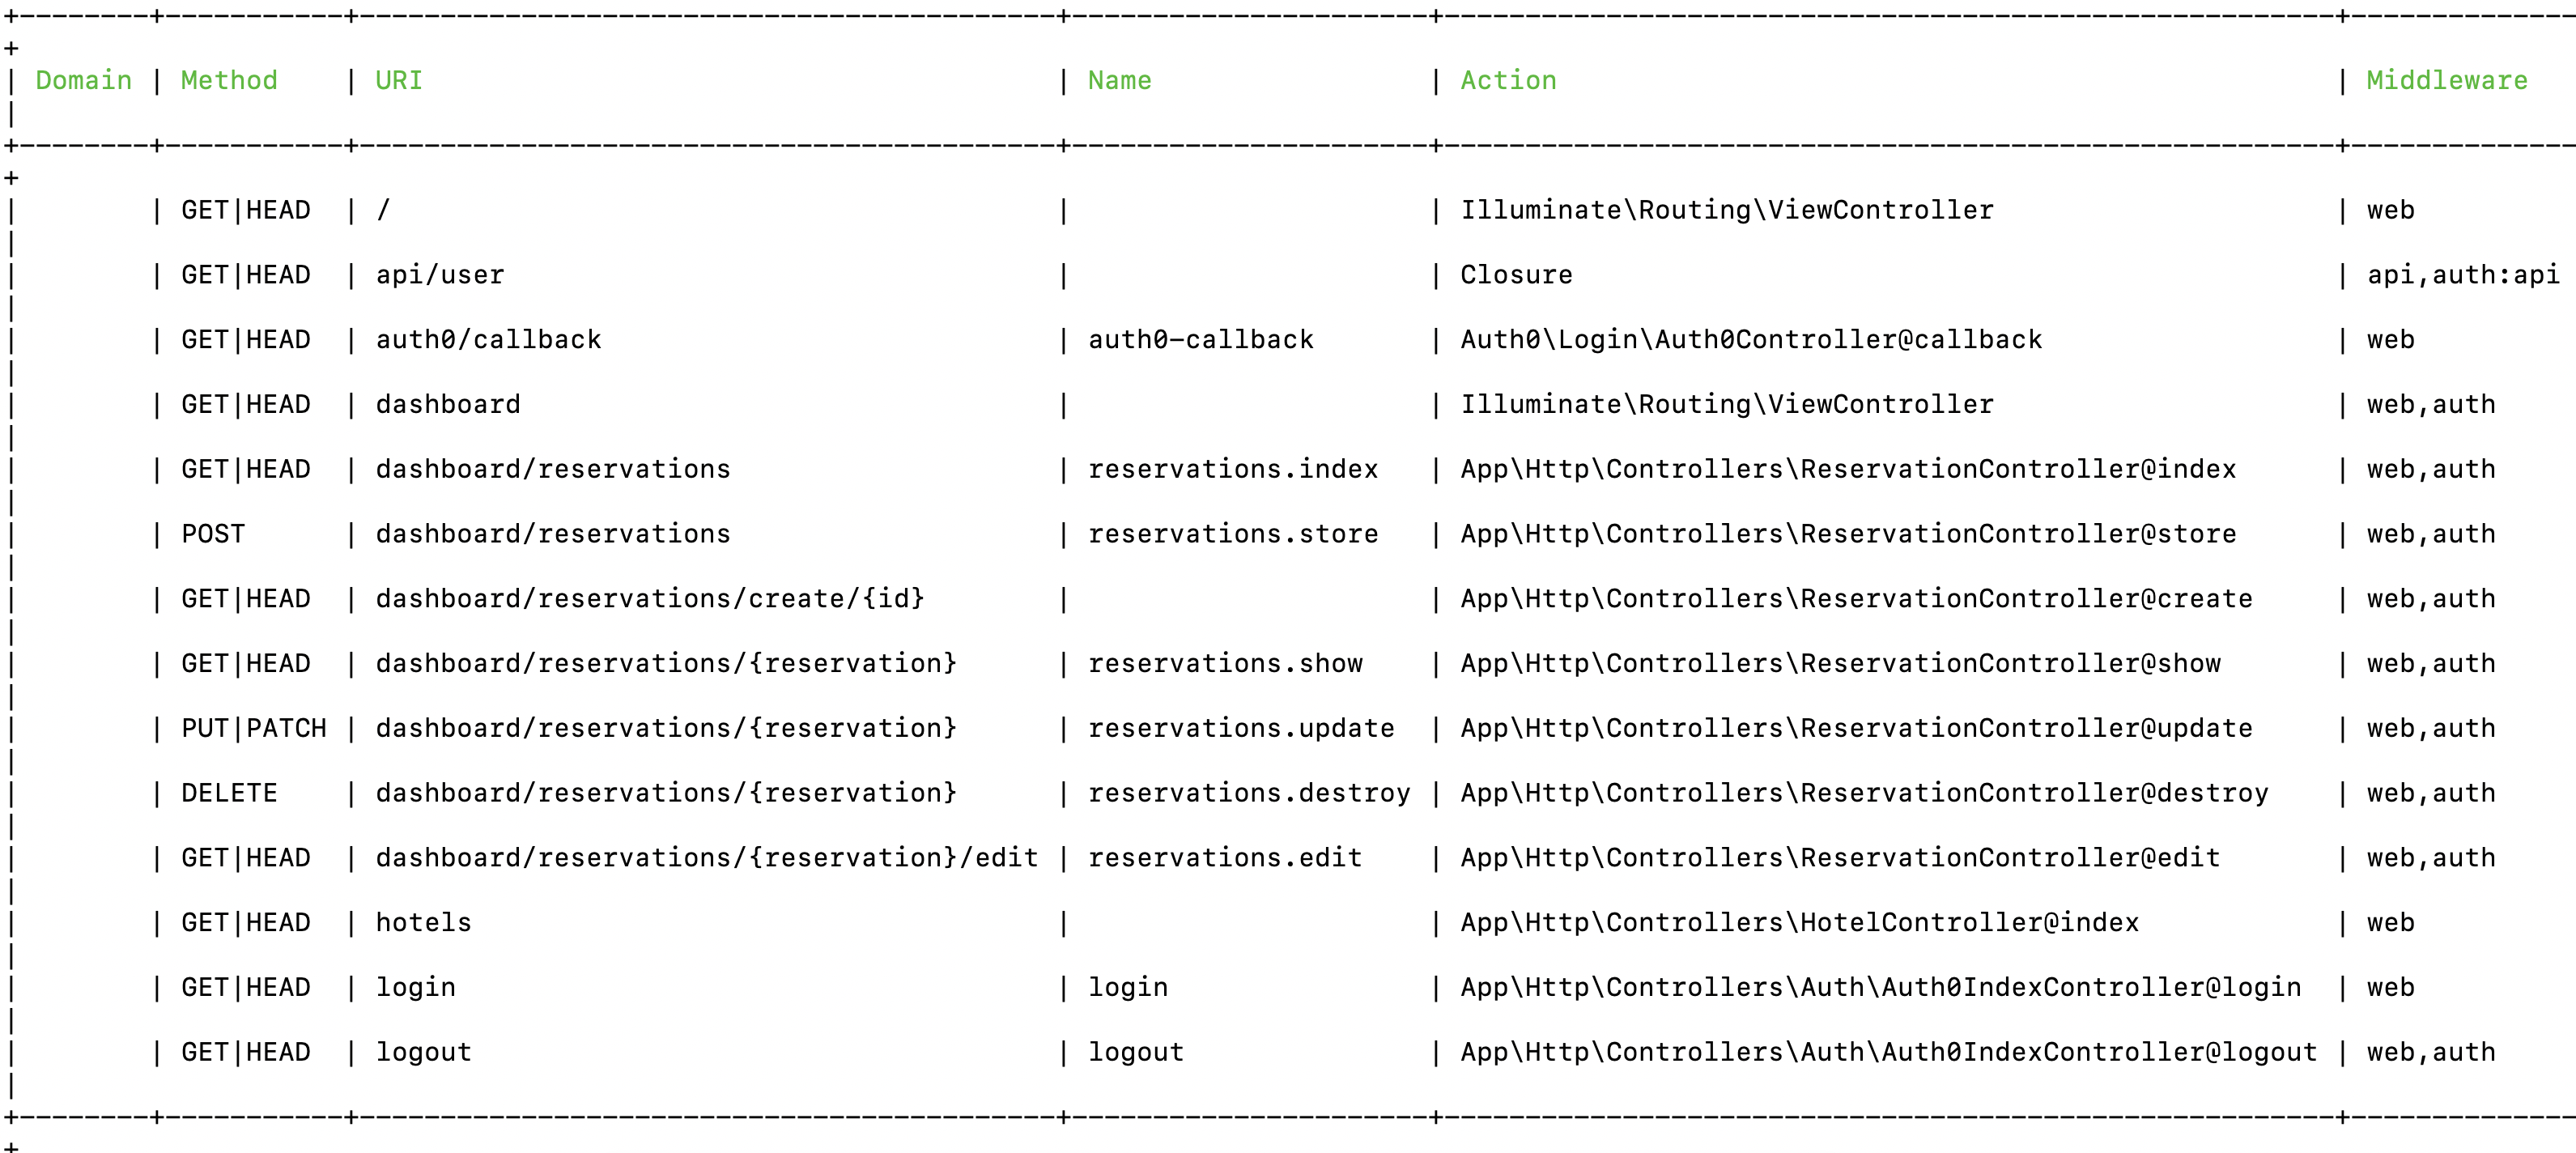
This will throw an error right now since you haven’t created the controllers, but once your those are in place, you can see all routes by running:
php artisan route:list
Here’s what yours will look like at the end of the tutorial:
Creating the Database
What’s a CRUD application without data? Well, boring. So let’s add some data!
You’re going to need three tables: reservations, hotels, and rooms.
Rooms Table
id— auto-generatedcreated_at— auto-generatedupdated_at— auto-generateduser_idroom_idnum_of_guestsarrivaldeparture
Hotels Table
id- auto-generatedhotel_idtypedescriptionpriceimage
Reservations Table
id— auto-generatednamelocationdescriptionimage
The structure will look like this:
Configuration
Open up your .env file and you should see some default entries for the database configuration. The default for using the MySQL database that comes with Homestead is:
// .env
DB_CONNECTION=mysql
DB_HOST=127.0.0.1
DB_PORT=3306
DB_DATABASE=homestead
DB_USERNAME=homestead
DB_PASSWORD=secret
You’ll be using MySQL for this tutorial, so you don’t need to change any of this.
Creating models
Let’s create the models for the application. The models allow you to easily work with the data using Laravel’s Eloquent ORM. Head to the terminal and run the following commands to make models for the hotels, rooms, and reservations:
mkdir app/Models
php artisan make:model Model/Hotel -m
php artisan make:model Model/Room -m
php artisan make:model Model/Reservation -m
This will create the models and the migration files (which we’ll go over next) for each model. Fill in each of the models as follows:
In app/Models/Hotel.php:
<?php
namespace App\Models;

use Illuminate\Database\Eloquent\Model;

class Hotel extends Model
{
    public $timestamps = false;
    protected $fillable = [
        'name',
        'location',
        'description',
        'image'
    ];

    public function rooms() {
        return $this->hasMany('App\Models\Room');
    }
}
In app/Models/Room.php:
<?php
namespace App\Models;

use Illuminate\Database\Eloquent\Model;

class Room extends Model
{
    public $timestamps = false;
    protected $fillable = [
        'hotel_id',
        'type',
        'description',
        'price',
        'image'
    ];

    public function hotel() {
        return $this->belongsTo('App\Models\Hotel');
    }
}
In app/Models/Reservation.php:
<?php

namespace App\Models;

use Illuminate\Database\Eloquent\Model;

class Reservation extends Model
{
    protected $fillable = [
        'user_id',
        'room_id',
        'num_of_guests',
        'arrival',
        'departure'
    ];

    public function room() {
        return $this->belongsTo('App\Models\Room');
    }
}
Each of these models does three things:
- Outlines the data stored in the table associated with that model (e.g. Reservation Model -> reservations table)
- Defines the relationships between models (e.g. a
roombelongs to ahotel) - Defines which attributes are allowed to be edited by our application
It’s important to always add the attributes you want to be able to edit to the
$fillablearray. If you ever run into a scenario where your CRUD operations aren’t executing as expected, check out the model for that item and make sure the attribute you’re trying to update is in the fillable array!
Take a look at the room() function in the Reservation model. Here we’re specifying the relationship that exists between a room and a reservation: a reservation can only have one room.
Creating migrations
Next let’s create the migrations, which are like version control for your database. These will outline the schema so that if you have multiple people working on this project, they can just run your migrations to get the database set up.
Back when you created the models you added a flag, -m, which also created the migrations for those models.
Go to the database/migrations folder and you should see a couple default files plus three files for each of those models with the date of creation prepended to them.
Open up each of the migration files listed below and replace their contents with the following:
Hotel migration
In database/migrations/xxxx_xx_xx_xxxxx_create_hotels_table.php:
<?php

use Illuminate\Support\Facades\Schema;
use Illuminate\Database\Schema\Blueprint;
use Illuminate\Database\Migrations\Migration;

class CreateHotelsTable extends Migration
{
    /**
     * Run the migrations.
     *
     * @return void
     */
    public function up()
    {
        Schema::create('hotels', function (Blueprint $table) {
            $table->bigIncrements('id');
            $table->string('name');
            $table->string('location');
            $table->string('description');
            $table->string('image');
        });
    }

    /**
     * Reverse the migrations.
     *
     * @return void
     */
    public function down()
    {
        Schema::dropIfExists('hotels');
    }
}
Room migration
In database/migrations/xxxx_xx_xx_xxxxx_create_rooms_table.php:
<?php

use Illuminate\Support\Facades\Schema;
use Illuminate\Database\Schema\Blueprint;
use Illuminate\Database\Migrations\Migration;

class CreateRoomsTable extends Migration
{
    /**
     * Run the migrations.
     *
     * @return void
     */
    public function up()
    {
        Schema::create('rooms', function (Blueprint $table) {
            $table->bigIncrements('id');
            $table->unsignedBigInteger('hotel_id');
            $table->foreign('hotel_id')->references('id')->on('hotels');
            $table->string('type');
            $table->string('description');
            $table->decimal('price', 10, 2);
            $table->string('image');
        });
    }

    /**
     * Reverse the migrations.
     *
     * @return void
     */
    public function down()
    {
        Schema::dropIfExists('rooms');
    }
}
Reservation migration
In database/migrations/xxxx_xx_xx_xxxxx_create_reservations_table.php:
<?php

use Illuminate\Support\Facades\Schema;
use Illuminate\Database\Schema\Blueprint;
use Illuminate\Database\Migrations\Migration;

class CreateReservationsTable extends Migration
{
    /**
     * Run the migrations.
     *
     * @return void
     */
    public function up()
    {
        Schema::create('reservations', function (Blueprint $table) {
            $table->bigIncrements('id');
            $table->timestamps();
            $table->string('user_id');
            $table->unsignedBigInteger('room_id');
            $table->foreign('room_id')->references('id')->on('rooms');
            $table->integer('num_of_guests');
            $table->date('arrival');
            $table->date('departure');
        });
    }

    /**
     * Reverse the migrations.
     *
     * @return void
     */
    public function down()
    {
        Schema::dropIfExists('reservations');
    }
}
This is where we define the type for all data as well as relationships.
Seeding the database
The final thing to do is seed the database with some data. Seeding just means you’re going to programmatically fill in those tables we made with some mock data. This isn’t really necessary when building a CRUD application since you can just create data through the application, but when developing, it’s helpful to have some data you can test with as you go.
Laravel lets you create seeder files that you can fill with mock data to populate the database. Let’s do that now.
Head to your terminal to create the seeder files:
php artisan make:seeder HotelSeeder
php artisan make:seeder RoomSeeder
php artisan make:seeder ReservationSeeder
You can now find these files in database/seeds. Fill them in as follows:
Hotel seeder
In database/HotelSeeder.php:
<?php

use Illuminate\Database\Seeder;
use App\Models\Hotel;

class HotelSeeder extends Seeder
{
    /**
     * Run the database seeds.
     *
     * @return void
     */
    public function run()
    {
        // array of specific hotels to populate database
        $hotels = [
            [
                'name' => 'Marriott',
                'location' => 'Seattle, WA',
                'description' => 'International luxurious hotel.',
                'image' => 'https://placeimg.com/640/480/arch'
            ],
            [
                'name' => 'Aria',
                'location' => 'Las Vegas, NV',
                'description' => 'International luxurious hotel.',
                'image' => 'https://placeimg.com/640/480/arch'
            ],
            [
                'name' => 'MGM Grand',
                'location' => 'Las Vegas, NV',
                'description' => 'International luxurious hotel.',
                'image' => 'https://placeimg.com/640/480/arch'
            ]
        ];

        foreach ($hotels as $hotel) {
            Hotel::create(array(
                'name' => $hotel['name'],
                'location' => $hotel['location'],
                'description' => $hotel['description'],
                'image' => $hotel['image']
            ));
        }
    }
}
Room seeder
In database/seeds/RoomSeeder.php:
<?php

use Illuminate\Database\Seeder;
use App\Models\Room;

class RoomSeeder extends Seeder
{
    /**
     * Run the database seeds.
     *
     * @return void
     */
    public function run()
    {
        // array of specific rooms to populate database
        $rooms = [
            [
                'hotel_id' => 1,
                'type' => 'Luxury Suite',
                'description' => '2000 sqft, 3 king sized beds, full kitchen.',
                'price' => 980.00,
                'image' => 'https://placeimg.com/640/480/arch'
            ],
            [
                'hotel_id' => 1,
                'type' => 'Double',
                'description' => 'Two queen beds.',
                'price' => 200.00,
                'image' => 'https://placeimg.com/640/480/arch'
            ],
            [
                'hotel_id' => 2,
                'type' => 'Suite',
                'description' => 'International luxurious room.',
                'price' => 350.00,
                'image' => 'https://placeimg.com/640/480/arch'
            ],
            [
                'hotel_id' => 2,
                'type' => 'Economy',
                'description' => 'One queen bed, mini fridge.',
                'price' => 87.99,
                'image' => 'https://placeimg.com/640/480/arch'
            ],
            [
                'hotel_id' => 3,
                'type' => 'Suite',
                'description' => 'One ultra wide king bed, full kitchen.',
                'price' => 399.00,
                'image' => 'https://placeimg.com/640/480/arch'
            ]
        ];

        foreach ($rooms as $room) {
            Room::create(array(
                'hotel_id' => $room['hotel_id'],
                'type' => $room['type'],
                'description' => $room['description'],
                'price' => $room['price'],
                'image' => $room['image']
            ));
        }
    }
}
Reservation seeder
In database/seeds/ReservationSeeder.php:
<?php

use Illuminate\Database\Seeder;
use App\Models\Reservation;

class ReservationSeeder extends Seeder
{
    /**
     * Run the database seeds.
     *
     * @return void
     */
    public function run()
    {
        // array of specific reservations to populate database
        $reservations = [
            [
                'user_id' => '1',
                'room_id' => 1,
                'num_of_guests' => 4,
                'arrival' => '2020-05-18',
                'departure' => '2020-05-28'
            ],
            [
                'user_id' => '1',
                'room_id' => 2,
                'num_of_guests' => 1,
                'arrival' => '2020-05-10',
                'departure' => '2020-05-12'
            ],
            [
                'user_id' => '1',
                'room_id' => 3,
                'num_of_guests' => 3,
                'arrival' => '2020-05-06',
                'departure' => '2020-05-07'
            ],
            [
                'user_id' => '1',
                'room_id' => 4,
                'num_of_guests' => 2,
                'arrival' => '2020-05-12',
                'departure' => '2020-05-15'
            ],
            [
                'user_id' => '1',
                'room_id' => 2,
                'num_of_guests' => 2,
                'arrival' => '2020-05-20',
                'departure' => '2020-05-24'
            ]
        ];

        foreach ($reservations as $reservation) {
            Reservation::create(array(
                'user_id' => $reservation['user_id'],
                'room_id' => $reservation['room_id'],
                'num_of_guests' => $reservation['num_of_guests'],
                'arrival' => $reservation['arrival'],
                'departure' => $reservation['departure']
            ));
        }
    }
}
Here we created an array to hold several entries of mock data for each table. Then we loop through each array item and create a new entry with it.
One last thing before you can run the seeder. Open up database/seeds/DatabaseSeeder.php and replace it with this:
<?php

use Illuminate\Database\Seeder;

class DatabaseSeeder extends Seeder
{
    /**
     * Seed the application's database.
     *
     * @return void
     */
    public function run()
    {
        $this->call(HotelSeeder::class);
        $this->call(RoomSeeder::class);
        $this->call(ReservationSeeder::class);
    }
}
This tells the seeder what files to call and in what order to run them. Now it’s time to run the seeder! To do this, you need to interact with MySQL, which requires you to connect to the virtual machine (Homestead).
Head to your terminal and make sure you’re in the root folder of the project.
SSH into the Homestead box (this is how you’ll access MySQL):
vagrant ssh
Switch to the Code folder where the project is:
cd code
Run the artisan command to migrate:
php artisan migrate
Run the artisan command to seed the database:
php artisan db:seed
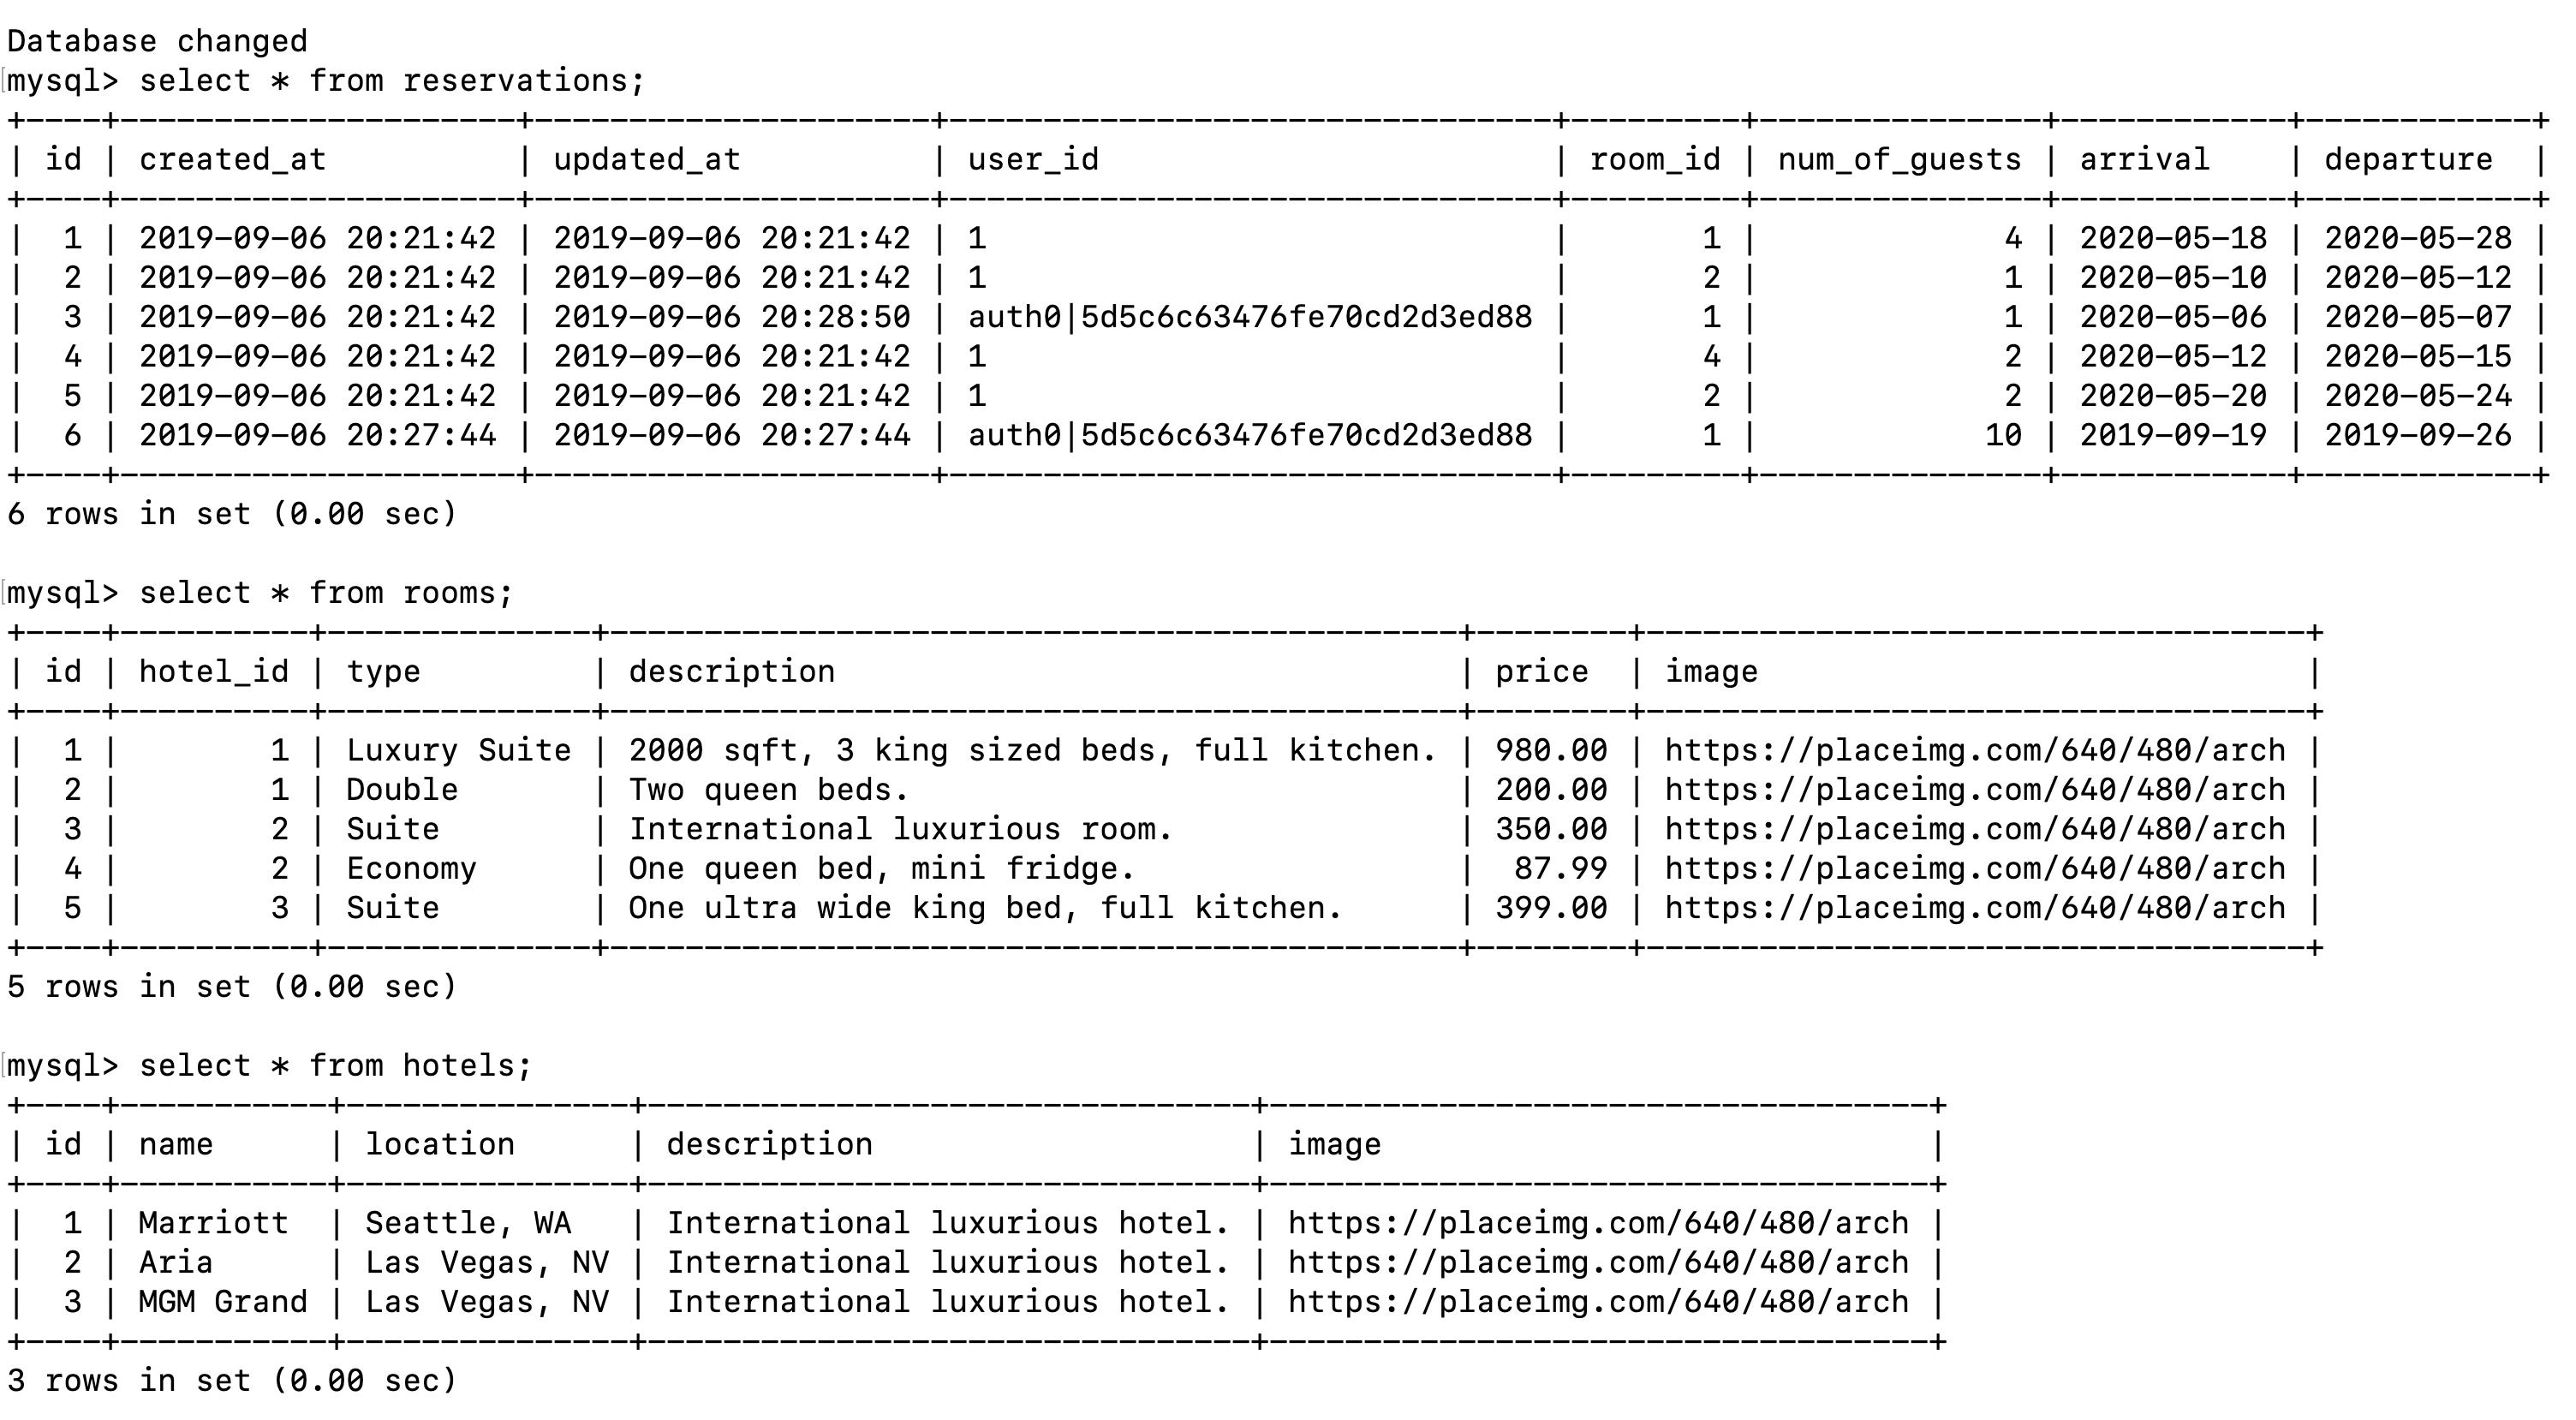
If you’d like to check out the newly created database, stay in the VM and run:
mysql
USE homestead;
SHOW tables;
You can run any MySQL commands you’d like from there as well. SELECT * FROM reservations;, for example, will show you all reservations. Once you’re done playing around just run exit to get out of MySQL and then exit the VM again using exit.
Let’s create the controllers.
Creating the Controllers
This application is going to be using three controllers: ReservationController.php, HotelController.php, and LoginController.php. You’ll create the first two now and the login controller later when you implement authentication.
A quick way to create controllers is using the artisan command:
php artisan make:controller HotelController
php artisan make:controller ReservationController --resource
You should now see two new files in the app/Http/Controllers directory.
Open up the ReservationController and you’ll see several methods listed out for you. These were automatically created by adding the --resource flag at the end of the command. These are the default methods for running CRUD (create, read, update, destroy) requests.
Let’s fill these in now.
Reservation Controller
// app/Http/Controllers/ReservationController.php
<?php

namespace App\Http\Controllers;

use Illuminate\Http\Request;
use Illuminate\Support\Facades\DB;
use App\Models\Reservation;
use App\Models\Hotel;
use App\Models\Room;
class ReservationController extends Controller
{
    /**
     * Display a listing of the reservations.
     *
     * @return \Illuminate\Http\Response
     */
    public function index() {
      $reservations = Reservation::with('room', 'room.hotel')
        ->orderBy('arrival', 'asc')
        ->get();

      return view('dashboard.reservations')->with('reservations', $reservations);
    }

    /**
     * Show the form for creating a new reservation.
     *
     * @return \Illuminate\Http\Response
     */
    public function create($hotel_id)
    {
      $hotelInfo = Hotel::with('rooms')->get()->find($hotel_id);
      return view('dashboard.reservationCreate', compact('hotelInfo'));
    }

    /**
     * Store a newly created reservation in storage.
     *
     * @param  \Illuminate\Http\Request  $request
     * @return \Illuminate\Http\Response
     */
    public function store(Request $request)
    {
      $request->request->add(['user_id' => 1]);
      Reservation::create($request->all());

      return redirect('dashboard/reservations')->with('success', 'Reservation created!');
    }

    /**
     * Display the specified reservation.
     *
     * @param  int  $id
     * @return \Illuminate\Http\Response
     */
    public function show(Reservation $reservation)
    {
      $reservation = Reservation::with('room', 'room.hotel')->get()->find($reservation->id);
      $hotel_id = $reservation->room->hotel_id;
      $hotelInfo = Hotel::with('rooms')->get()->find($hotel_id);

      return view('dashboard.reservationSingle', compact('reservation', 'hotelInfo'));
    }

    /**
     * Show the form for editing the specified reservation.
     *
     * @param  int  $id
     * @return \Illuminate\Http\Response
     */
    public function edit(Reservation $reservation)
    {
      $reservation = Reservation::with('room', 'room.hotel')->get()->find($reservation->id);
      $hotel_id = $reservation->room->hotel_id;
      $hotelInfo = Hotel::with('rooms')->get()->find($hotel_id);

      return view('dashboard.reservationEdit', compact('reservation', 'hotelInfo'));
    }

    /**
     * Update the specified reservation in storage.
     *
     * @param  \Illuminate\Http\Request  $request
     * @param  int  $id
     * @return \Illuminate\Http\Response
     */
    public function update(Request $request, Reservation $reservation)
    {
      $reservation->user_id = 1;

      $reservation->save();
      return redirect('dashboard/reservations')->with('success', 'Successfully updated your reservation!');
    }

    /**
     * Remove the specified reservation from storage.
     *
     * @param  int  $id
     * @return \Illuminate\Http\Response
     */
    public function destroy(Reservation $reservation)
    {
      $reservation = Reservation::find($reservation->id);
      $reservation->delete();

      return redirect('dashboard/reservations')->with('success', 'Successfully deleted your reservation!');
    }
}
Alright, breathe. There’s a lot to unpack here, so let’s break it down method by method.
index() — Display all reservations
public function index() {
    $reservations = Reservation::with('room', 'room.hotel')
    ->orderBy('arrival', 'asc')
    ->get();

    return view('dashboard.reservations')->with('reservations', $reservations);
}
Here we want to get all reservations. We’re using the Reservation model to also grab the rooms for each hotel as well as the user information using with(). This is possible because of those relationships we defined earlier in the Reservation model in app/Models/Reservation.php. Just make sure you’re including the path to every model at the top of the file to take advantage of this, e.g. use App\Models\Reservation, etc.
Next, we’re just ordering them from the most recent arrival date. Then once we have the data, we can return the view that we’ll be making later at resources/views/dashboard/reservations.blade.php. We also use with() here to return a variable $reservations to the view that will hold the reservation data.
create($hotel_id) — Show the form to create a new reservation for a specific hotel
public function create($hotel_id)
{
    $hotelInfo = Hotel::with('rooms')->get()->find($hotel_id);
    return view('dashboard.reservationCreate', compact('hotelInfo'));
}
The create() method is used to return the page that holds the form to create a new reservation. You may have noticed the $id parameter here. Our scenario is a little more complex than just returning a form and it requires this additional parameter.
When a user is creating a reservation, they first look at a list of all hotels on a different page and then select the hotel they want to make a reservation at. Once they click “Make reservation”, this method will be called. So the $hotel_id in this case is the ID of the hotel they selected from that previous page. Each hotel will have different rooms to choose from, so we’re calling on the Hotel model to get all of the rooms associated with that hotel. Then we return them to the view at dashboard/reservationCreate.blade.php along with the hotel information.
store() — Store the new reservation
public function store(Request $request)
{
    $request->request->add(['user_id' => 1]);
    Reservation::create($request->all());

    return redirect('dashboard/reservations')->with('success', 'Reservation created!');
}
After the form to create a new reservation is submitted, the store() method is called. Here, we’re just taking the request and creating a new database entry for it with create(). If the new entry is added successfully, we redirect back to the reservations page with a success message. Ideally you’d want to add form validation here and send back an error message if something goes wrong, but this is fine for our demonstration app.
Right now, we haven’t actually integrated authentication, so we’re manually setting a user with $request->request->add(['user_id' => 1]) just so we don’t get an error. Once we add authentication, we’ll come back and fix this.
show() — Show a single reservation
public function show(Reservation $reservation)
{
    $reservation = Reservation::with('room', 'room.hotel')->get()->find($reservation->id);
    $hotel_id = $reservation->room->hotel_id;
    $hotelInfo = Hotel::with('rooms')->get()->find($hotel_id);

    return view('dashboard.reservationSingle', compact('reservation', 'hotelInfo'));
}
This method will display a single reservation. First, we have to get all data associated with the reservation using with() and then we find the specific reservation by id using find().
We also want to display information about the hotel that this reservation is at. Our reservation and room data only contains the hotel_id, which isn’t helpful to a user, so we use the hotel model to get information about that hotel and then return the reservationSingle view.
edit() — Show the form to edit an existing reservation
public function edit(Reservation $reservation)
{
    $reservation = Reservation::with('room', 'room.hotel')->get()->find($reservation->id);
    $hotel_id = $reservation->room->hotel_id;
    $hotelInfo = Hotel::with('rooms')->get()->find($hotel_id);

    return view('dashboard.reservationEdit', compact('reservation', 'hotelInfo'));
}
This is similar to create(), but this time we’re showing a form to edit the reservation. Therefore, we need to pass in the id of the reservation so that we can grab it and display it back to the user to edit in the form.
update() — Update the edited reservation in the database
public function update(Request $request, Reservation $reservation)
{
    $reservation->user_id = 1;

    $reservation->save();
    return redirect('dashboard/reservations')->with('success', 'Successfully updated your reservation!');
}
This is called after a user submits the form to update an existing reservation. We set the existing reservation values to those that came through in the request, save the reservation with save(), and send them back to the reservations index page.
destroy() — Delete a specific reservation
public function destroy(Reservation $reservation)
{
    $reservation = Reservation::find($reservation->id);
    $reservation->delete();

    return redirect('dashboard/reservations')->with('success', 'Successfully deleted your reservation!');
}
Finally, we have the method used to delete a reservation. We’re just finding that specific reservation in the database and calling the delete() method on it. Then we redirect the user back to the reservations page.
Of course in a real scenario, you’d want to make sure you validate all information coming in from a form, but for a demo application, this is fine.
Hotel Controller
Next, let’s fill out the hotel controller. This one will be quick.
// app/Http/Controllers/HotelController.php
<?php

namespace App\Http\Controllers;

use Illuminate\Http\Request;
use App\Models\Hotel;

class HotelController extends Controller
{
    public function index() {
        $hotels = Hotel::all();
        return view('hotels')->with('hotels', $hotels);
    }
}
The only thing you need to do here is display the list of hotels. This is done by calling all() on the Hotel model.
Creating Views with Blade
Now that you have the routes and controllers set up, it’s time to create some views so you can finally see it all in action! In Laravel, the view files are found in the resources/views folder. Create the folders and files listed below:
cd resources/views
mkdir dashboard partials
cd dashboard
touch reservationCreate.blade.php reservationEdit.blade.php reservationSingle.blade.php reservations.blade.php dashboard.blade.php
cd ../partials
touch nav.blade.php
cd ..
touch home.blade.php hotels.blade.php index.blade.php
You should now have this folder structure:
resources/views
    /dashboard
        - dashboard.blade.php
        - reservationCreate.blade.php
        - reservationEdit.blade.php
        - reservations.blade.php
        - reservationSingle.blade.php
    /partials
        - nav.blade.php
    home.blade.php
    hotels.blade.php
    index.blade.php
Laravel also comes with a default view file, resources/views/welcome.blade.php. Go ahead and delete that now.
We’re going to be using Laravel’s Blade templating engine to build out the views. Blade allows you to create server-side rendered (SSR) applications with Laravel. Your Blade files compile into PHP, which means you can actually use PHP in your views as well!
Blade gives you an easy way to extend layouts (as you’ll see when we build the index file), display data that’s being returned from controllers, add conditionals and loops, and more.
If you’re looking to build a single page application (e.g. React or Angular front-end) with Laravel as the back-end, that’s doable as well, but if not, then using Blade templating is a great option for quick and easy development.
One last note, this application is using Bootstrap 4 for styling. This used to come by default with previous versions of Laravel, but as of 6.0, it has been extracted into its own package and must be added manually.
Head back to the terminal, switch to the root directory, and add the package:
cd ../..
composer require laravel/ui
php artisan ui bootstrap
npm install
npm run dev
In the second to last step, Laravel uses npm to install Bootstrap. Once you have the Bootstrap package, you need to compile the SASS files to CSS with Webpack. Laravel actually provides a special tool to take care of this called Laravel Mix. Luckily this tool does all of the work for you. Simply run, npm run dev, and all of the pre-built Mix tasks will run.
Now let’s fill in the resources/views/index.blade.php file.
<!DOCTYPE html>
<html lang="{{ str_replace('_', '-', app()->getLocale()) }}">
    <head>
        <meta charset="utf-8">
        <meta name="viewport" content="width=device-width, initial-scale=1">
        <title>@yield('title') - Hotel Manager</title>
        <link href="https://fonts.googleapis.com/css?family=Nunito:200,600" rel="stylesheet">
        <link rel="stylesheet" href="{{asset('css/app.css')}}">
    </head>
    <body>
        @include('partials.nav')
        <main>@yield('content')</main>
    </body>
</html>
There are two things here that may be new to you, @yield() and @include().
@yield('title')
This allows you to dynamically set content. For example, we want to use a different title depending on the page. So on the hotels page, you can add @section('title', 'Hotels') and it will render the title as Reservations - Hotel Manager.
We’re also using @yield('content) in the <main> tag, which lets you fill in content dynamically per page instead of repeating this index layout on every single page.
@include('partials.nav)
Using @include() allows you to insert code from somewhere else, similar to the component architecture popular in JavaScript frameworks. In this case, we’re dropping the contents of the partials/nav.blade.php file inside <body></body>. This will persist through every page that extends the index.blade.php layout.
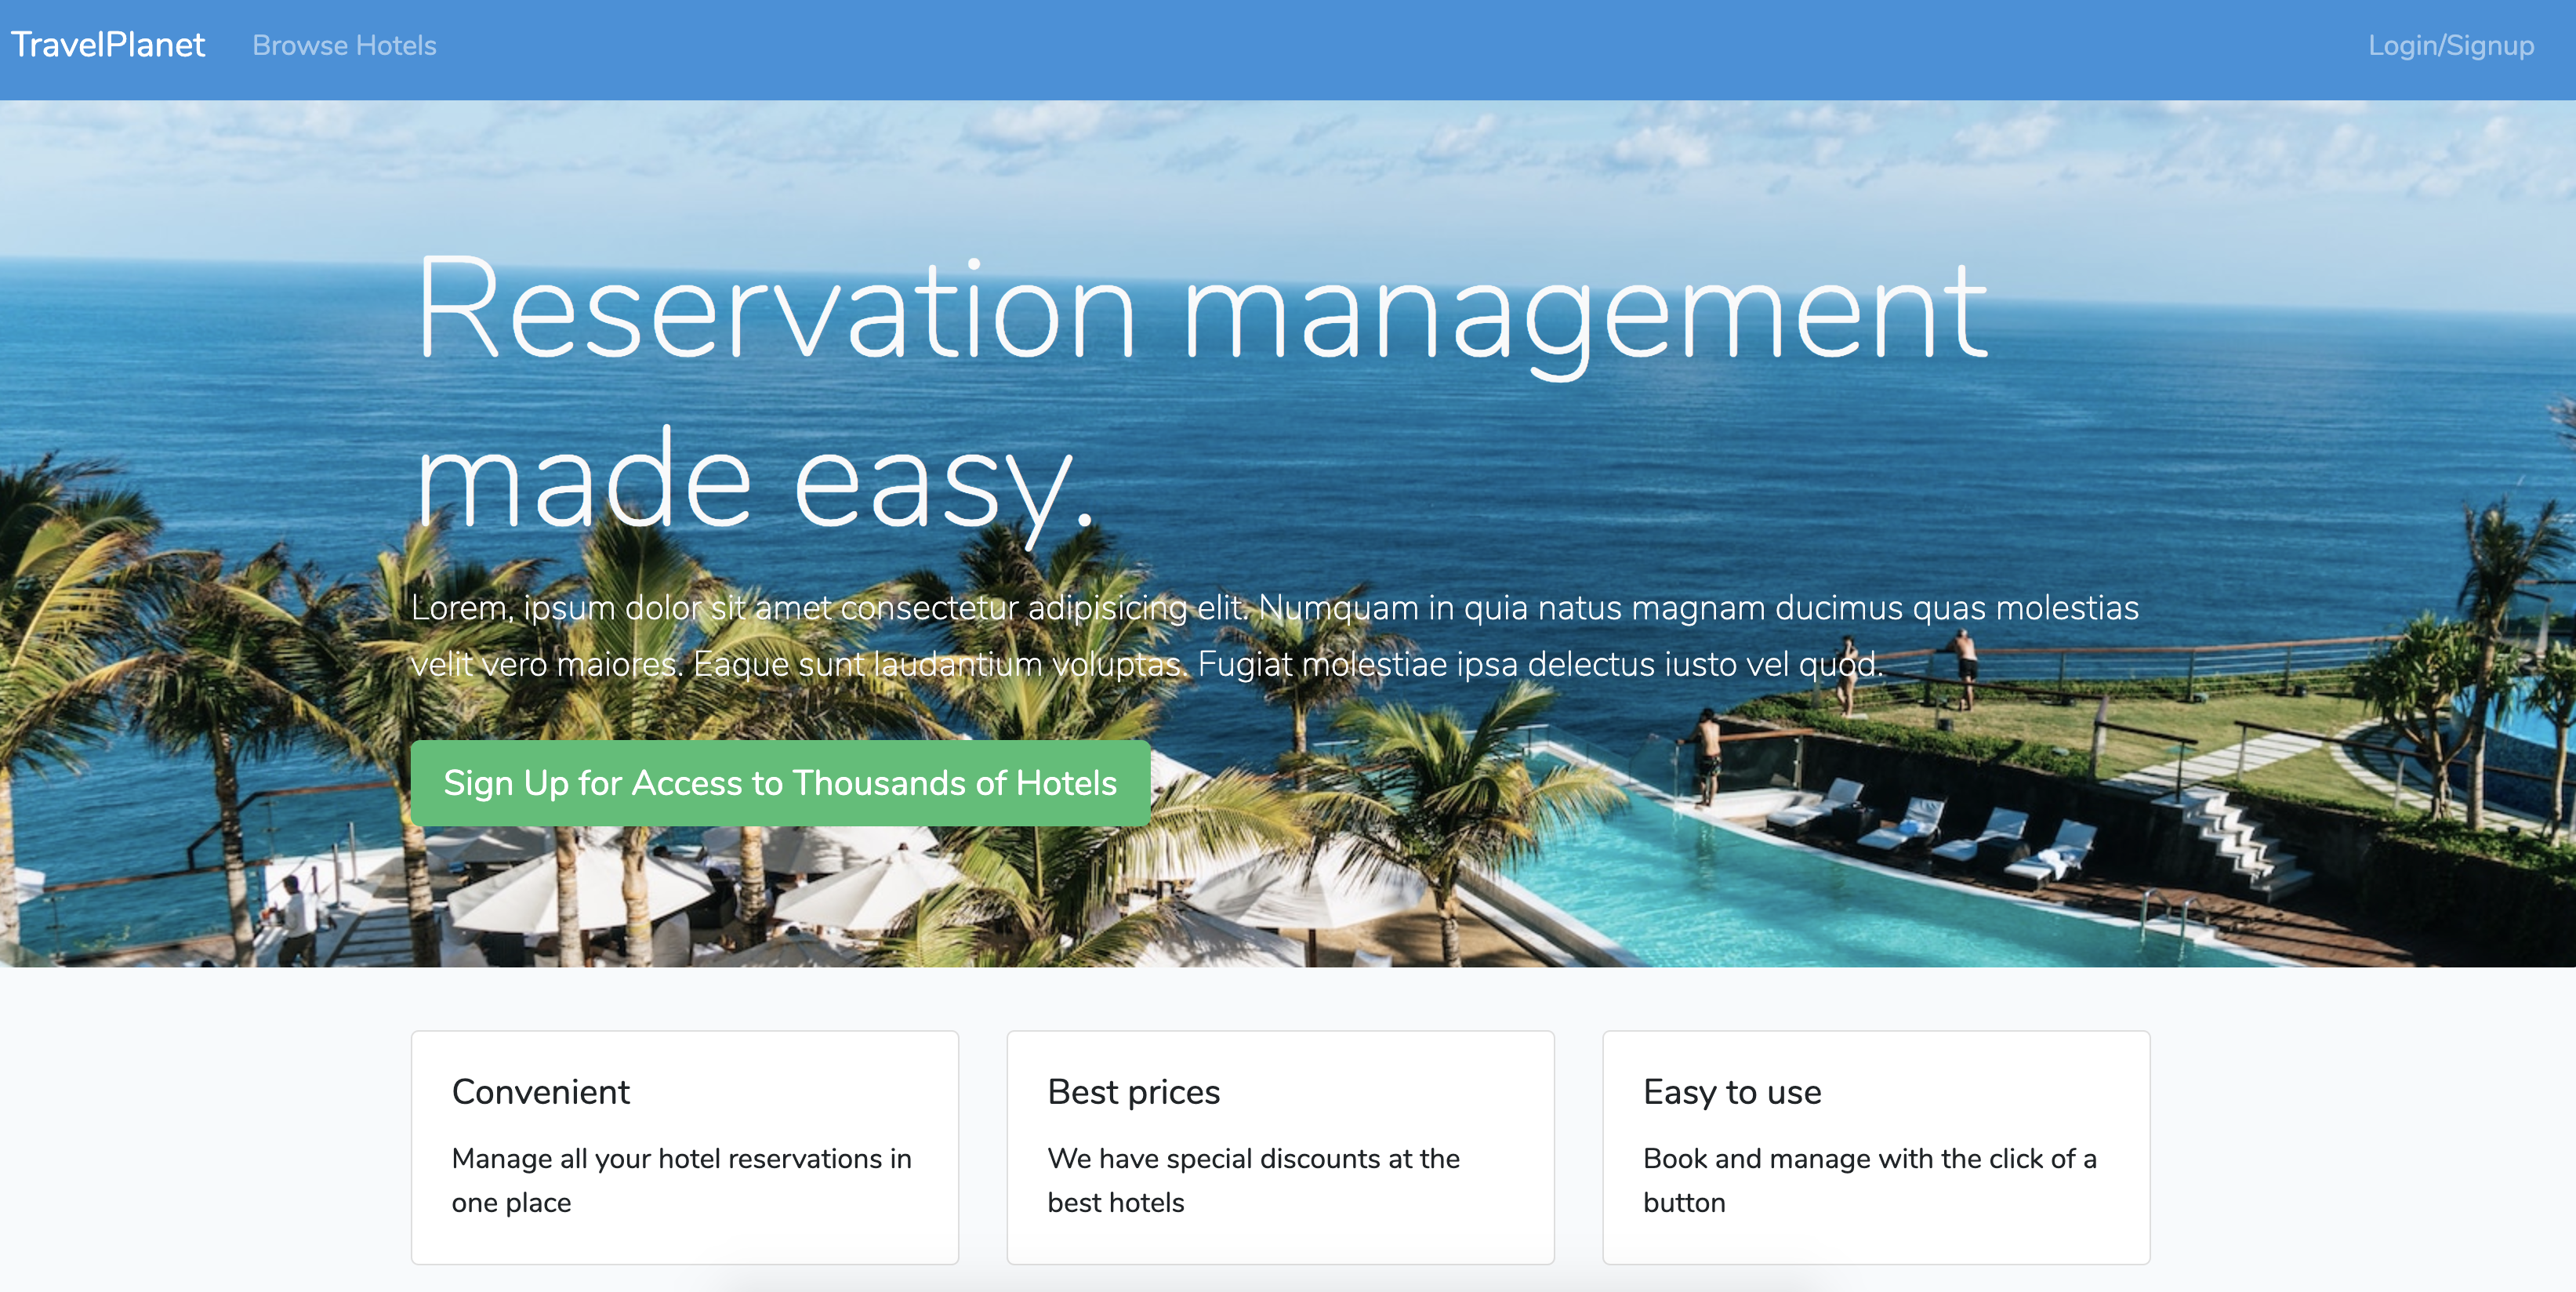
Now that you have some background on Blade elements, let’s fill in the home.blade.php file to see how you can extend index.blade.php.
<!-- resources/views/home.blade.php -->
<!-- Specify that we want to extend the index file -->
@extends('index')
<!-- Set the title content to "Home" -->
@section('title', 'Home')
<!-- Set the "content" section, which will replace "@yield('content')" in the index file we're extending -->
@section('content')
<div class="jumbotron text-light" style="background-image: url('https://source.unsplash.com/1600x900/?nature')">
    <div class="container">
        <h1 class="display-3">Reservation management made easy.</h1>
        <p class="lead">Lorem, ipsum dolor sit amet consectetur adipisicing elit. Numquam in quia natus magnam ducimus quas molestias velit vero maiores. Eaque sunt laudantium voluptas. Fugiat molestiae ipsa delectus iusto vel quod.</p>
        <a href="/login" class="btn btn-success btn-lg my-2">Sign Up for Access to Thousands of Hotels</a>
    </div>
</div>
<div class="container">
    <div class="row">
        <div class="col-sm-4">
            <div class="card">
                <div class="card-body">
                    <h5 class="card-title">Convenient</h5>
                    <p class="card-text">Manage all your hotel reservations in one place</p>
                </div>
            </div>
        </div>
        <div class="col-sm-4">
            <div class="card">
                <div class="card-body">
                    <h5 class="card-title">Best prices</h5>
                    <p class="card-text">We have special discounts at the best hotels</p>
                </div>
            </div>
        </div>
        <div class="col-sm-4">
            <div class="card">
                <div class="card-body">
                    <h5 class="card-title">Easy to use</h5>
                    <p class="card-text">Book and manage with the click of a button</p>
                </div>
            </div>
        </div>
    </div>
</div>
@endsection
You can see the use of @yield() and @section() in action here! Now let’s add in the nav. Add the following into partials/nav.blade.php:
<nav class="navbar navbar-expand navbar-dark bg-primary">
    <div class="navbar-nav w-100">
        <a class="navbar-brand text-color" href="/">TravelPlanet</a>
        <a class="nav-item nav-link" href="/hotels">Browse Hotels</a>
    </div>
</nav>
Later on we’ll add a login/logout link, but for now this is fine. Next, paste this into the hotels.blade.php file:
<!-- resources/views/hotels.blade.php -->
@extends('index')
@section('title', 'Hotels')
@section('content')
<div class="container my-5">
    <div class="row">
        <!-- Loop through hotels returned from controller -->
        @foreach ($hotels as $hotel)
        <div class="col-sm-4">
            <div class="card mb-3">
                <div style="background-image:url('{{ $hotel->image }}');height:300px;background-size:cover;" class="img-fluid" alt="Front of hotel"></div>
                <div class="card-body">
                    <h5 class="card-title">{{ $hotel->name }}</h5>
                    <small class="text-muted">{{ $hotel->location }}</small>
                    <p class="card-text">{{ $hotel->description }}</p>
                    <a href="/dashboard/reservations/create/{{ $hotel->id }}" class="btn btn-primary">Book Now</a>
                </div>
            </div>
        </div>
        @endforeach
    </div>
</div>
@endsection
Back in the HotelController, you returned a variable called $hotels to the view, which gave you access to all the hotels in the database. Now you can just loop through that data here to display everything. Pretty cool!
The rest of the views will be for dashboard pages. Open up dashboard.blade.php and paste in the following:
<!-- resources/views/dashboard/dashboard.blade.php -->
@extends('index')
@section('title', 'Dashboard')
@section('content')
<div class="container text-center my-5">
    <div class="row">
        <div class="col-sm-6">
            <div class="card">
            <div class="card-body">
                <h4 class="card-title">Manage your Reservations</h4>
                <p class="card-text">Modify your current reservations.</p>
                <a href="/dashboard/reservations" class="btn btn-primary">My Reservations</a>
            </div>
            </div>
        </div>
        <div class="col-sm-6">
            <div class="card">
            <div class="card-body">
                <h4 class="card-title">Find a Room</h4>
                <p class="card-text">Browse our catalog of top-rated hotels.</p>
                <a href="/hotels" class="btn btn-primary">Our Hotels</a>
            </div>
            </div>
        </div>
    </div>
</div>
@endsection
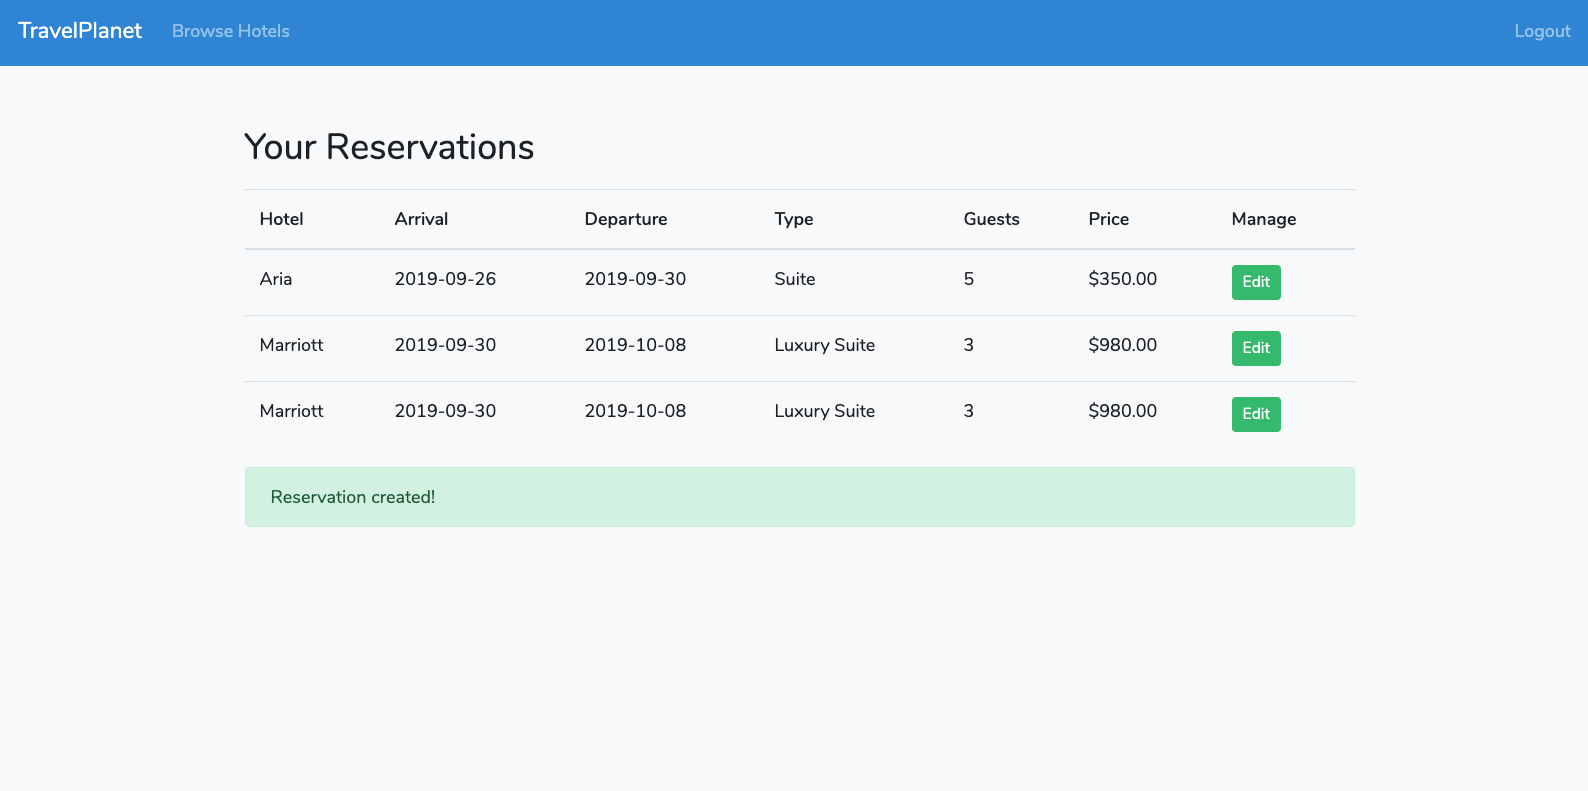
Next, we’ll handle the page to display all reservations, dashboard/reservations.blade.php.
@extends('index')
@section('title', 'Reservations')
@section('content')
<div class="container mt-5">
    <h2>Your Reservations</h2>
    <table class="table mt-3">
        <thead>
            <tr>
            <th scope="col">Hotel</th>
            <th scope="col">Arrival</th>
            <th scope="col">Departure</th>
            <th scope="col">Type</th>
            <th scope="col">Guests</th>
            <th scope="col">Price</th>
            <th scope="col">Manage</th>
            </tr>
        </thead>
        <tbody>
            @foreach ($reservations as $reservation)
            <tr>
                <td>{{ $reservation->room->hotel['name'] }}</td>
                <td>{{ $reservation->arrival }}</td>
                <td>{{ $reservation->departure }}</td>
                <td>{{ $reservation->room['type'] }}</td>
                <td>{{ $reservation->num_of_guests }}</td>
                <td>${{ $reservation->room['price'] }}</td>
            <td><a href="/dashboard/reservations/{{ $reservation->id }}/edit" class="btn btn-sm btn-success">Edit</a></td>
            </tr>
            @endforeach
        </tbody>
    </table>
    @if(!empty(Session::get('success')))
        <div class="alert alert-success"> {{ Session::get('success') }}</div>
    @endif
    @if(!empty(Session::get('error')))
        <div class="alert alert-danger"> {{ Session::get('error') }}</div>
    @endif
</div>
@endsection
Next is the page to show a single reservation, reservationSingle.blade.php.
<!-- resources/views/dashboard/dashboard.blade.php -->
@extends('index')
@section('title', 'Edit Reservation')
@section('content')
<div class="container">
    <div class="card my-5">
        <div class="card-header">
            <h2>You're all booked for the {{ $hotelInfo->name }} in {{ $hotelInfo->location }}!</h2>
        </div>
        <div class="card-body">
            <div class="card-body">
                <div class="row">
                    <div class="col-sm-6">
                        <img src="{{ $hotelInfo->image }}" class="img-fluid" alt="Front of hotel">
                    </div>
                    <div class="col-sm-6">
                        <h3 class="card-title">
                            {{ $hotelInfo->name }} - <small>{{ $hotelInfo->location }}</small>
                        </h3>
                        <p class="card-text">{{ $hotelInfo->description }}</p>
                        <p class="card-text"><strong>Arrival: </strong>{{ $reservation->arrival }}</p>
                        <p class="card-text"><strong>Departure: </strong>{{ $reservation->departure }}</p>
                        <p class="card-text"><strong>Room: </strong>{{ $reservation->room['type'] }}</p>
                        <p class="card-text"><strong>Guests: </strong>{{ $reservation->num_of_guests }}</p>
                        <p class="card-text"><strong>Price: </strong>${{ $reservation->room['price'] }}</p>
                    </div>
                </div>
                <div class="text-center mt-3">
                    <a href="/dashboard/reservations/{{ $reservation->id }}/edit" class="btn btn-lg btn-success">Edit this reservation</a>
                    <a href="/dashboard/reservations/{{ $reservation->id }}/delete" class="btn btn-lg btn-danger">Delete</a>
                </div>
            </div>
        </div>
    </div>
</div>
@endsection
This includes the buttons to edit and delete the specific reservation. Let’s fill out that edit page now.
Open up reservationEdit.blade.php.
<!-- resources/views/dashboard/reservationEdit.blade.php -->
@extends('index')
@section('title', 'Edit Reservation')
@section('content')
<div class="container">
    <div class="card my-5">
        <div class="card-header">
            <h2>{{ $hotelInfo->name }} - <small class="text-muted">{{ $hotelInfo->location }}</small></h2>
        </div>
        <div class="card-body">
            <h5 class="card-title"></h5>
            <p class="card-text">Book your stay now at the most magnificent resort in the world!</p>
            <form action="{{ route('reservations.update', $reservation->id) }}" method="POST">
                @csrf
                @method('PUT')
                <div class="row">
                    <div class="col-sm-8">
                        <div class="form-group">
                            <label for="room">Room Type</label>
                            <select class="form-control" name="room_id" value="{{ old('room_id', $reservation->room_id) }}">
                                @foreach ($hotelInfo->rooms as $option)
                                    <option value="{{$option->id}}">{{ $option->type }} - ${{ $option->price }}</option>
                                @endforeach
                            </select>
                        </div>
                    </div>
                    <div class="col-sm-4">
                        <div class="form-group">
                            <label for="guests">Number of guests</label>
                            <input class="form-control" name="num_of_guests" value="{{ old('num_of_guests', $reservation->num_of_guests) }}">
                        </div>
                    </div>
                    <div class="col-sm-6">
                        <div class="form-group">
                            <label for="arrival">Arrival</label>
                            <input type="date" class="form-control" name="arrival" placeholder="03/21/2020" value="{{ old('arrival', $reservation->arrival) }}">
                        </div>
                    </div>
                    <div class="col-sm-6">
                        <div class="form-group">
                            <label for="departure">Departure</label>
                            <input type="date" class="form-control" name="departure" placeholder="03/23/2020" value="{{ old('departure', $reservation->departure) }}">
                        </div>
                    </div>
                </div>
                <button type="submit" class="btn btn-lg btn-primary">Submit</button>
            </form>
        </div>
    </div>
    <form action="{{ route('reservations.destroy', $reservation->id) }}" method="POST">
        @method('DELETE')
        @csrf
        <p class="text-right">
            <button type="submit" class="btn btn-sm text-danger">Delete reservation</button>
        </p>
    </form>
</div>
@endsection
Alright, this one is a little more complicated than just displaying data like the previous files, so let’s dig a little deeper.
<form action="{{ route('reservations.update', $reservation->id) }}" method="POST">
    @csrf
    @method('PUT')
    ...
</form>
This is the form we’re using stripped of the form elements. For the action field, it’s calling the route named reservations.update and passing it the ID for this reservation.
Then we’re adding the hidden @csrf token field which Laravel will automatically handle. This will protect the application from cross-site request forgery.
Next, we’re including @method() to specify that this will be a PUT request.
Since we’re editing an existing reservation, we need to fill the form in with that existing information so that the user can decide what they want to change.
<input type="date" class="form-control" name="arrival" placeholder="03/21/2020" value="{{ old('arrival', $reservation->arrival) }}">
We’re using the old() helper here, which allows us to pass in the name of the value and the value we want to use as the default.
Finally, we added a button to delete the reservation.
<form action="{{ route('reservations.destroy', $reservation->id) }}" method="POST">
    @method('DELETE')
    @csrf
    <p class="text-right">
        <button type="submit" class="btn btn-sm text-danger">Delete reservation</button>
    </p>
</form>
Here we’re using a similar form and action as above, but this time it calls the destroy() method.
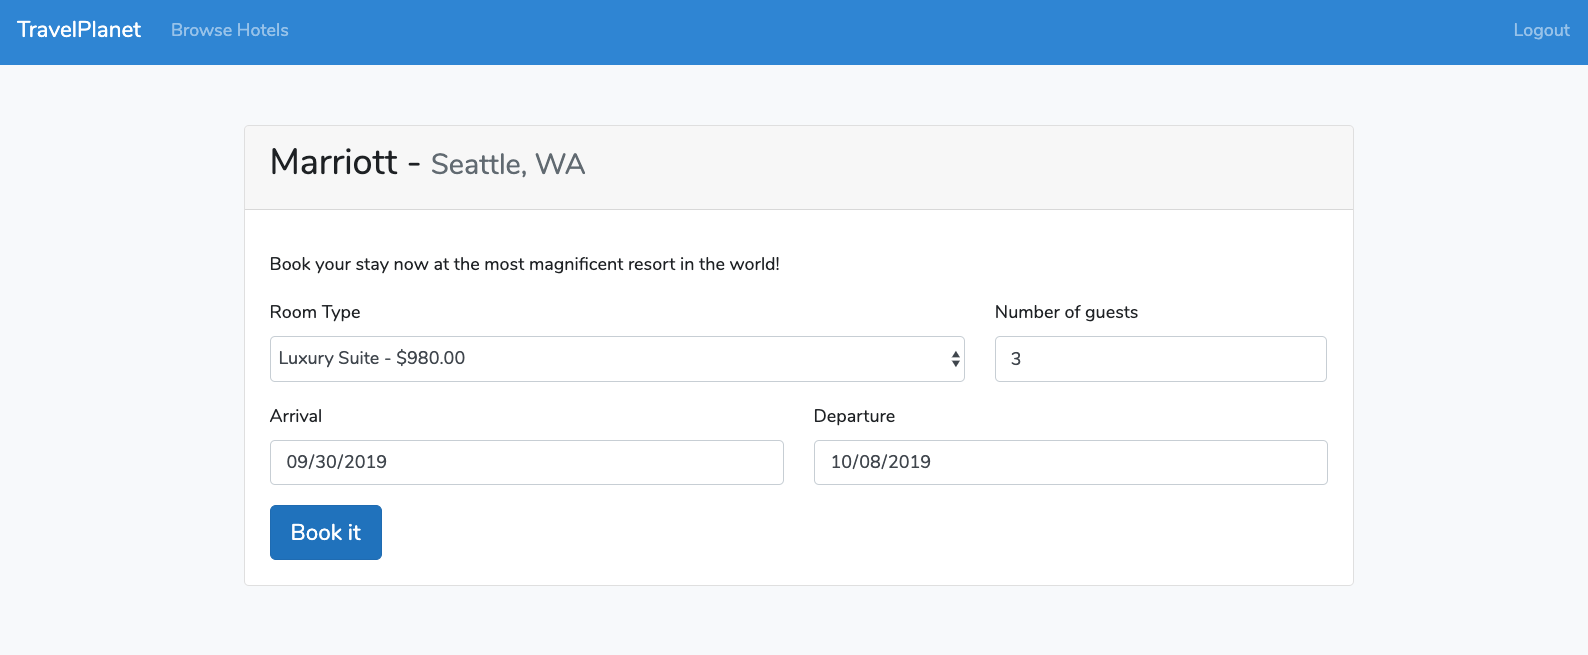
Next up open the reservationCreate.blade.php file, which will hold the form to create a new reservation.
<!-- resources/views/dashboard/reservationCreate.blade.php -->
@extends('index')
@section('title', 'Create reservation')
@section('content')
<div class="container my-5">
    <div class="card">
        <div class="card-header">
            <h2>{{ $hotelInfo->name }} - <small class="text-muted">{{ $hotelInfo->location }}</small></h2>
        </div>
        <div class="card-body">
            <h5 class="card-title"></h5>
            <p class="card-text">Book your stay now at the most magnificent resort in the world!</p>
            <form action="{{ route('reservations.store') }}" method="POST">
                @csrf
                <div class="row">
                    <div class="col-sm-8">
                        <div class="form-group">
                            <label for="room">Room Type</label>
                            <select class="form-control" name="room_id">
                                @foreach ($hotelInfo->rooms as $option)
                                    <option value="{{$option->id}}">{{ $option->type }} - ${{ $option->price }}</option>
                                @endforeach
                            </select>
                        </div>
                    </div>
                    <div class="col-sm-4">
                        <div class="form-group">
                            <label for="guests">Number of guests</label>
                            <input class="form-control" name="num_of_guests" placeholder="1">
                        </div>
                    </div>
                    <div class="col-sm-6">
                        <div class="form-group">
                            <label for="arrival">Arrival</label>
                            <input type="date" class="form-control" name="arrival" placeholder="03/21/2020">
                        </div>
                    </div>
                    <div class="col-sm-6">
                        <div class="form-group">
                            <label for="departure">Departure</label>
                            <input type="date" class="form-control" name="departure" placeholder="03/23/2020">
                        </div>
                    </div>
                </div>
                <button type="submit" class="btn btn-lg btn-primary">Book it</button>
            </form>
        </div>
    </div>
</div>
@endsection
This is more or less the same as the view for editing a post, except here the form action calls the create() method. You don’t need to fill any old values since this is a new reservation.
Because these two files are similar you could use conditionals and combine them into one, but for the sake of clarity in this article, we’ll just keep them separate.
Adding Authentication to Your Laravel 6.0 Application
It’s finally time to add authentication! In the app’s current state all reservations are public, so anyone can come in and create or modify a reservation. We need to add authentication to the application so we know who is logging in and can limit what they can see and do.
Auth0 vs Laravel’s Built-in Authentication
Laravel comes with out-of-the-box authentication that can be set up with just a bit of configuration. So why use Auth0 instead?
Benefits of using Auth0
Auth0 comes with all of these options, most of which you can enable with just a click from the dashboard:
- Universal login from a centralized authorization server
- Social login (Facebook, Twitter, GitHub, etc.)
- Easily manage users from the dashboard
- Multi-factor authentication
- Easy role management
- Brute force protection
- Breached password detection
- Account linking for users who need to merge two separate accounts
- Option to block certain users
- Advanced user login analytics
- Extend Auth0 capabilities with custom rules
- And much more!
Perhaps the greatest benefit of all is being able to shift the stress of securing your application against the never-ending threat of attacks onto someone else! With the free Auth0 plan, you can have up to 7000 free active users and unlimited logins.
Auth0 Session Management
Here is what the general login flow will look like:
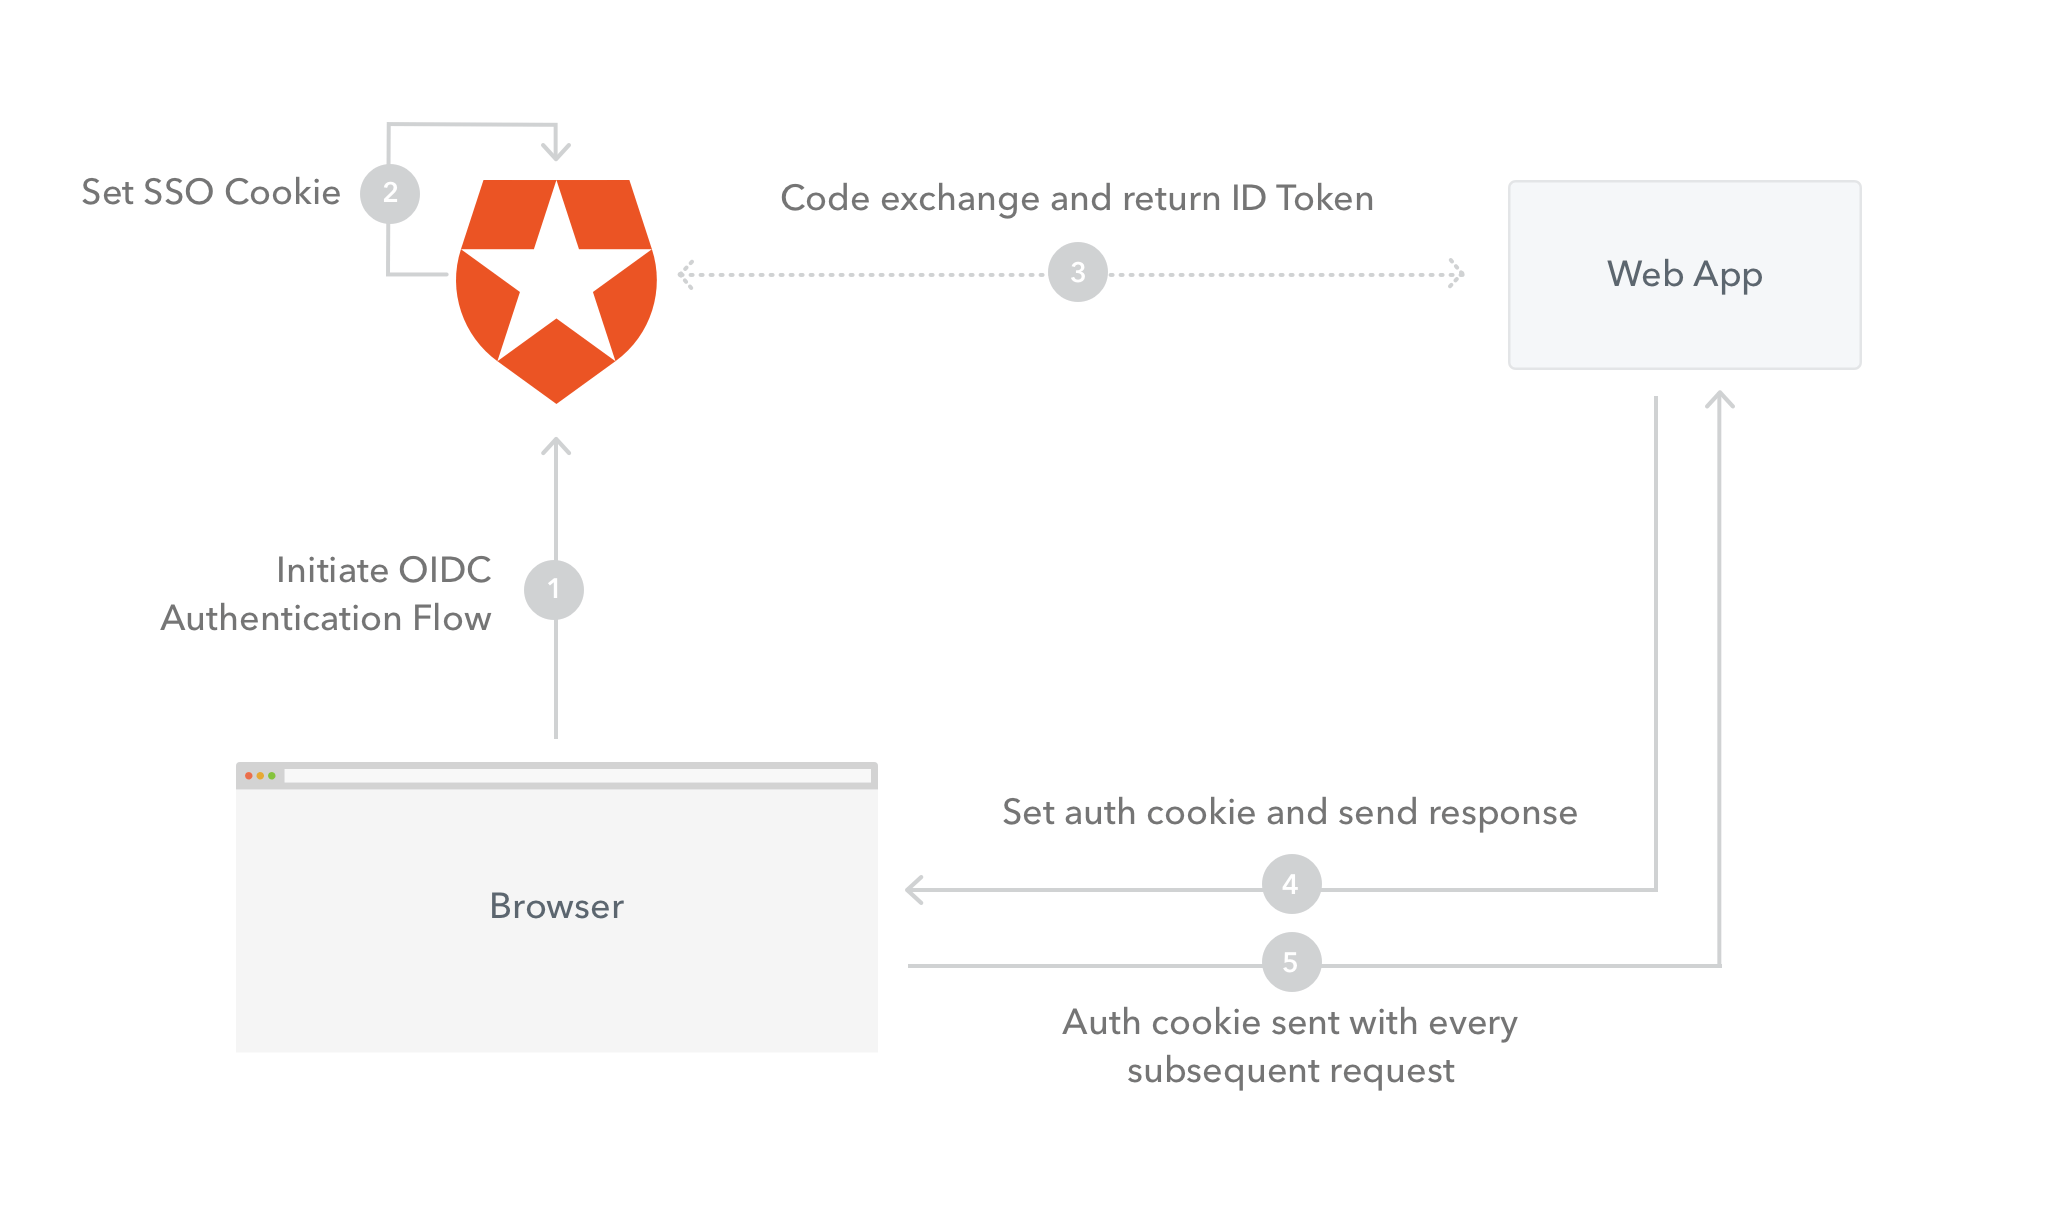
Except in our case, Laravel is storing the session data in a file instead of a cookie (see config/session.php).
Once a user successfully logs in, you’ll store their Auth0 ID token (auth0_id_token) and Auth0 user information (auth0_user) in the session.
You can check the session data at any time by pasting <?php dd(Session()->all()); ?> into any view and refreshing the page.
Remember this is just to test while you’re learning, so make sure to delete it from your application afterward!
Signing up for Auth0
Let’s see how easy it is to integrate Auth0 into your Laravel 6.0 application. Go ahead and sign up for a free Auth0 account now.
Once you’ve signed up, click on “Applications” in the dashboard. There should be a default application that was created for you, but if not just go ahead and create one with type “Regular Web Application”.
Dashboard configuration
The first thing you need to do is configure the valid callback URLs and logout URLs in the dashboard.
Click on “Applications” in the sidebar menu and then select the Application you just created (or the default one). Next, click on “Settings”.
In “Allowed callback URLs” paste in your local development URL with /auth0/callback appended to it. This should be something like http://homestead.test/auth0/callback or http://localhost:8000/auth0/callback. Just make sure it matches exactly what your development URL is, no trailing slashes.
Next, paste in your exact development URL in the “Logout URLs”, i.e. http://homestead.test or http://localhost:8000.
Install the Auth0 PHP plugin
Now go back to your terminal and install the Auth0 plugin and dependencies.
composer require auth0/login:"~5.0"
This will install the Auth0 PHP plugin and Auth0 Laravel plugin.
Finishing up Auth0 integration
Next, open up the config/app.php file and add the Auth0 login service provider to the list of providers:
// ...
'providers' => [
    // ...
    Auth0\Login\LoginServiceProvider::class,
];
Scroll down in that same file until you find the aliases array and then add the Auth0 facade:
// ...
'aliases' => [
    // ...
    'Auth0' => Auth0\Login\Facade\Auth0::class,
];
Now you’ll bind the Auth0UserRepository class that provides the User model every time a user is logged in or a JWT is decoded. Open up app/Providers/AppServiceProvider.php and add the following under register():
    // ...
    class AppServiceProvider extends ServiceProvider
    {
        // ...
        public function register()
        {
            $this->app->bind(
                \Auth0\Login\Contract\Auth0UserRepository::class,
                \Auth0\Login\Repository\Auth0UserRepository::class
            );
        }
    }
Now head back to the terminal to publish the plugin configuration. You’ll run the following command and then it will ask you which vendor file you’d like to publish.
php artisan vendor:publish
Select Auth0\Login\LoginServiceProvider from the resulting list, which will create the config/laravel-auth0.php configuration file.
Open up this file and you’ll see some Auth0 related settings. A few of these need to be filled in, but you want to keep them out of the repository since this is sensitive information. This is done using the .env file.
Open up .env and add the following:
AUTH0_DOMAIN=your-auth0-domain.auth0.com
AUTH0_CLIENT_ID=your-client-id
AUTH0_CLIENT_SECRET=your-client-secret
All of these values can be found in your Auth0 dashboard under “Applications” > “Your Application” > “Settings”.
While you’re here, take a look at what’s set for APP_URL. It should match the URL that you’ve been using for your application, which is most likely http://homestead.test or http://localhost:8000.
Integrate Auth0 with Laravel authentication system
Next, the Auth0 plugin needs to be integrated with the Laravel authentication system.
The Laravel authentication system needs a User Object from the User Provider so that it can know how user data is structured and where it is stored. This is configured in config/auth.php. The default provider is Eloquent, which will persist the User model in the database using the Eloquent ORM. For this application, we’re not using the default User model.
Because our user data will be stored in Auth0’s database, the Auth0 plugin comes with its own authentication driver that defines the user based on a standardized user profile instead of Laravel’s User model. This driver does not persist the user in your database. If your application does need to persist users, you can skip this and implement the instructions in the documentation.
To switch out the user driver, open up config/auth.php and change it to this:
// ...
'providers' => [
    'users' => [
        'driver' => 'auth0',
    ],
],
Setup authentication routes
Awesome! Auth0 is now integrated into your Laravel 6.0 application! Now let’s go back and review those authentication-related routes that were added earlier.
Open up routes/web.php and find:
// ...
Route::get( '/auth0/callback', '\Auth0\Login\Auth0Controller@callback' )->name( 'auth0-callback' );
Route::get( '/login', 'Auth\Auth0IndexController@login' )->name( 'login' );
Route::get( '/logout', 'Auth\Auth0IndexController@logout' )->name( 'logout' )->middleware('auth');
This first route is using the Auth0Controller provided by the plugin that was installed earlier to handle the callback. If you’d like to take a look at the “magic” occurring here, you can find the controller in vendor/auth0/login/src/controllers. The rest of the Auth0 Laravel files lie in vendor/auth0/login/src/Auth/Login.
/**
    * Callback action that should be called by auth0, logs the user in.
    */
public function callback()
{
    // Get a handle of the Auth0 service (we don't know if it has an alias)
    $service = \App::make('auth0');

    // Try to get the user information
    $profile = $service->getUser();

    // Get the user related to the profile
    $auth0User = $this->userRepository->getUserByUserInfo($profile);

    if ($auth0User) {
        // If we have a user, we are going to log them in, but if
        // there is an onLogin defined we need to allow the Laravel developer
        // to implement the user as they want an also let them store it.
        if ($service->hasOnLogin()) {
            $user = $service->callOnLogin($auth0User);
        } else {
            // If not, the user will be fine
            $user = $auth0User;
        }
        \Auth::login($user, $service->rememberUser());
    }

    return \Redirect::intended('/');
}
The next two routes handle the actual login and logout.
Route::get( '/login', 'Auth\Auth0IndexController@login' )->name( 'login' );
Route::get( '/logout', 'Auth\Auth0IndexController@logout' )->name( 'logout' )->middleware('auth');
They use a controller called Auth0IndexController, which you need to create now.
php artisan make:controller Auth/Auth0IndexController
Now open up app/Http/Controllers/Auth/Auth0IndexController.php and replace it with the following:
<?php

namespace App\Http\Controllers\Auth;

use Illuminate\Http\Request;
use App\Http\Controllers\Controller;

class Auth0IndexController extends Controller
{
  /**
    * Redirect to the Auth0 hosted login page
    *
    * @return mixed
    */
  public function login()
  {
    $authorize_params = [
      'scope' => 'openid profile email',
    ];
    return \App::make('auth0')->login(null, null, $authorize_params);
  }

  /**
    * Log out of Auth0
    *
    * @return mixed
    */
  public function logout()
  {
    \Auth::logout();
    $logoutUrl = sprintf(
      'https://%s/v2/logout?client_id=%s&returnTo=%s',
      env('AUTH0_DOMAIN'),
      env('AUTH0_CLIENT_ID'),
      env('APP_URL'));
    return  \Redirect::intended($logoutUrl);
  }
}
Then the login() function will send users to Auth0 to enter in their credentials. You’ll see this in action soon.
The scopes being requested are:
openid — to indicate that the application intends to use OIDC to verify the user’s identity
profile — returns name, nickname, and picture
email — returns email and if the email is verified
The logout() function uses those environment variables you set earlier to hit an Auth0 logout URL, redirect back to the logout URL you set in the dashboard, and clear all session data for the user.
Configure the views
Finally, you just need to go back and add the login links to the navigation. Open up resources/views/partials/nav.blade.php and replace it with this:
<nav class="navbar navbar-expand navbar-dark bg-primary">
  <div class="navbar-nav w-100">
    <a class="navbar-brand text-color" href="/">TravelPlanet</a>
    <a class="nav-item nav-link" href="/hotels">Browse Hotels</a>
    @if (Route::has('login'))
      <div class="ml-auto">
        @auth
          <a class="nav-item nav-link" href="{{ route('logout') }}">Logout</a>
        @else
          <a class="nav-item nav-link" href="{{ route('login') }}">Login/Signup</a>
        @endauth
      </div>
    @endif
  </div>
</nav>
If the user is logged in, they’ll see the logout button and if not, they’ll see the login button.
The button on the homepage also needs to be updated. Open up resources/views/home.blade.php and replace the jumbotron with:
<div class="jumbotron text-light" style="background-image: url('https://source.unsplash.com/1800x900/?beach')">
<div class="container">
@if(Auth::user())
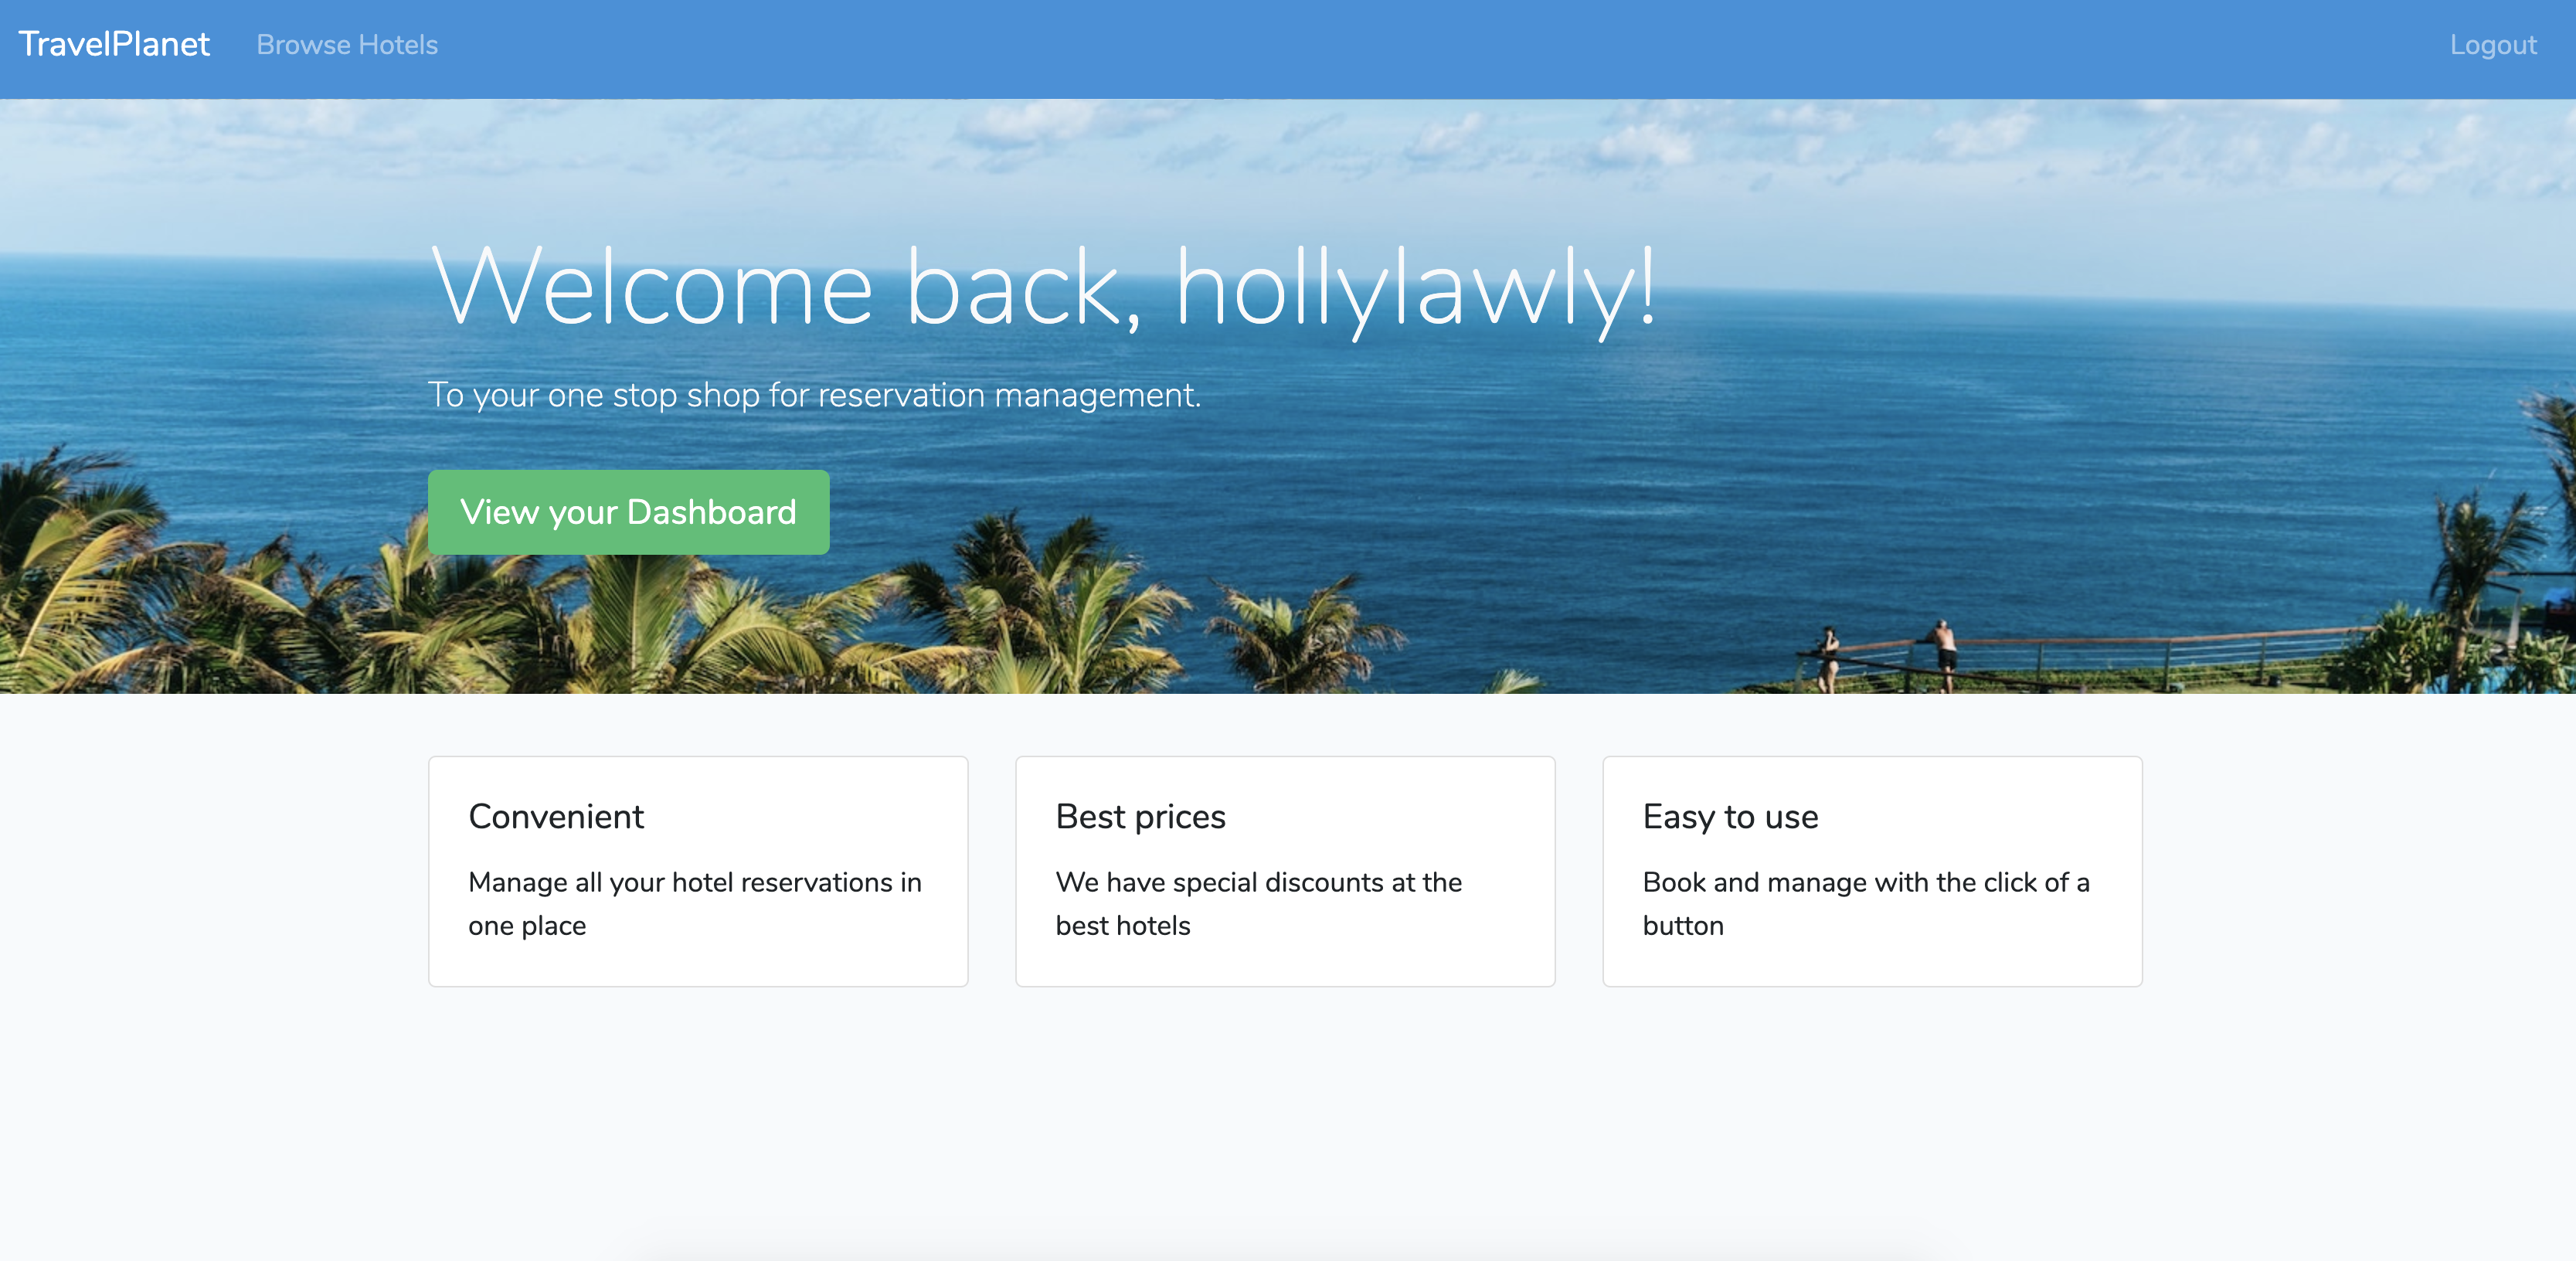
<h1 class="display-4">Welcome back, {{ Auth::user()->nickname}}!</h1>
<p class="lead">To your one stop shop for reservation management.</p>
<a href="/dashboard" class="btn btn-success btn-lg my-2">View your Dashboard</a>
@else
<h1 class="display-3">Reservation management made easy.</h1>
<p class="lead">Lorem, ipsum dolor sit amet consectetur adipisicing elit. Numquam in quia natus magnam ducimus quas molestias velit vero maiores. Eaque sunt laudantium voluptas. Fugiat molestiae ipsa delectus iusto vel quod.</p>
<a href="/login" class="btn btn-success btn-lg my-2">Sign Up for Access to Thousands of Hotels</a>
@endif
</div>
</div>
Now when a user is logged in, they’ll see a welcome message with their name!
Application-specific integration
Let’s test everything to make sure it works. Head to the homepage and click “Login”. You’ll be redirected to the Auth0 Application Domain that you setup in the Auth0 dashboard. This page holds the login/signup form. Go ahead and sign up here.
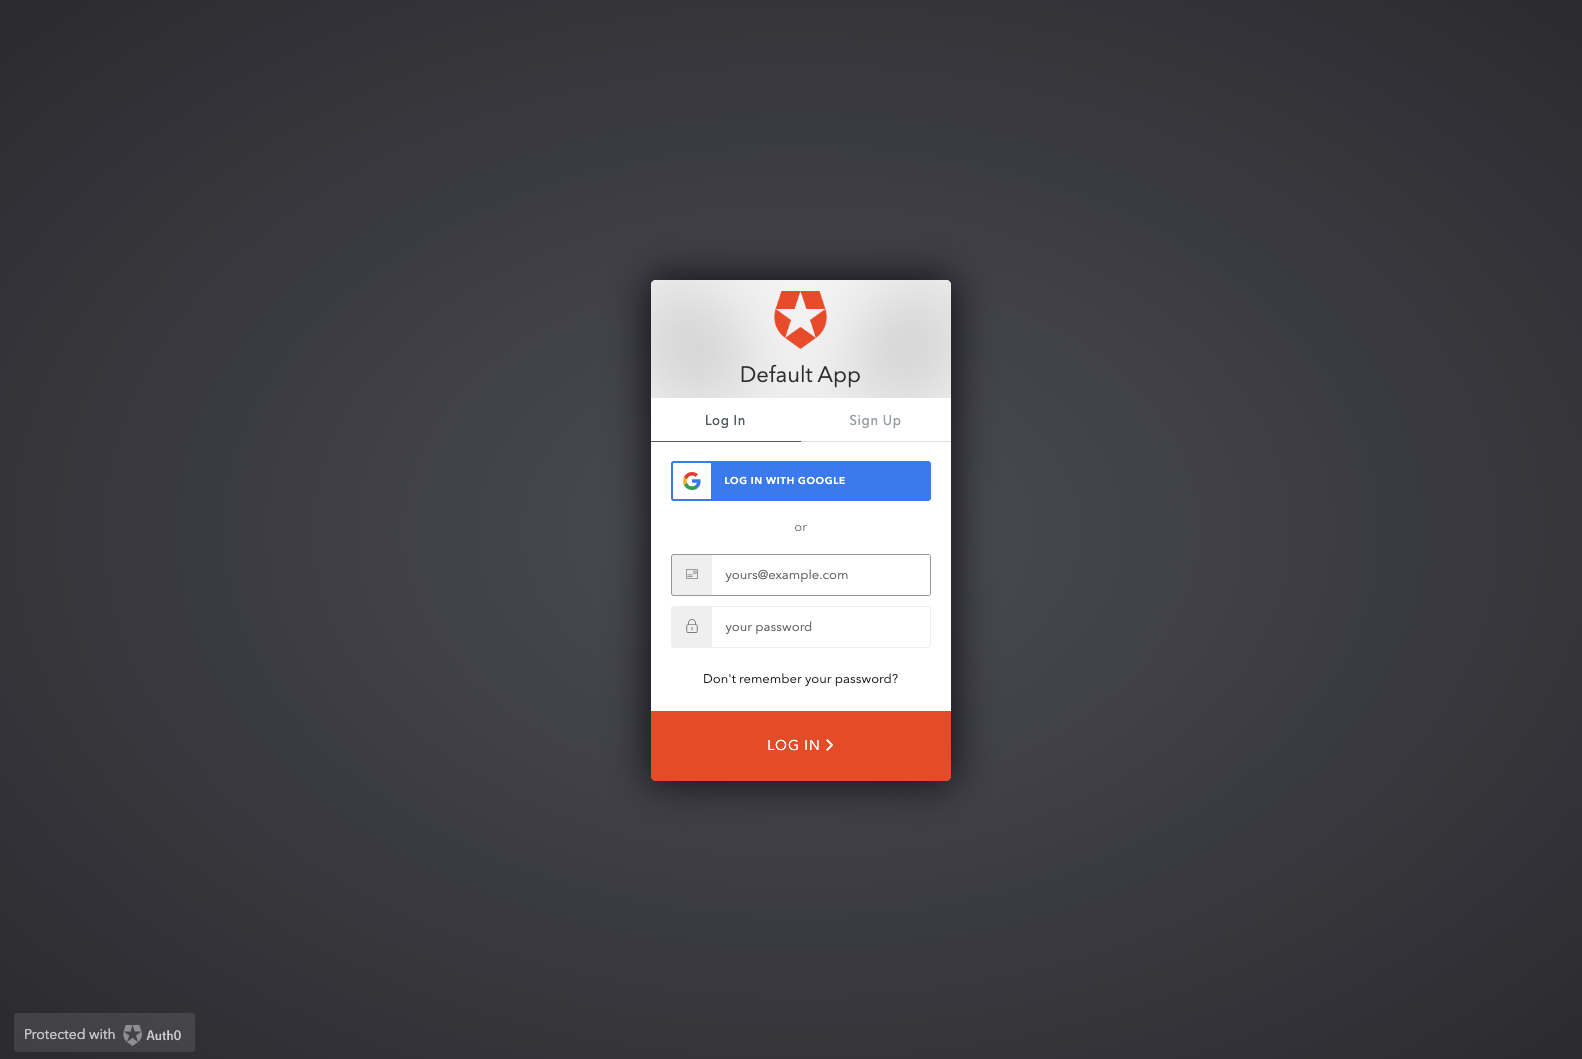
Once you have signed up, you’ll be redirected back to the homepage. You should now see a welcome message and a logout button. If you ran into any problems in the process, please reach out in the comments below!
Note:
You can see all of the user information you’ll get back with getUserInfo().
To test this, just dump the user data onto the homepage. Paste this anywhere in home.blade.php:
<?php dd(\Auth::user()->getUserInfo()); ?>
You should see something like this:

This method will return all of the profile data for a logged in user. Make sure to delete this once you’re done!
Now there are two things left to do to make this a fully functional application.
-
Figure out how to connect the user from the Auth0 user database with the data in your application. You need to replace the
user_idon a reservation with a unique identifier provided by Auth0. -
Learn how to protect routes and limit the data shown to a user. Right now, anyone can go to
/dashboard/reservationsand see and edit ALL reservations from all users. You need to lock thedashboardroutes down to only those who are logged in and limit reservation data so that a logged-in user can only see their own reservations.
Attaching a user to a reservation
Auth0 provides a unique identifier, sub, that you can use as a user_id. Go back into the ReservationController and under the store() method, add this:
  public function store(Request $request)
  {
    // Set the user_id equal to the user's Auth0 sub id before
    // Will be similar to "auth0|123123123123123"
    $user_id = \Auth::user()->getUserInfo()['sub'];
    $request->request->add(['user_id' => $user_id]);

    // Create the request
    Reservation::create($request->all());

    return redirect('dashboard/reservations')->with('success', 'Reservation created!');
  }
Now when a user creates a reservation, their unique sub id will be saved with the reservation.
Let’s create a reservation now to check that it works. Go to “Browse Hotels” and click “Book Now” on your favorite hotel. Choose your room type from the dropdown, enter the number of guests, and pick your arrival and departure dates.
Press “Book” and you’ll be redirected back to the reservations page in the dashboard with a success message and your newly created reservation.
That reservation you created is also linked to the current account you’re logged in with! You can test this by adding
{{ $reservation->user_id }}
inside the foreach loop of the reservations page at reservations.blade.php and you should see an id prepended with auth0 for any new reservations you’ve created.
Now let’s go through this same process, but for editing a reservation. Change the user_id to use \Auth::user() instead:
public function update(Request $request, Reservation $reservation) {
  $user_id = \Auth::user()->getUserInfo()['sub'];
  $reservation->user_id = $user_id;
  $reservation->num_of_guests = $request->num_of_guests;
  $reservation->arrival = $request->arrival;
  $reservation->departure = $request->departure;
  $reservation->room_id = $request->room_id;

  $reservation->save();

  return redirect('dashboard/reservations')->with('success', 'Successfully updated your reservation!');
}
Now anytime a user updates or creates a reservation, it will be linked to the user stored in the Auth0 database!
Restricting access to reservations
Alright, the final thing to do is restrict dashboard access to those who are logged in and also lock down reservations by user.
Open up routes/web.php and add the auth middleware to the route group for the dashboard:
// ...
Route::group(['prefix' => 'dashboard', 'middleware' => 'auth'], function() {
  // ...
});
Now if you open an incognito tab and go to homestead.test/dashboard or any other dashboard routes, you’ll be kicked back to the login page. So that solves the problem of dashboard access for users who aren’t logged in!
Now we need to check who is logged in and only show them their own reservations.
Right now, our own application is the only consumer of our application’s routes. When a user hits a route, the server is returning a view with the necessary data. We don’t have a mobile application or a SPA front-end that’s consuming an API. We just need our server to pull the user from the session data and deliver the appropriate data to the PHP Blade view.
There are upsides and downsides to this. For one, what we’ve built is a very simple approach for a simple application. But what if you needed to extend this application in the future? Perhaps you want to build a mobile application eventually. Or maybe you decide you want a full SPA front-end so that the page doesn’t reload every time the user interacts with their reservations.
In that case, you’d need to create an API for those clients to consume. In a follow-up to this tutorial, we’ll look at how we can modify this application to an API-driven architecture that can be used by several different clients. This architecture will require a different approach to authorization.
For our purposes here, we can use the user session data to restrict access.
Open up app/Http/Controllers/ReservationController.php and instead of grabbing all reservations in index(), use where() to restrict to just those reservations that match the current user’s id.
public function index() {
  $reservations = Reservation::with('room', 'room.hotel')
    ->where('user_id', \Auth::user()->getUserInfo()['sub'])
    ->orderBy('arrival', 'asc')
    ->get();

  return view('dashboard.reservations')->with('reservations', $reservations);
}
Now go back to the reservations page and refresh and you’ll see that only the reservations that belong to you will show up. Cool!
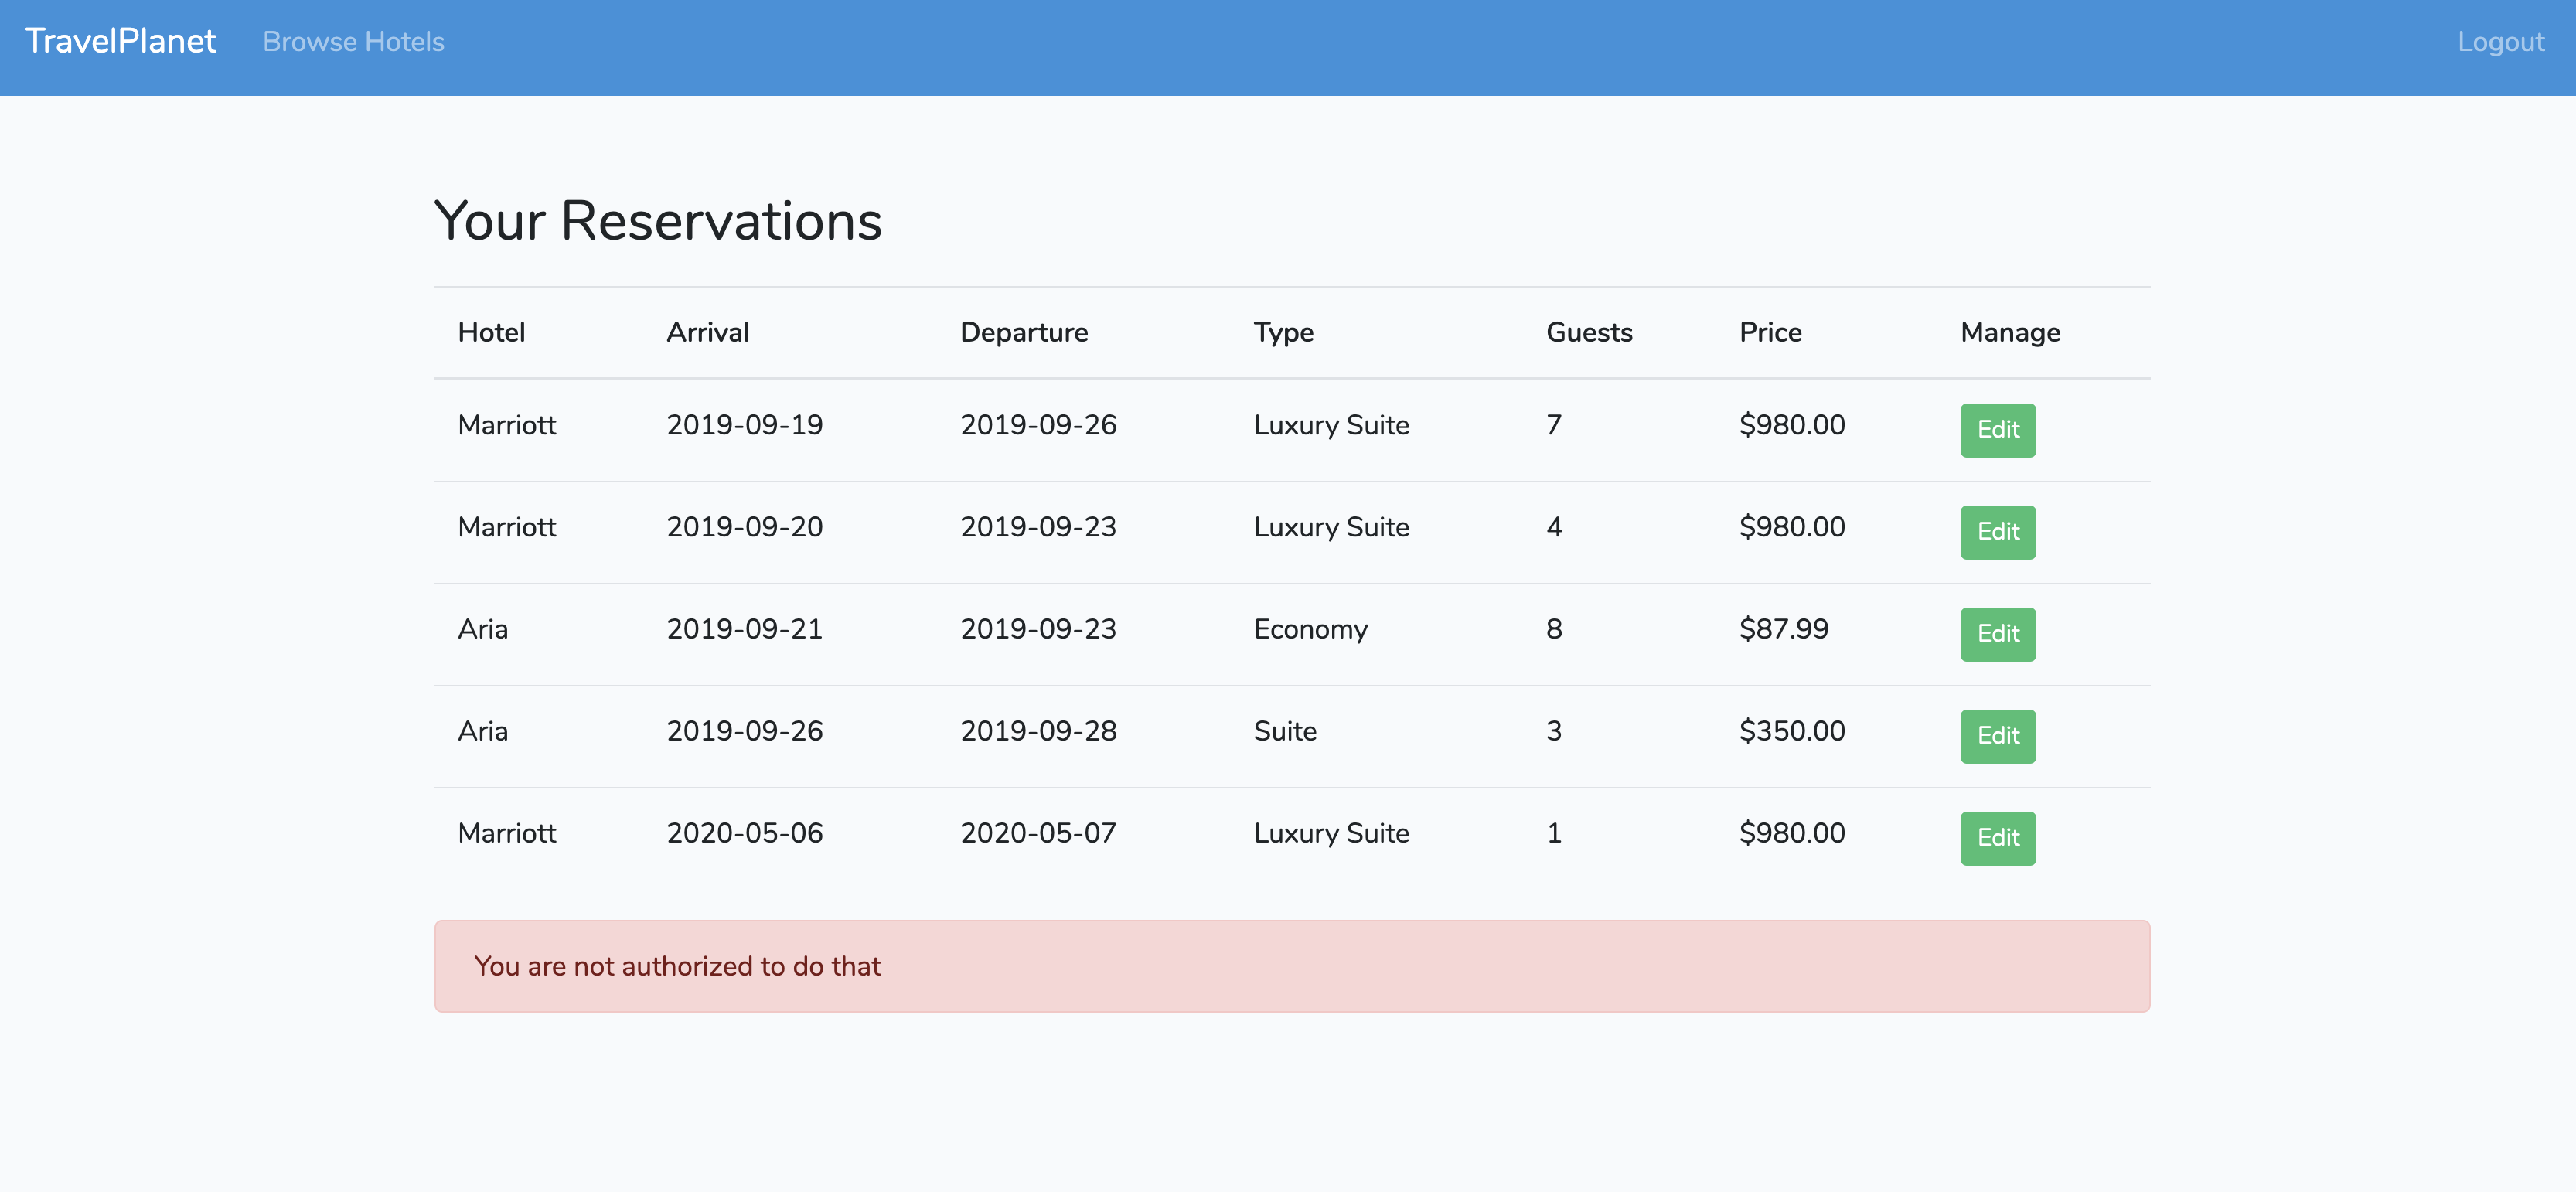
Secure, right? Unfortunately, there’s still a hole here. What if a sneaky user goes directly to a reservation by id instead of just clicking “Edit” on the ones we showed them on the reservation page? Right now, that user could still view and edit a reservation that doesn’t belong to them.
Try it for yourself. Go to http://homestead.test/dashboard/reservations/2. Press edit, change some stuff around, and press save. It worked! And you just ruined someone’s vacation…
You can fix this by checking the user_id for the rest of the CRUD methods in the same way you did for index().
In the show() method of app/Http/Controllers/ReservationController.php, let’s lock it down so that that sneaky user can’t see anyone else’s reservations.
public function show(Reservation $reservation) {
  $reservation = Reservation::with('room', 'room.hotel')
    ->get()
    ->find($reservation->id);

  if ($reservation->user_id === \Auth::user()->getUserInfo()['sub']) {
    $hotel_id = $reservation->room->hotel_id;
    $hotelInfo = Hotel::with('rooms')->get()->find($hotel_id);

    return view('dashboard.reservationSingle', compact('reservation', 'hotelInfo'));
  } else
    return redirect('dashboard/reservations')->with('error', 'You are not authorized to see that.');
}
Here’s one way to do that. Get the requested reservation by id and then check if the user_id for that reservation matches the sub id of the user logged in. If it does, let them proceed. If not, kick them back to the reservations page.
Repeat this same process for edit(), update(), and destroy().
public function edit(Reservation $reservation) {
  $reservation = Reservation::with('room', 'room.hotel')
    ->get()
    ->find($reservation->id);

  if ($reservation->user_id === \Auth::user()->getUserInfo()['sub']) {
    $hotel_id = $reservation->room->hotel_id;
    $hotelInfo = Hotel::with('rooms')->get()->find($hotel_id);

    return view('dashboard.reservationEdit', compact('reservation', 'hotelInfo'));
  } else
    return redirect('dashboard/reservations')->with('error', 'You are not authorized to do that');
}
public function update(Request $request, Reservation $reservation) {
    if ($reservation->user_id != \Auth::user()->getUserInfo()['sub'])
        return redirect('dashboard/reservations')->with('error', 'You are not authorized to update this reservation');

    $user_id = \Auth::user()->getUserInfo()['sub'];
    $reservation->user_id = $user_id;
    $reservation->num_of_guests = $request->num_of_guests;
    $reservation->arrival = $request->arrival;
    $reservation->departure = $request->departure;
    $reservation->room_id = $request->room_id;

    $reservation->save();

    return redirect('dashboard/reservations')->with('success', 'Successfully updated your reservation!');
}
public function destroy(Reservation $reservation) {
  $reservation = Reservation::find($reservation->id);

  if ($reservation->user_id === \Auth::user()->getUserInfo()['sub']) {
    $reservation->delete();

    return redirect('dashboard/reservations')->with('success', 'Successfully deleted your reservation!');
  } else
    return redirect('dashboard/reservations')->with('error', 'You are not authorized to delete this reservation');
}
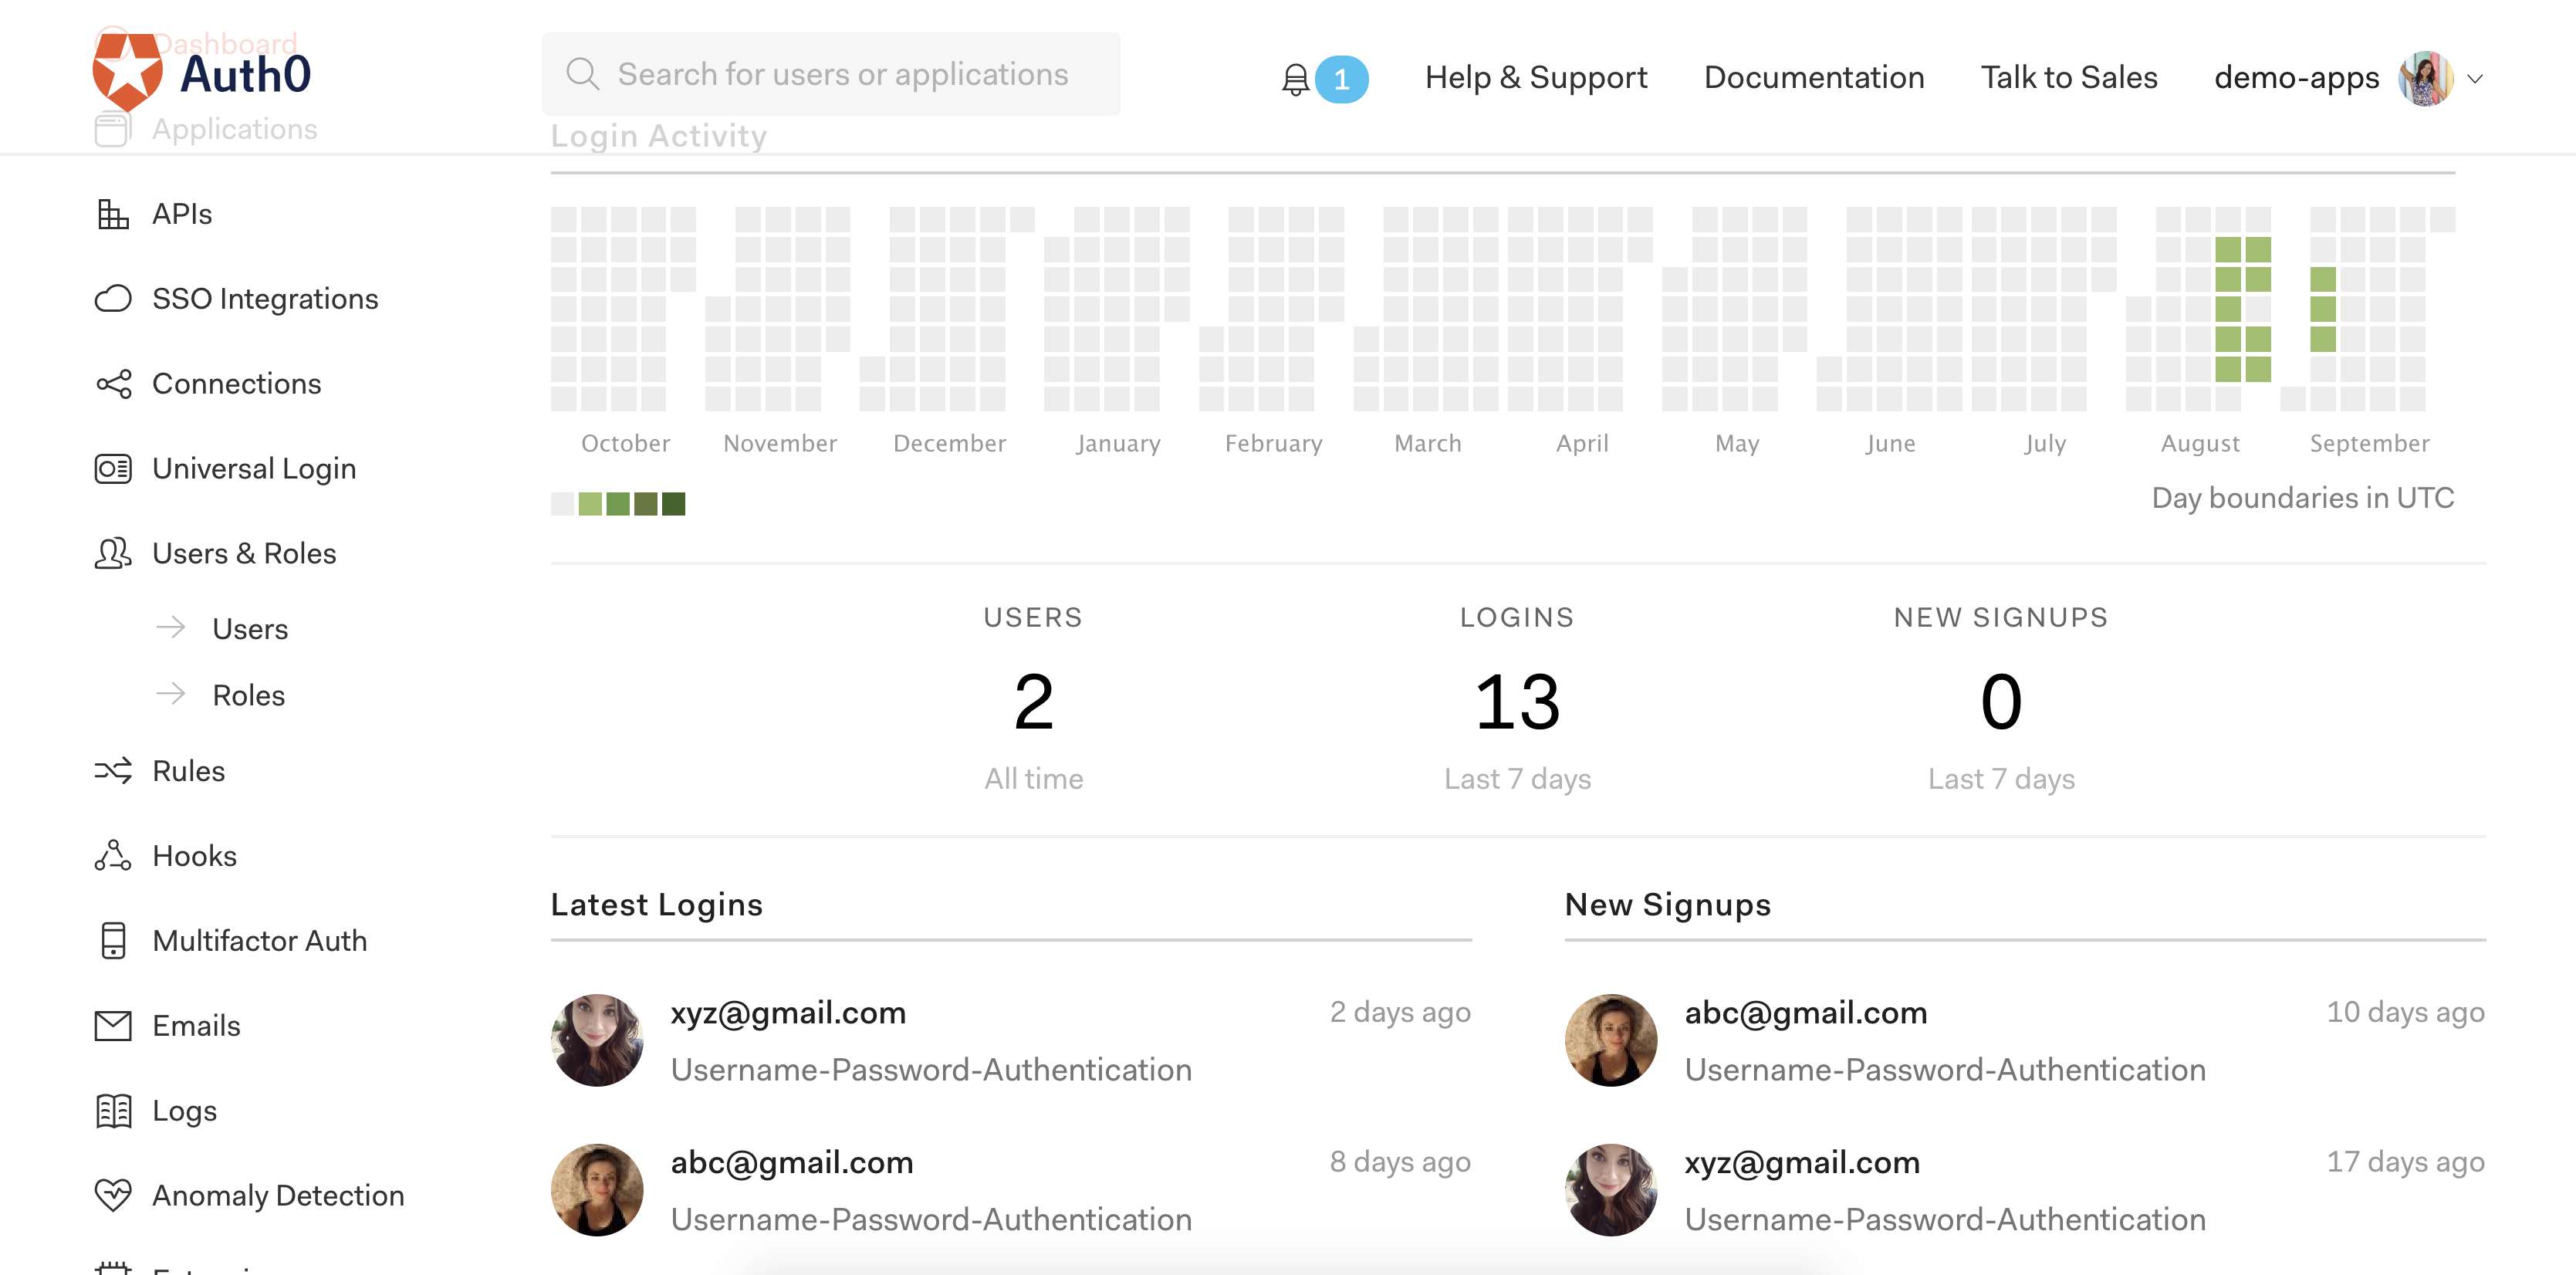
And that’s it! Now all future reservations will be tied back to a user from your Auth0 database. Head back to your Auth0 dashboard now and you’ll see some new information about those test users you just created. You can even click on an individual user for more information about them!
Once you’re done with development, make sure you suspend your VM with vagrant suspend.
Wrap-up
That was a lot to cover, but if you finished the whole tutorial, you now know how to create and secure a Laravel 6.0 CRUD application from scratch! Just to recap, here’s what you just learned to do:
- Setup your Laravel 6 development environment with Homestead
- Create routes in Laravel 6
- Create and seed a database with MySQL
- Create controllers
- Use Bootstrap and Blade to create views
- Add authentication to a Laravel 6 application
- Relate your Auth0 users to your own database
- Restrict access to certain resources in a regular web application
Again, this was a lot to process, so thank you if you made it to the end! Hopefully this has helped you figure out how to integrate authentication into your Laravel application and see how easy it is to work with the Auth0 Laravel plugin.
If this was your first time working with Laravel, let me know what you think of it in the comments. Thanks for following along and keep an eye out for the Laravel API-driven development tutorial. And of course if you have any questions, feel free to reach out below!
#laravel #php #web-development