Progressive web applications (PWAs) quickly gained popularity because they are web performance applications based on fast performance, streamlined to provide a mobile app-like experience. PWAs are built using HTML, CSS, and JavaScript to create a level of availability and performance equivalent to that of native mobile applications. They respond quickly, consume less data, store more space, and support push notifications and offline use in the browser.
Building a progressive web application has now become the web development trend that every business wants to follow. Significant players like Twitter and Flipboard have recently rolled out their progressive web apps to provide a mobile experience for users, without requiring them to install the app. In this article, you will learn how to build a progressive web application using React. Let’s get started.
Step One — Set up the React Application
First, create a React application with create-react-app. To do so, you need to run the following commands:
npm install -g create-react-appcreate-react-app pwa-app
Now, install React Router:
cd pwa-appnpm install --save react-router@3.0.5
You need to replace the content of src / App.js using the code below to get a basic template with navigation.
import React, { Component } from 'react';
import { Router, browserHistory, Route, Link } from 'react-router';
import './App.css';

const NavBar = () => (
  <div className="navbar">
    <Link to="/">Feed</Link>
    <Link to="/profile">Profile</Link>
  </div>
);

const Template = ({ title }) => (
  <div>
    <NavBar />
    <p className="page-info">
      This is the {title} page.
    </p>
  </div>
);

const Feed = (props) => (
  <Template title="Feed"/>
);

const Profile = (props) => (
  <Template title="Profile"/>
);

class App extends Component {
  render() {
    return (
      <Router history={browserHistory}>
        <Route path="/" component={Feed}/>
        <Route path="/profile" component={Profile}/>
      </Router>
    );
  }
}
export default App;
Now, you’ll have to update the default styles by replacing your src/App.css with the styles below to make your application look clean.
.navbar {
  background-color: #01C8E5;
  text-align: center;
}

.navbar a {
  display: inline-block;
  padding: 10px;
  color: #fff;
  text-decoration: none;
}

.page-info {
  text-align: center;
  font-weight: bold;
}
Then, run npm start to test the application in the browser. It is basically an application with two routes. Now, you will convert it to PWA.
Step Two — Lighthouse Setting and Auditing
Lighthouse is an automated open-source tool for testing applications against PWA checklists. It facilitates audits for accessibility, performance, and more.
Check your application with Lighthouse. Click the Lighthouse icon from the top right corner in Chrome and then click the “Create Report” button. The generated report will look like this:
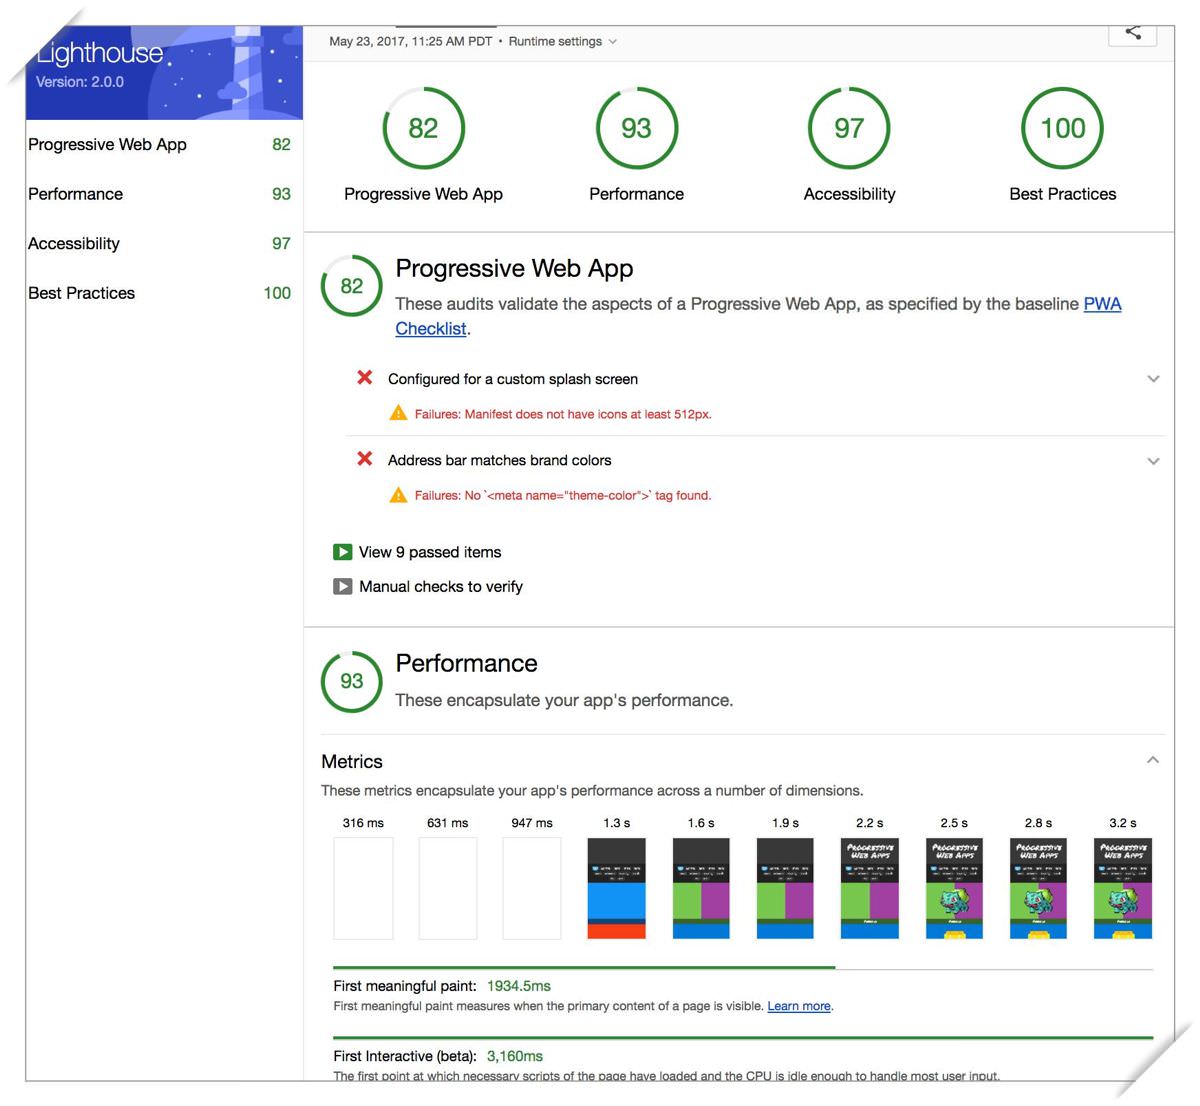
Creating a report to test your PWA with Lighthouse
Fix all failed audits.
Step 3 — Sign Up for a Service Staff
Service employees are proxy servers that connect the application and the network. With Service Worker, you will have to block network requests and save cached files. It allows your application to work even with an unavailable system.
Create an empty worker.js file in your application’s general directory and add the following code to that file.
// Flag for enabling cache in production
var doCache = false;

var CACHE_NAME = 'pwa-app-cache';

// Delete old caches
self.addEventListener('activate', event => {
  const currentCachelist = [CACHE_NAME];
  event.waitUntil(
    caches.keys()
      .then(keyList =>
        Promise.all(keyList.map(key => {
          if (!currentCachelist.includes(key)) {
            return caches.delete(key);
          }
        }))
      )
  );
});

// This triggers when user starts the app
self.addEventListener('install', function(event) {
  if (doCache) {
    event.waitUntil(
      caches.open(CACHE_NAME)
        .then(function(cache) {
          fetch('asset-manifest.json')
            .then(response => {
              response.json();
            })
            .then(assets => {
              // We will cache initial page and the main.js
              // We could also cache assets like CSS and images
              const urlsToCache = [
                '/',
                assets['main.js']
              ];
              cache.addAll(urlsToCache);
            })
        })
    );
  }
});

// Here we intercept request and serve up the matching files
self.addEventListener('fetch', function(event) {
  if (doCache) {
    event.respondWith(
      caches.match(event.request).then(function(response) {
        return response || fetch(event.request);
      })
    );
  }
});
Now, check if the browsers support service staff and then register worker.js. To do this, you need to add the following script to the file public/index.html (note that shrink-to-fit=no in the viewport meta tag has been deleted).
<!doctype html>
<html lang="en">
  <head>
    <meta charset="utf-8">
    <meta name="viewport" content="width=device-width, initial-scale=1">
    <meta name="theme-color" content="#000000">
    <link rel="manifest" href="%PUBLIC_URL%/manifest.json">
    <link rel="shortcut icon" href="%PUBLIC_URL%/favicon.ico">
    <title>React App</title>
  </head>
  <body>
    <noscript>
      You need to enable JavaScript to run this app.
    </noscript>
    <div id="root"></div>
    <script>
      if ('serviceWorker' in navigator) {
        window.addEventListener('load', function() {
          navigator.serviceWorker.register('worker.js').then(function(registration) {
            console.log('Worker registration successful', registration.scope);
          }, function(err) {
            console.log('Worker registration failed', err);
          }).catch(function(err) {
            console.log(err);
          });
        });
      } else {
        console.log('Service Worker is not supported by browser.');
      }
    </script>
  </body>
</html>
You must restart your application and reload the browser after which you will see the Successful registration of member workers on the developer console. Now, recreate the Lighthouse report.
Step 4 - Improve the Progressive Nature of the Application
Your application will display an original blank div until the JavaScript loads and React hooks the original route. You must make sure your application works without downloading JS and displaying a bit of CSS and HTML before React takes effect. Your updated Index.html will look like this:
<!doctype html>
<html lang="en">
  <head>
    <meta charset="utf-8">
    <meta name="viewport" content="width=device-width, initial-scale=1">
    <meta name="theme-color" content="#000000">
    <link rel="manifest" href="%PUBLIC_URL%/manifest.json">
    <link rel="shortcut icon" href="%PUBLIC_URL%/favicon.ico">
    <title>React App</title>
    <style type="text/css">
      body {
        margin: 0;
        padding: 0;
        font-family: sans-serif;
      }
      .navbar {
        background-color: #01C8E5;
        text-align: center;
      }
      .navbar a {
        display: inline-block;
        padding: 10px;
        color: #fff;
        text-decoration: none;
      }
      .page-info {
        text-align: center;
        font-weight: bold;
      }
    </style>
  </head>
  <body>
    <noscript>
      You need to enable JavaScript to run this app.
    </noscript>
    <div id="root">
      <div class="navbar">
        <a href="/">Feed</a>
      </div>
      <p class="page-info">
        Loading an awesome app...
      </p>
    </div>
    <script>
      if ('serviceWorker' in navigator) {
        window.addEventListener('load', function() {
          navigator.serviceWorker.register('worker.js').then(function(registration) {
            console.log('Worker registration successful', registration.scope);
          }, function(err) {
            console.log('Worker registration failed', err);
          }).catch(function(err) {
            console.log(err);
          });
        });
      } else {
        console.log('Service Worker is not supported by browser.');
      }
    </script>
  </body>
</html>
Now, use Lighthouse to retest your application, and you’ll see an improvement in the performance of the application.
Step 5 - Add the Splash Icon
You are required to add a 512x512 icon to display on the screen. To do so, you will have to update the manifest.json file and add the t0 icon to the public directory.
{
  "short_name": "React App",
  "name": "Create React App Sample",
  "icons": [
    {
      "src": "icon-192x192.png",
      "sizes": "192x192",
      "type": "image/png"
    },
    {
      "src": "icon-512x512.png",
      "sizes": "512x512",
      "type": "image/png"
    }
  ],
  "start_url": "/",
  "display": "standalone",
  "theme_color": "#000000",
  "background_color": "#ffffff"
}
Also, use the following meta tags to allow the browser to determine that your application is a PWA.
<!-- Tell the browser it's a PWA -->
<meta name="mobile-web-app-capable" content="yes">
<!-- Tell iOS it's a PWA -->
<meta name="apple-mobile-web-app-capable" content="yes">
Step 6 — Implement PWA
Now, only HTTPS is missing, and the cache can be fixed after you deploy the application. Update the doCache flag with true in the worker.js file. Create a new project in the firebase dashboard and name it “Pwa Application.” Then, run the following command in the project directory:
npm install -g firebase-tools
firebase login
firebase init
Your Firebase.json will look like this:
{
  "hosting": {
    "public": "build",
    "rewrites": [
      {
        "source": "**",
        "destination": "/index.html"
      }
    ]
  }
}
After initializing, building and deploying your application.
npm run buildfirebase deploy
You will see results after you test the application using Lighthouse on the deployed URL.

Final product with Lighthouse
Finally, you have created your first progressive web application with React.js!
=======================================================
Thanks for reading :heart: If you liked this post, share it with all of your programming buddies! Follow me on Facebook | Twitter
Learn More
☞ Typescript Masterclass & FREE E-Book
☞ React - The Complete Guide (incl Hooks, React Router, Redux)
☞ Modern React with Redux [2019 Update]
☞ The Complete React Developer Course (w/ Hooks and Redux)
☞ React JS Web Development - The Essentials Bootcamp
☞ React JS, Angular & Vue JS - Quickstart & Comparison
☞ The Complete React Js & Redux Course - Build Modern Web Apps
☞ React JS and Redux Bootcamp - Master React Web Development
#reactjs #javascript #web-development