Python Connect MySQL Database
Databases are critical for storing and processing data even if you consider a powerful programming language like Python. Ever wondered where does this whole large set of data is stored in or fetched from?
In this article, I’ll talk about the same and take you through the following aspects in detail.
-
What is a [database](https://morioh.com/topic/database "database")? -
What is [MySQLdb](https://morioh.com/topic/mysql "MySQLdb")? -
How does [Python](https://morioh.com/topic/python "Python") connect to a database? -
Creating a Database -
Database Operations-[CRUD](https://morioh.com/p/60b941830c01 "CRUD")
Let’s get started :)
What is a database?
A database is basically a collection of structured data in such a way that it can easily be retrieved, managed and accessed in various ways. One of the simplest forms of databases is a text database. Relational databases are the most popular database system which includes the following:
- MySQL
- Oracle Database
- SQL server
- Sybase
- Informix
- IBM db2
- NO SQL
Among all these databases, MySQL is one of the easiest databases to work with. Let me walk you through about this in detail.
What is MySQLdb?
MySQLdb is an open-source freely available relational database management system that uses Structured Query Language. Now one of the most important question here is “What is SQL?”
SQL (Structured Query Language) is a standard language for relational databases that allow users to do various operations on data like, Manipulating, Creating, Dropping, etc. In a nutshell, SQL allows you to do anything with the data.
Let’s move ahead and dive deep into Python database connection wherein you will learn how to connect with the database.
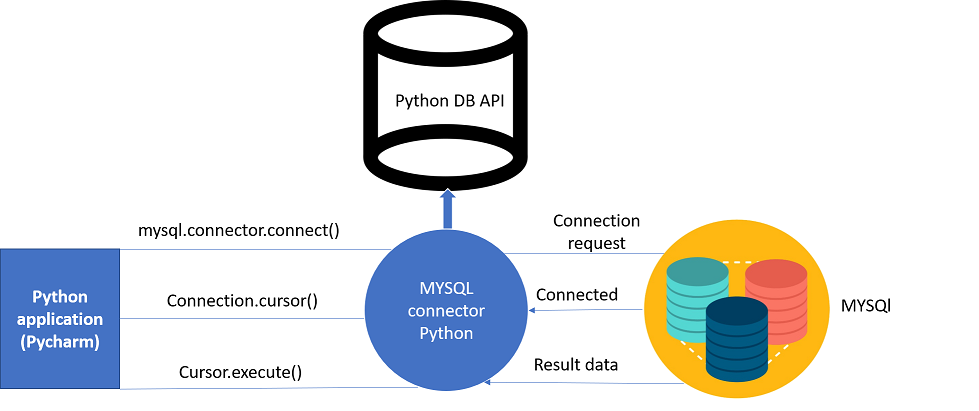
**How does Python connect to a database? **
It is very simple to connect Python with the database. Refer the below image which illustrates a Python connection with the database where how a connection request is sent to MySQL connector Python, gets accepted from the database and cursor is executed with result data.
Before connecting to the MySQL database, make sure you have MySQL installer installed on your computer. It provides a comprehensive set of tools which helps in installing MySQL with the following components:
MySQL server All available connectorsMySQL WorkbenchMySQL NotifierTools for Excel and Microsoft Visual StudioMySQL Sample DatabasesMySQL Documentation
To download the MySQL installer please go through the following video which talks about the various steps that you need to follow while installing MySQL.
Before proceeding you should make sure you have MySQL db installed on your computer. Refer the below commands for installing MySQL in command prompt and pycharm:
Using Pip:
Command:
pip install mysql-connector
**Using Pycharm **
Command:
import mysql.connector
Output:
C:UsersHarshit_KantPycharmProjectstest1venvScriptspython.exe C:/Users/Harshit_Kant/PycharmProjects/test1/venv/python-db-conn.py
Process finished with exit code 0
Moving on in this article with Python Database Connection let us see the parameters required to connect to the database:
- **Username- It is simply the username you give to work MySQL server with, the Default username is root.
- **Password- **Password is given by the user when you have installed the MySQL database. I am giving password here as ‘password123’
- Host Name- This basically is the server name or IP address on which your MySQL is running, If it is a ‘localhost’, then your IP address is 127.0.0.0
I will show you from a coding perspective to connect python with MySQL database.
Example:
import mysql.connector

mydb=mysql.connector.connect(host="localhost",user="root",passwd="password123") // I have used 'host','username','password'

print(mydb)
Output:
C:UsersHarshit_KantPycharmProjectstest1venvScriptspython.exe C:/Users/Harshit_Kant/PycharmProjects/test1/venv/python-db-conn.py
<mysql.connector.connection_cext.CMySQLConnection object at 0x000001606D7BD6A0>
Process finished with exit code 0
**Explanation: **Here ‘mydb’ is just an instance. From the output, you can clearly see that it has connected to the database.
Next up in Python Database Connection, you will learn how to create a database.
Creating a Database:
Once the database connection is established, you are ready to create your own database which will be acting as a bridge between your python and MySQL server.
Let’s see the implementation part of it.
Example:
import mysql.connector

mydb=mysql.connector.connect(host="localhost",user="root",passwd="password123")
mycursor=mydb.cursor()
mycursor.execute("create database harshdb")
Output:
C:/Users/Harshit_Kant/PycharmProjects/test1/venv/python-db-conn.py
Process finished with exit code 0
Explanation:
- In the above program, I have made use of cursor which is basically an object that is used to communicate to your entire MySQL server through which I am able to create my own database.
- You can see from the output that my database with the name”harshdb” is created which is custom, as you can give any name to your database.
If you want to see the databases in your MySQL server, you can implement the following piece of code in pycharm:
Example :
import mysql.connector

mydb=mysql.connector.connect(host="localhost",user="root",passwd="password123")
mycursor=mydb.cursor()
mycursor.execute("show databases")

for db in mycursor:
print(db)
Output:
C:UsersHarshit_KantPycharmProjectstest1venvScriptspython.exe C:/Users/Harshit_Kant/PycharmProjects/test1/venv/python-db-conn.py
(‘harshdb’,)
(‘information_schema’,)
(‘mysql’,)
(‘performance_schema’,)
(‘sakila’,)
(‘sys’,)
(‘world’,)
Process finished with exit code 0
Explanation:
- By implementing the above-written code I have tried showing all the databases which are existing in MySQL server.
Now that you have created your database, let’s dive deep into one of the most important aspects of Python Database Connection by doing few operations in it. Let us understand this in detail.
Database Operations[CRUD]:
There are numerous operations a programmer can perform using databases and SQL in order to have sound knowledge of database programming and MySQL.
I have demonstrated the CRUD operations below
- Create– It is an SQL statement used to create a record in the table or can say it is used for creating a table.
- **Read- **It is used for fetching useful information from the database.
- **Update- **This particular SQL statement is used for updating the records in the table or updating the table.
- **Delete- **As the name itself justifies this command is used for deleting the table.
Let us look at each aspect in detail from the coding perspective.
Create Operation:
import mysql.connector

mydb=mysql.connector.connect(host="localhost",user="root",passwd="password123",database=harshdb)

mycursor=mydb.cursor()

mycursor.execute("create table employee(name varchar(250),sal int(20))")
Output:
C:UsersHarshit_KantPycharmProjectstest1venvScriptspython.exe C:/Users/Harshit_Kant/PycharmProjects/test1/venv/python-db-conn.py
Process finished with exit code 0
Explanation:
- In the above-given program, I have created a table ’employee’.
- Table employee has two fields ‘name’ and ‘sal’.
- Here, the User id is “root” and Password is “password123” used for accessing harshdb.
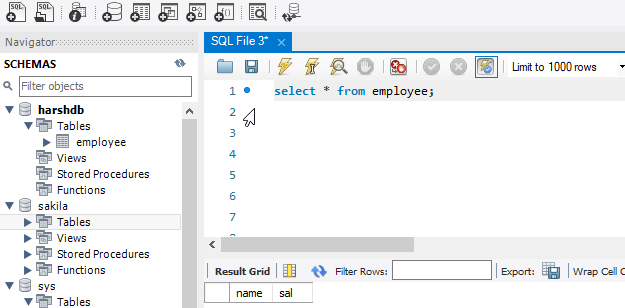
Below given Screenshot shows the table ’employee’ and returns the fields ‘name’ and ‘sal’.
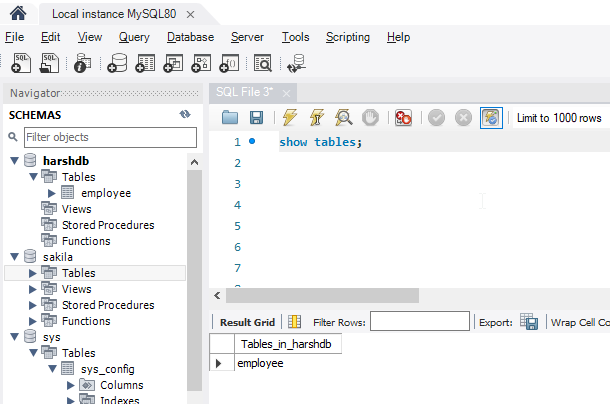
In order to see the table which I have created, refer to the following code in python
import mysql.connector

mydb=mysql.connector.connect(host="localhost",user="root",passwd="password123",database="harshdb")
mycursor=mydb.cursor()
mycursor.execute("show tables")

for tb in mycursor:
    print(tb)
Output:
C:UsersHarshit_KantPycharmProjectstest1venvScriptspython.exe C:/Users/Harshit_Kant/PycharmProjects/test1/venv/python-db-conn.py
(’employee’,)
Process finished with exit code 0
Below given Screenshot shows the table ’employee’ which I have created.
Screenshot:
Now that you have seen how a table is created, let us look at how a user can fetch values from it.
Read Operation:
This particular operation happens in various stages. In order to do that first stage is to populate the table.
Code:
import mysql.connector

mydb=mysql.connector.connect(host="localhost",user="root",passwd="password123",database="harshdb")
mycursor=mydb.cursor()

sqlformula = "Insert into employee(name,sal) values(%s,%s)"//'values has placeholders

employees = [("harshit",200000),("rahul", 30000),("avinash", 40000),("amit", 50000),]//Created an array of emplpoyees


mycursor.executemany(sqlformula, employees)//Passing the data

mydb.commit()//SQL statement used for saving the changes
Output:
C:UsersHarshit_KantPycharmProjectstest1venvScriptspython.exe C:/Users/Harshit_Kant/PycharmProjects/test1/venv/python-db-conn.py
Process finished with exit code 0
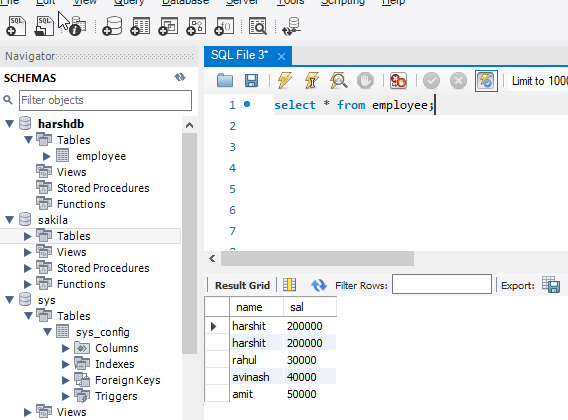
In the above code, I have populated the data by using an array of employees by writing SQL statements in Python. Below a screenshot of the database will show the changes

Here,’harshit’ is used two times in the record while created the array.
**Stage 2: **In this stage, we will make use of the “select” SQL statement where the actual read operation will take place.
- fetchall()– This particular function fetches all the data from the last executed statement.
- **fetchone()- **This particular statement fetches one data from the last executed statement.
Code:
import mysql.connector

mydb=mysql.connector.connect(host="localhost",user="root",passwd="password123",database="harshdb")
mycursor=mydb.cursor()

mycursor.execute("select * from employee")

myresult = mycursor.fetchall()

for row in myresult:
    print(row)
Output:
(‘harshit’, 200000)
(‘harshit’, 200000)
(‘rahul’, 30000)
(‘avinash’, 40000)
(‘amit’, 50000)
Process finished with exit code 0
**Explanation: **In the above code we have made use of the function ‘fetchall()’. It fetches all the data from the last executed statement.
Given below is the screenshot of the database.
Code:
import mysql.connector

mydb=mysql.connector.connect(host="localhost",user="root",passwd="password123",database="harshdb")
mycursor=mydb.cursor()

mycursor.execute("select name from employee")//selecting the field i want data to be fetched from

myresult = mycursor.fetchone()

for row in myresult:
    print(row)
Output:
C:UsersHarshit_KantPycharmProjectstest1venvScriptspython.exe C:/Users/Harshit_Kant/PycharmProjects/test1/venv/python-db-conn.py
harshit
Process finished with exit code 0
**Explanation: **In the above code, I have made use of the function “fetchone()” which basically fetches a single data from the last executed statement.
That was all about ‘Read operation’, let’s dive deep into Update operation.
Update Operation:
This SQL statement is used for updating the records in the table. Let’s implement the code and see how the changes are taking place.
Code:
import mysql.connector

mydb=mysql.connector.connect(host="localhost",user="root",passwd="password123",database="harshdb")
mycursor=mydb.cursor()

sql = "Update employee SET sal = 70000 WHERE name = 'harshit'"

mycursor.execute(sql)

mydb.commit()
Output:
C:UsersHarshit_KantPycharmProjectstest1venvScriptspython.exe C:/Users/Harshit_Kant/PycharmProjects/test1/venv/python-db-conn.py
Process finished with exit code 0
**Explanation: **We have updated the row “sal” of record harshit in the above-given code. Below given Screenshot will give you a clear picture.
Screenshot:

As you can clearly see row ‘sal’ of record ‘harshit’ is updated to 70000.
This was all about Update operation, moving on with “Python Connect MySQL Database” article we will see the last operation which is ‘delete’.
Delete Operation:
As the name itself justifies, Delete operation is used for the deletion of records from the table. Let’s understand it from a coding perspective.
Code:
import mysql.connector

mydb=mysql.connector.connect(host="localhost",user="root",passwd="password123",database="harshdb")
mycursor=mydb.cursor()

sql = "DELETE FROM employee  WHERE name = 'harshit'"

mycursor.execute(sql)

mydb.commit()
Output:
C:UsersHarshit_KantPycharmProjectstest1venvScriptspython.exe C:/Users/Harshit_Kant/PycharmProjects/test1/venv/python-db-conn.py
Process finished with exit code 0
**Explanation: **In the above code I have deleted a record ‘harshit’ as it was repeated twice.
Below given screenshot will give you a better picture.
 As you can clearly see from the screenshot record ‘harshit’ has been deleted. Well, you can do another set of manipulation from the delete operation itself like deleting salary. I had mentioned only two fields so the operations on the record which I could do is limited, but you can create more fields under the same table ’employee’ or any other table you create.
This brings us to the end of our article on “Python Connect MySQL Database”. I hope you are clear with all the concepts related to database, MYSQL db, database operations in python. Make sure you practice as much as possible and revert your experience.
#python #mysql #database