The history of Machine Comprehension (MC) has its origins along with the birth of first concepts in Artificial Intelligence (AI). The brilliant Allan Turing proposed in his famous article “Computing Machinery and Intelligence” what is now called the Turing test as a criterion of intelligence. Almost 70 years later, Question Answering (QA), a sub-domain of MC, is still one of the most difficult tasks in AI.
However, since last year, the field of Natural Language Processing (NLP) has experienced a fast evolution thanks to the development in Deep Learning research and the advent of Transfer Learning techniques. Powerful pre-trained NLP models such as OpenAI-GPT, ELMo, BERT and XLNet have been made available by the best researchers of the domain.
With such progress, several improved systems and applications to NLP tasks are expected to come out. One of such systems is the cdQA-suite, a package developed by some colleagues and me in a partnership between Telecom ParisTech, a French engineering school, and BNP Paribas Personal Finance, a European leader in financing for individuals.
Open-domain QA vs. closed-domain QA
When we think about QA systems we should be aware of two different kinds of systems: open-domain QA (ODQA) systems and closed-domain QA(CDQA) systems.
Open-domain systems deal with questions about nearly anything, and can only rely on general ontologies and world knowledge. One example of such a system is DrQA, an ODQA developed by Facebook Research that uses a large base of articles from Wikipedia as its source of knowledge. As these documents are related to several different topics and subjects we can understand why this system is considered an ODQA.
On the other hand, closed-domain systems deal with questions under a specific domain (for example, medicine or automotive maintenance), and can exploit domain-specific knowledge by using a model that is fitted to a unique-domain database. The cdQA-suite was built to enable anyone who wants to build a closed-domain QA system easily.
cdQA-suite
The cdQA-suite is comprised of three blocks:
- cdQA: an easy-to-use python package to implement a QA pipeline
- cdQA-annotator: a tool built to facilitate the annotation of question-answering datasets for model evaluation and fine-tuning
- cdQA-ui: a user-interface that can be coupled to any website and can be connected to the back-end system.
I will explain how each module works and how you can use it to build your QA system on your own data.
cdQA
The cdQA architecture is based on two main components: the Retriever and the Reader. You can see below a schema of the system mechanism.

Mechanism of cdQA pipeline
When a question is sent to the system, the Retriever selects a list of documents in the database that are the most likely to contain the answer. It is based on the same retriever of DrQA, which creates TF-IDF features based on uni-grams and bi-grams and compute the cosine similarity between the question sentence and each document of the database.
After selecting the most probable documents, the system divides each document into paragraphs and send them with the question to the Reader, which is basically a pre-trained Deep Learning model. The model used was the Pytorch version of the well known NLP model BERT, which was made available by HuggingFace. Then, the Reader outputs the most probable answer it can find in each paragraph. After the Reader, there is a final layer in the system that compares the answers by using an internal score function and outputs the most likely one according to the scores.
Using the cdQA python package
Before starting using the package, let’s install it. You can install it using pip install cdqa , but for this tutorial, I will install it from the source so I can run a script that downloads pre-trained models and the BNP dataset (a dataset with articles extracted from their public news webpage).
# Setting up cdQA package
git clone
https://github.com/cdqa-suite/cdQA.git &&
cd cdQA &&
pip install .

# Download models and BNP dataset
python download.py
Now, you can open a jupyter notebook and follow the steps below to see how cdQA works:
You should have something like the following as output:
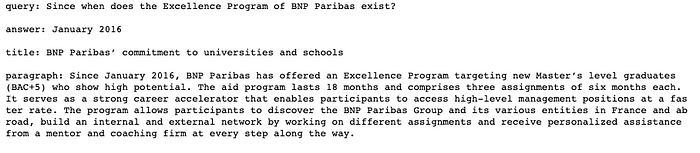
The output of a QAPipeline prediction
You can notice that the system not only outputs an answer, but also theparagraph where the answer was found and the title of the document / article.
In the snippet above, the preprocessing / filtering steps were needed to transform the BNP Paribas dataframe to the following structure:

Structure of the Dataframe that should be sent to cdQA pipeline
If you use your own dataset, please be sure that your dataframe has such structure.
When using the CPU version of the model, each prediction takes between 10 and 20 seconds to be done. This moderate execution time is due to the BERT Reader, which is a very large deep learning model (~110M parameters). If you have a GPU, you can use directly the GPU version of the model models/bert<em>qa</em>vGPU-sklearn.joblib. These pre-trained models are also available on the releases page of cdQA github: https://github.com/cdqa-suite/cdQA/releases
Training / Fine-tuning the reader
You can also improve the performance of the pre-trained Reader, which was pre-trained on SQuAD 1.1 dataset. If you have an annotated dataset (that can be generated by the help of the cdQA-annotator) in the same format as SQuAD dataset you can fine-tune the reader on it:
# Put the path to your json file in SQuAD format here
path_to_data = './data/SQuAD_1.1/train-v1.1.json'

cdqa_pipeline.fit_reader(path_to_data)
Please be aware that such fine-tuning should be performed using GPU as the BERT model is too large to be trained with CPU.
You can also check out other ways to do the same steps on the official tutorials: https://github.com/cdqa-suite/cdQA/tree/master/examples
cdQA-annotator
In order to facilitate the data annotation, the team has built a web-based application, the cdQA-annotator.
In order to use it, you should have your dataset transformed to a JSON file with SQuAD-like format:
from cdqa.utils.converters import df2squad
# Converting dataframe to SQuAD format
json_data = df2squad(df=df, squad_version='v1.1', output_dir='.', filename='dataset-name.json')
Now you can install the annotator and run it:
# Clone the repo
git clone https://github.com/cdqa-suite/cdQA-annotator

# Install dependencies
cd cdQA-annotator
npm install

# Start development server
cd src
vue serve
Now you can go to http://localhost:8080/ and after loading your JSON file you will see something like this:

cdQA-annotator interface
To start annotating question-answer pairs you just need to write a question, highlight the answer with the mouse cursor (the answer will be written automatically), and then click on Add annotation:

Annotating question-answer pairs with cdQA-annotator
After the annotation, you can download it and use it to fine-tune the BERT Reader on your own data as explained in the previous section.
cdQA-ui
The team also has provided a web-based user interface to couple with cdQA. In this section, I will describe how you can use de UI linked to the back-end of cdQA.
First, you have to deploy a cdQA REST API by executing on your shell (be sure you run it on cdQA folder):
export dataset_path = 'path-to-dataset.csv'
export reader_path = 'path-to-reader-model'
FLASK_APP=api.py flask run -h 0.0.0.0
Second, you should proceed to the installation of the cdQA-ui package:
git clone https://github.com/cdqa-suite/cdQA-ui &&
cd cdQA-ui &&
npm install
Then, you start the develpoment server:
npm run serve
You can now access the web application on http://localhost:8080/. You will see something like the figure below:

Web application of cdQA-ui
As the application is well connected to the back-end, via the REST API, you can ask a question and the application will display an answer, the passage context where the answer was found and the title of the article:

Demonstration of the web application running
Inserting the interface in a web-site
If you want to couple the interface on your website you just need do the following imports in your Vue app:
import Vue from 'vue'
import CdqaUI from 'cdqa-ui'
Vue.use(CdqaUI)

import Vue from 'vue'
import BootstrapVue from "bootstrap-vue"
Vue.use(BootstrapVue)
import "bootstrap/dist/css/bootstrap.css"
import "bootstrap-vue/dist/bootstrap-vue.css"
Then you insert the cdQA interface component:
Demo
You can also check out a demo of the application on the official website: https://cdqa-suite.github.io/cdQA-website/#demo
Conclusion
In this article, I presented cdQA-suite, a software suite for the deployment of an end-to-end Closed Domain Question Answering System.
If you are interested in learning more about the project, feel free to check out the official GitHub repository: https://github.com/cdqa-suite. Do not hesitate to star and to follow the repositories if you liked the project and consider it valuable for you and your applications.
#python #machine-learning #deep-learning