How to Implement Redux in 24 Lines of JavaScript?
Redux is among the most important JavaScript libraries ever created. In this posr, you’ll learn how to Implement Redux in 24 lines of JavaScript.
Inspired by prior art like Flux and Elm, Redux put JavaScript functional programming on the map by introducing a scalable architecture of three simple points.
If you’re new to Redux, consider reading the official docs first.
Redux Is Mostly Convention
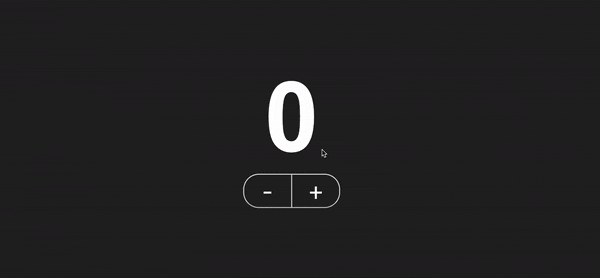
Consider this simple counter application that uses the Redux architecture. If you’d like to jump ahead check out the Github repo for it.
State lives in a single tree
The application’s state looks like this.
const initialState = { count: 0 };
Actions declare state changes
By Redux convention, I do not directly modify (mutate) the state.
// DON'T do this in a Redux app
state.count = 1;
Instead I create all the actions the user may leverage in the application.
const actions = {
  increment: { type: 'INCREMENT' },
  decrement: { type: 'DECREMENT' }
};
Reducer interprets action and updates state
The last architectural piece calls for a reducer, a pure function that returns a new copy of your state based on the previous state and action.
- If
incrementis fired, incrementstate.count. - If
decrementis fired, decrementstate.count.
const countReducer = (state = initialState, action) => {
  switch (action.type) {
    case actions.increment.type:
      return {
        count: state.count + 1
      };

    case actions.decrement.type:
      return {
        count: state.count - 1
      };

    default:
      return state;
  }
};
No Redux so far
Did you notice that we haven’t touched the Redux library yet? We’ve just created some objects and a function. This is what I mean by “mostly convention”, 90% of Redux doesn’t require Redux!
Let’s implement Redux
To put this architecture to use, we must plug it into a store. We’ll implement just one function–createStore.
It’s used like this.
import { createStore } from 'redux'

const store = createStore(countReducer);

store.subscribe(() => {
  console.log(store.getState());
});

store.dispatch(actions.increment);
// logs { count: 1 }

store.dispatch(actions.increment);
// logs { count: 2 }

store.dispatch(actions.decrement);
// logs { count: 1 }
And here’s our initial boilerplate. We’ll need a list of listeners and the initial state supplied by the reducer.
const createStore = (yourReducer) => {
    const listeners = [];
    let currentState = yourReducer(undefined, {});
}
Whenever someone subscribes to our store, they get added to the listeners array. The is important because every time someone dispatches an action, all the listeners must be notified in a loop.
Calling yourReducer with undefined and an empty object returns the initialState we installed up above. This gives us a proper value to return when we call store.getState(). Speaking of which, let’s create that method.
store.getState()
This is a function that returns the latest state from the store. We’ll need this to update our UI every time the user clicks a button.
const createStore = (yourReducer) => {
    const listeners = [];
    let currentState = yourReducer(undefined, {});

    return {
        getState: () => currentState
    };
}
store.dispatch(action)
This is a function that takes an action as a parameter. It feeds that action and the currentState to yourReducer to get a new state. Then dispatch notifies everyone subscribed to the store.
const createStore = (yourReducer) => {
  const listeners = [];
  let currentState = yourReducer(undefined, {});

  return {
    getState: () => currentState,
    dispatch: (action) => {
      currentState = reducer(currentState, action);

      listeners.forEach((listener) => {
        listener();
      });
    }
  };
};
store.subscribe(listener)
This is a function that lets you be notified when the store receives an action It’s good to use store.getState() in here to get your latest state and update your UI.
const createStore = (yourReducer) => {
  const listeners = [];
  let currentState = yourReducer(undefined, {});

  return {
    getState: () => currentState,
    dispatch: (action) => {
      currentState = reducer(currentState, action);

      listeners.forEach((listener) => {
        listener();
      });
    },
    subscribe: (newListener) => {
      listeners.push(newListener);

      const unsubscribe = () => {
        listeners = listeners.filter((l) => l === newListener);
      };

      return unsubscribe;
    }
  };
};
subscribe returns a function called unsubscribe that you can call when you’re no longer interested in listening to the store’s updates.
All Together Now
Let’s hook this up to our buttons and view the final source code.
// simplified createStore function
const createStore = (reducer) => {
  const listeners = [];
  let currentState = reducer(undefined, {});

  return {
    getState: () => currentState,
    dispatch: (action) => {
      currentState = reducer(currentState, action);

      listeners.forEach((listener) => {
        listener();
      });
    },
    subscribe: (newListener) => {
      listeners.push(newListener);

      const unsubscribe = () => {
        listeners = listeners.filter((l) => l === newListener);
      };

      return unsubscribe;
    }
  };
};

// Redux architecture pieces
const initialState = { count: 0 };

const actions = {
  increment: { type: 'INCREMENT' },
  decrement: { type: 'DECREMENT' }
};

const countReducer = (state = initialState, action) => {
  switch (action.type) {
    case actions.increment.type:
      return {
        count: state.count + 1
      };

    case actions.decrement.type:
      return {
        count: state.count - 1
      };

    default:
      return state;
  }
};

const store = createStore(countReducer);

// DOM elements
const incrementButton = document.querySelector('.increment');
const decrementButton = document.querySelector('.decrement');

// Wire click events to actions
incrementButton.addEventListener('click', () => {
  store.dispatch(actions.increment);
});

decrementButton.addEventListener('click', () => {
  store.dispatch(actions.decrement);
});

// Initialize UI display
const counterDisplay = document.querySelector('h1');
counterDisplay.innerHTML = parseInt(initialState.count);

// Update UI when an action fires
store.subscribe(() => {
  const state = store.getState();

  counterDisplay.innerHTML = parseInt(state.count);
});
And once again here’s our final UI.
If you’re interested in the HTML/CSS I used, here’s the GitHub repo again!
Thanks for reading
#javascript #redux