Node.js Promise Tutorial for Beginners
Originally published at https://www.guru99.com
In other tutorials, you would have seen callback functions which are used for Asynchronous events. But sometimes callback functions can become a nightmare when they start becoming nested, and the program starts to become long and complex.
In this tutorial, you will learn
- What are promises?
- Callbacks to promises
- Dealing with nested promises
- Creating a custom promise
What are promises?
Before we start with promises, let's first revisit what are "callback" functions in Node.js. We have seen these callback functions a lot in the previous chapters, so let's quickly go through one of them.
The example below shows a code snippet, which is used to connect to a MongoDB database and perform an update operation on one of the records in the database.

- In the above code, the part of the function(err,db) is known as the declaration of an anonymous or callback function. When the MongoClient creates a connection to the MongoDB database, it will return to the callback function once the connection operation is completed. So in a sense, the connection operations happen in the background, and when it is done, it calls our callback function. Remember that this is one of the key points of Node.js to allow many operations to happen concurrently and thus not block any user from performing an operation.
- The second code block is what gets executed when the callback function is actually called. The callback function just updates one record in our MongoDB database.
So what is a promise then? Well, a promise is just an enhancement to callback functions in Node.js. During the development lifecycle, there may be an instance where you would need to nest multiple callback functions together. This can get kind of messy and difficult to maintain at a certain point in time. In short, a promise is an enhancement to callbacks that looks towards alleviating these problems.
The basic syntax of a promise is shown below;
var promise = doSomethingAync()
promise.then(onFulfilled, onRejected)
- "doSomethingAync" is any callback or asynchronous function which does some sort of processing.
- This time, when defining the callback, there is a value which is returned called a "promise."
- When a promise is returned, it can have 2 outputs. This is defined by the 'then clause'. Either the operation can be a success which is denoted by the 'onFulfilled' parameter. Or it can have an error which is denoted by the 'onRejected' parameter.
Note: So the key aspect of a promise is the return value. There is no concept of a return value when working with normal callbacks in Node.js. Because of the return value, we have more control of how the callback function can be defined.
In the next topic, we will see an example of promises and how they benefit from callbacks.
Callbacks to promises
Now let's look at an example of how we can use "promises" from within a Node.js application. In order to use promises in a Node.js application, the 'promise' module must first be downloaded and installed.
We will then modify our code as shown below, which updates an Employeename in the 'Employee' collection by using promises.
Step 1) Installing the NPM Modules
To use Promises from within a Node JS application, the promise module is required. To install the promise module, run the below command
npm install promise
Step 2) Modify the code to include promises

var Promise = require('promise');
var MongoClient = require('mongodb').MongoClient;
var url = 'mongodb://localhost/EmployeeDB';
MongoClient.connect(url)

.then(function(err, db) {

db.collection(‘Employee’).updateOne({

“EmployeeName”: “Martin”

}, {

$set: {

“EmployeeName”: “Mohan”

}

});

});
Code Explanation:-
- The first part is to include the ‘promise’ module which will allow us to use the promise functionality in our code.
- We can now append the ‘then’ function to our MongoClient.connect function. So what this does is that when the connection is established to the database, we need to execute the code snippet defined thereafter.
- Finally, we define our code snippet which does the work of updating EmployeeName of the employee with the name of “Martin” to “Mohan”.
Note:
If you now check the contents of your MongoDB database, you will find that if a record with EmployeeName of “Martin” exists, it will be updated to “Mohan.”
To check that the data has been properly inserted in the database, you need to execute the following commands in MongoDB
- Use EmployeeDB
- db.Employee.find({EmployeeName :Mohan })
The first statement ensures that you are connected to the EmployeeDb database. The second statement searches for the record which has the employee name of “Mohan”.
Dealing with nested promises
When defining promises, it needs to be noted that the “then” method itself returns a promise. So in a sense, promises can be nested or chained to each other.
In the example below, we use chaining to define 2 callback functions, both of which insert a record into the MongoDB database.
(Note: Chaining is a concept used to link execution of methods to one another. Suppose if your application had 2 methods called ‘methodA’ and ‘methodB.’ And the logic was such that ‘methodB’ should be called after ‘methodA,’ then you would chain the execution in such a way that ‘methodB’ gets called directly after ‘methodA.’)
The key thing to note in this example is that the code becomes cleaner, readable and maintainable by using nested promises.
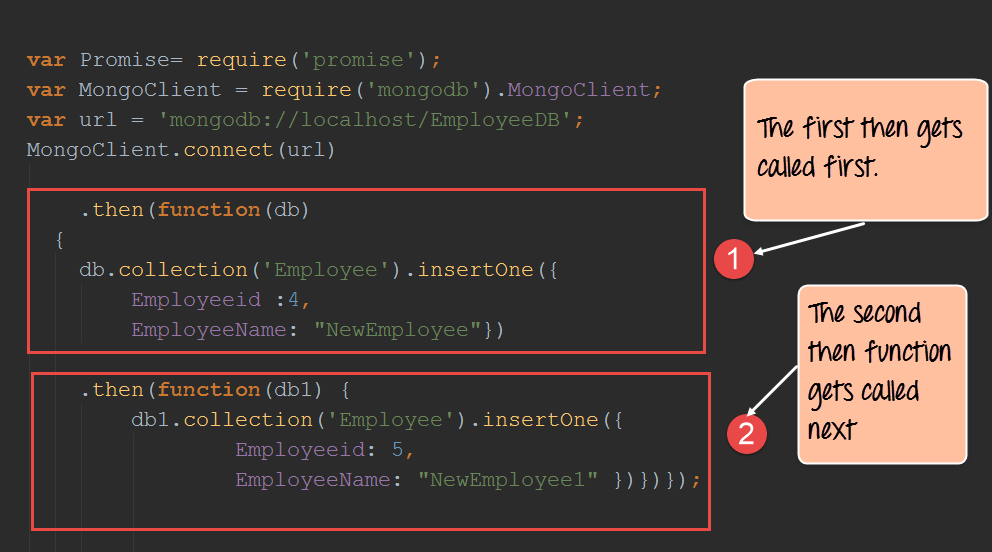
var Promise = require(‘promise’);
var MongoClient = require(‘mongodb’).MongoClient;
var url = ‘mongodb://localhost/EmployeeDB’;
MongoClient.connect(url).then(function(db) {
db.collection(‘Employee’).insertOne({
Employeeid: 4,
EmployeeName: “NewEmployee”
}).then(function(db1) { db1.collection('Employee').insertOne({ Employeeid: 5, EmployeeName: "NewEmployee1" }) })});
Code Explanation:-
- We are now defining 2 “then” clauses which get executed one after the other. In the first then clause, we are passing the ‘db’ parameter which contains our database connection. We are then using the collection property of the ‘db’ connection to insert records into the ‘Employee’ collection. The ‘insertOne’ method is used to insert the actual document into the Employee collection.
- We are then using the 2nd then clause also to insert another record into the database.
If you now check the contents of your MongoDB database, you will find the 2 record’s inserted into the MongoDB database.
Creating a custom promise
A custom promise can be created by using a node module called ‘q.’ The ‘q’ library needs to be downloaded and installed using the node package manager. After using the ‘q’ library, the method “denodeify” can be called which will cause any function to become a function which returns a promise.
In the example below, we will create a simple function called “Add” which will add 2 numbers. We will convert this function into a function to return a promise.
Once that is done, we will use the promise returned by the Add function to display a message in the console.log.
Let’s follow the below steps to creating our custom function to return a promise.
Step 1) Installing the NPM Modules
To use ‘q’ from within a Node JS application, the ‘q’ module is required. To install the ‘q’ module, run the below command
npm install q
Step 2) Define the following code which will be used to create the custom promise.

Code Explanation:-
- The first bit is to include the ‘q’ library by using the require keyword. By using this library, we will be able to define any function to return a callback.
- We are creating a function called Add which will add 2 numbers defined in variables a and b. The sum of these values will be stored in variable c.
- We are then using the q library to denodeify ( the method used to convert any function into a function that would return a promise) our Add function or in otherwise convert our Add function to a function which returns a promise.
- We now call our “Add” function and are able to get a return promise value because of the prior step we performed of denodeify the Add function.
- The ‘then’ keyword is used specify that if the function is executed successfully then display the string “Addition function completed” in the console.log.
When the above code is run, the output “Addition function completed” will be displayed in the console.log as shown below.

Summary
- Using callback functions in Node.js does have its disadvantages. Sometimes during the process of development, the nested use of callback functions can make the code messier and difficult to maintain.
- Most of the issues with nested callback functions can be mitigated with the use of promises and generators in node.js
- A Promise is a value returned by an asynchronous function to indicate the completion of the processing carried out by the asynchronous function.
- Promises can be nested within each other to make code look better and easier to maintain when an asynchronous function need to be called after another asynchronous function
Thanks for reading ❤
If you liked this post, share it with all of your programming buddies!
Follow us on Facebook | Twitter
Further reading
☞ Best 50 Nodejs interview questions from Beginners to Advanced in 2019
☞ Node.js 12: The future of server-side JavaScript
☞ An Introduction to Node.js Design Patterns
☞ Getting Started with Promises in Nodejs
☞ Understanding Promises in JavaScript
#node-js #web-development #javascript