Build a Slack Polling App with Airtable, Standard Library, and Node.js
Originally published by Steve Meyer at https://medium.com
Whether you’re trying to figure out lunch or which bit of copy sounds best, polls are a simple way to get quick feedback from many people. Slack doesn’t have a native polling solution, but fortunately, with Build on Standard Library and Airtable it’s easy to roll your own. This guide will go step by step through the process of creating a fully customizable polling app, but if you’re just interested in the result, there’s a GitHub repo available where you can deploy a complete version to Build on Standard Library in just a few clicks.
Simpling polls with Slack and Airtable
What You’ll Need Beforehand
- 1x Slack account — https://www.slack.com/
- 1x Airtable account — https://www.airtable.com/
Step 1: Create your Airtable Base
Part spreadsheet, part database, and entirely flexible, teams use Airtable to organize their work, their way.
Backing your polling system is Airtable, which you can think of as Google Sheets meets a database. The polling app relies on a specific schema. The base has two tables, Polls and Votes. Polls has a record of each poll created, and Votes contains a record of each vote. Votes are limited to one per Slack user per poll. The Polls and Votes tables are linked together, similar to using a foreign key with a SQL database.
Copy this template to your Airtable account by following the link and clicking “Copy base” in the top-right corner of the screen. It’s that simple! You can try interacting with the embedded base below.
Step 2: Start your workflow
Head over to https://build.stdlib.com (Build on Standard Library) to start building your workflow. You are going to start with the Slack command to create polls, so you’ll want to pick the following options:
Event:
Slack → command
With this command name… → poll
Actions:
Airtable → Insert a Row into a Base
Slack → Create a new Message from your Bot
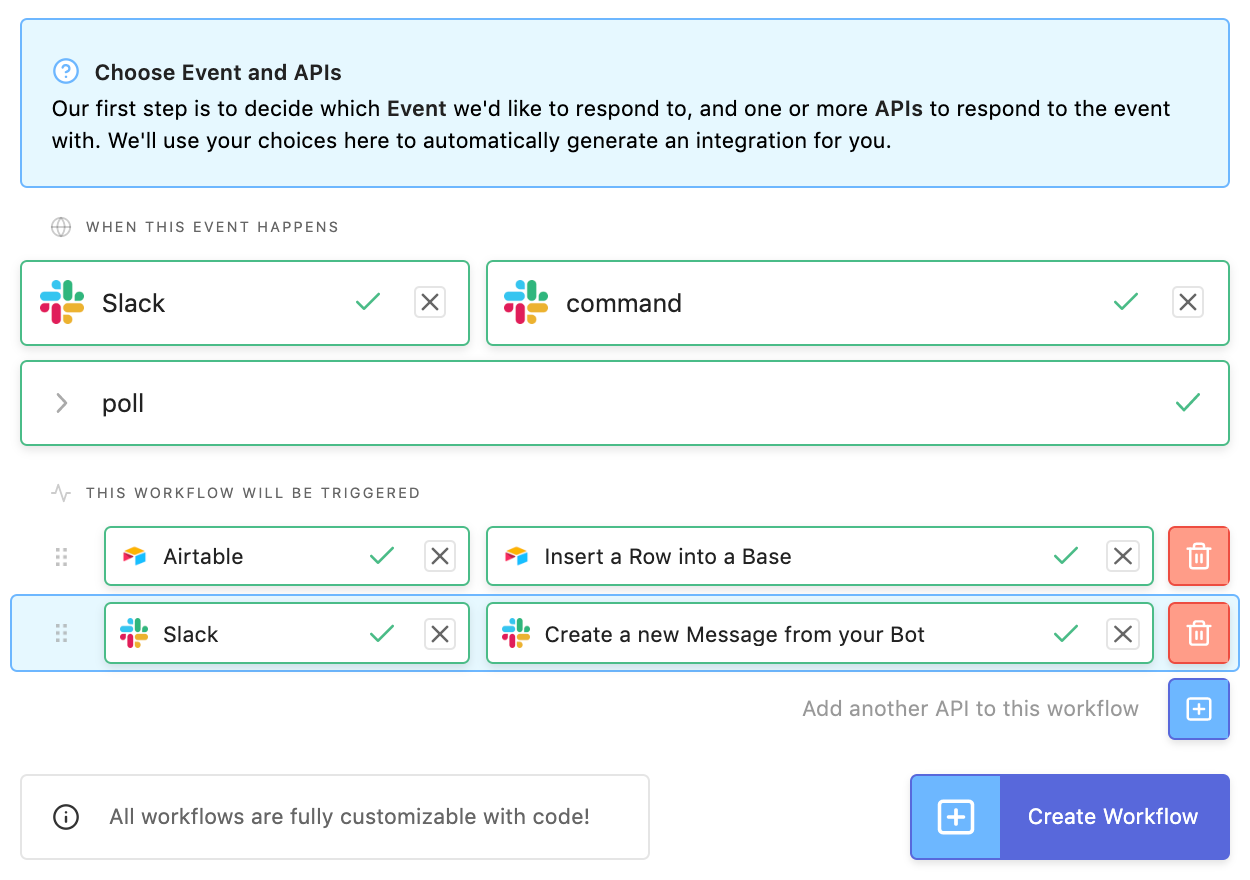
Click “Create Workflow” to continue
Step 3: Link your Accounts
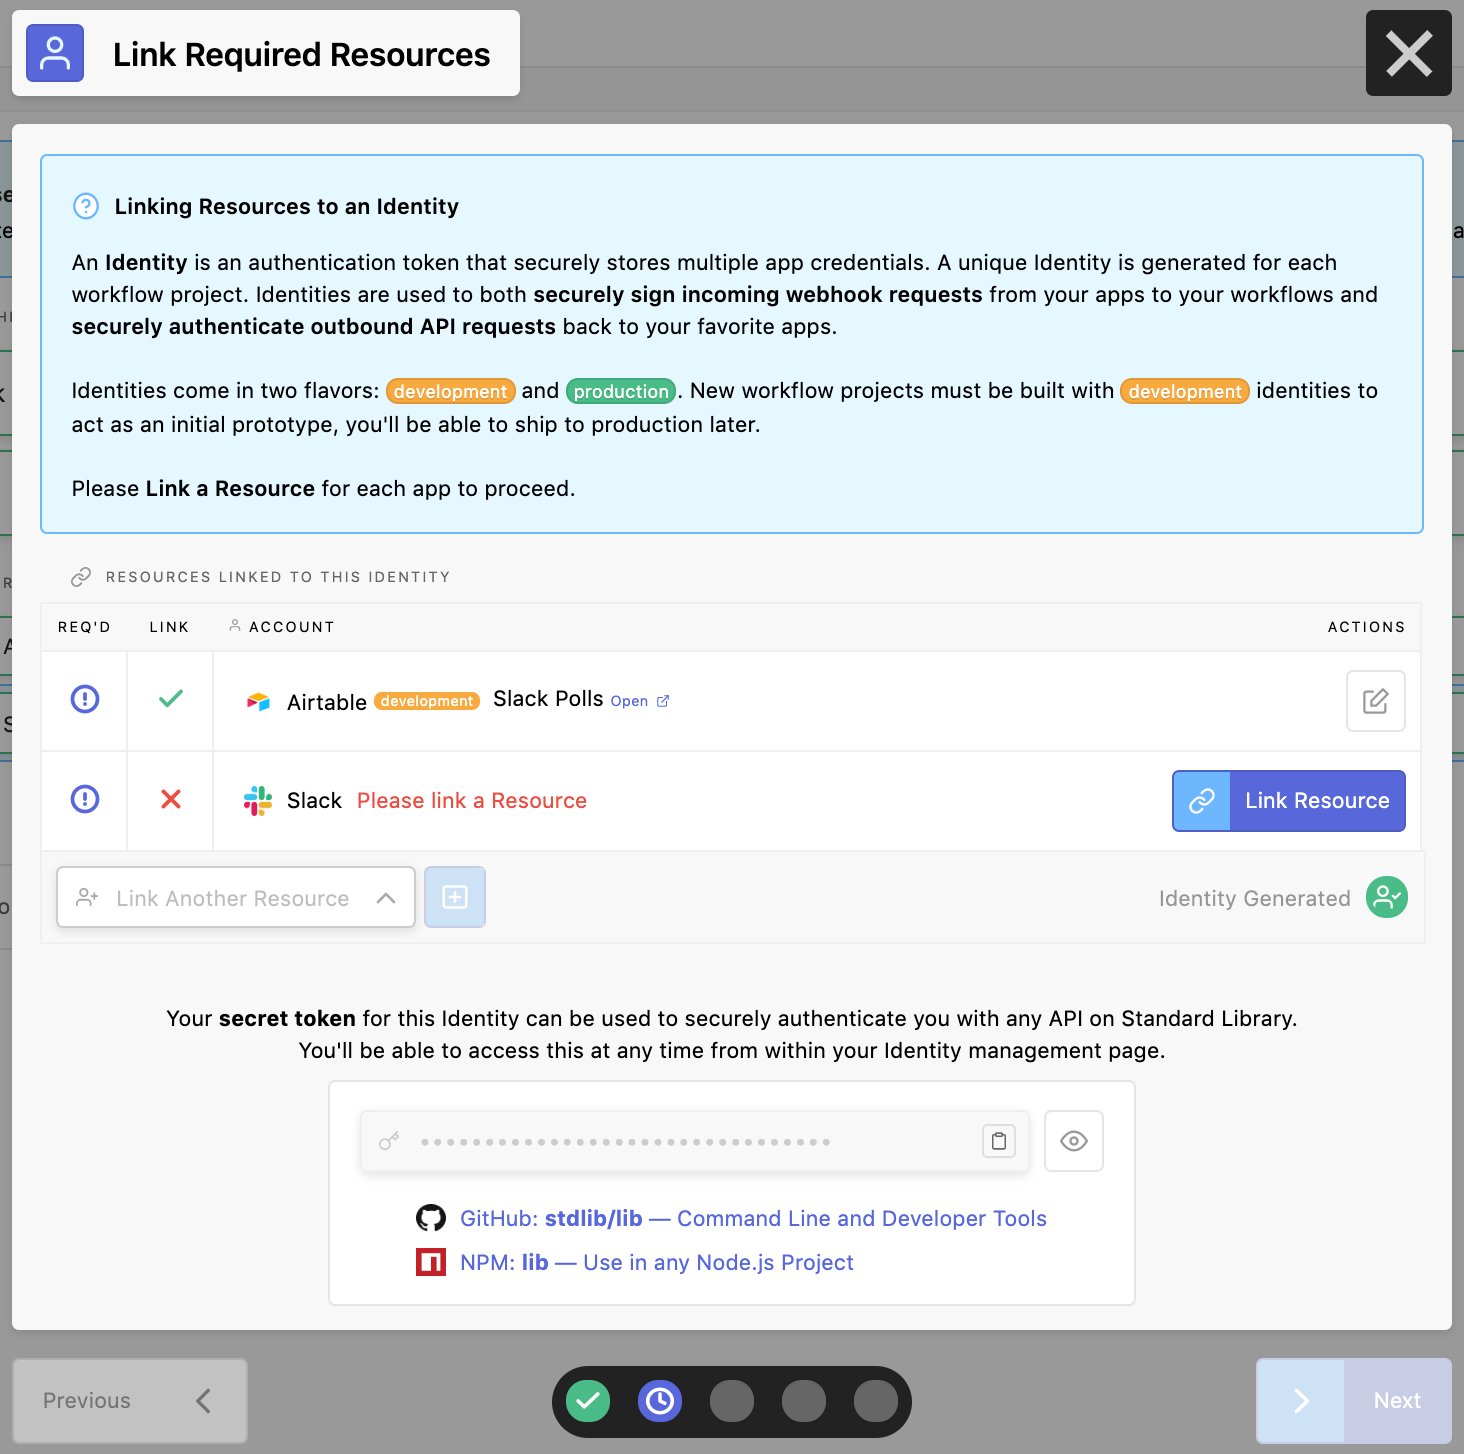
Standard Library provides the concept of Identities that manage third-party API credentials. Identities allow you to link your Airtable and Slack accounts once and use it with any workflows you build. After clicking “Create Workflow” in the last step, you should see a screen like this:

Linking your Airtable and Slack accounts
Step 3a: Linking your Airtable Account
From here, you’ll want to click the Link Resource button to the right of Airtable, and you’ll be prompted with this screen:

Choosing an Airtable base
If you haven’t linked an Airtable account before you won’t see any bases to choose from. Either way, click “Link New Resource”, and you’ll be prompted with this screen:
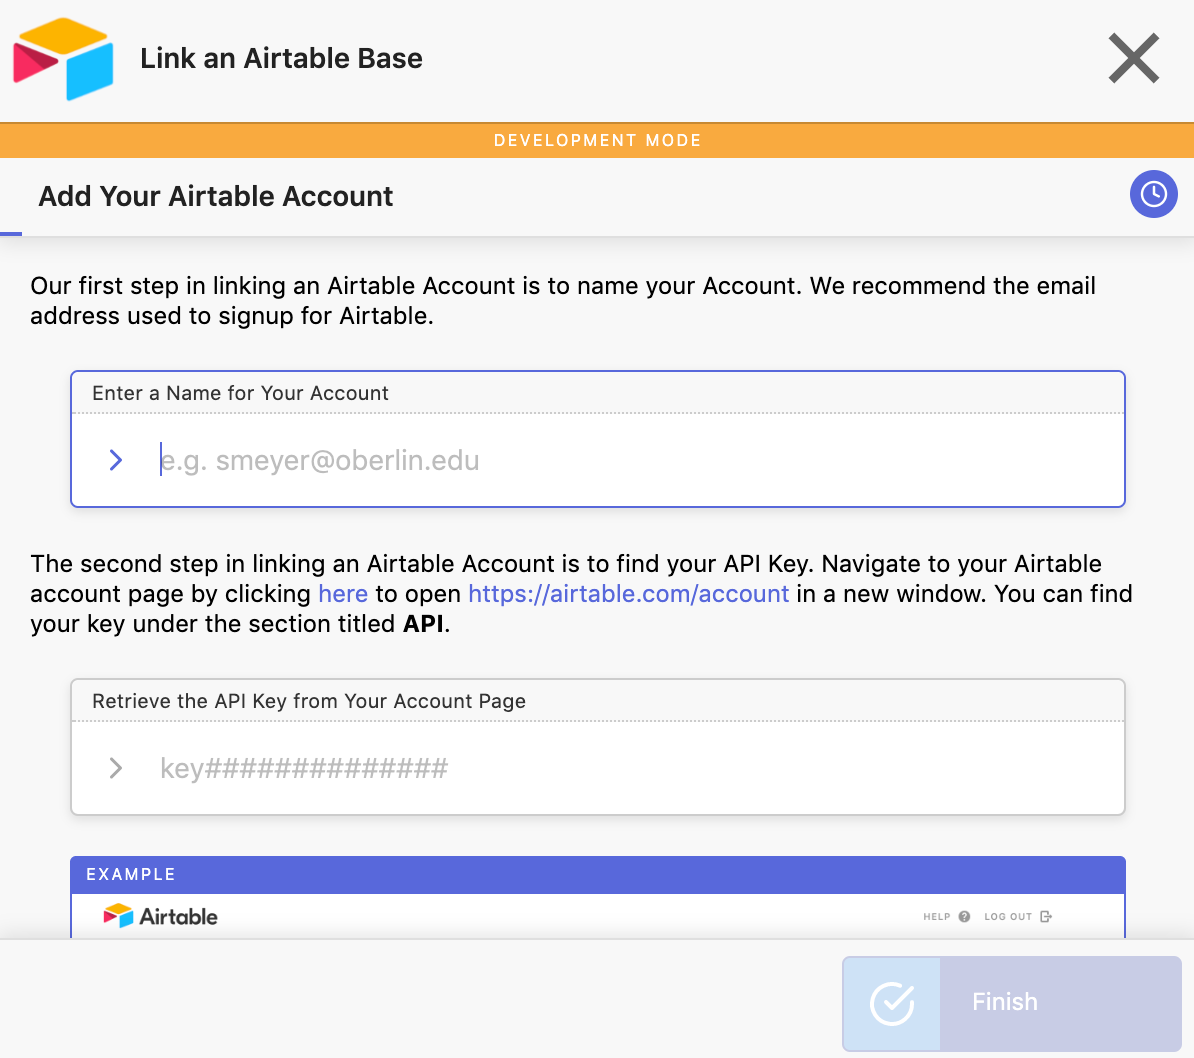
Linking your Airtable Account
To add an Airtable account, you need to set a display name, which we recommend to be the email you used to sign up for Airtable. You also need to copy and paste your API key, which can be found in the Airtable account management page. Once you’ve filled out the required fields, click “Finish”, and you’ll be prompted with this screen:
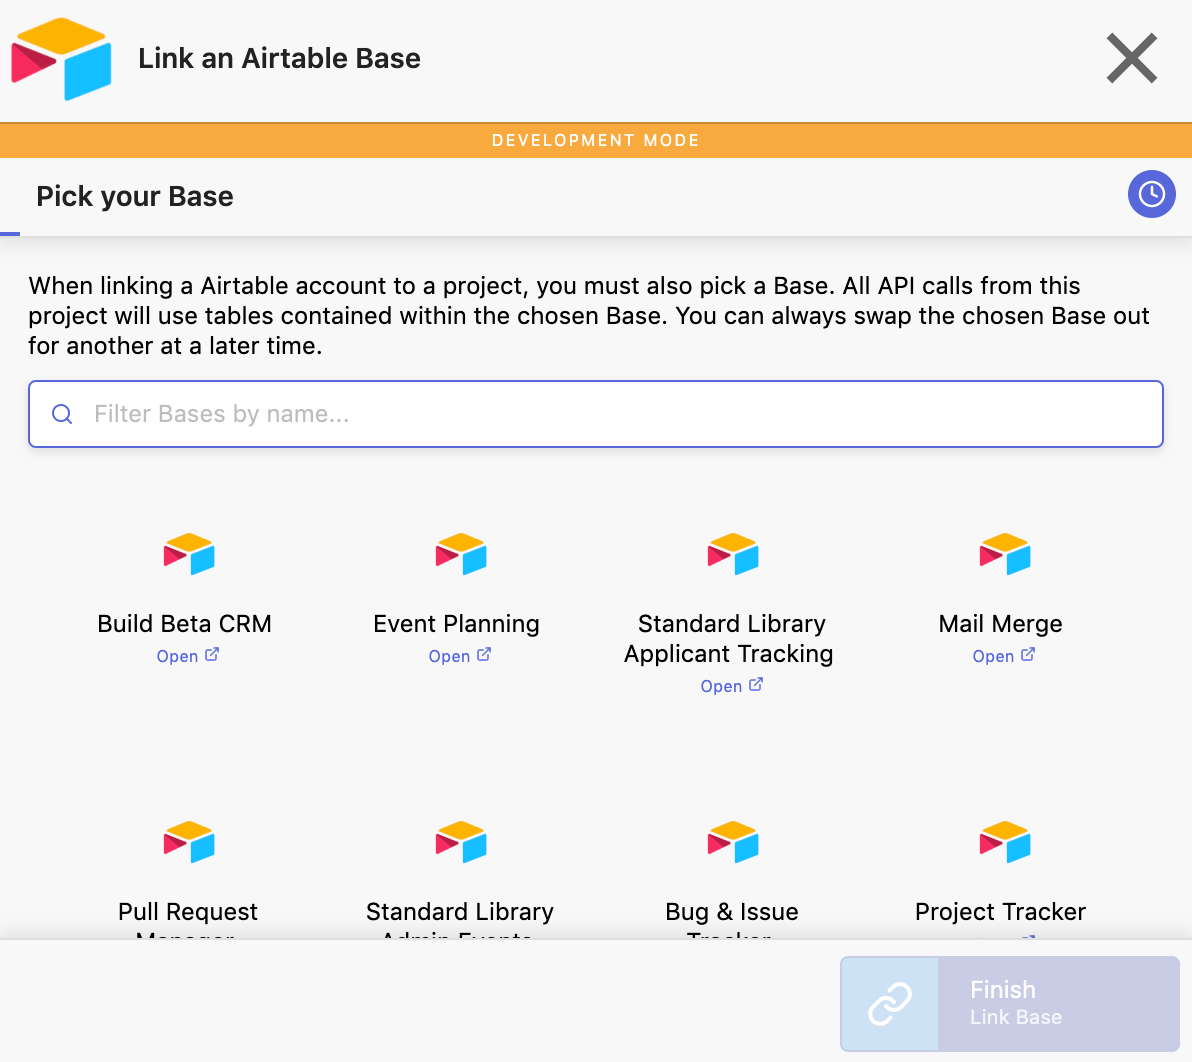
Choosing an Airtable base
You’ll be presented with a list of bases that your account has access to. You want to pick the one you copied from the template earlier, which is called “Slack Polls”. Click “Finish”, and you’ll be brought back to the Identities page:
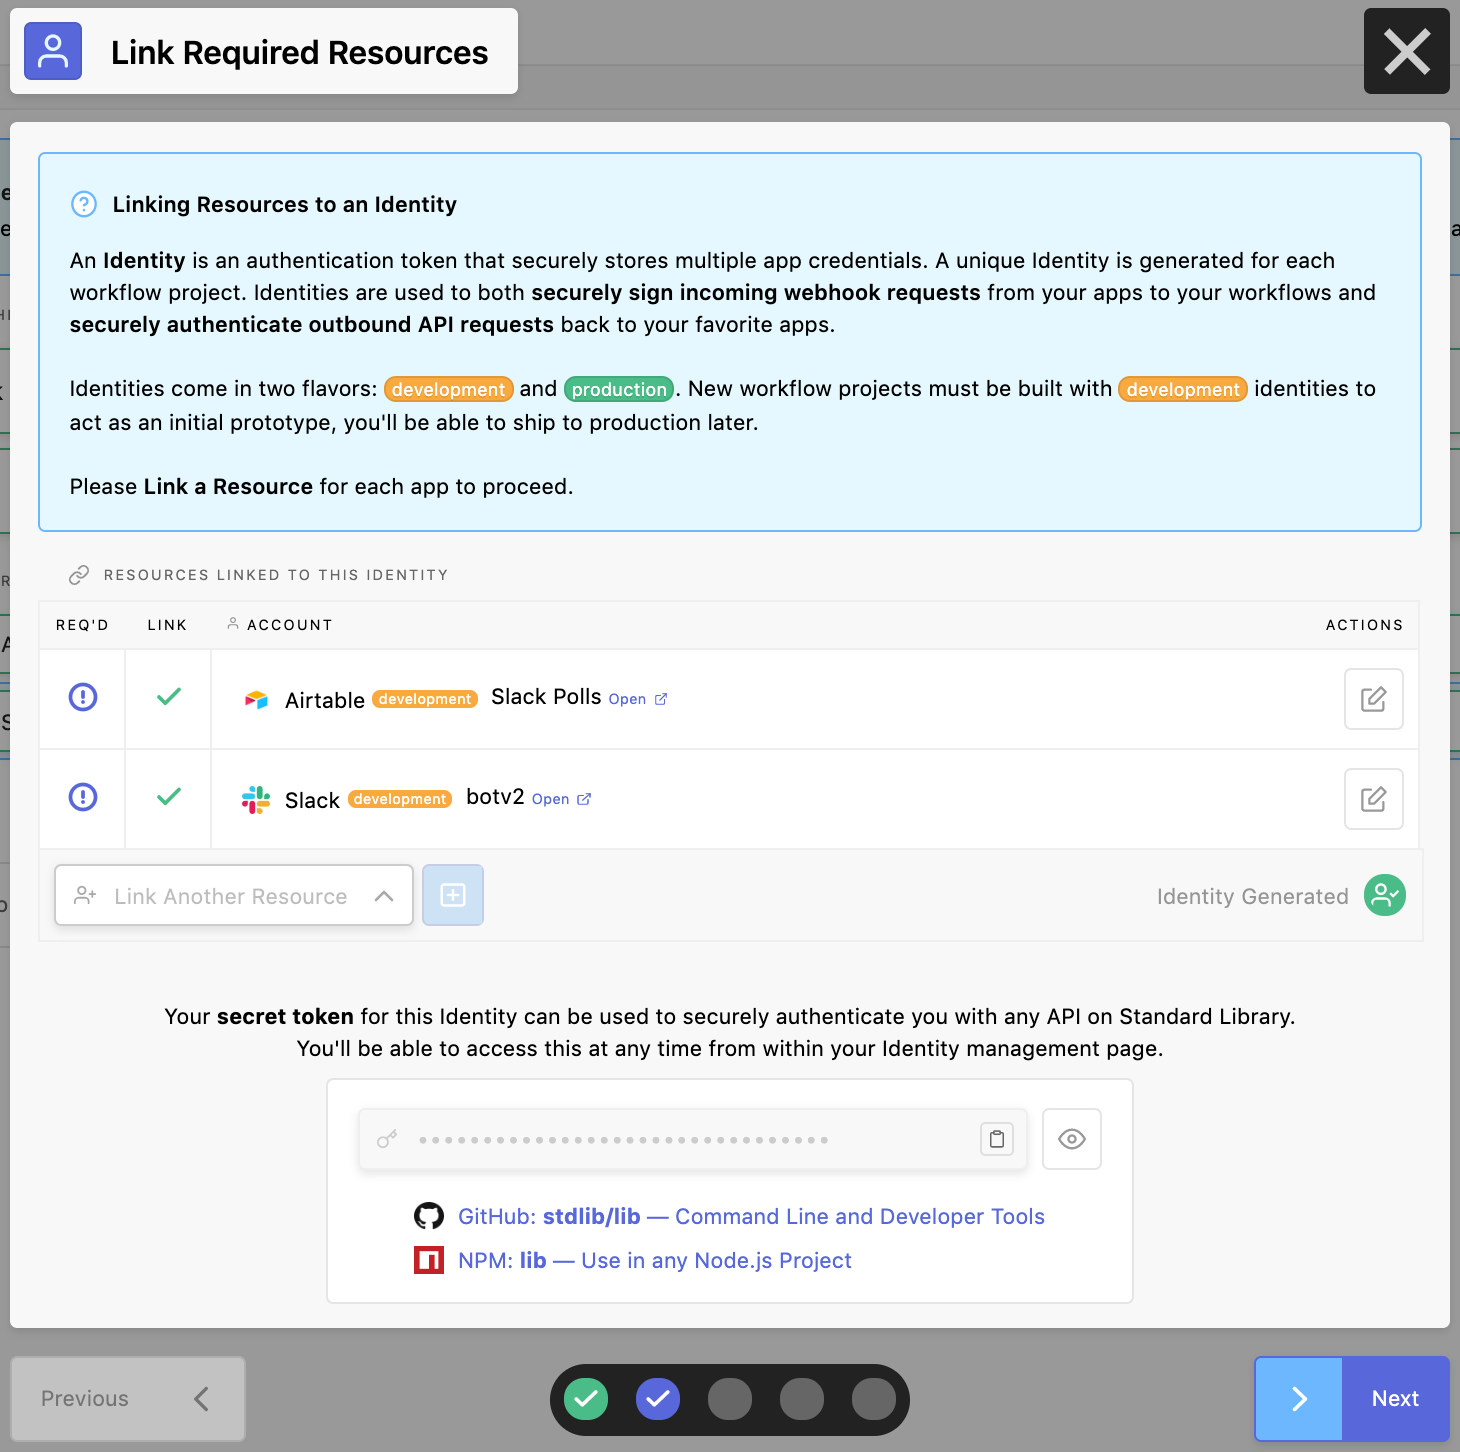
One down, one to go
Step 3b: Linking your Slack Account
From here, you’ll want to click the Link Resource button to the right of Slack, and you’ll be prompted with this screen:

Choosing a Slack App
If you haven’t linked a Slack account before you won’t see any Slack Apps to choose from. Regardless, click “Link New Resource” and you’ll be presented with detailed instructions on creating your Slack App. Once you’ve finished you’ll be brought back to your, now complete, Identity page:
Click “Next” to continue
Click “Next” to continue to the next step, where you’ll be asked to create your slash command:
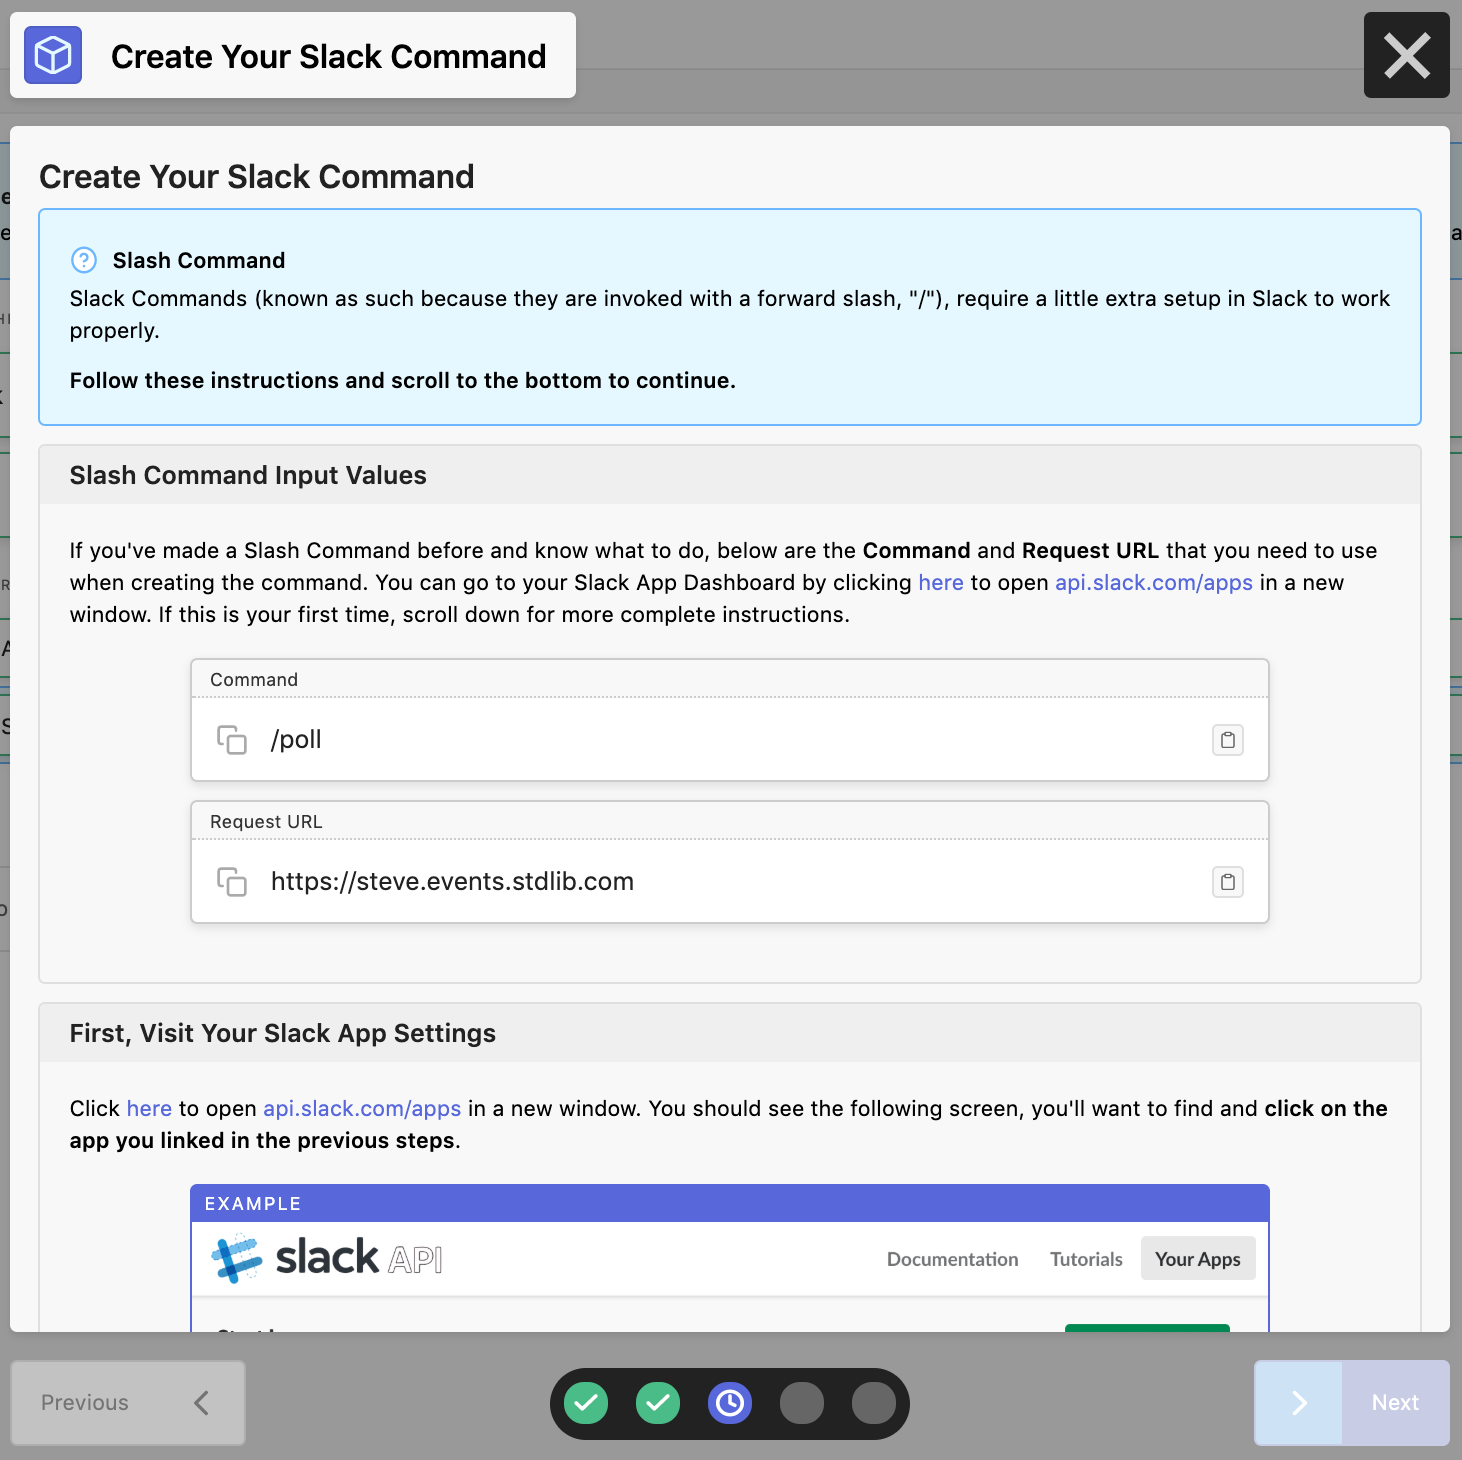
You’ll be given the command name (which was set when you picked the Slack → Command event) and your Request URL, which should be https://<username>.events.stdlib.com where <username> is your Standard Library username. Follow the instructions on the page and create your slack command:

Creating a slash command
Once you’ve created your slash command, click “Next” and you can start to configure your workflow.
Step 4: Configure your Workflow
After clicking “Next” in the previous step, you’ll be prompted with the following:
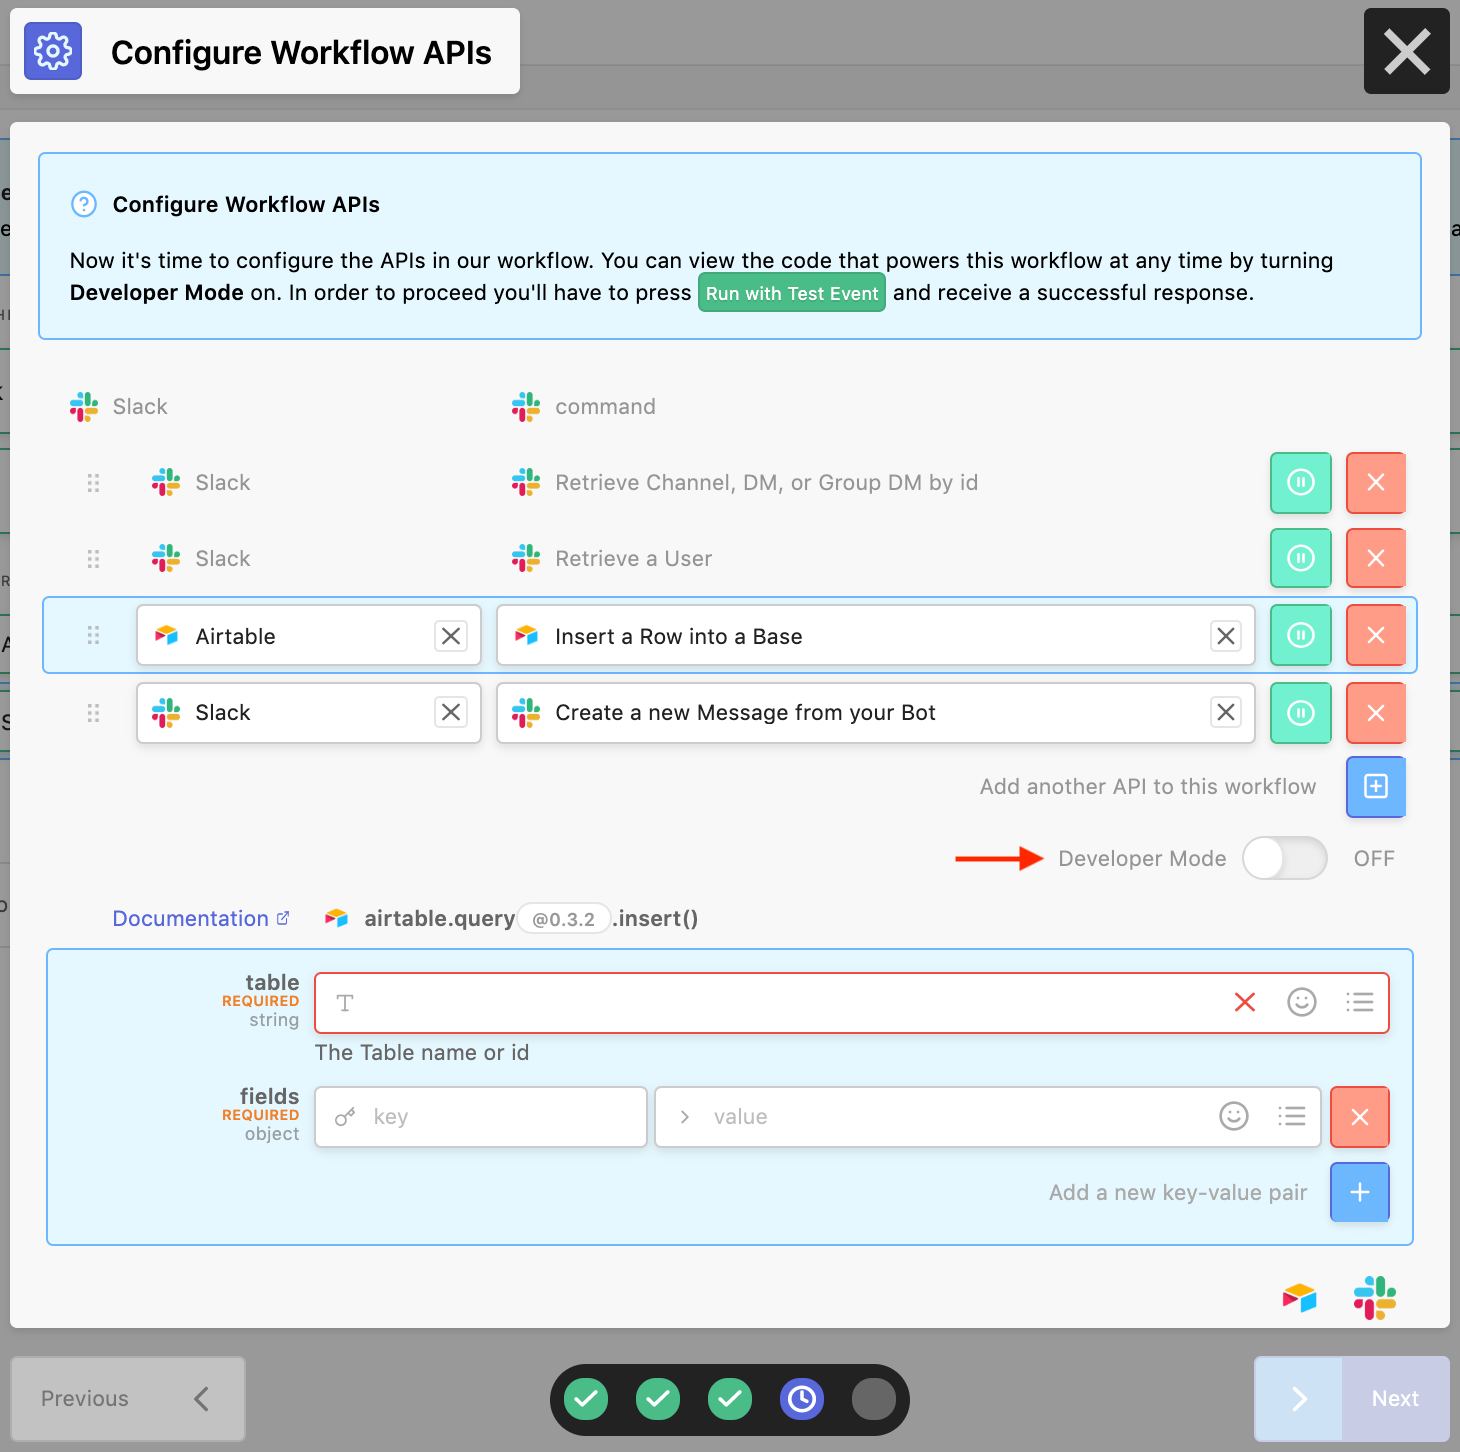
Toggle Developer Mode
At the top are the APIs used by this workflow. The first two are automatically added, and they enrich the event data sent by Slack. The second two are the ones you picked when you started building. Click the “Developer Mode” toggle, and you’ll see the code generated for the workflow. Delete the body of the function and replace it with the following code:
function createPoll ({ name, creator, options, pollId }) {
  const NUM_EMOJI = {
    1: ':one:',
    2: ':two:',
    3: ':three:',
    4: ':four:',
    5: ':five:',
    6: ':six:',
    7: ':seven:',
    8: ':eight:',
    9: ':nine:',
    10: ':keycap_ten:'
  };
let text = [

*${name}* Poll by <@${creator}>,

…options.map(

(option, index) => ${NUM_EMOJI[index + 1]} ${option.text} | ${option.votes} votes

)

].join(‘\n\n’);
const createButton = (index, pullId) => {

return {

name: ‘vote’,

text: NUM_EMOJI[index + 1],

type: ‘button’,

value: ${pullId}|${(index + 1).toString()}

};

};
return [

{

text: text,

fallback: *${name}* Poll by <@${creator}>,

callback_id: ‘vote’,

color: ‘#3AA3E3’,

attachment_type: ‘default’,

actions: options.map((_, index) => createButton(index, pollId))

}

];

}
let workflow = {};
let [name, …options] = event.text

.match(/“([^”]*)"/g) // Match all double quoted text

.map(s => s.slice(1, -1)); // Trim the double quotes off
workflow.poll = await lib.airtable.query[‘@0.3.2’].insert({

table: Polls,

fields: {

Name: name,

‘Creator Id’: event.user_id,

‘Channel Id’: event.channel_id,

Options: options.join(‘|’)

}

});
workflow.message = await lib.slack.messages[‘@0.5.1’].create({

id: event.channel_id,

as_user: false,

attachments: createPoll({

name: name,

creator: event.user_id,

options: options.map(option => {

return {

text: option,

votes: 0

};

}),

pollId: workflow.poll.fields.Id

})

});
workflow.updateQuery = await lib.airtable.query[‘@0.3.2’].update({

table: ‘Polls’,

where: [

{

Id: workflow.poll.fields.Id

}

],

fields: {

‘Message Timestamp’: workflow.message.ts

}

});
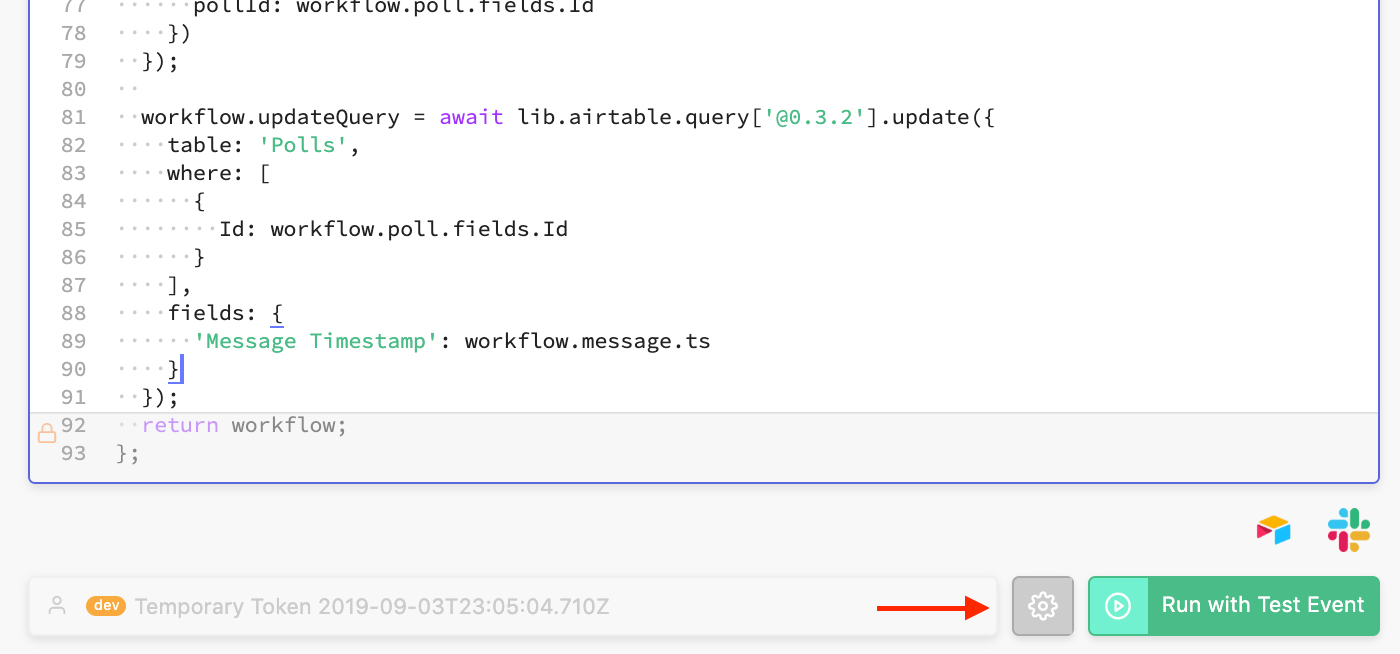
This code responds to the slash command by adding a record of it to Airtable and sending a message to Slack. With the new code in place, its time to test it out. Before doing so, you need to edit the test event data by clicking the gear icon next to “Run with Test Event”.
Click the gear icon
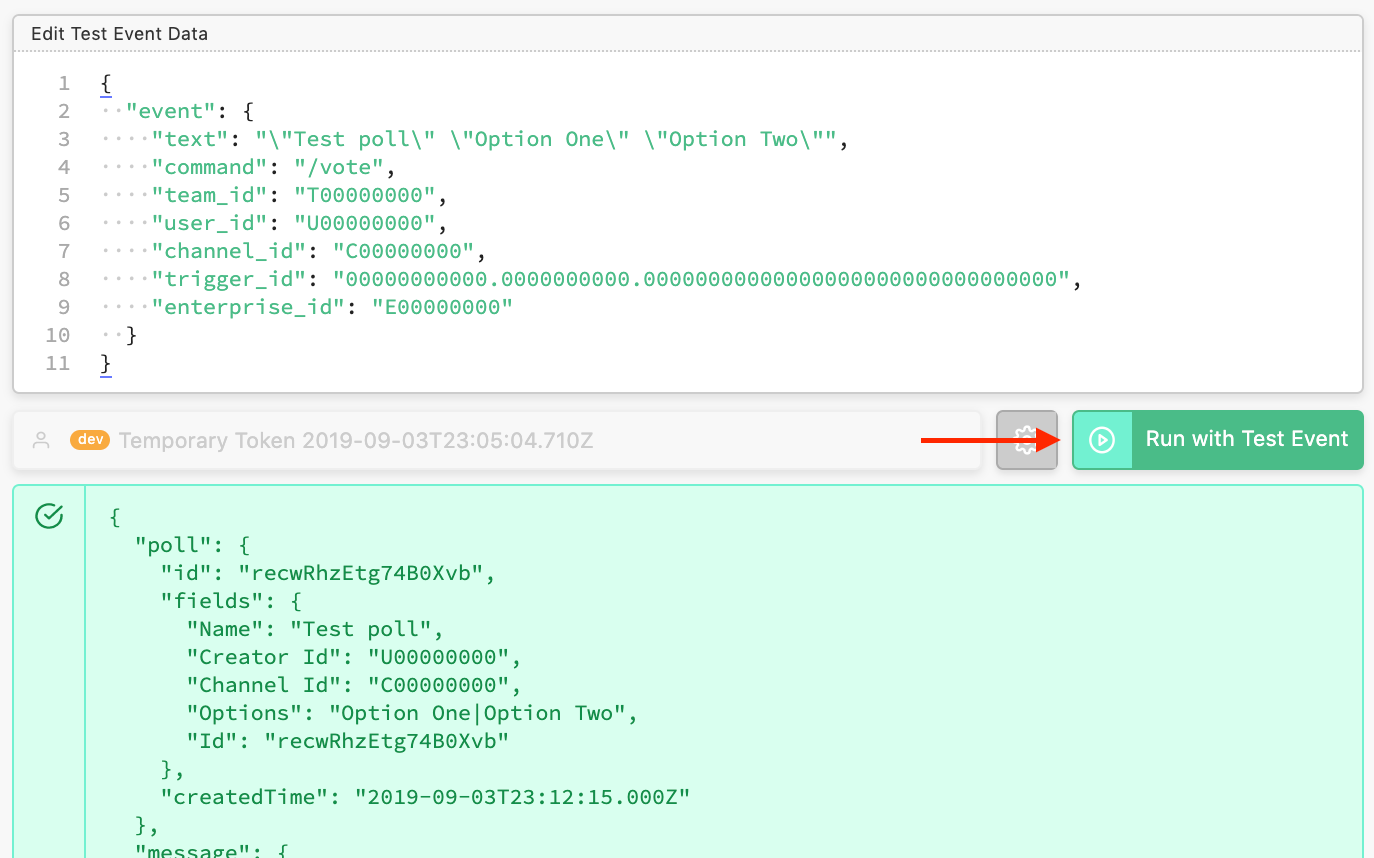
Copy and paste the following for the new test event:
{

“event”: {

“text”: ““Test poll” “Option One” “Option Two””,

“command”: “/vote”,

“team_id”: “T00000000”,

“user_id”: “U00000000”,

“channel_id”: “C00000000”,

“trigger_id”: “00000000000.0000000000.00000000000000000000”,

“enterprise_id”: “E00000000”

}

}
Now click “Run with Test Event”, and you should see some logs, a message in Slack, and a new Record in Airtable. Note: The message in Slack won’t be quite complete, because U00000000 is not a real Slack user id.
Log output from the test event
Message from the test event
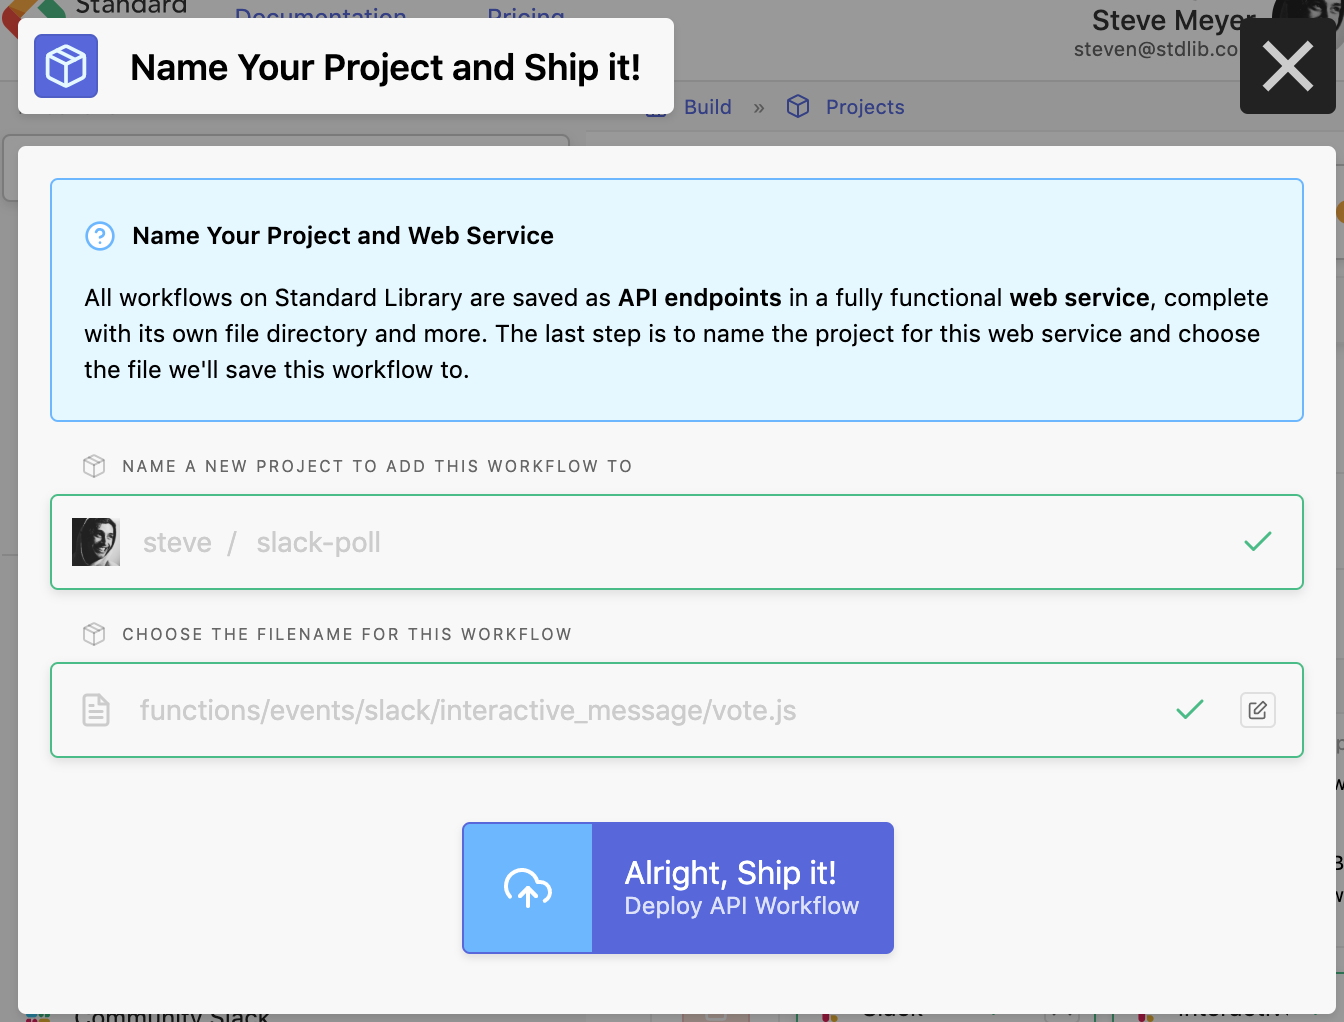
Step 5: Ship your Workflow
After running your workflow successfully in the last step, the blue “Next” button on the bottom right should be enabled. Click it to proceed, and you’ll be presented with this screen:
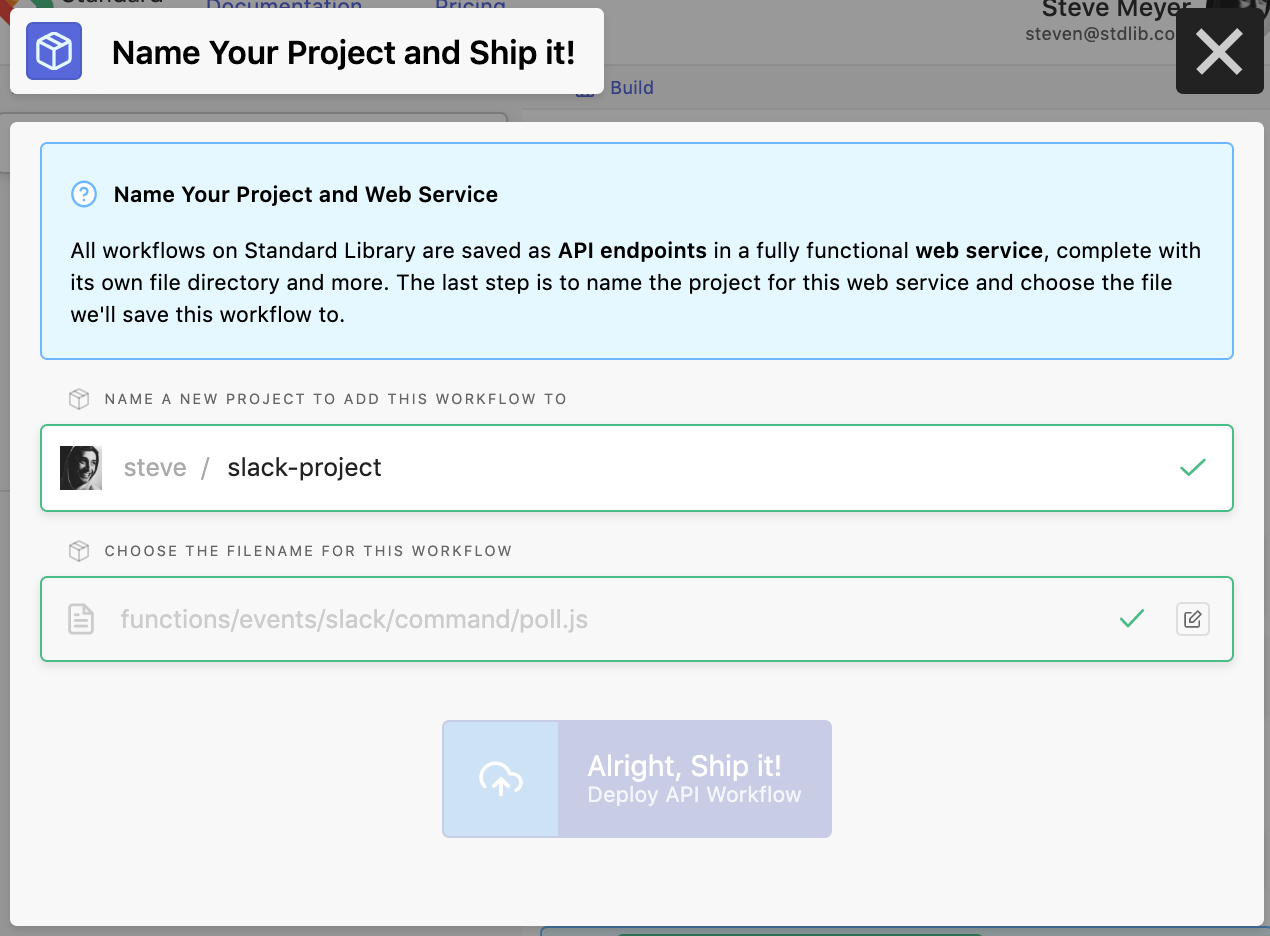
Name your project
The name of your Project should be automatically generated, along with the filename in which we’ll store our code-based workflow. Click “Alright, Ship it!” to proceed. You’ll see the following prompt:
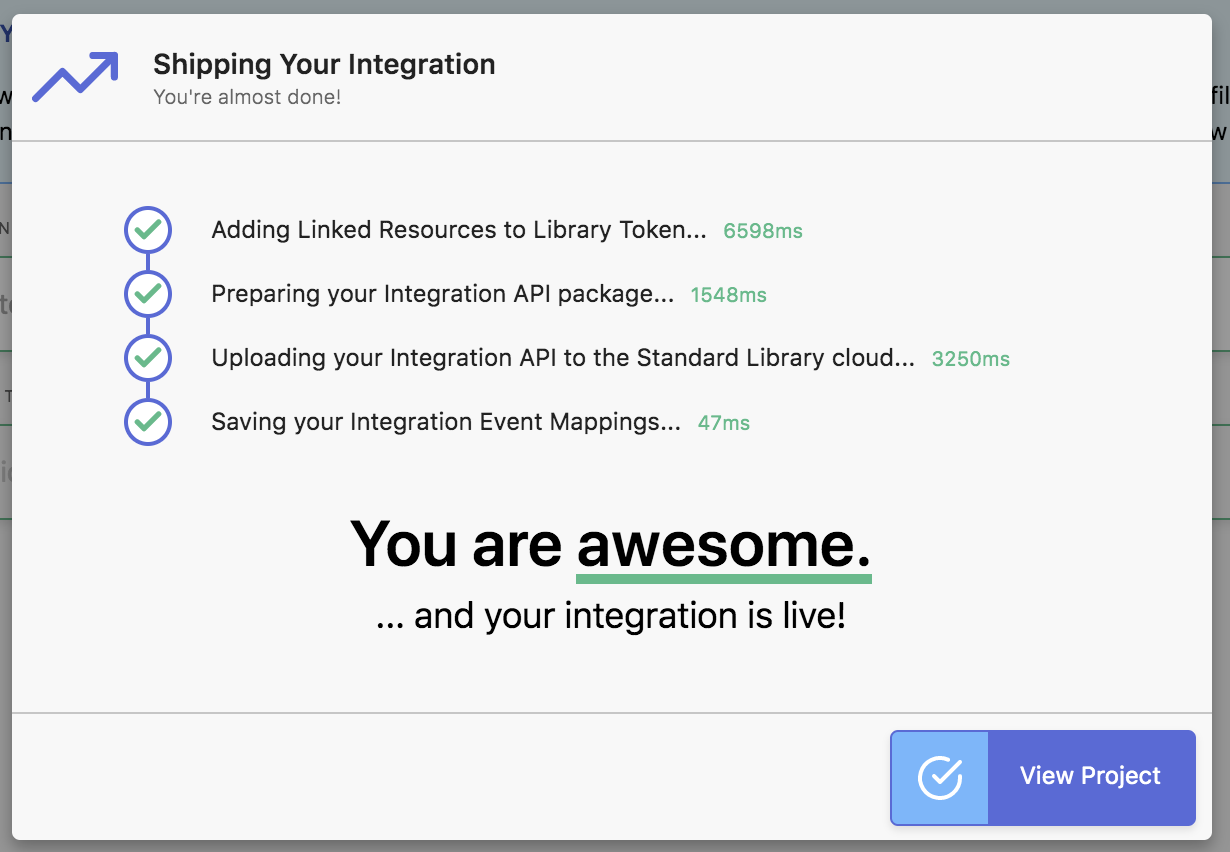
That’s it! Your workflow is live. Upon clicking “View Project” you’ll be brought to a project management screen.
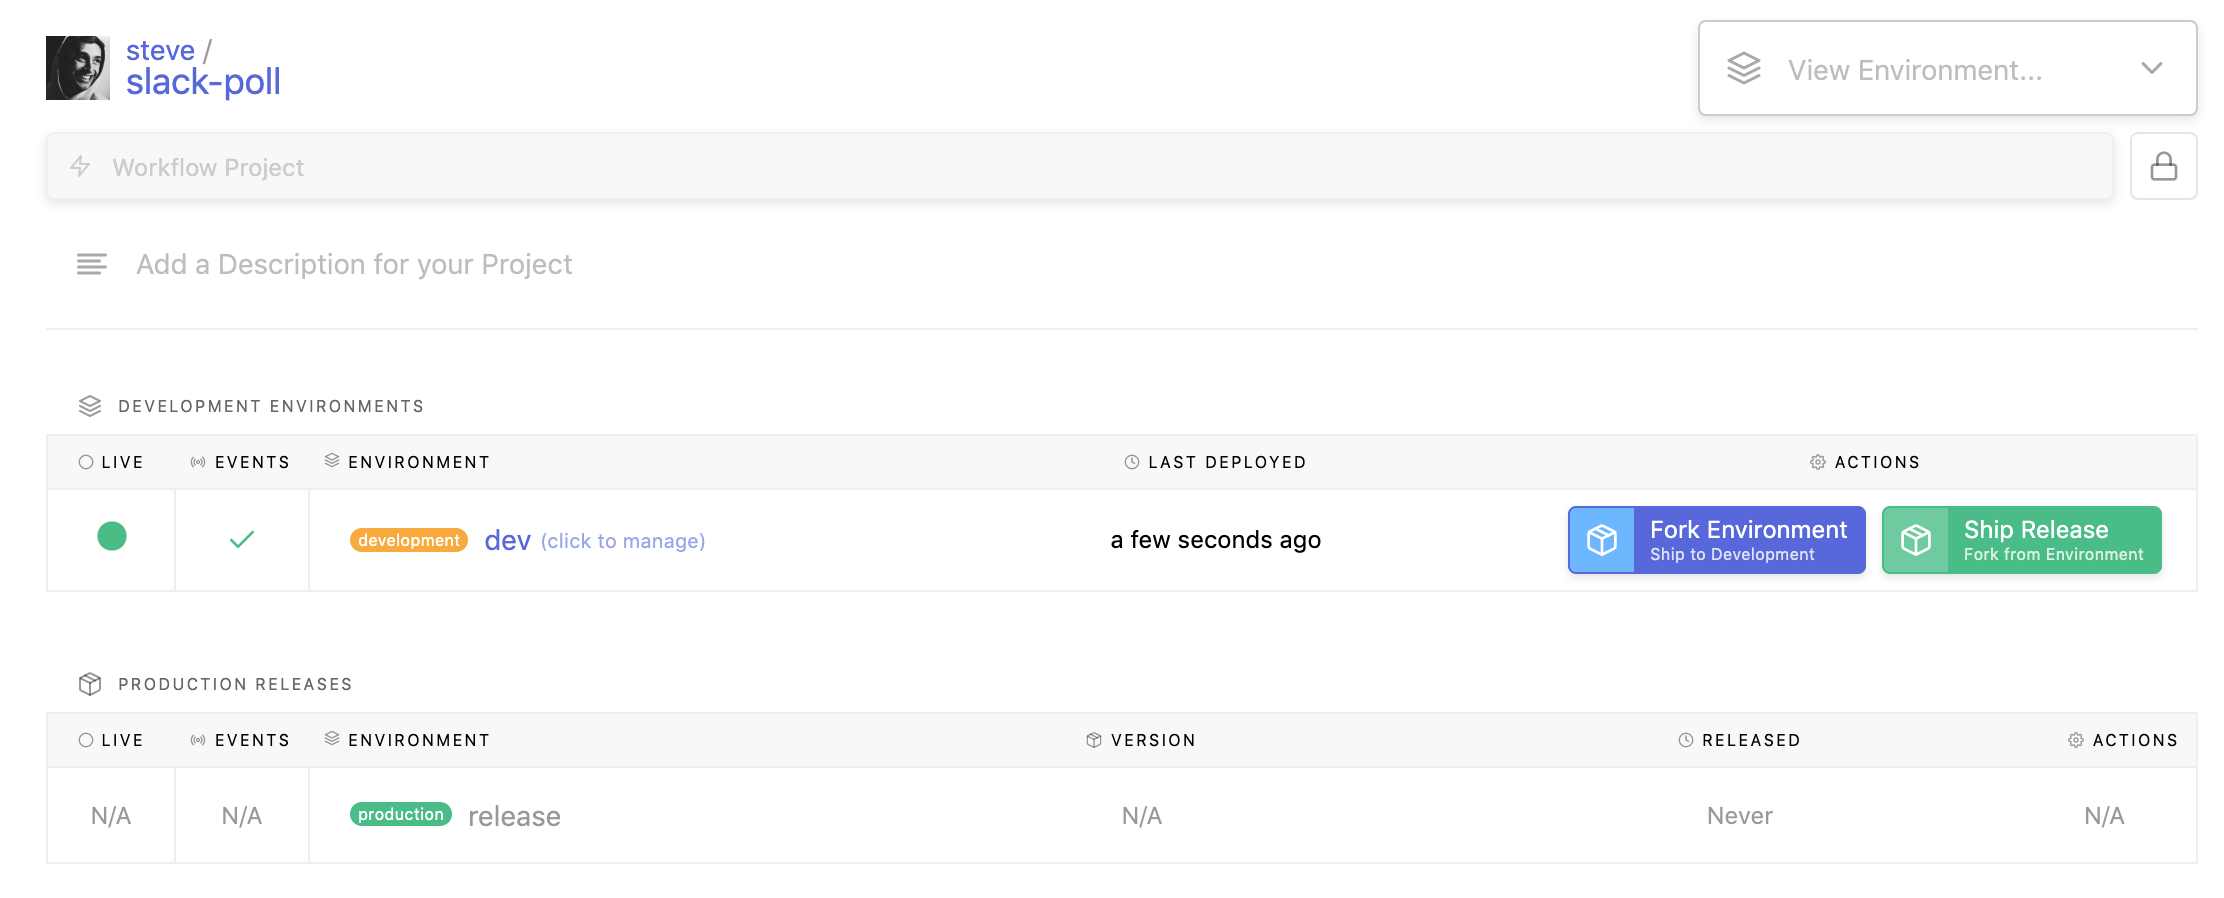
Click dev (click to manage)
For now, click “dev (click to manage)” to see your workflow development environment. You’ll see a summary of your workflow project and the API actions it’s taking. Now, from your Slack workspace, you can try creating a poll with /poll “<question>” “<option>” “<option 2>”! However, people won’t be able to vote on the poll just yet. To fix that you need to add one more handler.
Step 6: Add a new Handler
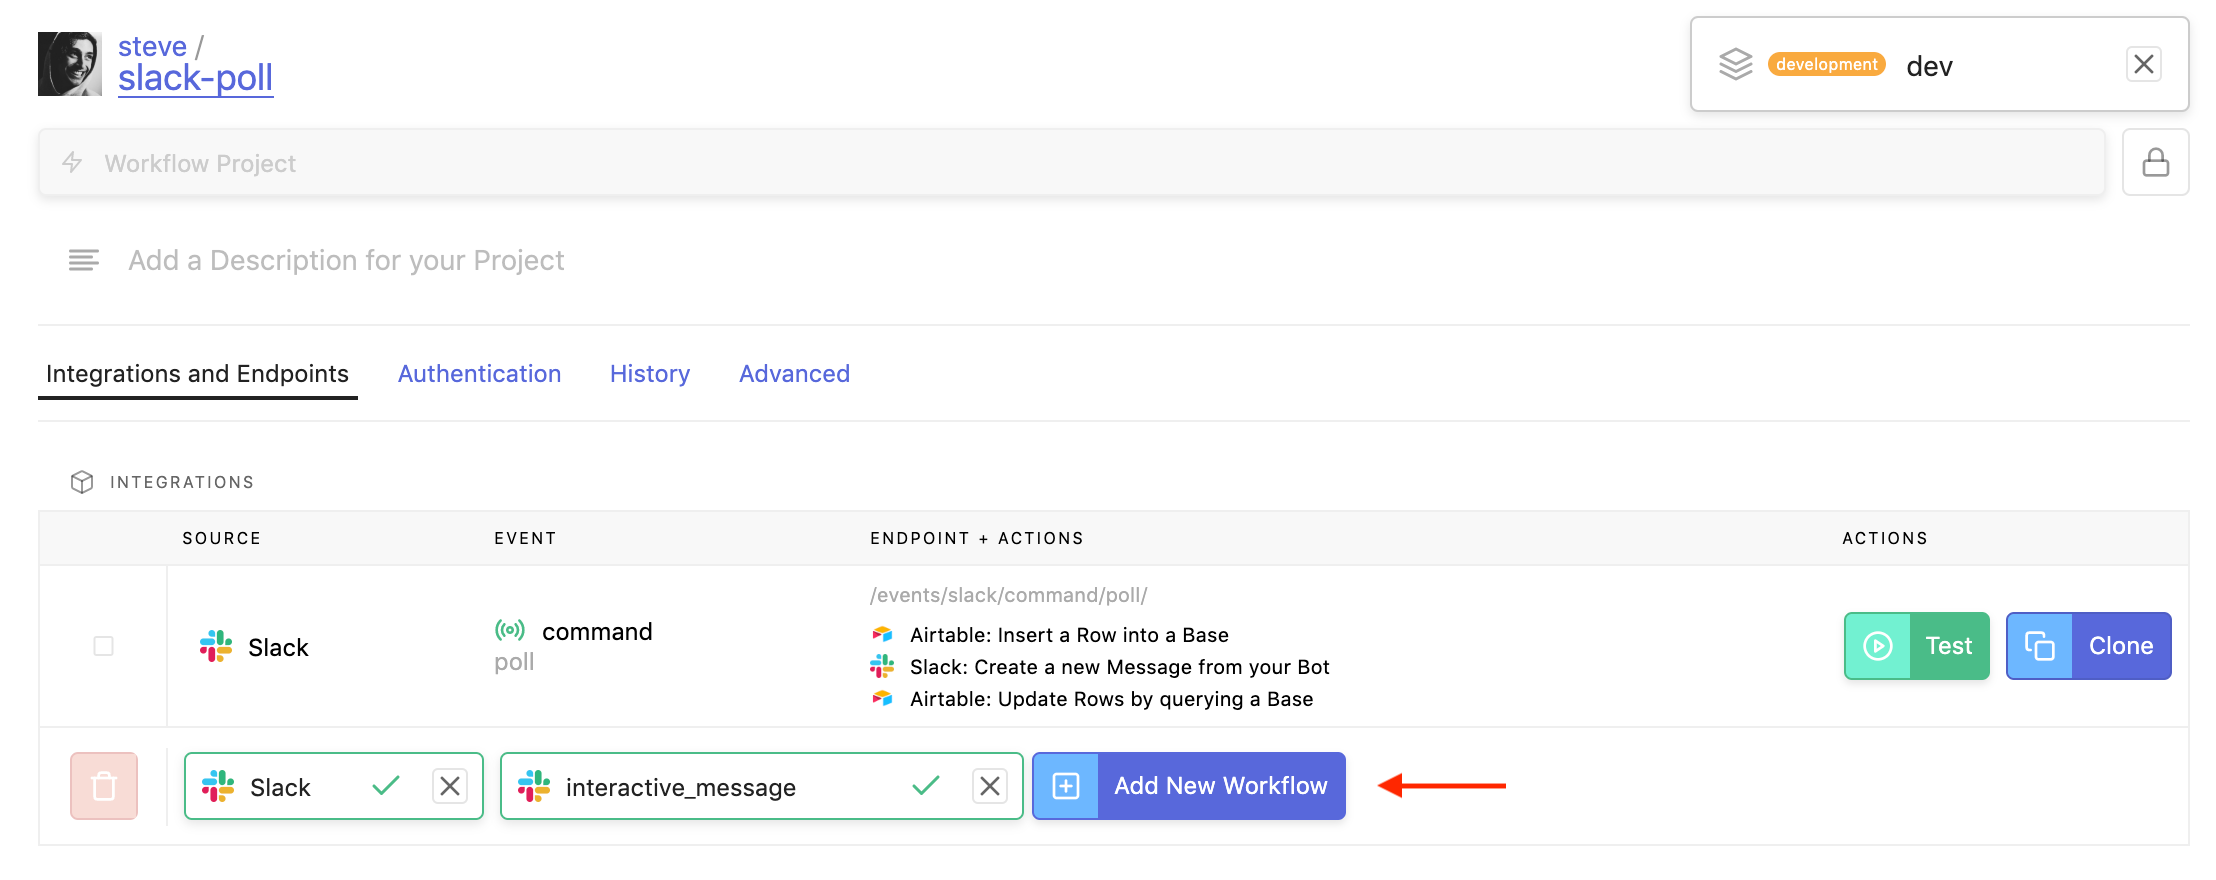
Workflow summary
At this point, you have one endpoint that handles the slash command. However, there is nothing set up for when a user votes. For that, you need to add another handler. From the integrations table, set Slack → interactive_message as the event and click “Add New Workflow”. You’ll be prompted with a familiar screen:
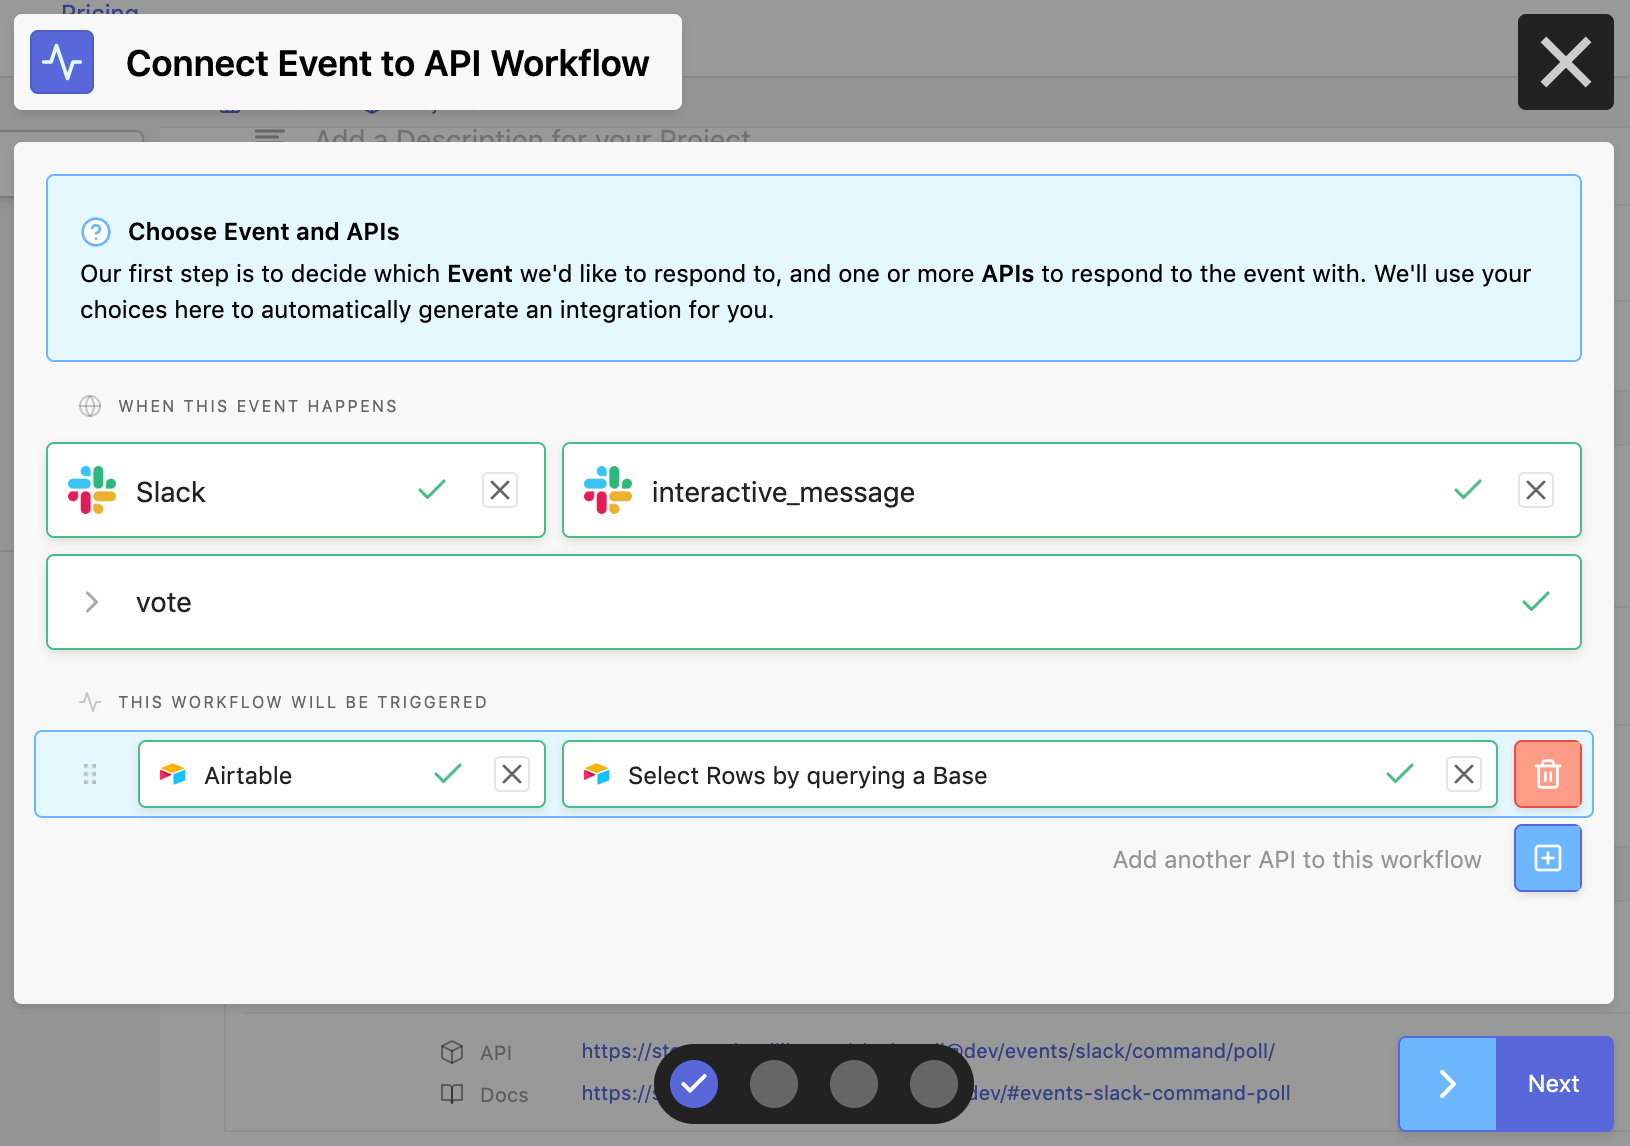
Adding a new handler
Set callback_id of the event to vote and add Airtable → Select Rows by querying a Base to the list of actions. Click “Next” and you’ll be brought to the Identities page. Everything is already linked so just click “Next” again to continue to the workflow configuration page.
Click the “Developer Mode” toggle, and you’ll see the code generated for the workflow. Delete the body of the function and replace it with the following code:
function createPoll ({ name, creator, options, pollId }) {

const NUM_EMOJI = {

1: ‘:one:’,

2: ‘:two:’,

3: ‘:three:’,

4: ‘:four:’,

5: ‘:five:’,

6: ‘:six:’,

7: ‘:seven:’,

8: ‘:eight:’,

9: ‘:nine:’,

10: ‘:keycap_ten:’

};
let text = [

*${name}* Poll by <@${creator}>,

…options.map(

(option, index) => ${NUM_EMOJI[index + 1]} ${option.text} | ${option.votes} votes

)

].join(‘\n\n’);
const createButton = (index, pullId) => {

return {

name: ‘vote’,

text: NUM_EMOJI[index + 1],

type: ‘button’,

value: ${pullId}|${(index + 1).toString()}

};

};
return [

{

text: text,

fallback: *${name}* Poll by <@${creator}>,

callback_id: ‘vote’,

color: ‘#3AA3E3’,

attachment_type: ‘default’,

actions: options.map((_, index) => createButton(index, pollId))

}

];

}
let workflow = {};
let action = event.actions.find(action => action.name === ‘vote’);

if (!action) {

return {};

}
let [pollId, choice] = action.value.split(‘|’);
workflow.previousVote = await lib.airtable.query[‘@0.3.2’]

.select({

table: ‘Votes’,

where: [

{

Poll__contains: pollId,

‘User Id’: event.user.id

}

]

})

.then(results => results.rows.pop());
if (workflow.previousVote) {

await lib.airtable.query[‘@0.3.2’].update({

table: ‘Votes’,

where: [

{

Id: workflow.previousVote.fields.Id

}

],

fields: {

Choice: choice

}

});

} else {

await lib.airtable.query[‘@0.3.2’].insert({

table: ‘Votes’,

fields: {

Poll: [pollId],

‘User Id’: event.user.id,

Choice: choice

}

});

}
workflow.poll = await lib.airtable.query[‘@0.3.2’]

.select({

table: ‘Polls’,

where: [{ Id: pollId }]

})

.then(results => results.rows.pop());
workflow.votes = await lib.airtable.query[‘@0.3.2’]

.select({

table: ‘Votes’,

where: [

{

Poll__contains: pollId

}

]

})

.then(results => results.rows);
let options = workflow.poll.fields.Options.split(‘|’).map((option, index) => {

return {

text: option,

votes: workflow.votes.filter(vote => parseInt(vote.fields.Choice) === index + 1).length

};

});
await lib.slack.messages[‘@0.5.1’].update({

id: workflow.poll.fields[‘Channel Id’],

ts: workflow.poll.fields[‘Message Timestamp’],

attachments: createPoll({

name: workflow.poll.fields.Name,

creator: workflow.poll.fields[‘Creator Id’],

options: options,

pollId: workflow.poll.fields.Id

})

});
This code responds to the interactive_message event (i.e., a button is clicked) by adding a record of the vote to Airtable and updating the Slack message to reflect the new vote. Now click “Run with Test Event”. You won’t see much, because there is no poll up yet to test voting on.
After running your workflow successfully, the blue “Next” button on the bottom right should be enabled, click it to proceed. You should see a familiar screen:
Adding a new handler
Click “Alright, Ship it!” to proceed. When it’s finished click “View Project” you’ll be brought to a project management screen. Again, click “dev (click to manage)” to see your workflow development environment. It should now have two endpoints.

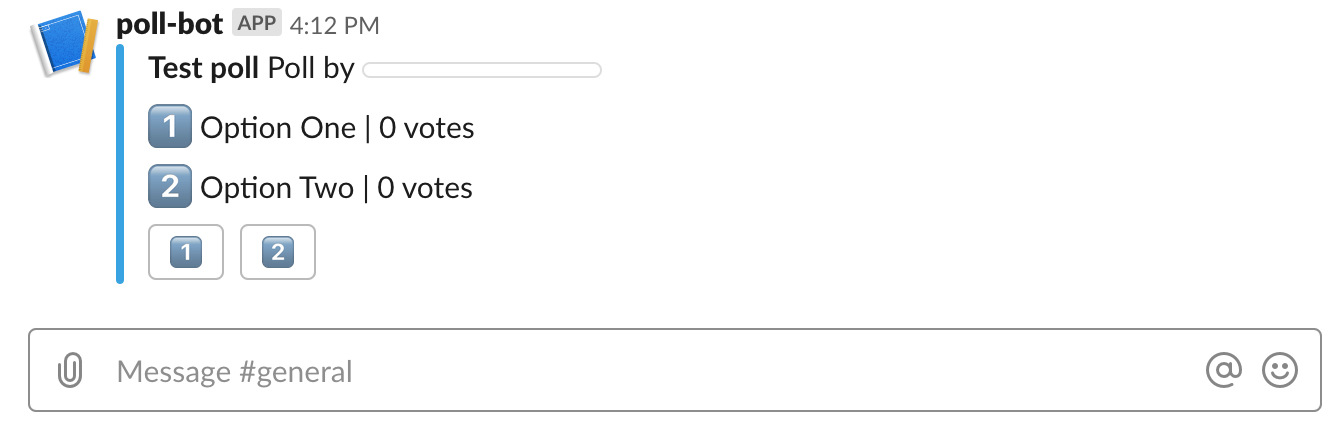
With both endpoints up, you can now test out your app. Go to slack and type:
/poll “Test poll” “Option one” “Option two” “Option three”
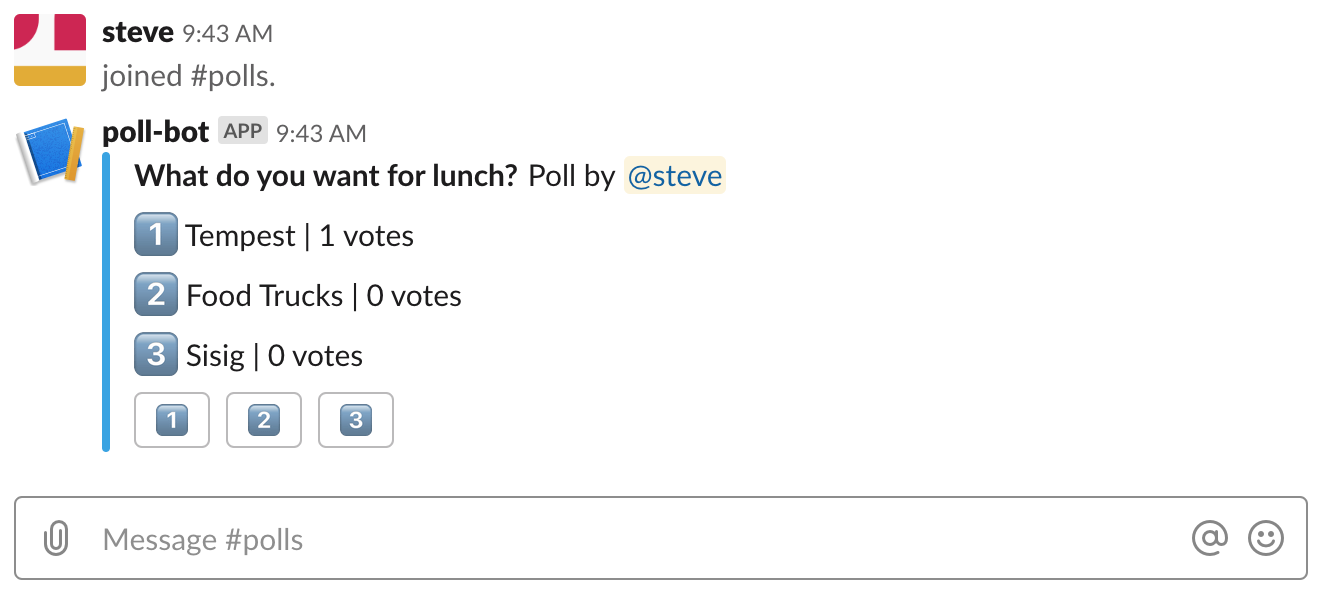
After a moment you should see a poll pop up in the channel:
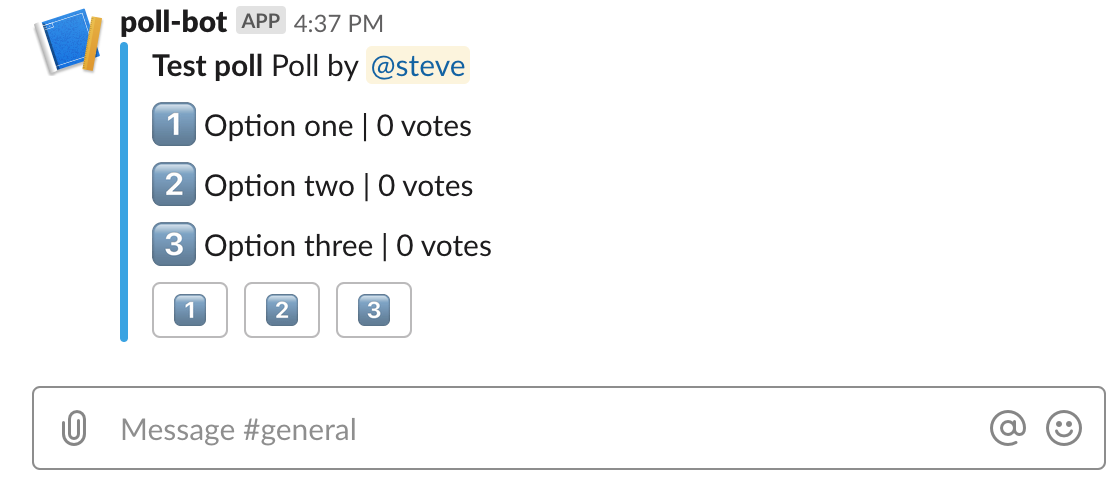
Click the numbers to vote for each corresponding option. You can only vote once, but you can switch your vote by picking a second number.
That’s it!
In just a few minutes you set up a Poll App with Airtable, Slack, and Standard Library. As you just saw, you have full control when customizing your workflow with code. You can configure it do just about anything.
Thanks for reading ❤
If you liked this post, share it with all of your programming buddies!
Follow us on Facebook | Twitter
Further reading
☞ The Complete Node.js Developer Course (3rd Edition)
☞ Angular & NodeJS - The MEAN Stack Guide
☞ NodeJS - The Complete Guide (incl. MVC, REST APIs, GraphQL)
☞ Best 50 Nodejs interview questions from Beginners to Advanced in 2019
☞ Node.js 12: The future of server-side JavaScript
☞ An Introduction to Node.js Design Patterns
☞ Basic Server Side Rendering with Vue.js and Express
☞ Fullstack Vue App with MongoDB, Express.js and Node.js
☞ How to create a full stack React/Express/MongoDB app using Docker
#node-js #web-development