Learn how to use and modify SQL tables within JupyterLabs
Jupyter Notebooks are an essential part of any Data Science workflow, so much so that many of the organizations like Netflix find them indispensable. The browser-based computing environment, coupled with reproducible document format, has made them the de-facto choice of millions of data scientists and researchers around the globe. Jupyter boasts of a great international community coming from almost every country on earth. The community themselves has developed a lot of kernels.
Jupyter Lab is the next-generation user interface for Project Jupyter offering all the familiar building blocks of the classic Jupyter Notebook like the notebook, terminal, text editor, file browser, rich outputs, etc. However, unlike the classic notebooks, all these features are provided in a flexible and powerful user interface. The basic idea of the Jupyter Lab is to bring all the building blocks that are in the classic notebook, plus some new stuff, under one roof.
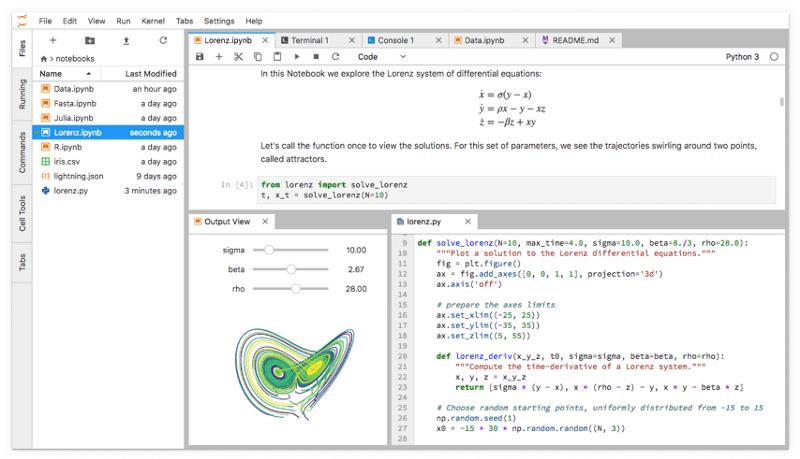
JupyterLab showing its work area with notebooks, text files, terminals, and notebook outputs all capable of interacting with each other.
Let’s first get Jupyter Lab installed and running on our systems.
Installation JupyterLab
JupyterLab can be installed using conda, pip, or pipenv.
conda install -c conda-forge jupyterlab

or

pip install jupyterlab

or

pipenv install jupyterlab

pipenv shell
Have a look at the official installation documentation for more details.
Have a look at the official installation documentation for more details.
Starting JupyterLab
You can start Jupyter by simply typing the following in the console:
jupyter lab
JupyterLab will open automatically open in the browser with an interface resembling the one below. This means everything is in place, and you are good to go.
The main work area is the place where the actual activity takes place. It comprises of the notebooks, documents, consoles, terminals, etc. Just double click or drag a file on to this area to start working.
SQL Interface to JupyterLab

Most of the times, the data that we work with is stored in files called databases, and an essential task of a Data Scientist is to be able to access data from databases and then analyze it. Therefore it is a great idea to have a seamless interface between SQL databases and Jupyter Notebook/Lab so that accessing and manipulating data becomes easier and more efficient. This interface can be achieved in two possible ways:
1. Using IPython SQL Magic extension
Magic commands are a set of convenient functions in Jupyter Notebooks that are designed to solve some of the common problems in standard data analysis. You can see all of the available magics with the help of %lsmagic.
IPython SQL magic extension makes it possible to write SQL queries directly into code cells as well as read the results straight into pandas DataFrames. This works for both the traditional notebooks as well as the modern Jupyter Labs.
Installing SQL module in the notebook
!pip install ipython-sql
Loading the SQL module
%load_ext sql
The above magic command loads the ipython-sql extension. We can connect to any database which is supported by SQLAlchemy. Here we will connect to a SQLite database. Enter the following command in the code cell:
%sql sqlite://
If you get the output as ‘Connected: @None', this means the connection has been established.
- Creating a database
Finally, we create a demo table called EMPLOYEES to showcase the function.
%%sql
CREATE TABLE EMPLOYEE(firstname varchar(50),lastname varchar(50));
INSERT INTO EMPLOYEE VALUES('Tom','Mitchell');
INSERT INTO EMPLOYEE VALUES('Jack','Ryan');
We can now execute queries on our database.
%sql SELECT * from EMPLOYEE;
 ----------------------------------
 * sqlite://
 Done.
The above query outputs the following table.

- Working with an existing database
We can also connect to an existing database using the magic function. For this tutorial, we will be making use of the SQL_SAFI database(Studying African Farmer-led Irrigation (SAFI) database). “The SAFI Project is a research project looking at farming and irrigation methods used by farmers in Tanzania and Mozambique. This dataset is composed of survey data relating to households and agriculture”. You can download it from here.
#Specifying the path of the database
 %sql sqlite:////Users/Parul/Desktop/SQL_SAFI.sqlite
 -----------------------------------------------------------

'Connected: @/Users/Parul/Desktop/SQL_SAFI.sqlite'
he above statement opened the database named SQL_SAFI.sqlite that resides in the path: Users/Parul/Desktop. Let’s select the Crops table and display its contents.
%sql select * from Crops
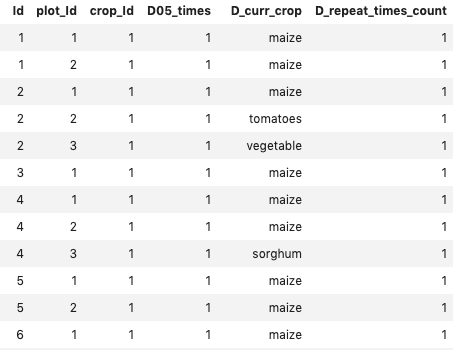
Displaying first few rows of the Crops Table
%sql select * from Crops where D_curr_crop = "maize" AND ID <= 3;

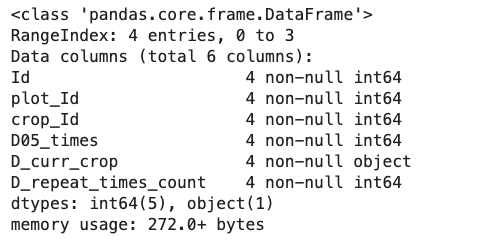
The result can also be converted to a pandas dataframe, as follows:
result = %sql select * from Crops where D_curr_crop = "maize" AND ID <= 3;
dataframe = result.DataFrame()

dataframe.info()
2. The jupyterlab-sql extension
Before going further, let’s talk a little about the Jupyter extensions in general.
JupyterLab Extensions
Extensions are one of the most useful features of Jupyter Lab and can enhance the Jupyter lab experience. Jupyter Lab is essentially an extensible environment itself with notebooks, terminal, and editor, all present as an extension.
"JupyterLab extensions are npm packages (the standard package format in Javascript development)"rce). Extensions provide a way to customize and enhance the JupyterLab experience by providing several useful options like new themes, viewers, keyboard shortcuts, advanced settings options, to name a few. There are many community-developed extensions on GitHub. You can search for the GitHub topic jupyterlab-extension to find extensions.
To install JupyterLab extensions, you need to have Node.js installed which can either be installed from their website or as follows.
conda install -c conda-forge nodejs
or
brew install node #for MacOS users
The jupyterlab-sql extension is one such useful extension that lets you add a SQL user interface to Jupyter Lab. This has two primary advantages:
- The SQL tables can be explored with a simple point and click.
- Tables can also be modified and read with custom queries.
You can read more about it at the official Github repository.
Installation
To install jupyterlab-sql, run the following commands in the given order:
pip install jupyterlab_sql
jupyter serverextension enable jupyterlab_sql --py --sys-prefix
jupyter lab build
You will then need to restart any running Jupyter servers.
Also, it is important to note that jupyterlab-sql only works with Python 3.5 and above.
Getting Started
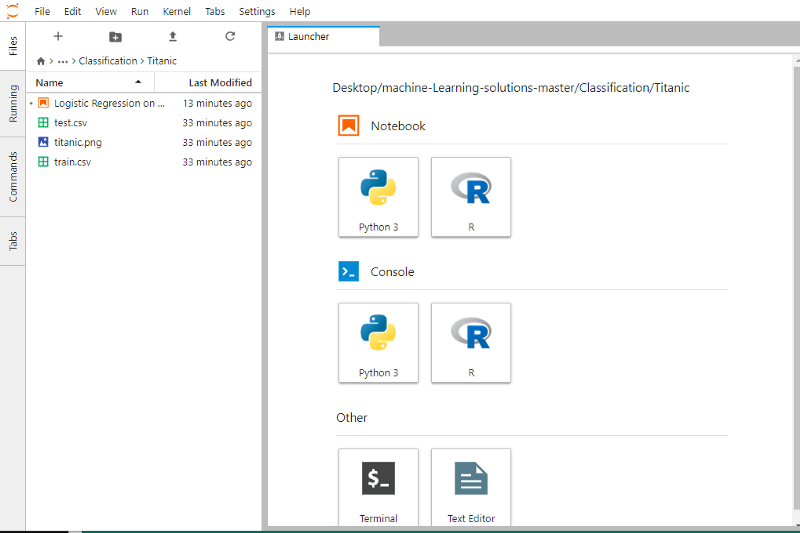
After you restart the Jupyter Lab, a new SQL icon appears in the launcher
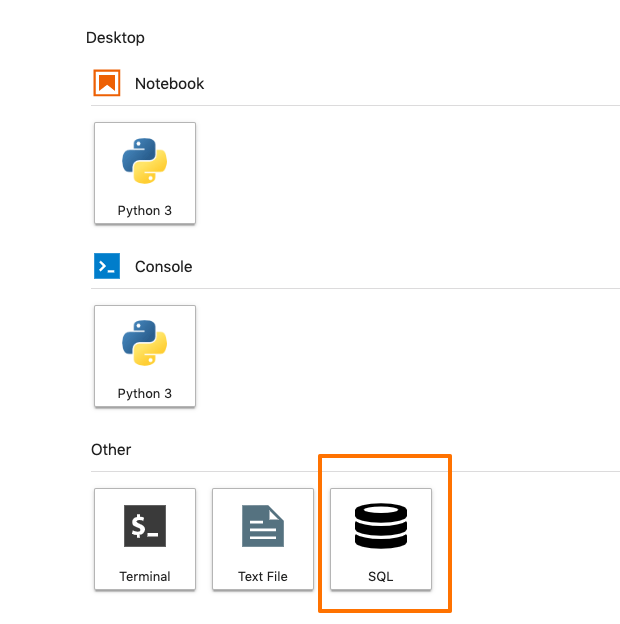
This means, everything is installed correctly, and you are ready to connect your instance to a database.
Connection
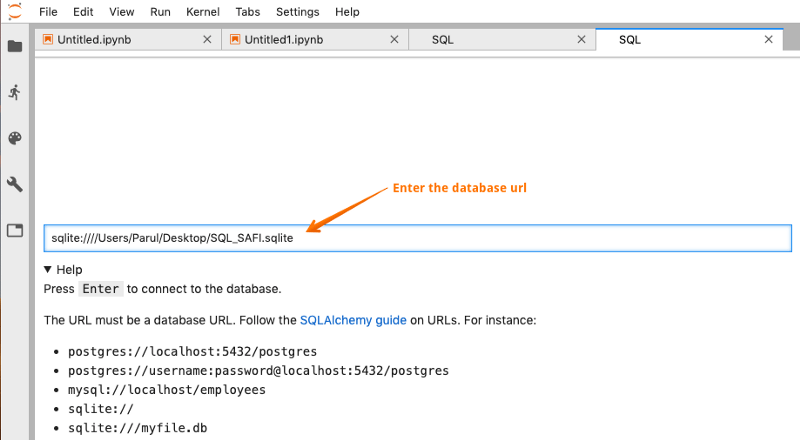
For connecting to the database, you need to have a valid database URL. jupyterlab-sql has been extensively tested against SQLite, PostgreSQL, and MySQL databases. Follow the SQLAlchemy guide on URLs. The URL must be a database URL, for instance:
postgres://localhost:5432/postgres
postgres://username:password@localhost:5432/postgres
mysql://localhost/employees
sqlite://
sqlite:///myfile.db
Let us connect to the existing SQL_SAFI database, that we used earlier. Click on the SQL icon in the launcher and type in the database url. Press enter to connect.
As soon as the database gets connected, you can view all your tables in the database.
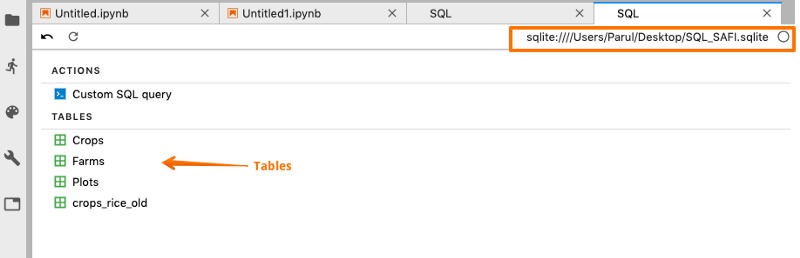
Next, we can also write custom SQL queries to get the desired data from the tables.
Conclusion
Using SQL and JupterLab together takes the data analysis to the next level. The jupyter-sql interface makes it very easy to connect the SQL Server to Jupyter ecosystem and extract the data directly into it, without having to leave the Jupyter interface.
#sql #data-science #database #python

datacamp.com
SQL Interface within JupyterLab
Learn how to use and modify SQL tables within JupyterLabs