How to Login and Registration ASP.NET Web API with Angular 8
In this article, we will learn the step by step process of creating login and registration pages in a Web API with Angular 8 using the following technologies:
- ASP.NET Web API.
- Angular 8.
- SQL Server.
- Bootstrap.
You may also like: Angular 8 HttpClient & Http Tutorial – Build and Consume RESTful API.
Prerequisites
- Basic knowledge of Angular and Web API.
- Visual Studio Code and Visual Studio IDE should be installed.
- SQL Server Management Studio.
- Nodejs should be installed.
Step 1
Open SQL Server Management Studio, create a database named Employee, and in this database, create a table. Give that table a name like Employeemaster.
CREATE TABLE [dbo].[Employeemaster](
    [UserId] [int] IDENTITY(1,1) NOT NULL,
    [UserName] [varchar](50) NOT NULL,
    [LoginName] [varchar](50) NULL,
    [Password] [varchar](50) NOT NULL,
    [Email] [varchar](50) NULL,
    [ContactNo] [varchar](15) NULL,
    [Address] [varchar](50) NULL,
    [IsApporved] [int] NULL,
    [Status] [int] NULL,
    [TotalCnt] [int] NULL,
PRIMARY KEY CLUSTERED
(
    [UserId] ASC
)WITH (PAD_INDEX = OFF, STATISTICS_NORECOMPUTE = OFF, IGNORE_DUP_KEY = OFF, ALLOW_ROW_LOCKS = ON, ALLOW_PAGE_LOCKS = ON) ON [PRIMARY]
) ON [PRIMARY]

GO
Now, create a stored procedure with the name, Usp_Login for adding the login functionality.
create proc  [dbo].[Usp_Login]
@UserName varchar(50)='',
@Password varchar(50)=''
as begin
    declare @UserId int =0,@TotalCnt int =0
    select @UserId=UserId,@TotalCnt=TotalCnt from  Employeemaster um
    where LoginName=@UserName and Password=@Password and Status<>3 and IsApporved=1
    if(@TotalCnt>=5)
    begin
       select 0 UserId,'' UserName,'' LoginName,'' Password,'' Email,'' ContactNo,
    ''Address,0 IsApporved,-1 Status
    end
    if(@UserId>0)
    begin
        select UserId, UserName, LoginName, Password, Email, ContactNo,
        Address, IsApporved, Status from  Employeemaster um
        where UserId=@UserId
        --update  Employeemaster  set  Status=2 where UserId=@UserId

    end
    else
    begin
       Update Employeemaster set @TotalCnt=TotalCnt+1
       where LoginName=@UserName and Status=1 and IsApporved=1
       select 0 UserId,'' UserName,'' LoginName,'' Password,'' Email,'' ContactNo,
    ''Address,0 IsApporved,0 Status
    end
    end
Step 2
Open Visual Studio and create a new project.
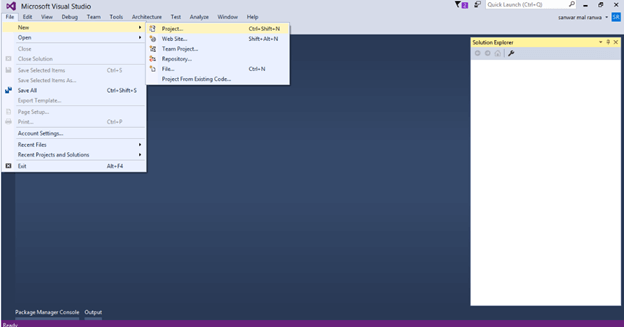
Change the name as LoginAPI and select Web API as its template.

Step 3
Right-click the Models folder from Solution Explorer and go to Add >> New Item >> data. 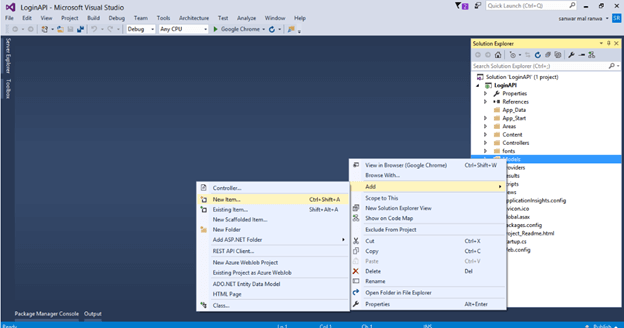
Click on the ADO.NET Entity Data Model option and click Add. 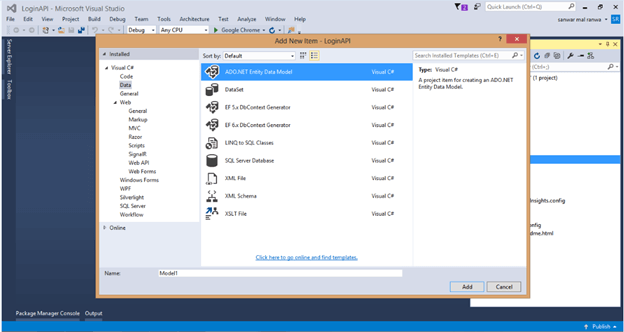
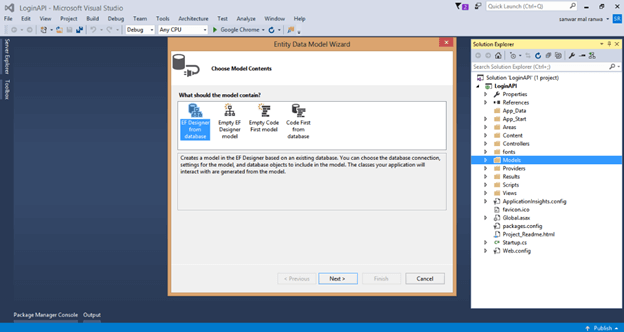
Select EF designer from the database and click the Next button.
Add the connection properties, select database name on the next page, and click OK. 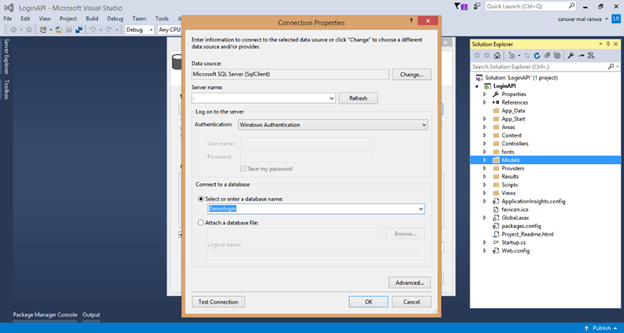
Check the Tables and Stored procedure checkboxes. The internal options will be selected by default. Now, click the Finish button.
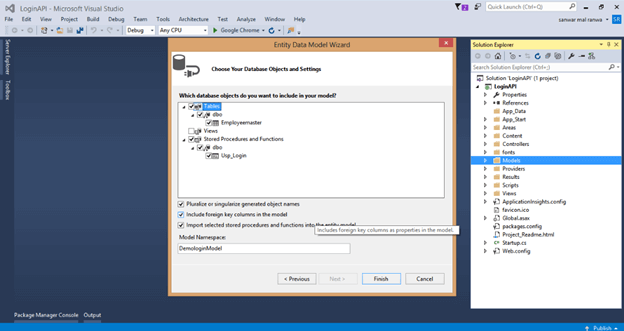
Our data model is created now.
Step 4
Right-click on the Models folder and add two classes — Login and Response respectively. Now, paste the following codes in these classes.
using LoginAPI.Models;
Step 5
Right-click on the Controllers folder and add a new controller. Name it as Logincontroller.
Add the following namespace in the Login controller.
[Route("Api/Login/createcontact")]
       [HttpPost]
       public object createcontact(Registration Lvm)
       {
           try
           {
               DemologinEntities db = new DemologinEntities();
               Employeemaster Em = new Employeemaster();
               if (Em.UserId == 0)
               {
                   Em.UserName = Lvm.UserName;
                   Em.LoginName = Lvm.LoginName;
                   Em.Password = Lvm.Password;
                   Em.Email = Lvm.Email;
                   Em.ContactNo = Lvm.ContactNo;
                   Em.Address = Lvm.Address;
                   Em.IsApporved = Lvm.IsApporved;
                   Em.Status = Lvm.Status;
                   db.Employeemasters.Add(Em);
                   db.SaveChanges();
                   return new Response
                   { Status = "Success", Message = "SuccessFully Saved." };
               }
           }
           catch (Exception)
           {

               throw;
           }
           return new Response
           { Status = "Error", Message = "Invalid Data." };
       }
Now, add a method to insert data into the database for user registration.
[Route("Api/Login/UserLogin")]
       [HttpPost]
       public Response Login(Login Lg)
       {
           DemologinEntities DB = new DemologinEntities();
           var Obj = DB.Usp_Login(Lg.UserName, Lg.Password).ToList<Usp_Login_Result>().FirstOrDefault();
           if (Obj.Status == 0)
               return new Response { Status = "Invalid", Message = "Invalid User." };
           if (Obj.Status == -1)
               return new Response { Status = "Inactive", Message = "User Inactive." };
           else
               return new Response { Status = "Success", Message = Lg.UserName };
       }
Step 6
Add a new method for logging into the Login controller with the following lines of code.
using System;
using System.Collections.Generic;
using System.Linq;
using System.Net;
using System.Net.Http;
using System.Web.Http;
using LoginAPI.Models;

namespace LoginAPI.Controllers
{
    public class LoginController : ApiController
    {

        //For user login
        [Route("Api/Login/UserLogin")]
        [HttpPost]
        public Response Login(Login Lg)
        {
            DemologinEntities DB = new DemologinEntities();
            var Obj = DB.Usp_Login(Lg.UserName, Lg.Password).ToList<Usp_Login_Result>().FirstOrDefault();
            if (Obj.Status == 0)
                return new Response { Status = "Invalid", Message = "Invalid User." };
            if (Obj.Status == -1)
                return new Response { Status = "Inactive", Message = "User Inactive." };
            else
                return new Response { Status = "Success", Message = Lg.UserName };
        }

        //For new user Registration
        [Route("Api/Login/createcontact")]
        [HttpPost]
        public object createcontact(Registration Lvm)
        {
            try
            {
                DemologinEntities db = new DemologinEntities();
                Employeemaster Em = new Employeemaster();
                if (Em.UserId == 0)
                {
                    Em.UserName = Lvm.UserName;
                    Em.LoginName = Lvm.LoginName;
                    Em.Password = Lvm.Password;
                    Em.Email = Lvm.Email;
                    Em.ContactNo = Lvm.ContactNo;
                    Em.Address = Lvm.Address;
                    Em.IsApporved = Lvm.IsApporved;
                    Em.Status = Lvm.Status;
                    db.Employeemasters.Add(Em);
                    db.SaveChanges();
                    return new Response
                    { Status = "Success", Message = "SuccessFully Saved." };
                }
            }
            catch (Exception)
            {

                throw;
            }
            return new Response
            { Status = "Error", Message = "Invalid Data." };
        }
    }

}
Complete Login controller
EnableCorsAttribute cors = new EnableCorsAttribute("*", "*", "*");
config.EnableCors(cors);
Step 7
Now, let’s enable Cors. Go to Tools, open NuGet Package Manager, search for Cors, and install the “Microsoft.Asp.Net.WebApi.Cors” package. 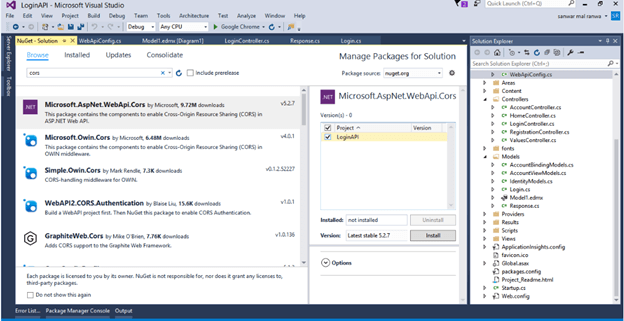 Open Webapiconfig.cs and add the following lines.
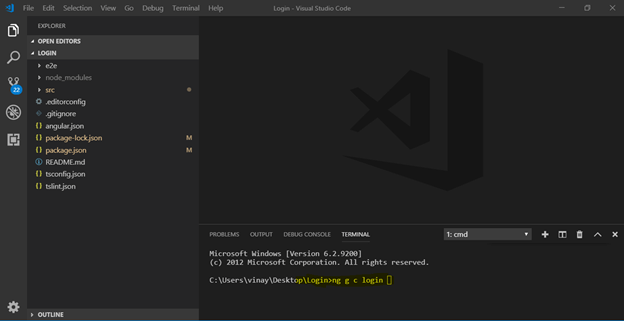
ng new login
Step 8
Create an Angular 8 project with a name “login” by using the following command.
npm install bootstrap --save
Step 9
Open Visual Studio Code, open the newly created project and add bootstrap to this project.
export class Register {
    UserName:string;
    LoginName:string;
    Password:string;
    Email:string;
    ContactNo:string;
    Address:string
}
Step 10
Now, create three components for the login page, registration page, and dashboard respectively. To create the components, open terminal and use the following commands.
- ng g c login
- ng g c register
- ng g c dashboard
Step 11
Create a class named “register”. ng g class register Add the required properties in the class.
ng g s login
Step 12
Create a service to call the Web API.
import { Injectable } from '@angular/core';
import {HttpClient} from '@angular/common/http';
import {HttpHeaders} from '@angular/common/http';
import { from, Observable } from 'rxjs';
import { Register } from "../app/register";
@Injectable({
  providedIn: 'root'
})
export class LoginService {
  Url :string;
  token : string;
  header : any;
  constructor(private http : HttpClient) {

    this.Url = 'http://localhost:14812/api/Login/';

    const headerSettings: {[name: string]: string | string[]; } = {};
    this.header = new HttpHeaders(headerSettings);
  }
  Login(model : any){
    debugger;
     var a =this.Url+'UserLogin';
   return this.http.post<any>(this.Url+'UserLogin',model,{ headers: this.header});
  }
   CreateUser(register:Register)
   {
    const httpOptions = { headers: new HttpHeaders({ 'Content-Type': 'application/json' }) };
    return this.http.post<Register[]>(this.Url + '/createcontact/', register, httpOptions)
   }
}
Open the login service and import required packages and classes. Add the following lines of code in the login.service.ts file.
<div class="container" style="padding-top:40px;">
    <div class="row">
      <div class="col-md-6 mx-auto">
        <div class="card mx-4">
          <div class="card-body p-4">
            <form [formGroup]="employeeForm" (ngSubmit)="onFormSubmit(employeeForm.value)">
              <h1 style="text-align:center">Register</h1>

              <div class="input-group mb-3">

                <input type="text" class="form-control" placeholder="Username"  formControlName="UserName">
              </div>
              <div class="input-group mb-3">
                <input type="text" class="form-control" placeholder="Loginname"  formControlName="LoginName">
              </div>
              <div class="input-group mb-3">
                <input type="password" class="form-control" placeholder="Password"  formControlName="Password">
              </div>
              <div class="input-group mb-4">
                <input type="text" class="form-control" placeholder="Email"  formControlName="Email">
              </div>
              <div class="input-group mb-4">
                <input type="text" class="form-control" placeholder="Contact No"  formControlName="ContactNo">
              </div>
              <div class="input-group mb-4">
                <input type="text" class="form-control" placeholder="Address"  formControlName="Address">
              </div>
              <button type="submit" class="btn btn-block btn-success">Add User</button>
            </form>
          </div>
        </div>
      </div>
    </div>
  </div>
Step 13
Now, open register.component.html and add the following HTML code to design the registration form.
import { Component, OnInit } from '@angular/core';
import { LoginService } from '../login.service';
import {Register} from '../register';
import {Observable} from 'rxjs';
import { NgForm, FormBuilder, FormGroup, Validators, FormControl } from '@angular/forms';

@Component({
  selector: 'app-register',
  templateUrl: './register.component.html',
  styleUrls: ['./register.component.css']
})
export class RegisterComponent implements OnInit {
  data = false;
  UserForm: any;
  massage:string;
  constructor(private formbulider: FormBuilder,private loginService:LoginService) { }

  ngOnInit() {
    thisthis.UserForm = this.formbulider.group({
      UserName: ['', [Validators.required]],
      LoginName: ['', [Validators.required]],
      Password: ['', [Validators.required]],
      Email: ['', [Validators.required]],
      ContactNo: ['', [Validators.required]],
      Address: ['', [Validators.required]],
    });
  }
   onFormSubmit()
  {
    const user = this.UserForm.value;
    this.Createemployee(user);
  }
  Createemployee(register:Register)
  {
  this.loginService.CreateUser(register).subscribe(
    ()=>
    {
      this.data = true;
      this.massage = 'Data saved Successfully';
      this.UserForm.reset();
    });
  }
}
Step 14
Open register.componet.ts file and add following lines.
<div class="container" style="padding-top:60px;">
  <div class="row">
    <div class="col-md-6 mx-auto">
      <div class="card-group">
        <div class="card p-4">
          <div class="card-body">
            <form name="form" (ngSubmit)="login()" #f="ngForm">
              <h1 style="text-align:center">Login</h1>

              <div class="input-group mb-3">
                <div class="input-group-prepend">
                  <span class="input-group-text"><i class="icon-user"></i></span>
                </div>
                <input type="text" name="UserName" [(ngModel)]="model.UserName" class="form-control sty1" placeholder="Email" required>
              </div>
              <div class="input-group mb-4">
                <div class="input-group-prepend">
                  <span class="input-group-text"><i class="icon-lock"></i></span>
                </div>
                <input  type="password" name="Passward" [(ngModel)]="model.Password" class="form-control"
               placeholder="Password">
              </div>
              <div>
                  <p style="color:#E92626;font-size:20px;font-weight:normal" Class="success" align="left">
                    {{errorMessage}}
                  </p>
                </div>
              <div class="row">
                <div class="col-6">
                  <button type="submit" class="btn btn-primary px-4">Login</button>
                </div>
                <div class="col-6 text-right">
                  <button type="button" class="btn btn-link px-0">Forgot password?</button>
                </div>
              </div>

            </form>
          </div>
        </div>
      </div>
    </div>
  </div>
</div>
Step 15
Open login.componet.html and add this HTML.
import { Component, OnInit } from '@angular/core';
import { Router } from '@angular/router';
import { LoginService } from '../login.service';
 import { FormsModule } from '@angular/forms';

@Component({
  selector: 'app-login',
  templateUrl: './login.component.html',
  styleUrls: ['./login.component.css']
})
export class LoginComponent {

  model : any={};

  errorMessage:string;
  constructor(private router:Router,private LoginService:LoginService) { }

  ngOnInit() {
    sessionStorage.removeItem('UserName');
    sessionStorage.clear();
  }
  login(){
    debugger;
    this.LoginService.Login(this.model).subscribe(
      data => {
        debugger;
        if(data.Status=="Success")
        {
          this.router.navigate(['/Dashboard']);
          debugger;
        }
        else{
          this.errorMessage = data.Message;
        }
      },
      error => {
        this.errorMessage = error.message;
      });
  };
 }
Open login.componet.ts and add following code.
<div>
  <div class="row">
    <div class="col-sm-12 btn btn-primary">
        Welcome to DashBoard
    </div>
  </div>
</div>
Step 16
Now, open dashboard.component.html and add the following lines.
import { NgModule } from '@angular/core';
import { Routes, RouterModule } from '@angular/router';
import { DashboardComponent } from './dashboard/dashboard.component';
import { LoginComponent } from './login/login.component';
import { RegisterComponent } from './register/register.component';

export const routes: Routes = [
  {
    path: '',
    redirectTo: 'login',
    pathMatch: 'full',
  },
  {
    path: 'login',
    component: LoginComponent,
    data: {
      title: 'Login Page'
    }
  },
  {
    path: 'Dasboard',
    component: DashboardComponent,
    data: {
      title: 'Dashboard Page'
    }
  },
  {
    path: 'AddUser',
    component: RegisterComponent,
    data: {
      title: 'Add User Page'
    }
  },
];

@NgModule({
  imports: [RouterModule.forRoot(routes)],
  exports: [RouterModule]
})
export class AppRoutingModule { }
Step 17
Now, open app-routing.module.ts file and add the following lines to create routing
import { NgModule } from '@angular/core';
import { Routes, RouterModule } from '@angular/router';
import { DashboardComponent } from './dashboard/dashboard.component';
import { LoginComponent } from './login/login.component';
import { RegisterComponent } from './register/register.component';

export const routes: Routes = [
  { path: '', redirectTo: 'login', pathMatch: 'full', },
  { path: 'login', component: LoginComponent, data: { title: 'Login Page' } },
  { path: 'Dasboard', component: DashboardComponent, data: { title: 'Dashboard Page' } },
  { path: 'AddUser', component: RegisterComponent, data: { title: 'Add User Page' } },
];

@NgModule({
  imports: [RouterModule.forRoot(routes)],
  exports: [RouterModule]
})

export class AppRoutingModule { }
Step 18
Now, let us run the project and redirect the URL to the “Add User” page.
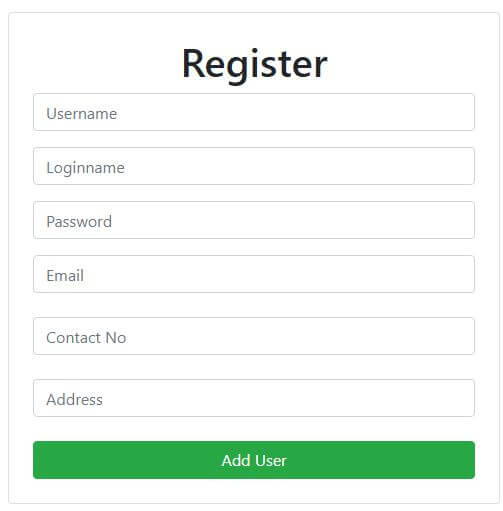
Enter the details and click on the “Add User” button.
Step 19
Now, run the project’s default URL which takes us to the login page. Enter the username and password and click “Login”.

The following Page will be displayed.

You may also like: Angular vs React vs Vue: Which one will be popular in 2020.
Summary
In this article, we discussed the process of Login and Registration page creation in an application with Angular 8 and Web API.
Thank you for reading ! If you enjoyed this article, please share it with others who may enjoy it as well.!
#angular #asp-net #sql-server #bootstrap #web-development
