Web Development with Rust - 03/x: Create a REST API
Content
- HTTP Requests
- POST/PUT/PATCH/DELETE are special
- The Job of a Framework
- Creating an API spec
- Crafting the API
- Input Validation
- Summary
APIs are the bread and butter of how a modern and fast-paced web environment. Frontend application, other web services and IoT devices need to be able to talk to your service. API endpoints are like doors to which you decide what comes in and in which format.
Since Rust is a static typed language with a strong compiler you won't face many of the common pitfalls about running a web service in production. Although there are still run time errors which you have to cover.
HTTP Requests
When we talk about creating an API we basically mean a web application which listens on certain paths and responds accordingly. But first things first. For two devices to be able to communicate with each other there has to be an established TCP connection.
TCP is a protocol which the two parties can use to establish a connection. After establishing this connection, you can receive and send messages to the other party. HTTP is another protocol, which is built on top of TCP, and it's defining the contents of the requests and responses.
So on the Rust side of things, TCP is implemented in the Rust core library, HTTP is not. Whatever framework you chose in the previous article they all implement HTTP and therefore are able to receive and send HTTP formatted messages.
An example GET requests for example looks like this:
GET / HTTP/1.1
Host: api.awesomerustwebapp.com
Accept-Language: en
It includes:
GET: the HTTP method/: The pathHTTP/1.1: The version of the HTTP protocolHOST: The host/domain of the server we want to request data fromAccept-Language: Which language we prefer and understand
The most common used HTTP methods are:
- GET
- POST
- PUT
- PATCH
- DELETE
POST/PUT/PATCH/DELETE are special
We are using GET every time we browse the web. If we want to alter data however (like using POST to send data over to another server), we need to be more cautions and precise.
First, not everyone is allowed to just send a bunch of data to another server. Our API can for example say: "I just accept data from the server with the host name allowed.awesomerustapp.com.
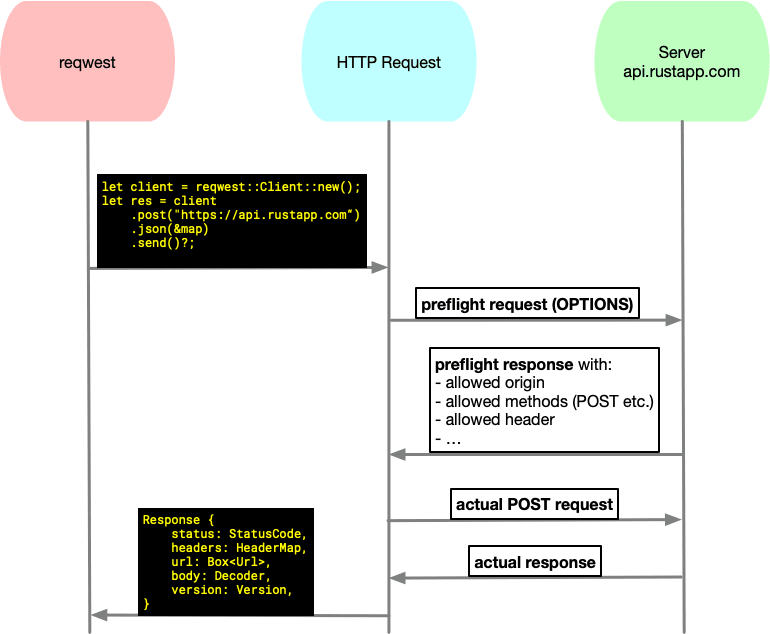
Therefore, when you send a POST to another server, what actually happens is the CORS workflow:
We first ask the server what is allowed, where do you accept requests from and what are your accepted headers. If we fulfill all of these requirements, then we can send a POST.
Disclaimer: Not all frameworks (like rocket and tide) are implementing CORS in their core. However, in a professional environment, you handle CORS on the DevOps side of things and put it for example in your NGINX config.
The Job of a Framework
We use the hard work of other people to create web applications. Everything has to be implemented at some point, just not from you for most of the time. A framework covers the following concerns:
- Start a web server and open a PORT
- Listen to requests on this PORT
- If a request comes in, look at the Path in the HTTP header
- Route the request to the
handleraccording to the Path - Help you extract the information out of the request
- Pack the generated
dataandHTTP StatusCode(created from you) and form aresponse - Send the
responseback to the sender
The Rust web framework tide includes http-service, which provides the basic abstractions you need when working with HTTP calls. The crate http-service is built on top of hyper, which transforms TCP-Streams to valid HTTP requests and responses.
Your job is to create routes like /users/:id and add a route_handler which is a function to handle the requests on this particular path. The framework makes sure that it directs the incoming HTTP requests to this particular handler.
Creating an API spec
You have to define your resources first to get an idea what your application needs to handle and uncover relationships between them. So if you want to build a idea-up-voting site, you would have:
- Users
- Ideas
- Votes
A simple spec for this scenario would look like this:
- Users
- POST
/users - GET
/users - PUT
/users/:user_id - PATCH
/users/:user_id - DELETE
/users/:user_id - GET
/users/:user_id
Ideas and Votes behave accordingly. A spec is helpful for two reasons:
- It gives you guidelines not to forget a path
- It helps to communicate to your API users what to expect
You can tools like swagger to write a full spec which also describes the structure of the data and the messages/responses for each path and route.
A more professional spec would include the return values for each route and the request and response bodies. However, the spec can be finalized once you know how your API should look like and behave. To get started, a simple list is enough.
Crafting the API
Depending on the framework you are using, your implementation will look different. You have to have the following features on your radar to look out for:
- Creating routes for each method (like
app.at("/users").post(post_users_handler)) - Extracting information from the request (like headers, uri-params and JSON from the request body)
- Creating responses with proper HTTP codes (
200,201,400,404etc.)
I am using the latest version of tide for this web series. You can add it in your Cargo.toml file and use it for your web app:
[dependencies]
tide = "0.1.0"
Our first User implementation will look like this:
async fn handle_get_users(cx: Context<Database>) -> EndpointResult {
    Ok(response::json(cx.app_data().get_all()))
}
async fn handle_get_user(cx: Context<Database>) -> EndpointResult {

let id = cx.param(“id”).client_err()?;

if let Some(user) = cx.app_data().get(id) {

Ok(response::json(user))

} else {

Err(StatusCode::NOT_FOUND)?

}

}
async fn handle_update_user(mut cx: Context<Database>) -> EndpointResult<()> {

let user = await!(cx.body_json()).client_err()?;

let id = cx.param(“id”).client_err()?;
if cx.app_data().set(id, user) {
    Ok(())
} else {
    Err(StatusCode::NOT_FOUND)?
}

}
async fn handle_create_user(mut cx: Context<Database>) -> EndpointResult<String> {

let user = await!(cx.body_json()).client_err()?;

Ok(cx.app_data().insert(user).to_string())

}
async fn handle_delete_user(cx: Context<Database>) -> EndpointResult<String> {

let id = cx.param(“id”).client_err()?;

Ok(cx.app_data().delete(id).to_string())

}
fn main() {

// We create a new application with a basic, local database

// You can use your own implementation, or none: App::new(())

let mut app = App::new(Database::default());

app.at(“/users”)

.post(handle_create_user)

.get(handle_get_users);

app.at(“/users/:id”)

.get(handle_get_user)

.patch(handle_update_user)

.delete(handle_delete_user);
app.serve("127.0.0.1:8000").unwrap();

}
You can find the full implementation of the code in the GitHub repository to this series.
We see that we first have to create a new App
let mut app = App::new(())
add routes
app.at(“/users”)
and for each route add the HTTP requests we want to handle
app.at(“/users”).get(handle_get_users)
Each framework has a different method of extracting parameters and JSON bodies. Actix is using Extractors, rocket is using Query Guards.
With tide, you can access request parameters and bodies and database connections through Context. So when we want to update a User with a specific id, we send a PATCH to /users/:id. From there, we call the handle_update_user method.
Inside this method, we can access the id from the URI like this:
let id = cx.param(“id”).client_err()?;
Each framework is also handling its own way of sending responses back to the sender. Tide is using EndpointResult, rocket is using Response and actix HttpResponse.
Everything else is completely up to you. The framework might help you with session management and authentication, but you can also implement this yourself.
My suggestion is: Build the first skeleton of your app with the framework of your choice, figure out how to extract information out of requests and how to form responses. Once this is working, you can use your Rust skills to build small or big applications as you wish.
Input Validation
Your best friend in the Rust world will be serde. It will help you parse JSON and other formats, but will also allow you to serialize your data.
When we talk about input validation, we want to make sure the data we are getting has the right format. Lets say we are extracting the JSON body out of a request:
let user: User = serde_json::from_str(&request_body);
We are using serde_json here to transform a JSON-String into a Struct of our choice. So if we created this struct:
struct User {

name: String,

height: u32,

}
we want to make sure the sender is including name and height. If we just do serde_json::from_str, and the sender forgot to pass on the height, the app will panic and shut down, since we expect the response to be a user: let user: User.
We can improve the error handling like this:
let user: User = match serde_json::from_str(&request_body) {

Ok(user) => user,

Err(error) => handle_error_case(error),

};
We catch the error and call our handle_error_case method to handle it gracefully.
Summary
- Pick a framework of your choice
- rocket is nightly
- actix is stable
- tide is fostered close to the Rust Core and also works on Rust nightly
- Know that there is no common CORS handling (yet). Recommendation is to handle this on the DevOps side (NGINX for example)
- After picking a framework, spec out your resources (
/users: GET, POST etc.) - Figure out how the framework of your choice is handling extracting parameters and JSON from the request and how to form a response
- Validate your input via
matchand serde_json
Thanks For Visiting, Keep Visiting. If you liked this post, share it with all of your programming buddies!
☞ Why you should learn the Rust programming language
☞ The Rust Programming Language
☞ Rust Vs. Haskell: Which Language is Best for API Design?
☞ An introduction to Web Development with Rust for Node.js Developers
☞ 7 reasons why you should learn Rust programming language in 2019
☞ Why you should move from Node.js to Rust in 2019
☞ Rust: Building Reusable Code with Rust from Scratch
☞ Programming in Rust: the good, the bad, the ugly.
☞ An introduction to Web Development with Rust for Node.js Developers
☞ Intro to Web Development with Rust for NodeJS Developers
☞ Introducing the Rust Crash Course
☞ 3 Frameworks for Building APIs Using Rust
This post was originally published here
#rust #rest #api #web-development


