In this article, we will walk through how to build a simple CRUD application using Spring Boot, MySQL, JPA/Hibernate and Okta OpenID Connect (OIDC) Single Sign-On (SSO).
The Java Persistence API (JPA) provides a specification for persisting, reading, and managing data from your Java object to relational tables in the database. The default implementation of JPA via Spring Boot is Hibernate. Hibernate saves you a lot of time writing code to persist data to a database, allowing you to focus on the business logic.
In this example, we will use MySQL for the database.
The application you will build will have two main parts. The first is the authentication piece. This will use Okta OIDC SSO to authenticate admin or ordinary users into the application. The second part will be the management of user events. These events are a record of any time a new token is issued for this application. The event will store the user’s name, internal id from Okta, and store additional information per token issuance including the time of the original login and the time the token was last used within the application to view a page. If you are wondering what the difference is between these three dates/times, here is a cheat-sheet:
- Login Date/Time - This is the time at which the user actually had to enter their credentials. There can be more than one token issued against the same original login. This could be the time the user logged into this application, the Okta console, or another application tied to the same developer account (since this is an SSO example).
- **Token Date/Time ** - When the user starts a session with the application described in this post, a new token is issued by Okta. This token is valid for a certain amount of time and is reused across page refreshes until it expires
- Last View Date/Time - This is the last time the application was viewed. If you refresh the page, this time will update, while the Token Date/Time and Login Date/Time should remain the same.
Summary of CRUD actions
CRUD - Create When any user visits the application with a new session, they will be issued a new token. When this token is issued, a userEvent will be generated and persisted in the MySQL Database.
CRUD - Read Ordinary users will be able to see a list of all of the times they have received a new Okta token for this application. The application will also display the Login Date/Time and Last View Date/Time for that token (described earlier).
Admin users will be able to see the same info as the normal user, but for all users who have logged into the system.
CRUD - Update Each time any user visits the application, it will check if the token that they are using has already been saved as a userEvent. If so, it will update that entry with a new Last View Date/Time
CRUD - Delete Admin users will have the option to delete any of the user events in the system. Pro Tip: In a production system, you wouldn’t want to ever delete a log history, particularly a log regarding authentication or authorization actions. If this were production code and you had a requirement to delete log entries in order to hide them from ordinary users, you would likely want to implement this by setting a deleted flag on that record and only displaying records that are not flagged as deleted.
Prerequisites
MySQL - You must have installed a local instance of MySQL or have access to a remote instance of MySQL. For this exercise, I recommend that you have a fresh empty database prepared and have the username and password for that database handy. They will be required in the application.properties file later.
Setup your Okta OIDC Application, Authorization Server, groups and users
Before we can dive into the code, we will want to first get our Okta configuration in place. If you haven’t already, head on over to developer.okta.com to create yourself a free-forever developer account. Look for the email to complete the initialization of your Okta org.
Once you have your developer account, we will need to set up your web application, authorization server, group, and users!
Setup you Okta OIDC Application
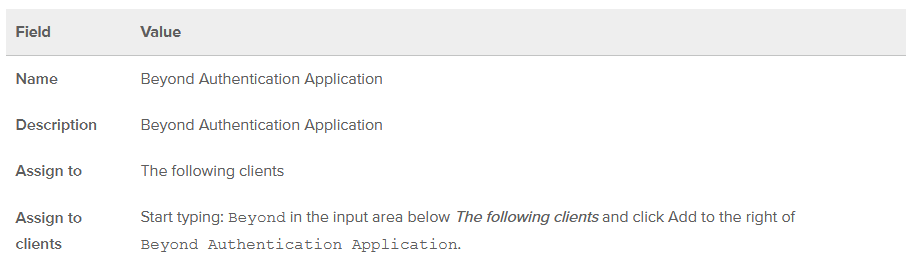
Navigate to Applications in the admin console and click: Add Application. Choose Web and click Next. Populate the fields with these values:
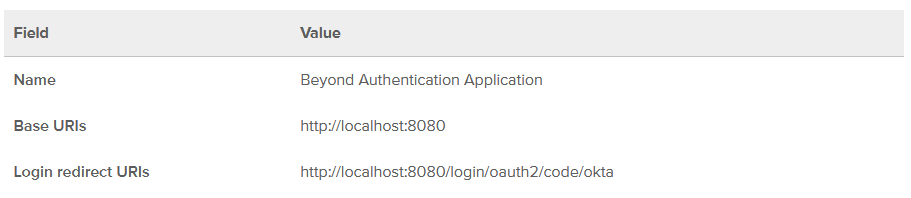
Click Done. Scroll down and copy the Client ID and Client Secret. You’ll use those values shortly.
Setup your Okta Authorization Server
Next, you’ll set up an Authorization Server with custom claims and access policies. This drives whether or not Okta will issue a token when one is requested. Navigate to API > Authorization Servers. Click Add Authorization Server. Fill in the values as follows:

Click Done. Click the Claims tab. Click Add Claim. Fill in the fields with these values and click Create (leave those not mentioned as their defaults):
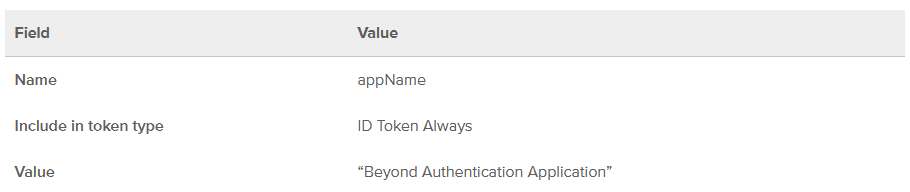
Note that there are double quotes (“) around “Beyond Authentication Application”.
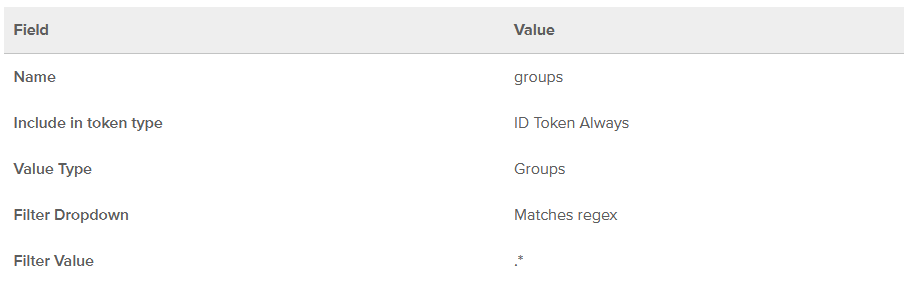
Next, click on Add Claim again. Fill in the fields with these values and click Create (leave those not mentioned as their defaults):
Click the Access Policies tab. Click Add Policy. Fill in the fields with these values and click Create Policy
This binds the policy to your OIDC app.
Next click Add Rule. Enter: Beyond Authentication Application for the Rule Name field. Deselect all the grant types except for Authorization Code. Click Create Rule. This ensures that the request must use the Authorization Code flow in order for Okta to create tokens. This is the most secure flow of all the available OAuth flows. It ensures that all sensitive information (like tokens) are delivered via a response to a POST request. Check out the references at the end of this post for more on OAuth flows.
Click the Settings tab and copy the Issuer URL. You’ll make use of this value shortly.
Create Okta Admin Group for your application
In order to complete this application, we need to set up an “Admin” group for our application. To do this, within your Okta developer console, click on Users > Groups and then click on Add Group. Enter the following values:

Create Okta Users for your application
Finally, we need to create two users. The first will be an ordinary user and the second will be an admin user. From the developers console, click on Users > People and then click on Add Person. Fill out the form with the information for the ordinary (non-admin) user using the table below. Repeat this for the Admin user, also using the table below.
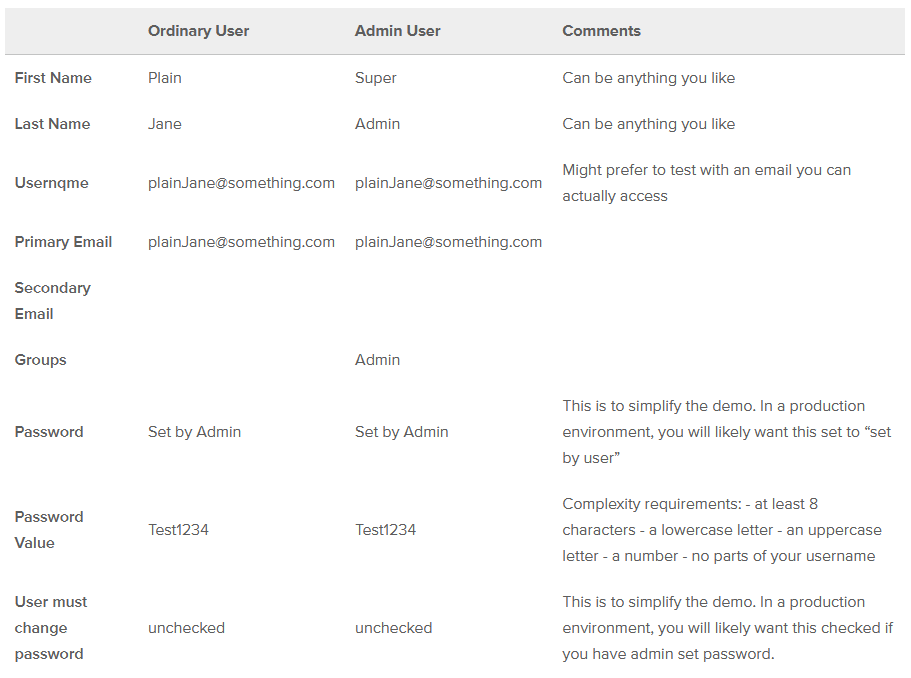
Take note of the username and password for each of the two users you created as you will use them to login later on.
Let’s code it
The structure of our project will look like this:

NOTE: For this post, I will be using Eclipse, as it is my preferred IDE. However, you can use any IDE or editor you please.
Dependencies
The Spring Initializr makes it super easy to create the scaffolding for your project. What’s even better is that it has a RESTful API, so you can get everything setup right from the command line. Run this command:
curl -s https://start.spring.io/starter.zip \
    -d dependencies=data-jpa,web,okta,thymeleaf,mysql \
    -d  packageName=com.okta.examples.jpa \
    -d groupId=com.okta.examples.jpa \
    -d name=BeyondAuthentication \
    > BeyondAuthentication.zip
Create a folder named: BeyondAuthentication, switch into it and unzip the resulting file.You’ll see the whole project has been setup for you. Let’s take a look at the pom.xml file, which has all the dependencies for the project.
The file should be set up as follows
<project xmlns="http://maven.apache.org/POM/4.0.0" xmlns:xsi="http://www.w3.org/2001/XMLSchema-instance"
        xsi:schemaLocation="http://maven.apache.org/POM/4.0.0 http://maven.apache.org/xsd/maven-4.0.0.xsd">
        4.0.0

                org.springframework.boot
                spring-boot-starter-parent
                2.1.6.RELEASE


        com.okta.examples.jpa
        demo
        0.0.1-SNAPSHOT
        BeyondAuthentication
        Demo project for Spring Boot


                1.8


                        org.springframework.boot
                        spring-boot-starter-data-jpa


                        org.springframework.boot
                        spring-boot-starter-thymeleaf


                        org.springframework.boot
                        spring-boot-starter-web


                        com.okta.spring
                        okta-spring-boot-starter
                        1.2.1


                        mysql
                        mysql-connector-java
                        runtime


                        org.springframework.boot
                        spring-boot-starter-test
                        test


                                org.springframework.boot
                                spring-boot-maven-plugin
The dependencies above tell the system that you want to use Thymeleaf for your web templates, MySQL for your database, and Hibernate (the default JPA implementation) to persist and retrieve data from MySQL.
Templates
Let’s also knock out the HTML template now, so you will have an idea what the application is trying to do/show later. Create the home.html file in the src/main/resources/templates folder.
                    <div th:if="${user.claims.containsKey('appName')}"
                         class="alert alert-success text-center" role="alert"
                    >
                        ##


                    <div th:if="${user.claims.containsKey('name')}"
                         class="alert alert-primary text-center" role="alert"
                    >
                        ### Welcome [[${user.claims.name}]]!


                                ## No User Events yet!


                                            Name
                                            Login Date/Time
                                            Token Date/Time
                                            Last View Date/Time
                                            Delete
This template is very basic. It shows a list of user events and related fields. If the logged in user is an admin, it will show a delete button by each event. This template doesn’t control which events are shown, that will be determined in the controller later.
Project Configuration
We will configure the project via the application.properties file located in src/main/resources. In this file, we will configure the database connection, the Okta account information, and a few other fields.
okta.oauth2.issuer={authServerUrl}
okta.oauth2.clientId={clientId}
okta.oauth2.clientSecret={clientSecret}
okta.oauth2.scope=openid

## MySQL
spring.datasource.url=jdbc:mysql://localhost:3306/{dbName}

spring.datasource.username={dbUser}
spring.datasource.password={dbPassword}

# drop in to create the table, good for testing, comment this in production. This will create the table for you on each load of application, so you may want to comment this out after the first load
spring.jpa.hibernate.ddl-auto=create
The first section of the properties file is the Okta configuration. Earlier, you copied a few items including your Okta Web Application’s client id, client secret, and authorization server issuer URL. Paste those values into the application.properties file.
The next section is the MySql configuration. Replace the values inside the {} with the appropriate database name, user, and password. Note, you will have to replace the whole data source URL if you are not running MySql locally.
The following line in the properties file is very important: spring.jpa.hibernate.ddl-auto=create
This property tells the system to create (or re-create) the table from scratch to match the definition in the POJO Entity class (described below). The first time you run your application, or any time you change the structure of the entity class, you will want to have this line uncommented. However, after the table is constructed as you like, you will want to comment this line out or else it will drop and recreate every time you run it and you may wonder why your data isn’t persisting!
POJO Entity
Under the com.okta.examples.jpa package, create the UserEvent class. This class is a POJO that represents the fields in the UserEvent object that will persist to the database.
@Entity
public class UserEvent {

    private static SimpleDateFormat formatter = new SimpleDateFormat("yyyy-MM-dd'T'HH:mm'Z'");

    @Id
    @GeneratedValue(strategy = GenerationType.AUTO)
    private Long id;

    private String name;

    @Lob
    private String token;

    private String userId;

    @Temporal(TemporalType.TIMESTAMP)
    private Date loginAt;

    @Temporal(TemporalType.TIMESTAMP)
    private Date tokenIssuedAt;

    @Temporal(TemporalType.TIMESTAMP)
    private Date lastViewedAt;

    public UserEvent() {}

    public UserEvent(String userId, String name,String token,Date loginAt,Date issueAt) {
        this.userId=userId;
        this.name = name;
        this.token = token;
        this.loginAt = loginAt;
        this.lastViewedAt=loginAt;
        this.tokenIssuedAt=issueAt;
    }

    @Override
    public String toString() {
        return "UserEvent{" +
            "id=" + id +
            ", name='" + name + '\'' +
            ", token='" + token + '\'' +
            ", loginAt='" + loginAt + '\'' +
            '}';
    }

    // put boilerplate getters and setters here

    @Transient
    public String getTokenIssuedAtString() {
        return formatter.format(tokenIssuedAt);
    }

    @Transient
    public String getLastViewedAtString() {
        return formatter.format(lastViewedAt);
    }

    @Transient
    public String getLoginAtString() {
        return formatter.format(loginAt);
    }
}
The @Entity notation tells the system that this object will represent a row in a table. It tells Hibernate that this data should be stored in a table called user_event (from lowercasing the class name and adding “_” between words that were capitalized). If you want the table named something different, you can use the @table(name="tbl_something") annotation. The @Entity class also tells Hibernate that all of the non-static fields and/or getter methods should be persisted to the database. It will ignore any fields/methods that have the @Transient annotation and it will ignore methods that are a getter for a corresponding field. In this case, the entity will store the following fields in the database: id, name, token, userId, loginAt, tokenIssuedAt, and lastViewedAt. In most cases, Hibernate will understand the type of field that the values should be stored as in the database, but there are some times when you need to explicitly tell it what field type to use. In this example, I have used the annotation Lob to tell the system that the token field should be set to longtext. I have also used the @Temporal(TemporalType.TIMESTAMP) annotation to specify that three of the fields should be saved as datetime values. Lastly, I have used the following annotations to indicate that the id field is the primary key that should be autogenerated by the database:
@Id
@GeneratedValue(strategy = GenerationType.AUTO)
Repository
Create the UserEventRepository class. This class is a POJO that represents the fields in the UserEventRepository object that will expose the ability to read and write from the user_event table.
public interface UserEventRepository extends JpaRepository {

    List findByName(String name);
    List findByToken(String token);
    List findByUserId(String userId);
}
This class must extend JpaRepository with the type UserEvent specified so that it knows the type of objects that will be passed in and out. The JpaRepository interface already specifies basic read/write methods, like findById, findAll, and save. However, if you want other find methods specific to the fields, you would include them here, as I did for findByName, findByToken, and findByUserId. The magic is that you do not need to create the implementation class for the UserEventRepository as Spring will automatically create the implementation class at runtime.
Main Application Class
Take a look at the BeyondAuthenticationApplication that was automatically created by the Spring Initializr project. This class is the main application class that runs the application.
@SpringBootApplication
public class BeyondAuthenticationApplication{

    public static void main(String[] args) {
        SpringApplication.run(BeyondAuthenticationApplication.class, args);
    }
}
Create a Controller Class to Route Requests
Last, but far from least, is the controller class. Create the HomeController class. This class does all of the work to read and write from the database. It also prepares the objects needed for the template to render including the list of events to show (all or just the user’s) and whether the logged in user is an admin or not.
@RestController
public class HomeController {

    private final UserEventRepository userEventRepository;

    public HomeController(UserEventRepository userEventRepository) {
        this.userEventRepository = userEventRepository;
    }

    @GetMapping("/")
    public ModelAndView home(@AuthenticationPrincipal OidcUser user) {
        String token = user.getIdToken().getTokenValue();

        //check if first time with this token, if so record new auth event
        List userEventsForToken = userEventRepository.findByToken(token);
        UserEvent event;
        if (userEventsForToken.size() == 0) {
            //add new event
            event = new UserEvent(
                user.getSubject(), user.getClaims().get("name").toString(),
                token, Date.from(user.getAuthenticatedAt()), Date.from(user.getIssuedAt())
            );
        } else {
            //edit existing event
            event = userEventsForToken.get(0); //there will only ever be one because we update it if it exists already
            event.setLastViewedAt(Date.from(Instant.now()));
        }
        userEventRepository.save(event);

        List eventsToShow;
        boolean isAdmin = user.getUserInfo().getClaimAsStringList("groups").contains("Admin");
        if (isAdmin) {
            eventsToShow = userEventRepository.findAll();
        } else {
            eventsToShow = userEventRepository.findByUserId(user.getSubject());
        }

        ModelAndView mav = new ModelAndView();
        mav.addObject("user", user.getUserInfo());
        mav.addObject("idToken", user.getIdToken().getTokenValue());
        mav.addObject("userEvents",eventsToShow);
        mav.addObject("isAdmin",isAdmin);
        mav.setViewName("home");
        return mav;
    }

    @GetMapping("/delete/{id}")
    public RedirectView deleteUser(@AuthenticationPrincipal OidcUser user,@PathVariable("id") long id, Model model) {
        UserEvent userEvent = userEventRepository.findById(id)
          .orElseThrow(() -> new IllegalArgumentException("Invalid event Id:" + id));
        userEventRepository.delete(userEvent);
        return new RedirectView("/");
    }
}
The constructor of this class automatically passes in the UserEventRepository implementation that Spring auto generated for you. This is the modern way to handle dependency injection. We don’t need the @Autowired annotation anymore.
The home method is annotated with the @GetMapping("/") annotation which tells the system to serve this model/view anytime someone accesses the application with no other path information specified. This method builds up the model and view for the main page of the site that uses the home.xml template. It does the following:
- Uses the token to look up old user events to see if one already exists for this token. If so, it updates the
lastViewedAttime. If not, it creates a new user event. - Determines if the logged in user is admin or not
- Gets list of user events. If user is admin, it gets all of the events. If the user is not an admin, it only gets events for that user.
- It returns the model and view with the appropriate variables set to use for rendering the template
The deleteUser method is annotated with the @GetMapping("/delete/{id}") annotation which tells it to execute this method when a user calls a URL or clicks on a link with the href that passes in the id of the event to delete. The home.html template included links with this URL configured for an admin to delete user events. This is the code that will get triggered when the user clicks on the delete button. The code simply finds the user event, deletes it, and then redirects back to the main listing page, where you will see the updated list without the deleted item.
Let’s Run it!
Let’s see it in action! In Eclipse, just right click on the BeyondAuthenticationApplication file, click run as > Java application, and it will kick it off. You can now test your application! Type [http://localhost:8080](http://localhost:8080) into your favorite web browser. You should be presented with an Okta login screen:

Note: If you don’t see the Okta login screen, it is likely because you recently logged into the dev console and it is recognizing that login as valid for this application (after all, it is SSO). If that is the case, just use a different browser or an incognito browser tab.
From the login screen, login as your admin user. It will then redirect you back to your application, which should look something like this:

Next, let’s login with a non-admin user. Do the same steps as above in a different browser or within a new incognito tab. It should present you with the login screen again. From there, log in with your non-admin user and you will see something like this:

Notice, the delete button is missing. When you refresh your screen for the admin user, you will now see events for both your admin and your non-admin. However, the view for your non-admin user will only ever show their own events.
Play around with the delete button from the admin’s view and try refreshing the page and notice that the last view date/time of the entry will update. If you log in again later on, you will see multiple entries for the user once a new token is issued.
#web-development #spring-boot #mysql #jpa #hibernate