Creating Micro Frontends using Web Components (with Angular and React)
If you’re React or Angular, Ember or Vue let’s create a place where they all can live together in perfect harmony using web components.
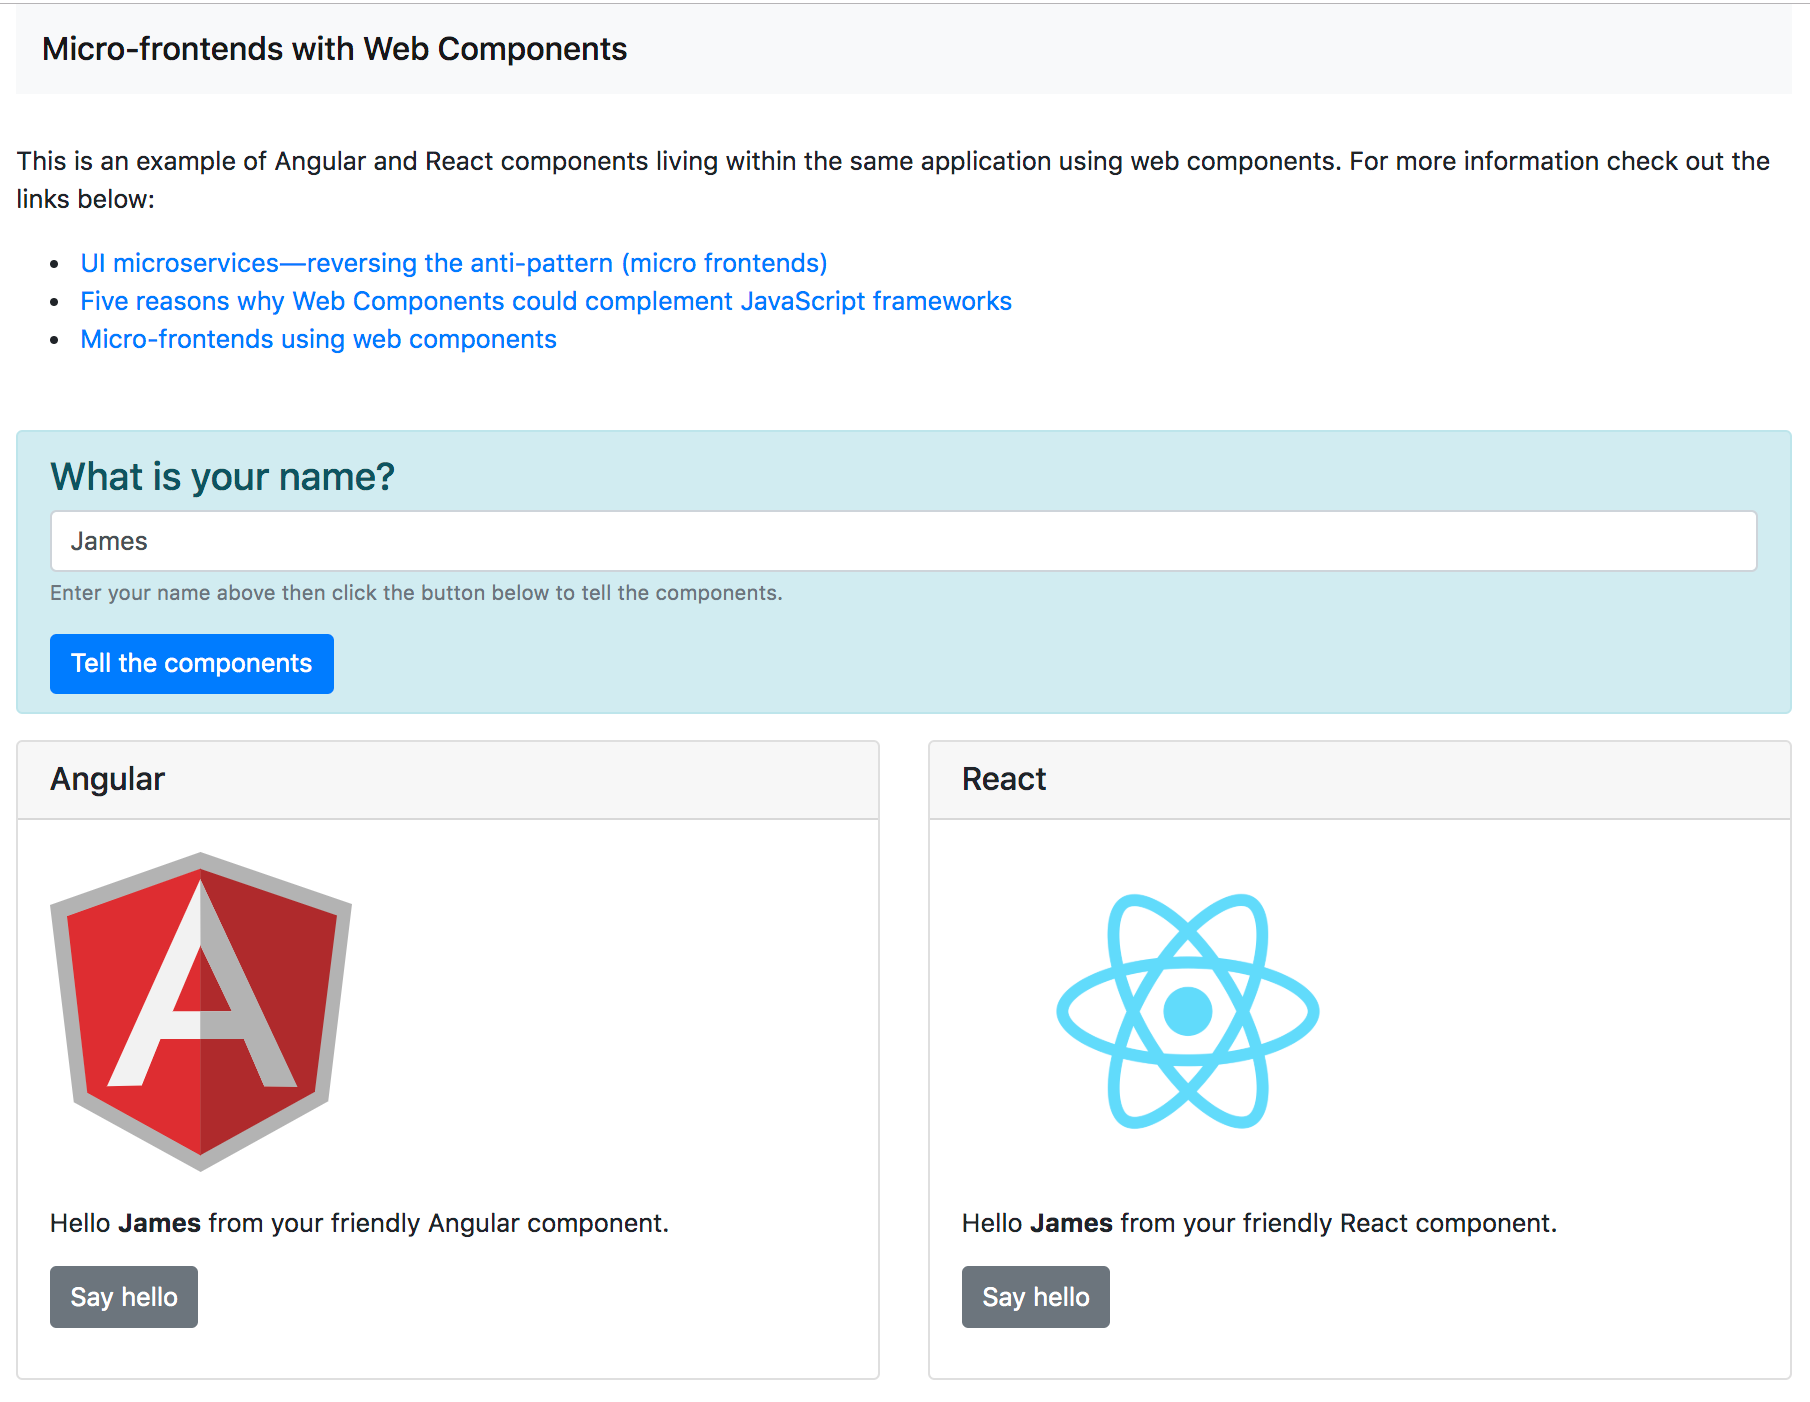
Using web components as a wrapper for both Angular and React components, I am going to show them working alongside each other in a single application. I will also pass data to both components from the parent container, and back again.
Our finished product will look like this:
https://github.com/chriskitson/micro-frontends-with-web-components
PrerequisitesTo enable us to focus on the important pieces, I have coded everything and uploaded it to my github
This isn’t a deep-dive by any means, but I will walk-through the important pieces for web component support in Angular and React.* If you would like to complete some of the other frameworks (Vue, Ember etc), feel free to create a pull request on my repo!
I’ve used the Angular CLI to generate a starting point for our Angular project. You should at least be familiar with this tool so you can navigate the code
As our end goal here is web components, we will be composing static JavaScript files as micro-services. To do this I will use serve on my local environment, which is an excellent tool for serving static files using node
Angular component as custom element
As Angular seem to be adopting web components (with Angular elements), you can serve Angular components as web components with a few small tweaks to the default Angular CLI generated project.
Everything should be working correctly in the /micro-fe-ng directory, all you need to do is install the dependencies and run the start script:
cd micro-fe-ng/
npm i
npm start
Now our Angular micro-frontend defining our custom element as <ng-el />should be running at http://localhost:5001/main.js.
Note: we are serving our files through localhost on different ports, but they could easily be sitting inside multiple micro-services sharing the same DNS.
If you’re interested in how this was achieved here is a rundown on the required changes:
We need a couple of new dependencies:
Angular’s support for custom elements (@angular/elements) and ngx-build-plus which is an alternative build tool for Angular (this has decent support for Angular elements):
npm i @angular/elements ngx-build-plus -D
We also need some changes to our package.json to build our Angular project and serve our project as custom elements:
micro-fe-ng/package.json:
"start": "npm run build && serve -l 5001 dist/micro-fe-ng",
"build": "ng build --prod --output-hashing none --single-bundle true",
We need to define the custom element(s) in our app.module.ts as below:
micro-fe-ng/src/app/app.module.ts:
import { BrowserModule } from '@angular/platform-browser';
import { NgModule, Injector } from '@angular/core';
import { createCustomElement } from '@angular/elements';
import { AppComponent } from './app.component';
import { CustomelementComponent } from './customelement/customelement.component';
@NgModule({
  declarations: [
    AppComponent,
    CustomelementComponent
  ],
  imports: [
    BrowserModule
  ],
  providers: [],
  bootstrap: [],
  entryComponents: [
    AppComponent,
    CustomelementComponent
  ]
})
export class AppModule {
  constructor(private injector: Injector) {}
  ngDoBootstrap(): void {
    const { injector } = this;
    // create custom elements from angular components
    const ngCustomElement = createCustomElement(CustomelementComponent, { injector });
    // define in browser registry
    customElements.define('ng-el', ngCustomElement);
  }
}
Finally, we need to tell Angular to use the ngx-build-plus build tool by specifying it in three places inside angular.json as shown below:
Ngx-build-plus returns the built project as a single JS file which is a requirement for web components to work as a single service.
micro-fe-ng/angular.json:
...
"architect": {
  "build": {
    "builder": "ngx-build-plus:build",
    ....
  "serve": {
    "builder": "ngx-build-plus:dev-server",
    ...
  "test": {
    "builder": "ngx-build-plus:karma",
React component as custom element
As React doesn’t have out-of-the-box support for web components, we will have to write a little more code than before to wrap a standard React component and present it as a native web component (custom element).
Much like React components, custom elements (web components) also have lifecycle hooks which you can access via callback methods.
By using the custom element API’s connectedCallback() and disconnectedCallback() lifecycle methods, we can map these to render()and unmount() of our React component respectively, as shown below:
class MyCustomElement extends HTMLElement {
  constructor() {
    super();
  }
  connectedCallback() {
    ReactDOM.render(<MyReactComponent />, this);
  }
  disconnectedCallback(){
    ReactDOM.unmountComponentAtNode(this);
  }
}
I’ve taken this a stage deeper by also mapping React props and events. If you want to check that out, then take a look at/micro-fe-react/src/index.js.
Everything should be working nicely in the example repository so you can do the following to get the React micro-service up and running:
cd micro-fe-react/
npm i
npm start
Now our React micro-frontend defining our custom element as <react-el /> should be running at http://localhost:5002/main.js
Micro-frontend wrapper
We have two micro-frontend services; one for an Angular component and one for a React component.
Now let’s create a world where they can live alongside each other…
Everything should be working correctly in the /micro-fe-wrapper directory, all you need to do is install the dependencies and run the start script:
cd micro-fe-wrapper/
npm i
npm start
Now our micro-frontend wrapper should be running at http://localhost:5000.
For an explanation of how it works, read on….
As web components are part of the native HTML spec we don’t need to do anything too fancy to bring them together.
In the real-world you might want to use a framework for better code structure and data binding etc., but in the interest of simplicity, let’s just stick with vanilla HTML/JS.
micro-fe-wrapper/index.html:
We need to include some external dependencies from a CDN:
- zone.js is required by Angular. It’s good practice to include this once in the wrapper application as you cannot have multiple versions on the same page.
- custom-elements-es5-adapter.js gives us Custom Element support inside our browser.
In addition we should include the JS files from our component services which we built and deployed in the previous steps:
<script src="https://cdnjs.cloudflare.com/ajax/libs/zone.js/0.9.1/zone.min.js"></script>
<script src="https://cdnjs.cloudflare.com/ajax/libs/webcomponentsjs/2.2.10/custom-elements-es5-adapter.js"></script>
<script src="http://localhost:5001/main.js"></script>
<script src="http://localhost:5002/main.js"></script>
I have defined a method as tellComponents(), which should inject custom element tags: <ng-el /> for Angular and <react-el /> for React into our page.
I am also passing an attribute name using setAttribute() to simulate the wrapper application talking to the components.
I am also listening for an event called helloEvt using addEventListener()which will listen for events coming from our components, enabling them to talk to our parent application and potentially other components. Pretty cool!
There’s a slight difference in attribute names for the helloEvt() between React and Angular. This is due to differing conventions between the frameworks. I’ll explain more later…
function tellComponents() {
  const name = document.getElementById('yourName').value;
const reactEl = document.createElement('react-el');
  reactEl.setAttribute('name', name);
  reactEl.setAttribute('onHelloEvt', 'onHelloEvt');
  reactEl.addEventListener('onHelloEvt', (e) => helloEvent('react'));
  const reactElContainer =  document.getElementById('react-container')
  if (reactElContainer.children.length > 0) {
    reactElContainer.removeChild(reactElContainer.children[0]);
  }
  reactElContainer.appendChild(reactEl);
const ngEl = document.createElement('ng-el');
  ngEl.setAttribute('name', name);
  ngEl.addEventListener('helloEvt', (e) => helloEvent('angular'));
  const ngElContainer =  document.getElementById('ng-container');
  if (ngElContainer.children.length > 0) {
    ngElContainer.removeChild(ngElContainer.children[0]);
  }
  ngElContainer.appendChild(ngEl);
}
Passing values to and from components
Remember the name attribute we passed to our custom elements? It’s actually quite straightforward to read this value in our components.
In Angular we simply reference an Input:
export class CustomelementComponent implements OnInit {
  @Input() name: string;
  ...
}
This makes the value available in our template:
<p>Hello <strong>{{name}}</strong> from your friendly Angular component.</p>
In React it will be passed to the component as a prop:
export class ExampleComponent extends React.Component {
static propTypes = {

name: PropTypes.string

}

static defaultProps = {

name: “Chris”

}

render() {

const { name } = this.props;

return (

<div className=“exampleComponent”>

<p>Hello <strong>{name}</strong> from your friendly React component.</p>

</div>

)

}

}
Sending events from our components is almost as simple as we are listening for helloEvt.
In Angular, all we need to do is specify an Output:
export class CustomelementComponent implements OnInit {

@Input() name: string;

@Output() helloEvt: EventEmitter<string> = new EventEmitter();

…

}
Then we can call this event from our template:
<button type=“submit” (click)=“helloEvt.next()”>Say hello</button>
Note that EventEmitter creates an observable in Angular, hence we need to invoke next().
In React, our component wrapper (micro-fe-react/src/index.js) will look for props prefixed with “on” and treat them as events e.g. onClick(), onFocus() etc for native events. This is why we called our custom event onHelloEvt() for React.
Events are treated as props in React, so all we need to do is define the prop and call it as a onClick() handler. That’s it!
export class ExampleComponent extends React.Component {

static propTypes = {

name: PropTypes.string,

onHelloEvt: PropTypes.func

}

static defaultProps = {

name: “Chris”

}

render() {

const { name, onHelloEvt } = this.props;
return (
  <div className="exampleComponent">
    <button type="submit" onClick={onHelloEvt}>Say hello</button>
  </div>
)

}

}
Conclusion
Using these concepts you should be able to create some really powerful applications mixing both Angular and React components by using the Web Component Custom Element spec. Many of the huge web platforms out there already invoke similar techniques to compose micro-frontends.
There are many pros and cons for why mixing frameworks might be beneficial or problematic (depending on your use case); considering things like adaptability, scalability, performance, security, resourcing, browser support etc.
Here’s a reminder of my github if you haven’t already checked it out. Enjoy!!
Originally published by Chris Kitson at https://medium.com
Useful article:
The Strengths and Benefits of Micro Frontends
#angular #reactjs #web-development #microservices #javascript