How to build a command-line chat app using SocketIO
Originally published by Chidume Nnamdi at https://blog.bitsrc.io
What we will learn in this post:
- How to create WebSocketsHow to Group chat worksHow to install and use SocketIO
Project Setup/Installation
First, we create a Node project:
mkdir node-stream
cd node-stream
npm init -y
Now, we install the socket.io library:
npm i socket.io
Now the socket.io has a client-side library that will be used by the client to communicate with the socket.io server:
npm i socket.io-client
Create a SocketIO server
Now, we will create our Websocket server. To do that let’s scaffold chat-node.js file
touch chat-node.js
Then we add the below to the chat-node.js file:
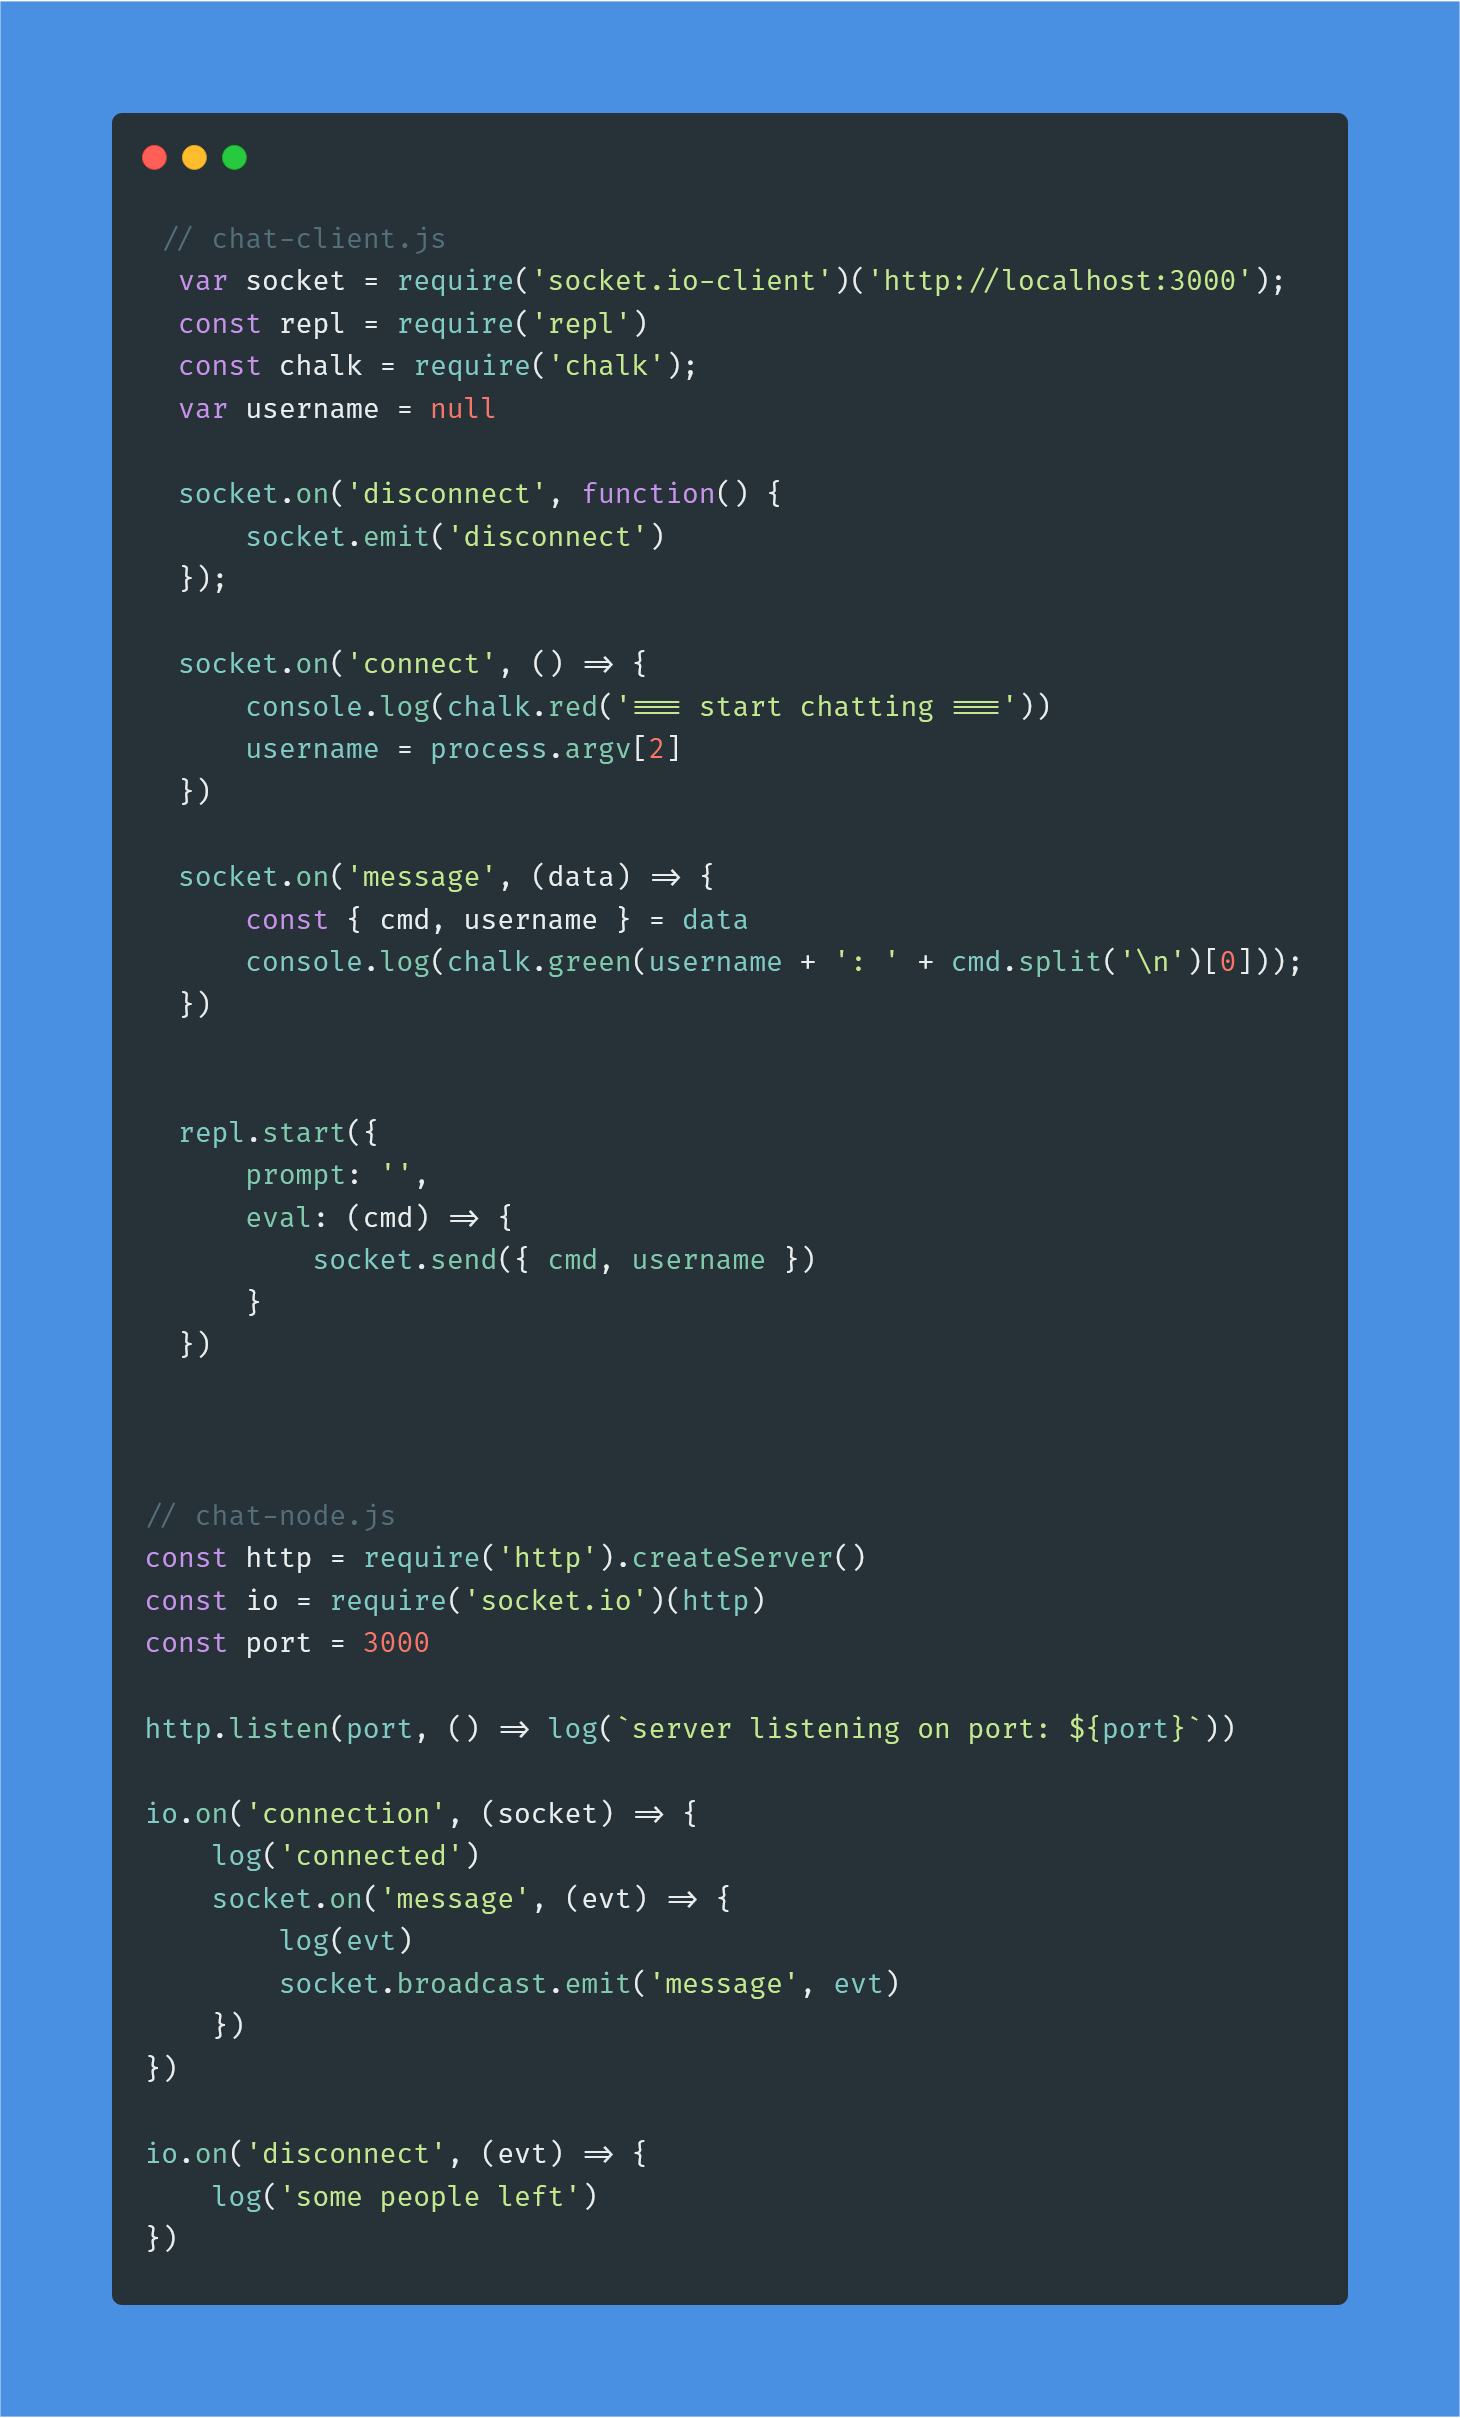
const http = require('http').createServer();
const io = require('socket.io')(server);
const port = 3000io.on('connection', (socket) => {
    log('connected')
})io.on('disconnect', (evt) => {
    log('disconnected')
})http.listen(port, () => log(`server listening on port: ${port}`))
The above attaches socket.io to a plain Node.JS HTTP server listening on port 3000.
SocketIO is based on events, you setup events with its handler and when the event is emitted the corresponding handler is run. To setup events, the .on method is used, it takes two parameters, the first is a string that holds the name of the event and the 2nd parameter is a function callback.
The connect event is emitted when a connection is made. The socket argument should be used in further communication with the client.
The disconnect event is emitted when a client disconnects from the server.
Now that we have set up our socket server, let’s see how to connect to the server.
Create a SocketIO client
We create a chat-client.js file
touch chat-client.js
Now add the below code to the chat-client.js file:
var socket = require('socket.io-client')('http://localhost:3000');
  const repl = require('repl')
  const chalk = require('chalk');  socket.on('disconnect', function() {
      socket.emit('disconnect')
  });  socket.on('connect', () => {
      console.log(chalk.red('=== start chatting ==='))
  })  socket.on('message', (data) => {
      const { cmd, username } = data
      console.log(chalk.green(username + ': ' + cmd.split('\n')[0]));
  })
  repl.start({
      prompt: '',
      eval: (cmd) => {
          socket.send(cmd)
      }
  })
We required the socket.io-client library, it returned a function that we called passing in the server URL http://localhost:3000. Remember we created a server a port 3000, so that's why we are referencing to port 3000. This gets us the socket channel to the WebSocket server for communication. With the socket we can send messages to the server.
Also we the client can set up event listeners. The repl will be used to create a terminal REPL and the chalk would be used to distinguish message by colors.
We set up various event listeners:
connect: This is fired when the client establishes a successful initial connection to the server. Here we make the handler to display '=== start chatting ===' in red color with the help of chalk.
disconnect: This event is fired when we disconnect from the server.
message: This event is fired when a data is sent from the server. Here the handler has a data argument, this holds the data that is sent from the server.
Then, last we called the repl start method. The function in the eval property whenever we type anything in the terminal and press Enter. So the cmd argument holds the message typed and we used the send method in the socket API to send the message to the server.
Whenever the send method is called, the server is called and the server, if has a registered socket, receives the message, it’s message event would be fired and its handler would be called.
Sending messages back and forth
Now, in our chat-node.js, the connection event handler receives the socket in its argument,
io.on('connection', (socket) => {
    log('connected')
})
let’s use it to register a message event.
io.on('connection', (socket) => {
    log('connected')
    socket.on('message', (evt) => {
    })
})
The evt holds the data payload emitted alongside the message event. Now as a group chat, the server needs to send the message to all registered sockets connected to it. This means broadcasting to all listening sockets.
io.on('connection', (socket) => {
    log('connected')
    socket.on('message', (evt) => {
        log(evt)
        socket.broadcast.emit('message', evt)
    })
})
Now, if two people run the chat-client.js and person 1 sends message “I’m person1”, the message would be received by the server in the message event and the call socket.broadcast.emit would send the message to person 2 and person1, all connected to the socket stream.
See the call socket.broadcast.emit('message', evt), the first param indicates the event that will be emitted on all connected sockets, in this case, it is the message event and their corresponding handlers would be run passing evt the message being conveyed.
Running it
To run it, we run chat-node.js in one terminal and chat-client.js in another terminal.
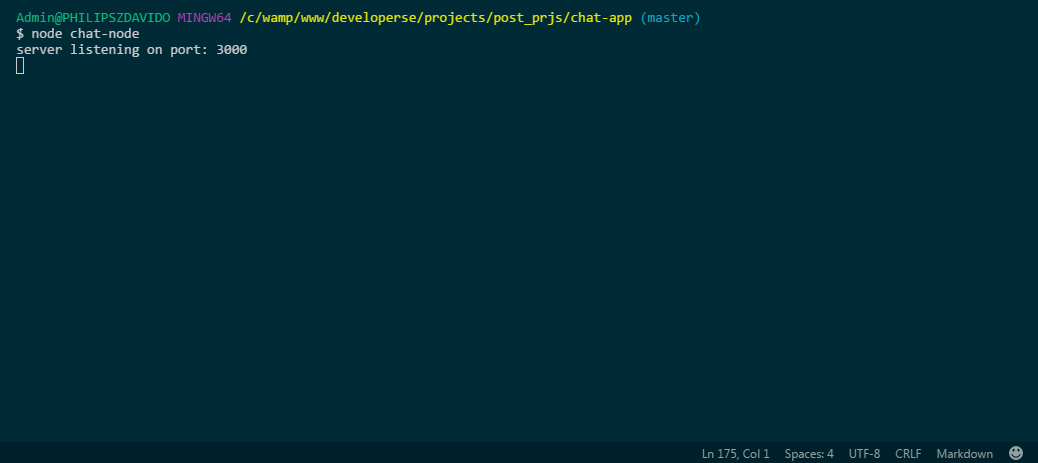
See the server logged server listening on port: 3000. Now open another terminal and run chat-client.js
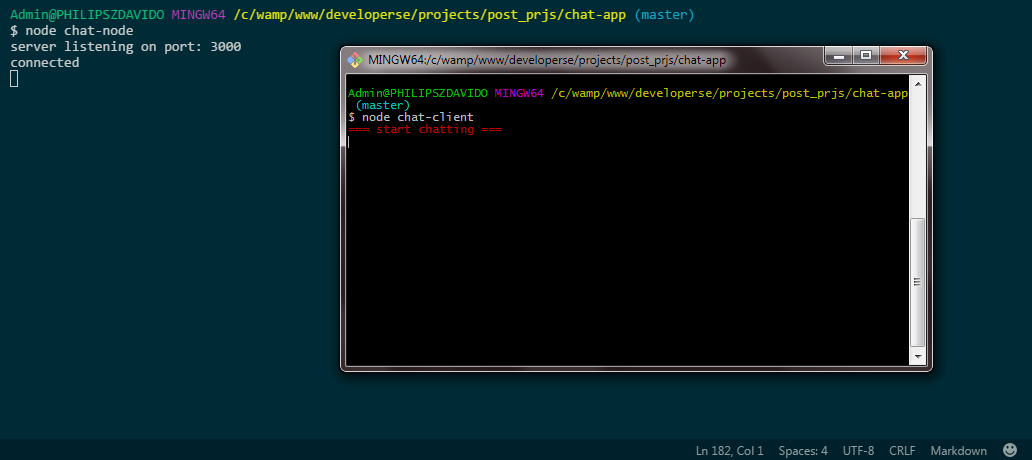
See in the server it logged connected, that's the connection handler running because we connected a socket.
Open another terminal and run chat-client.js
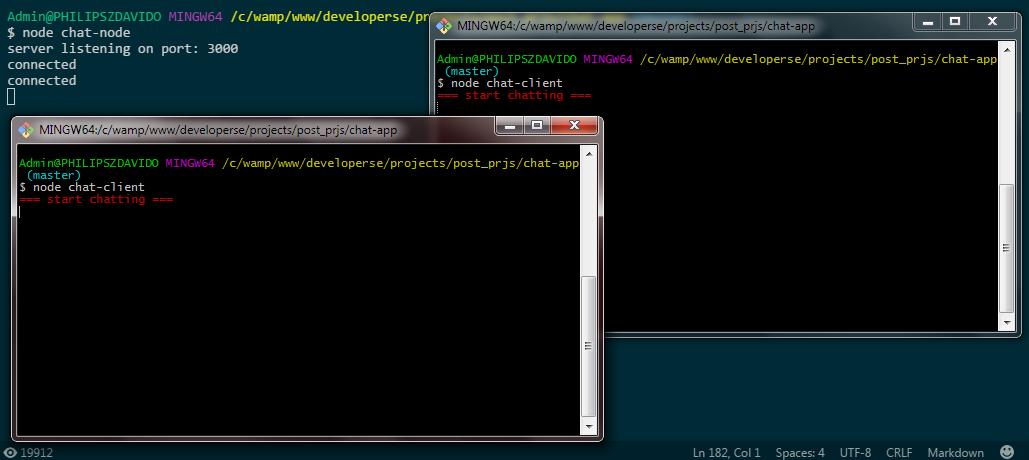
See it logged another connected
Now on the two client terminals we created, let’s type a message on one terminal and press Enter
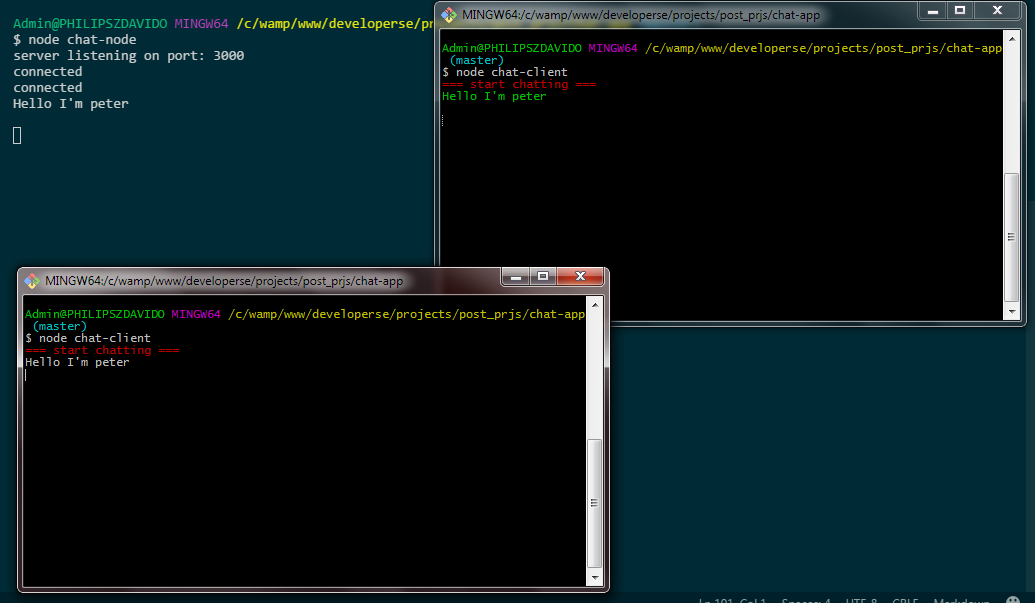
See it appeared on the second terminal. Now type on the second terminal and press Enter:
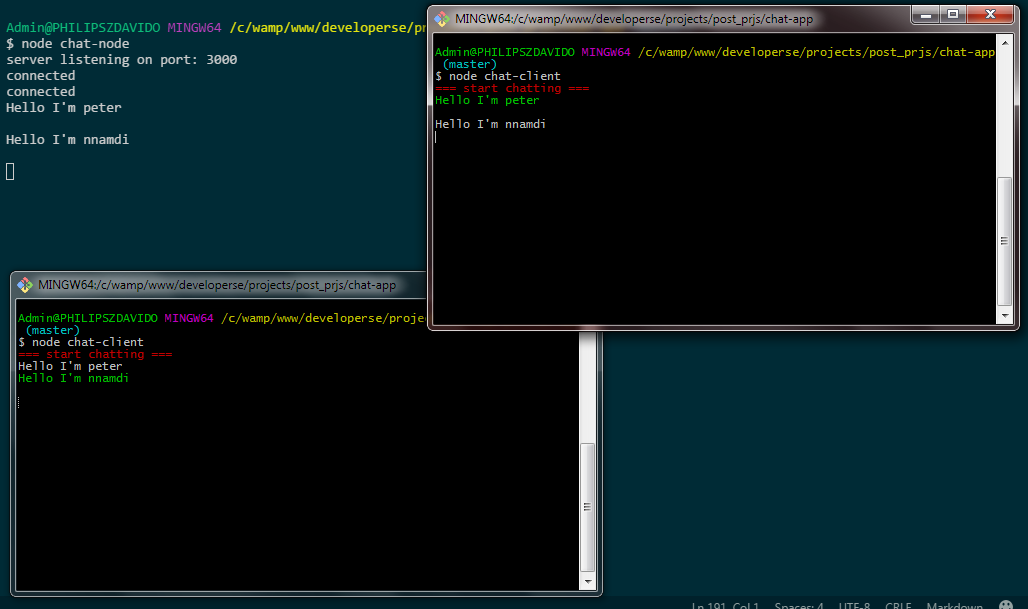
See it appeared on the first terminal.
Making it fun
To make it more fun, let’s add username so users can connect with their usernames and when anyone writes messages we can see who wrote a message.
Let’s add a username variable in chat-client.js:
var socket = require('socket.io-client')('http://localhost:3000');
  const repl = require('repl')
  const chalk = require('chalk');  var username = null
//...
Now, we will retrieve the username from the terminal when connecting like this: node chat-client nnamdi. This will be done in the connect event:
// ...
  socket.on('connect', () => {
      console.log(chalk.red('=== start chatting ==='))
      username = process.argv[2]
  })
The name is retrieved and stored in the username variable.
Now, we should edit the send call. When sending our message it should be tagged with our username:
// ...
repl.start({
      prompt: '',
      eval: (cmd) => {
          socket.send({ cmd, username })
      }
  })
The message event handler should be changed to destructure the above object to username and cmd.
// ...
  socket.on('message', (data) => {
      const { cmd, username } = data
      console.log(chalk.green(username + ': ' + cmd.split('\n')[0]));
  })
See, it will display the username followed with a semicolon and the message.
Let’s test it out. Close our previous client terminals.
Now, to connect to the server we have to add our username in the node chat-client. OK, open a new terminal and type node chat-client nnamdi. Here nnamdi is the username.
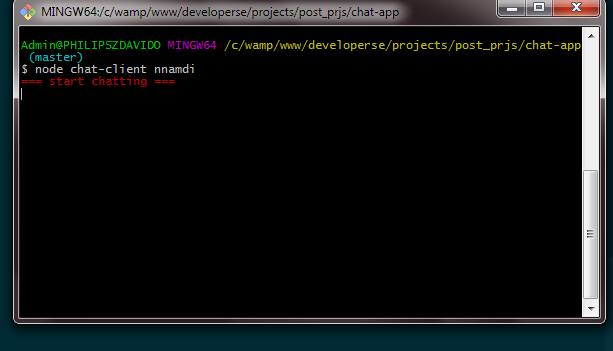
Let’s open another one: node chat-client peter

Now, on nnamdi terminal, let's type Hello I'm nnamdi
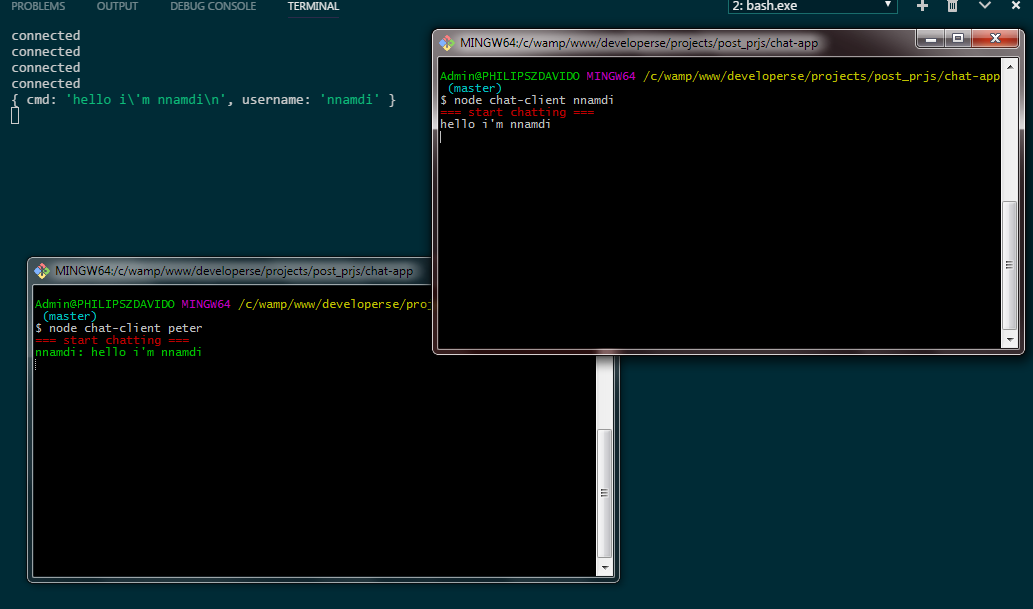
See it appears on peter terminal as nnamdi: Hello I'm nnamdi.
Also on peter terminal, let's type Hello i'm peter
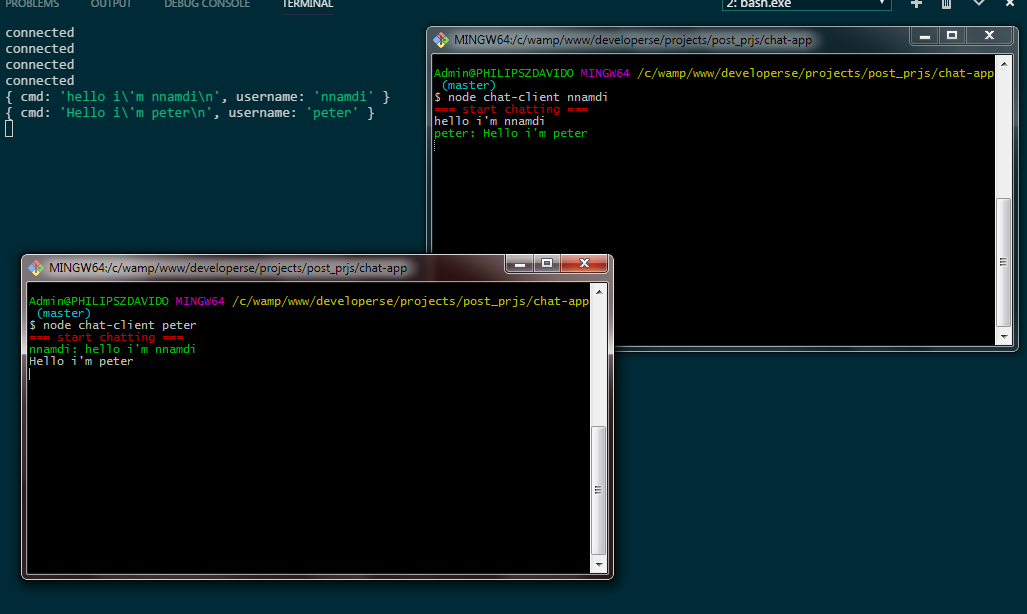
It appears on nnamdi terminal as peter: Hello I'm peter
Conclusion
It is very simple, once you know the right methods in the API you can replicate most of the popular app’s functionality. There are more features to be added, I urge as a reader to expand greatly on this, you might create the next big chat app for the next billion users.
If you have any question regarding this or anything I should add, correct or remove, feel free to comment
Full Code
Thanks for reading ❤
If you liked this post, please do share/like it with all of your programming buddies!
Follow us on Facebook | Twitter
Further reading
☞ The Complete JavaScript Course 2019: Build Real Projects!
☞ Vue JS 2 - The Complete Guide (incl. Vue Router & Vuex)
☞ JavaScript Bootcamp - Build Real World Applications
☞ JavaScript Programming Tutorial - Full JavaScript Course for Beginners
☞ New ES2019 Features Every JavaScript Developer Should Know
☞ Best JavaScript Frameworks, Libraries and Tools to Use in 2019
☞ JavaScript Basics Before You Learn React
☞ Best 50 Nodejs interview questions from Beginners to Advanced in 2019
☞ Node.js 12: The future of server-side JavaScript
☞ An Introduction to Node.js Design Patterns
☞ Basic Server Side Rendering with Vue.js and Express
#javascript #node-js #web-development