Learn Svelte 3.0 - Svelte Tutorial for Beginners
Svelte.js is the new kid on the block to compete against the big 3 (Angular, Vue and React) in the frontend javascript framework space.
Let’s get started!
Installation
To get started, you will need Node.js with NPM installed. Visit http://nodejs.org to download and install it if it’s not on your machine yet. You can open up your terminal and type ‘node -v’ to determine if it’s installed.
Once node.js is installed, in your terminal, type:
> npx degit sveltejs/template svelte-project
> cd svelte-project
> npm install (or npm i)
This downloads Svelte, hops you into the new folder, and then installs the dependencies associated with Svelte.
Next, open up the new folder in your preferred code editor. If you’re using VSC (Visual Studio Code), you can type “code .” in the svelte folder via the terminal and it will open up VSC in that folder.
Finally, we’ll run the dev server by typing:
> npm run dev
You can visit your new Svelte app by visiting http://localhost:5000 in your browser!
Project Folder & File Structure
It’s worth taking a look at the files and folders found within your Svelte app.
> node_modules
> public
> src
.gitignore
package-lock.json
package.json
README.md
rollup.config.js
It’s surprisingly very simplistic upon first glance, as compared to the file and folder structure as found in competitors such as Angular and Vue.
At the bottom we see rollup.config.js which is a module bundler for JavaScript. Think of it as a competitor to Webpack and Parcel.
Next up, we have /src which includes main.js and App.svelte.
main.js is the starting/entry point of the app.
import App from './App.svelte';

const app = new App({
       target: document.body,
       props: {
              name: 'world'
       }
});

export default app;
As you can see, it imports the other file at the top, which is the starting component for the app. It also specifies a target, which specifies where the app output will go, and any properties in the form of a props object.
In App.svelte:
<script>
       export let name;
</script>

<style>
       h1 {
              color: purple;
       }
</style>

<h1>Hello {name}!</h1>
Here, we have the 3 basic building blocks of a modern Javascript framework:
- The Logic
- The Style
- The HTML Template
Routing
Unfortunately, as of writing this, there is not an official Svelte router. There are numerous routers people have developed. We’re going to use one of these unofficial routers to help us navigate througout the different components of our Svelte app.
First, we need to install at in the terminal:
npm install --save svero
Here’s the github page for svero if you want to learn more.
After it’s installed, visit **App.svelte **and update it to match the following:
<script>

       import { Router, Route } from 'svero';

       import Header from './Header.svelte';
       import Index from './pages/Index.svelte';
       import About from './pages/About.svelte';

</script>

<style>

</style>

<Header/>

<div class="container">
       <Router>
              <Route path="*" component={Index} />
              <Route path="/about" component={About} />
       </Router>
</div>
First, we’re importing the router at the top. Then, we’re importing a few files that don’t yet exist (we’ll create those in a second).
Then, we’re nesting a
Let’s create those files now.
<strong>/pages/About.svelte</strong>:
<script>
 export let router = {};

 // Those contains useful information about current route status
 router.path; // /test
 router.route; // Route Object
 router.params; // /about/bill/123/kansas { who: 'bill', where: 'kansas' }
</script>

<h1>About me</h1>

<p>This is my router path: {router.path}</p>
At the top here, we’re demonstrating how you can access various router properties with the router library that we’re using.
<strong>/pages/Index.svelte</strong>:
<h1>I'm homeee</h1>

<p>Lorem ipsum dolor sit amet, consectetur adipisicing elit. Perspiciatis, laborum dignissimos? Ab blanditiis veniam a aspernatur autem, harum, quia dolor pariatur labore asperiores recusandae nihil dolorem exercitationem id itaque tempora?</p>
In this case, we’re only specifying the templating. If you don’t need logic or style, just omit those sections of the component.
<strong>/scr/Header.svelte</strong>:
<script>

   import {Link} from "svero"

</script>

<header>
   <Link href="/home" className="logo">Hello!</Link>
   <nav>
       <ul>
           <li><Link href="/home">Home</Link></li>
           <li><Link href="/about">About</Link></li>
       </ul>
   </nav>
</header>
Instead of using regular tags, we’re using Link from svero. Also, notice className instead of class, when we’re using the Link component.
If you save everything, it should be ready to rock! But it’s rather ugly, too.
Giving it some Style
This is all straight forward CSS stuff, with exception to one concept.
Visit App.svelte and specify the following within the style tags:
<style>

   :global(body) {
              /* this will apply to <body> */
              margin: 0;
              padding: 0;
       }

       .container {
              width: 80%;
              margin: 4em auto;
       }

</style>
Notice :global(selector). If you’re referencing any CSS elements that aren’t present in the current component’s template as HTML tags, you can use this global selector format.
<strong>Header.svelte</strong>:
<style>

   header {
       display: flex;
       justify-content: space-between;
       background: rgb(0, 195, 255);
   }

   nav ul {
       display: flex;
       list-style-type: none;
       margin: 0;
   }

   :global(header a) {
       padding: 1em;
       display: block;
       color: white !important;
   }

   :global(.logo) {
       font-weight: bold;
   }

</style>
Interpolation
Now, we’re going to cover some of the basic stuff in Svelte. Interpolation is simply displaying a variable of some sort in the template.
Open up Index.svelte and update it:
<script>

   let bro = 'Bro';

</script>

<h1>{bro}</h1>
As you can see, very, very simple.
Event Handling
Let’s create a method that’s called when a user clicks a button, and let’s make it do something:
<script>

   let bro = 'Bro';

   function clickEvent() {
       bro = 'Dude';
   }

</script>

<h1>{bro}</h1>

<button on:click={clickEvent}>Click me</button>
Easy, easy stuff! You can also change :click to other events, such as mouseover and it will work just the same.
If and Else
Update the component as follows:
<script>

   let person = {
       status: 'dude'
   }

</script>

{#if person.status == 'dude'}
   <h1>Dude!!</h1>
{/if}
If we want an else statement:
<script>

   let person = {
       status: 'bro'
   }

</script>

{#if person.status == 'dude'}
   <h1>Dude!!</h1>
{:else}
   <h1>{person.status}</h1>
{/if}
Once again, very simple to understand.
If you want else if, that’s easy too:
<script>

   let person = {
       status: 'woah'
   }

</script>

{#if person.status == 'dude'}
   <h1>Dude!!</h1>
{:else if person.status == 'bro'}
   <h1>bro!!</h1>
{:else}
   <h1>{person.status}</h1>
{/if}
Awesome!
Iteration
Many times, you need to iterate over an array of some sort. This is how you achieve that with Svelte:
<script>

   let persons = [
       { status: 'dude', tagline: 'Yo sup' },
       { status: 'bro', tagline: 'Gnarly, man' },
       { status: 'chick', tagline: 'Watchoo want boo?' },
   ]

</script>

<ul>
   {#each persons as {status, tagline }, i}
       <li>{i+1}: <strong>{status} </strong>({tagline})</li>
   {/each}
</ul>
So, we simply define an array (or an array of objects in our case), and we iterate over them in the template using #each.
This is a powerful concept to understand, as many times, you will be receiving data from a backend in the form of an array or an array of objects, and you will need to output the results to your template.
Bindings
Forms are a critical part of any app, so let’s discover how we can communicate form-based data to and from Svelte via 2 way data binding:
<script>
       let name = 'broseph';
</script>

<h1>{name}</h1>

<input bind:value={name}>
In this case, name is being set in the component logic, but it’s also something that can be set and updated in real time via the component template (the input textfield).
Another example of this reactivity in forms is with a checkbox:
<script>
       let status = false;
</script>

<label>
   <input type="checkbox" bind:checked={status}>
   Do you want to lear more svelte?
</label>

{#if status}
   <p>Of course I want to learn more</p>
{:else}
   <p>Nah, I want to keep being a newbie</p>
{/if}
Here, we’ve mixed what we learned with template conditionals with two-way data binding. Awesome!
Data Stores
Many times, you don’t want to store data at the component level. Rather, you want to store your data in a central location that your components can easily access.
To do this, create the file /src/stores.js with the following code:
import { writable } from 'svelte/store';

export const status = writable('dude');
Next, inside Index.svelte replace the previous code with:
<script>
   import { status } from '../stores.js';

   let the_status;

   const stat = status.subscribe(val => {
       the_status = val;
   })
</script>

<h1>{the_status}</h1>
As you can see, we must subscribe to status and then we can access the value as shown in the h1.
How about updating the property from our component?
Adjust the code to:
<script>
   import { status } from '../stores.js';

   let the_status;

   const stat = status.subscribe(val => {
       the_status = val;
   })

   function changeStore() {
       status.update(n => n = 'bro');
   }
</script>

<h1 on:mouseover={changeStore}>{the_status}</h1>
So, when you hover your mouse over the h1 element, we’re updating the status property as such.
Also, because we are subscribing to the property stat, to avoid memory issues, you should unsubscribe to the value on the lifecycle onDestroy().
<script>
   import { onDestroy } from 'svelte';
   import { status } from '../stores.js';

   let the_status;

   const stat = status.subscribe(val => {
       the_status = val;
   })

   function changeStore() {
       status.update(n => n = 'bro');
   }

   onDestroy(stat);

</script>

<h1 on:mouseover={changeStore}>{the_status}</h1>
Great!
Fetching Data
We can use modern browser’s fetch to grab data from an API. This could be from your own backend, or from a public test API in our case.
Visit Index.svelte and update it:
<script>
   import { onMount } from "svelte";

   let data = [];
   onMount(async function() {
       const response = await
fetch("https://jsonplaceholder.typicode.com/posts");
       const json = await response.json();
       data = json;
       console.log(data);
   });

</script>

<ul>
{#each data as {title}}
   <li><p>{title}</p></li>
{/each}
</ul>
Easy!
Deployment
To build out your Svelte app, run:
> npm run build
This outputs everything inside of the /public/ folder.
You can use the FTP to upload the contents of this folder to a web server and it will work. You can even install something like lite-server via NPM and launch it within the directory locally.
My current sponsor is Linode.com and I’m going to show you how to launch this static site using their service!
First, join up at Linode. Next, once logged in, click Create Linode:

Next for Distribution, choose Debian. Select a region, then choose a Nanode 1GB. Then, choose a password and click Create.
Wait for it to boot the server up. Once that’s done, click Launch Console. Wait until it prompts you for a localhost login. Choose “glish” at the top once it does.
Specify “root” for the login and your chosen password from earlier.
Once logged in, we need to install nginx which is an open source web server.
apt-get install nginx
Once it’s finished, we have to start it up:
systemctl start nginx
Now, in the linode dashboard, grab your site’s IP address and visit it in the browser. You will see a Welcome message, which means the server is now ready to rock!
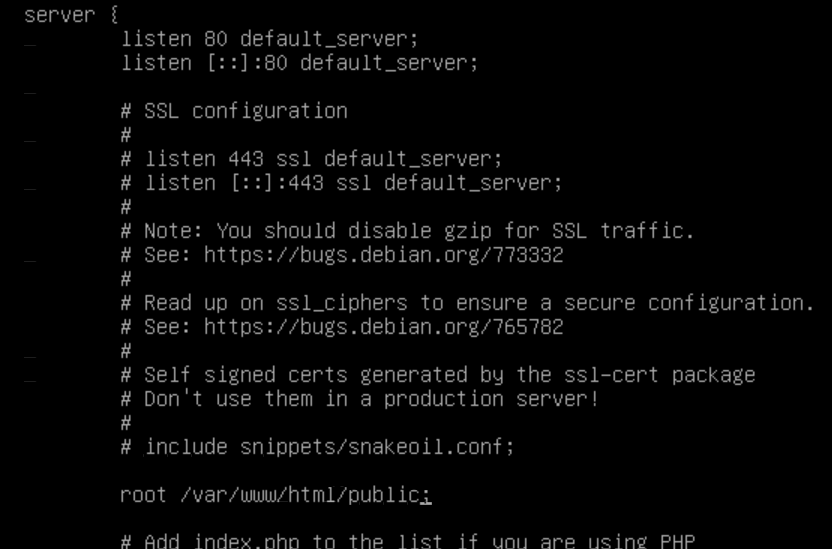
Right now, that welcome message is being served by default from /var/www/html – but when we pull in our project, it’s going to be stored in a /public folder. So, we need to modify that root folder to: /var/www/html/public so that it serves from that folder.
To do this:
> cd /etc/nginx/sites-enabled
> nano default
Using your keyboard arrow keys, navigate to the area shown below in the picture and add /public:
Then hit CTRL-O and hit Enter. Then hit CTRL-X to exit out of nano.
Next, we have to restart the server:
> service nginx restart
Now, if you refresh the server IP in the browser, you will receive a 404 not found. That’s because we haven’t yet pulled in our project.
Let’s install git on our server:
> apt-get install git
Next, let’s hop into our html folder:
> cd /var/www/html
Great! Now, we have to push our local project using git on our local machine. Which means, we’ll first need to create a repo at github.com.
Once you do that, in your local console within the project folder we worked in, type:
> git init
> git add .
> git commit -m "first commit"
> git remote add origin [the origin github displayed after creating the repo]
> git push -u origin master
Now, back in our server’s console, type:
> rm /var/www/html/*
>
git clone https://github.com/[yourusername]/[yourreponame].git .
We need to install nodejs and npm:
>
curl -sL https://deb.nodesource.com/setup_12.x | bash -
> apt-get install -y nodejs

>
curl -L https://npmjs.org/install.sh | sudo sh
Next, run:
> npm i
> npm run build
Great! Now, check your browser and you should see the app working!
You can also set up a domain and all of that good stuff, but this tutorial is already long enough!
Conclusion
We only just scratched the surface here, but we covered a lot of ground already and it’s now worth going over it one more time to commit it to memory. Stay tuned, we just might cover more Svelte!
Thanks for reading ❤
#javascript #angular #vue-js #reactjs #web-development