Build Falcon API Framework on Docker
We're going to adjust the Falcon API Framework on Docker. In this way, we'll able to build our APIs. There are 2 kinds of frameworks, full-featured and bare frameworks. If you would rather develop a RESTFul API for your projects with Python, in general, you consider structure the following.
1) Flask with Flask-RESTFul
2) Django + REST Framework
On the other hand, there is a very good light-weight API framework available in Python called Falcon.
Accordingly, Falcon claims (I agree with them), other frameworks weigh you down with tons of dependencies and unnecessary abstractions. Falcon cuts to the chase with a clean design that embraces HTTP and the REST architectural style.
Friendly Reminder
In this article, we're going to see the adjustment and installation of the Falcon on Docker. My next post will demonstrate to build APIs with Falcon.
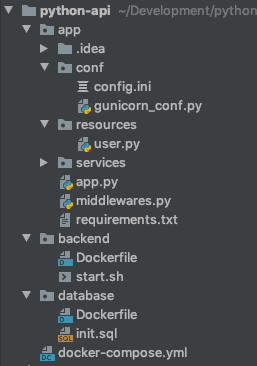
Well, let's start. Initially, we're supposed to modify the directory structure. It should be like this.
Firstly, I'm going to share docker-compose.yml file into the root directory.
version: '2'
services:
  backend:
    build: ./backend
    ports:
      - "9000:8000"
    volumes:
      - ./app/.:/app
    tty: true
    depends_on:
      - postgresql
postgresql:

image: postgres:alpine

environment:

POSTGRES_DB: test_dev

POSTGRES_USER: mertingen

POSTGRES_PASSWORD: mertingen

ports:

- ‘5432:5432’
As you can see, as a database solution, I refer to the Postgresql. Once you build this file, it will be created a database called test_dev and a user mertingen called. Also, our application exposes 9000 port to serve externally.
In the database directory, I’ve one file. Let’s look over the Dockerfile.
FROM postgres:10.1-alpine
For now, I’ve been just pulling an image. Therefore, we’ll able to connect the database and we’ll refer those environment variables in the docker-compose.yml file. We’re going to run this file then. In the backend directory, I’ve 2 files Dockerfile and start.sh. Let’s look over them.
FROM python:3.6.2COPY start.sh /scripts/start.sh
WORKDIR /app
ENTRYPOINT [“/scripts/start.sh”]
And, here is start.sh.
#!/bin/bashpip install --upgrade pip
pip install -r /app/requirements.txtgunicorn app:api -c /app/conf/gunicorn_conf.py --reload
You could find requirements.txt here.
attrs==19.1.0

falcon==2.0.0

falcon-autocrud==1.0.36

gunicorn==19.9.0

jsonschema==3.0.1

marshmallow==2.19.5

psycopg2==2.8.3

pyrsistent==0.15.4

python-dateutil==2.8.0

six==1.12.0

SQLAlchemy==1.3.6

webargs==5.4.0
start.sh file installs dependencies and creates a server to run the application. To serve the application, I create 2 configuration files, config.ini and gunicorn_conf.py in the conf directory. This is config.ini file.
[postgresqlDB]

host = postgresql

db = test_dev

user = mertingen

pass = mertingen
To connect the database, we’ll use this file. The parameters will be environment variables in my next article. This file helps to connect to the database.
import psycopg2
import configparser
import osdir_path = os.path.dirname(os.path.realpath(file))
config = configparser.ConfigParser()config.read(dir_path + ‘/…/conf/config.ini’)
def connect():
try:
connection = psycopg2.connect(user=config[‘postgresqlDB’][‘user’],
password=config[‘postgresqlDB’][‘pass’],
host=config[‘postgresqlDB’][‘host’],
port=“5432”,
database=config[‘postgresqlDB’][‘db’])
print(“You are connected!”)
return connection
except (Exception, psycopg2.Error) as error:
print(“Error while connecting to PostgreSQL”, error)
# finally:
# if connection:
# connection.close()
# print(“PostgreSQL connection is closed”)
Now, I share the configuration of the gunicorn server.
import multiprocessingbind = ‘0.0.0.0:8000’
workers = multiprocessing.cpu_count() * 2 + 1
timeout = 30
worker_connections = 1000
We barely need to create a Falcon application. For this, let’s create app.pyand put this code.
import falcon
from resources import user
from services import database#from middlewares import (
ContentEncodingMiddleware,
#)
conn = database.connect()
#api = falcon.API(middleware=[
ContentEncodingMiddleware(),
#])
api = falcon.API()
user = user.User(conn)
api.add_route(‘/users/{id}’, user)
api.add_route(‘/users’, user, suffix=‘collection’)
Simply, to see a response from this API, I create a user resource file in the resources directory. It’s like this.
import falcondef __init__(self, conn): self.conn = conn @staticmethod def set_columns(data, cursor): items = [] for x in data: item = {} c = 0 for col in cursor.description: item.update({col[0]: x[c]}) c = c + 1 items.append(item) return items def on_get(self, req, resp, id): try: cursor = self.conn.cursor() query = "SELECT * FROM Users WHERE id = %s;" cursor.execute(query, (id,)) record = cursor.fetchall() cursor.close() output = {"status": True, "message": None, 'data': self.set_columns(record, cursor)} resp.status = falcon.HTTP_200 resp.media = output except Exception as error: output = {"status": False, "message": str(error), "data": None} resp.status = falcon.HTTP_500 resp.media = output
In fact, I don’t mention codes, as I said we’re going to build an API in the next article. I’ve inserted some fake user data and the application returns the data.
From now on, we just need to run Docker Compose services with this command in the root directory.
docker-compose up --build
As a result, you will get an output like this.

After this point, as long as you request the http://localhost:9000/users URL, you will able to get this result. As I said, I played with fake data.

To Sum Up
Thanks all of you for reading till this point. Docker helps to build your development workspace and we should exploit its features in this way. Likewise, the Falcon framework builds pretty-cool APIs. I hope, this article will be useful for you and see you in the next article.
Further reading
☞ Docker Containers for Beginners
☞ Things You Should Know About Docker Containers
☞ Deploy Docker Containers With AWS CodePipeline
☞ Docker Mastery: The Complete Toolset From a Docker Captain
☞ Docker and Kubernetes: The Complete Guide
☞ Docker for the Absolute Beginner - Hands On - DevOps
☞ Docker Crash Course for busy DevOps and Developers
☞ The Docker for DevOps course: From development to production
☞ Docker for Node.js Projects From a Docker Captain
☞ Docker Certified Associate 2019
☞ Selenium WebDriver with Docker
#docker #python #web-development