Share State Across Your Next.js Application with Jotai
In this tutorial, you will learn how to use Jotai in Next.js projects to share and manage states across your application. Learn about Jotai APIs and how to use these patterns to share state across your Next.js application.
The React ecosystem has simplified and improved the web in the past couple of years. It has led to many useful patterns and practices for building modern web applications.
From the beginning, React positioned itself as an unopinionated, view-only library. This means React is responsible for the view layer only, or what is being rendered to the screen. It does this by mutating DOM nodes. The logic of how you share states across the application is up to the developer.
In this article, you will read about Jotai APIs and how you can use these patterns to share state across your Next.js application.
Contents:
- Sharing state in React apps
- Core principles of Jotai
- Performance bottlenecks in Next.js applications
- Using Jotai with Next.js
- Hydrating SSR pages
Sharing state in React apps
Although React provides APIs such as useState() and useContext() to manage state across your app, these APIs can be arguably suboptimal while building apps. Developers have long been building and leveraging third-party state management libraries like Redux, Redux Toolkit, Zustand, and others.
Jotai is one such library that you can use to share and manage states across your application. Jotai differentiates itself from other libraries out there by having a bottom-up approach:
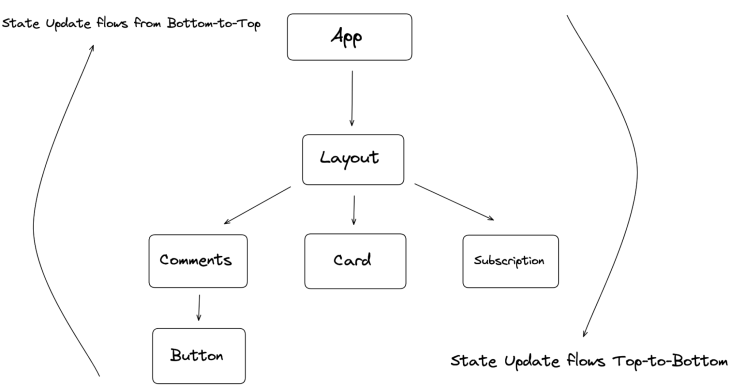
Libraries like Redux or Zustland create a global store outside the DOM tree and flow state updates to child components in a top-to-bottom approach. Jotai does the opposite — its state lives within the React DOM tree itself and the component state tree is updated in a bottom-to-top approach.
Core principles of Jotai
Jotai, being a very small library, has a lot to take care of as a state-sharing solution. It was inspired by Facebook’s Recoil, which solves a similar set of problems but is recommended for larger-scale organizations.
Recoil is an opinionated library that has its own way of setting up applications, unlike Jotai. Jotai is completely unopinionated and provides APIs that are very similar to React APIs, offering a sense of familiarity to developers with React experience.
Jotai relies on its atomicity principle, which says that every state at its core can be defined as an atom. These atoms can then be chained and scaled together to form complex states. The state value only ever re-renders if its atom dependency changes.
These dependency trackers are highly optimized for production. And unlike React, you usually don’t need to use any memoization techniques like the Memo component or useMemo Hook.
For example, in the below case, you can initialize an atomCount variable with the atom API:
import { useAtom, atom } from "jotai";

// states can be created using atom API
const atomCount = atom(5)

// pass the above atom variable to the `useAtom` hook to read and
// mutate its values
const [count, setCount] = useAtom(atomCount)
We will later use this approach to manage state using a hook called useAtom, which is similar to React’s useState API.
Performance bottlenecks in Next.js applications
One of the trickiest parts of working with large-scale Next.js applications is handling state across the application.
React Hooks simplify state management by providing the Context API to handle application-wide states that can’t be dealt with via the useState Hook. However, if you’re not too careful with Context APIs, you could run into performance problems quite easily.
For example, in the below case, you are passing three state values — theme, isSignedIn, and subscription — to your child components by wrapping them in AppContext providers:
<AppContext.Provider value={theme, isSignedIn, subscription}>
    <Navbar />
    <Main />
    <Subscription />
</AppContext.Provider>
In this case, all three child components would re-render themselves even if a single state value changes. This unnecessary rerendering issue causes huge bottlenecks while scaling your Next.js application.
To solve this, first, make sure you’re using Context API to handle only those states that are needed application-wide, such as themes, global language, and others. Secondly, as suggested by the core React team, split your context providers between the concerned components only.
In the above example, the subscription state value has nothing to do with the <Navbar /> or <Main /> components. Therefore, you can split the Context Provider like so:
<AppContext.Provider value={ theme, isSignedIn }>
    <Navbar />
    <Main />
</AppContext.Provider>

<SubscriptionContext.Provider value={ subscription }>
    <Subscription />
</SubscriptionContext.Provider>
One more trick you can use is wrapping your state values with useMemo before passing them to the Context Provider, which would further eliminate the chances of unnecessary re-rendering:
const value = React.useMemo(() => [subscription, setSubscription], [subscription])

<SubscriptionContext.Provider value={subscription}>
    <Subscription />
</SubscriptionContext.Provider>
This pattern would eliminate the unnecessary re-rendering issues. However, you have to be very careful while using Context APIs; there are so many ways to go wrong while handling hundreds of provider APIs that are typical in large-scale codebases.
Jotai takes care of most of these issues with the Context API, like the manual memoization problem, splitting context providers, and more. Let’s explore how.
Using Jotai with Next.js
Jotai uses its atomic principle to escape the memoization problem often present in Next.js applications. Everything you declare in Jotai can be simplified to atoms that are memoized by default and only re-render when the state changes:
import { atom, useAtom } from 'jotai'
import { useState } from 'react';

const init = atom('hello world')
function App(){
  return (
    const [search, setSearch] = useAtom(init)
  return (
    <input type="search" value={search} onChange={(e) => setSearch(e.target.value) } />
  ))
}
You may notice how similar it is to the useState hook, except that the atoms are declared outside the App component. This allows for more flexibility and readability from anywhere within your application.
Jotai goes a step further and allows you to have more control over these atoms. You can declare atoms to be read-only, write-only, or read- and write-only, like so:
// declare your initial atom state value here
const atomCount = atom(5)

// make declared atom to be read-only using `get`
const readOnlyAtom = atom((get) => get(atomCount) * get(atomCount))

// this is write-only allows you to mutate the initial value using `get` & //`set`

const writeOnlyAtom = atom(null, (get, set, _arg) => {
  set(atomCount, get(atomCount) - 12)
})

// read-write atoms allows you to both mutate & read atom values
const readwriteAtom = atom(
  (get) => get(atomCount),
  (get, set, _arg) => {
    set(atomCount, get(atomCount) - 12)
  }
)

// read values using useAtom() hook
const [count, setCount] = useAtom(atomCount)
const [readAtom, setReadAtom] = useAtom(readOnlyAtom)
const [writeAtom, setWriteAtom] = useAtom(writeOnlyAtom)
const [readwriteonly, setReadWriteOnly] = useAtom(readwriteAtom)
Similar to React’s Context API, you can wrap your components with Jotai’s Provider API. Wrap your root components in the _app.tsx file of your Next.js app like so:
const counterInit = atom(0);

const Counter = () => {
  const [counter, setCounter] = useAtom(counterInit);
  return (
    <>
      <h2>{counter}</h2>
      <button onClick={() => setCounter((value) => value + 1)}>inc</button>
    </>
  );
};

const App = () => {
  return (
    <>
      <Provider initialValues={[[counterState, 10]]}>
        <Counter />
      </Provider>

      <Provider initialValues={[[counterState, 20]]}>
        <Counter />
      </Provider>
    </>
  );
};
In the example above:
- There are two
Providersubtrees wrapping the<counter />component - The Provider API takes
initialValuesas a prop - You can pass the
atomstate with its initial state as an array - The
Appcomponent would render two instances of the<Counter />component with initial values of10and20, respectively
Jotai’s Provider API is helpful when creating a collection of components and wrapping them in a Provider to pass values to each wrapped component. These are optimized by default.
You can create multiple Provider subtrees for different scopes like so:
  <Provider initialValues={[languageAtom, initialValue]}>
            <App />
     </Provider>

    <Provider initialValues={[themeAtom, initialValue]}>
            <Main />
    </Provider>
Hydrating SSR pages in Next.js with Jotai
When working with server-side-rendered (SSR) applications, especially in the case of Next.js, the atoms you define in Jotai have to be prefetched to generate the SSR pages.
Unfortunately, the server-side components cannot return asynchronous promise-based events. To generate the server-side pages and prefetch atoms with values sent from the server, Jotai exposes a useHydrateAtoms hook.
In a typical SSR page — or, if you’re using Next.js v13 or newer, a page using React server components — you would use the useHydrateAtoms hook like so:
import { atom, useAtom } from 'jotai'
import { useHydrateAtoms } from 'jotai/utils'

const countInit = atom(0)

function CounterApp({ countSentFromServer }){
  useHydrateAtoms([[countInit, countSentFromServer]])
  const [count] = useAtom(countInit)

return (
    <>
        // count would be the value of `countSentFromServer`
      <h1> Count : { count } </h1>
    </>
  )
}
In the example above, Next.js would hydrate this page using Jotai’s useHydrateAtoms hook. The count value that was initially 0 would now hydrate its value from the server.
One important pattern worth talking about is the atomWithHash API. In Jotai, you can subscribe to the changes in router events using the atomWithHash API like so:
import React from 'react';
import { useAtom } from 'jotai';
import { atomWithLocation } from 'jotai-location';

const locationAtom = atomWithLocation();

function HomePage() {
  const [location, setLocation] = useAtom(locationAtom);
  return (
<button onClick={() => setLoc((prev) => ({ ...prev, pathname: '/dashboard',
 searchParams: new URLSearchParams([['page', '1']]), }))}>
     Goto Page 1
</button>
  );
};
The atomWithHash API is a pretty straightforward API that subscribes to changes in router events. You can pair this further with the Router.events API provided by Next.js, which would allow you to have more control over server-rendered pages by subscribing to changes in router events:
const pagination = atomWithHash('page', 1, {
  subscribe: (callbackFn) => {
     // triggers when route change is detected
    Router.events.on('routeChangeComplete', callbackFn)
   // return callback function for memory cleanup
   return () => {
      Router.events.off('routeChangeComplete', callbackFn)
    }
  },
})
In a Next.js application, the atomWithHash API can be used to subscribe to the changes in router events.
Conclusion
Jotai, being a small library compared to its ecosystem, is flexible enough to pair itself with other patterns and libraries such as Redux, Immer, and others. Jotai doesn’t strive to replace existing state management solutions; rather, it can work either in parallel with other state managers or with React itself.
The Jotai APIs are very similar to those in React, making it easy to learn. Jotai usually shines as an alternative to the Context API and useState APIs and doesn’t require any additional overhead as your application scales up, as is the case with React’s Context API.
Source: https://blog.logrocket.com
#jotai #nextjs