How to Build a Simple CRUD with GraphQL and Flutter
Flutter is an SDK (Software development kit) to build applications for Android and IOs with a single codebase. On the other hand, GraphQL is a query language that allows us to create queries that will be executing on the server. In this tutorial, I am going to show you how to build a simple CRUD with Flutter (client-side) and GraphQL (server-side). Let’s start
Once we have created our Flutter project we need to import some dependencies in our pubspec.yaml file in order to use GraphQL and HTTP with our API. It’s essential to notice that the API was created on NodeJS, so for this tutorial I’m not going to show how to build it.
dependencies:

flutter:

sdk: flutter

graphql_flutter: ^2.0.1

http: ^0.12.0+2
Then, we are going to create a file called graphQLConf.dart, this file will contain the basic configuration to use GraphQL like our link to the API and the cache configuration. So, we create a class called GraphQLConfiguration, inside this, there are three main parts. The first one is the link to the API, the second one is the ValueNotifier which will notify its listener when any kind of value changed, and finally, the method clientToQuery() will let us make queries and mutation in our application.
import “package:flutter/material.dart”;
import “package:graphql_flutter/graphql_flutter.dart”;class GraphQLConfiguration {
static HttpLink httpLink = HttpLink(
uri: “https://examplegraphql.herokuapp.com/graphql”,
);ValueNotifier<GraphQLClient> client = ValueNotifier(
GraphQLClient(
link: httpLink,
cache: OptimisticCache(dataIdFromObject: typenameDataIdFromObject),
),
);GraphQLClient clientToQuery() {
return GraphQLClient(
cache: OptimisticCache(dataIdFromObject: typenameDataIdFromObject),
link: httpLink,
);
}
}
In our main.dart file we will wrap the MaterialApp Widget with the previous configuration as follow:
import ‘package:flutter/material.dart’;
import “package:graphql_flutter/graphql_flutter.dart”;
import “services/graphqlConf.dart”;
import “package:example/components/principal.dart”;GraphQLConfiguration graphQLConfiguration = GraphQLConfiguration();
void main() => runApp(
GraphQLProvider(
client: graphQLConfiguration.client,
child: CacheProvider(child: MyApp()),
),
);class MyApp extends StatelessWidget {
@override
Widget build(BuildContext context) {
return MaterialApp(
title: ‘Example’,
debugShowCheckedModeBanner: false,
theme: ThemeData(
primarySwatch: Colors.blue,
),
home: Principal(),
);
}
}
As you can saw we called the GraphQLObject from the graphQLConf.dart file and then we wrap it into the main method. But we don’t know how the Principal Widget use there is made. Basically, during this example we are going to work with a class Person, this class will contain basic information such as the id, the name, the last name, and the age. The application lets us add a person, edit a person, see all the persons added and finally delete a person (a basic CRUD). So let’s create a class person.
class Person {

Person(this.id, this.name, this.lastName, this.age);
final String id;

final String name;

final String lastName;

final int age;
getId() => this.id;
getName() => this.name;
getLastName() => this.lastName;
getAge() => this.age;

}
As you can see is a simple class Person with the id, name, lastName and age attributes, also we had a constructor and the get methods to access its values. Then we need to do our queries to the API. GraphQL provides two forms:
- Query: It allows us to access data and read it.
- Mutation: It allows to modify our data. Add, edit or delete something.
For this, let’s create a class that will contain all the queries and mutation that we are going to use. (Note: Dart uses a notation with three quotes to make the queries).
class QueryMutation {

String addPerson(String id, String name, String lastName, int age) {

return “”"

mutation{

addPerson(id: “$id”, name: “$name”, lastName: “$lastName”, age: $age){

id

name

lastName

age

}

}

“”";

}
String getAll(){

return “”"

{

persons{

id

name

lastName

age

}

}

“”";

}
String deletePerson(id){

return “”"

mutation{

deletePerson(id: “$id”){

id

}

}

“”";

}
String editPerson(String id, String name, String lastName, int age){

return “”"

mutation{

editPerson(id: “$id”, name: “$name”, lastName: “$lastName”, age: $age){

name

lastName

}

}

“”";

}

}
Then, our Principal widget will use an AlertDialog to do the insert, read and delete operations, and then it will be called from our Widget. So let’s create the AlertDialog widget.
import “package:flutter/material.dart”;
import “…/services/graphqlConf.dart”;
import “…/services/queryMutation.dart”;
import “package:graphql_flutter/graphql_flutter.dart”;
import “package:example/components/person.dart”;class AlertDialogWindow extends StatefulWidget {
final Person person;
final bool isAdd;AlertDialogWindow({Key key, this.person, this.isAdd}) : super(key: key);
@override
State<StatefulWidget> createState() =>
_AlertDialogWindow(this.person, this.isAdd);
}class _AlertDialogWindow extends State<AlertDialogWindow> {
TextEditingController txtId = TextEditingController();
TextEditingController txtName = TextEditingController();
TextEditingController txtLastName = TextEditingController();
TextEditingController txtAge = TextEditingController();
GraphQLConfiguration graphQLConfiguration = GraphQLConfiguration();
QueryMutation addMutation = QueryMutation();final Person person;
final bool isAdd;_AlertDialogWindow(this.person, this.isAdd);
@override
void initState() {
super.initState();
if (!this.isAdd) {
txtId.text = person.getId();
txtName.text = person.getName();
txtLastName.text = person.getLastName();
txtAge.text = person.getAge().toString();
}
}@override
Widget build(BuildContext context) {
// TODO: implement build
return AlertDialog(
title: Text(this.isAdd ? “Add” : “Edit or Delete”),
content: Container(
child: SingleChildScrollView(
child: ConstrainedBox(
constraints: BoxConstraints(
maxWidth: MediaQuery.of(context).size.width,
),
child: Stack(
children: <Widget>[
Container(
child: TextField(
maxLength: 5,
controller: txtId,
enabled: this.isAdd,
decoration: InputDecoration(
icon: Icon(Icons.perm_identity),
labelText: “ID”,
),
),
),
Container(
padding: EdgeInsets.only(top: 80.0),
child: TextField(
maxLength: 40,
controller: txtName,
decoration: InputDecoration(
icon: Icon(Icons.text_format),
labelText: “Name”,
),
),
),
Container(
padding: EdgeInsets.only(top: 160.0),
child: TextField(
maxLength: 40,
controller: txtLastName,
decoration: InputDecoration(
icon: Icon(Icons.text_rotate_vertical),
labelText: “Last name”,
),
),
),
Container(
padding: EdgeInsets.only(top: 240.0),
child: TextField(
maxLength: 2,
controller: txtAge,
keyboardType: TextInputType.number,
decoration: InputDecoration(
labelText: “Age”, icon: Icon(Icons.calendar_today)),
),
),
],
),
),
),
),
actions: <Widget>[
FlatButton(
child: Text(“Close”),
onPressed: () => Navigator.of(context).pop(),
),
!this.isAdd
? FlatButton(
child: Text(“Delete”),
onPressed: () async {
GraphQLClient _client = graphQLConfiguration.clientToQuery();
QueryResult result = await _client.mutate(
MutationOptions(
document: addMutation.deletePerson(txtId.text),
),
);
if (!result.hasErrors) Navigator.of(context).pop();
},
)
: null,
FlatButton(
child: Text(this.isAdd ? “Add” : “Edit”),
onPressed: () async {
if (txtId.text.isNotEmpty &&
txtName.text.isNotEmpty &&
txtLastName.text.isNotEmpty &&
txtAge.text.isNotEmpty) {
if (this.isAdd) {
GraphQLClient _client = graphQLConfiguration.clientToQuery();
QueryResult result = await _client.mutate(
MutationOptions(
document: addMutation.addPerson(
txtId.text,
txtName.text,
txtLastName.text,
int.parse(txtAge.text),
),
),
);
if (!result.hasErrors) {
txtId.clear();
txtName.clear();
txtLastName.clear();
txtAge.clear();
Navigator.of(context).pop();
}
} else {
GraphQLClient _client = graphQLConfiguration.clientToQuery();
QueryResult result = await _client.mutate(
MutationOptions(
document: addMutation.editPerson(
txtId.text,
txtName.text,
txtLastName.text,
int.parse(txtAge.text),
),
),
);
if (!result.hasErrors) {
txtId.clear();
txtName.clear();
txtLastName.clear();
txtAge.clear();
Navigator.of(context).pop();
}
}
}
},
)
],
);
}
}
In the _AlertDialog we used all the mutations created to add, edit and delete a person. The process is as follows:
- We called our GraphQl configuration from GraphQLConfiguration: graphQLConfiguration = GraphQLConfiguration();
- We get the mutations from the class we have created: QueryMutation addMutation = QueryMutation();
- We create our GraphQL client to connect to our backend: GraphQLClient _client = graphQLConfiguration.clientToQuery();
- Finally we do our mutation with the required parameters.
Once we have done the previous steps we check is our result is correct, and if that is true, just return to the main page and clear all the TextFields. Basically, all the queries and mutations done during the example are based under the same principle: declare your variables, do your query or mutation and finally check if that has errors.
Finally, we have our whole Principal widget, and there is something more we need to remark. Inside our initState() we are going to call all the data saved in our backend, and to do that we use our function fillList(), and basically it will fill a listPerson with all the data stored, to access to it, we do result.data[“name our query or mutation”][index][“name of the variable”] and that is it.
import “package:flutter/material.dart”;
import “package:example/components/alertDialogs.dart”;
import “package:graphql_flutter/graphql_flutter.dart”;
import “package:example/components/person.dart”;
import “…/services/graphqlConf.dart”;
import “…/services/queryMutation.dart”;class Principal extends StatefulWidget {
@override
State<StatefulWidget> createState() => _Principal();
}class _Principal extends State<Principal> {
List<Person> listPerson = List<Person>();
GraphQLConfiguration graphQLConfiguration = GraphQLConfiguration();void fillList() async {
QueryMutation queryMutation = QueryMutation();
GraphQLClient _client = graphQLConfiguration.clientToQuery();
QueryResult result = await _client.query(
QueryOptions(
document: queryMutation.getAll(),
),
);
if (!result.hasErrors) {
for (var i = 0; i < result.data[“persons”].length; i++) {
setState(() {
listPerson.add(
Person(
result.data[“persons”][i][“id”],
result.data[“persons”][i][“name”],
result.data[“persons”][i][“lastName”],
result.data[“persons”][i][“age”],
),
);
});
}
}
}@override
void initState() {
super.initState();
fillList();
}void _addPerson(context) {
showDialog(
context: context,
builder: (BuildContext context) {
AlertDialogWindow alertDialogWindow =
new AlertDialogWindow(isAdd: true);
return alertDialogWindow;
},
).whenComplete(() {
listPerson.clear();
fillList();
});
}void _editDeletePerson(context, Person person) {
showDialog(
context: context,
builder: (BuildContext context) {
AlertDialogWindow alertDialogWindow =
new AlertDialogWindow(isAdd: false, person: person);
return alertDialogWindow;
},
).whenComplete(() {
listPerson.clear();
fillList();
});
}@override
Widget build(BuildContext context) {
// TODO: implement build
return Scaffold(
appBar: AppBar(
title: Text(“Example”),
actions: <Widget>[
IconButton(
icon: Icon(Icons.add_circle_outline),
onPressed: () => _addPerson(context),
tooltip: “Insert new person”,
),
],
),
body: Stack(
children: <Widget>[
Container(
width: MediaQuery.of(context).size.width,
child: Text(
“Person”,
textAlign: TextAlign.center,
style: TextStyle(fontSize: 30.0),
),
),
Container(
padding: EdgeInsets.only(top: 50.0),
child: ListView.builder(
itemCount: listPerson.length,
itemBuilder: (context, index) {
return ListTile(
selected: listPerson == null ? false : true,
title: Text(
“${listPerson[index].getName()}”,
),
onTap: () {
_editDeletePerson(context, listPerson[index]);
},
);
},
),
),
],
),
);
}
}
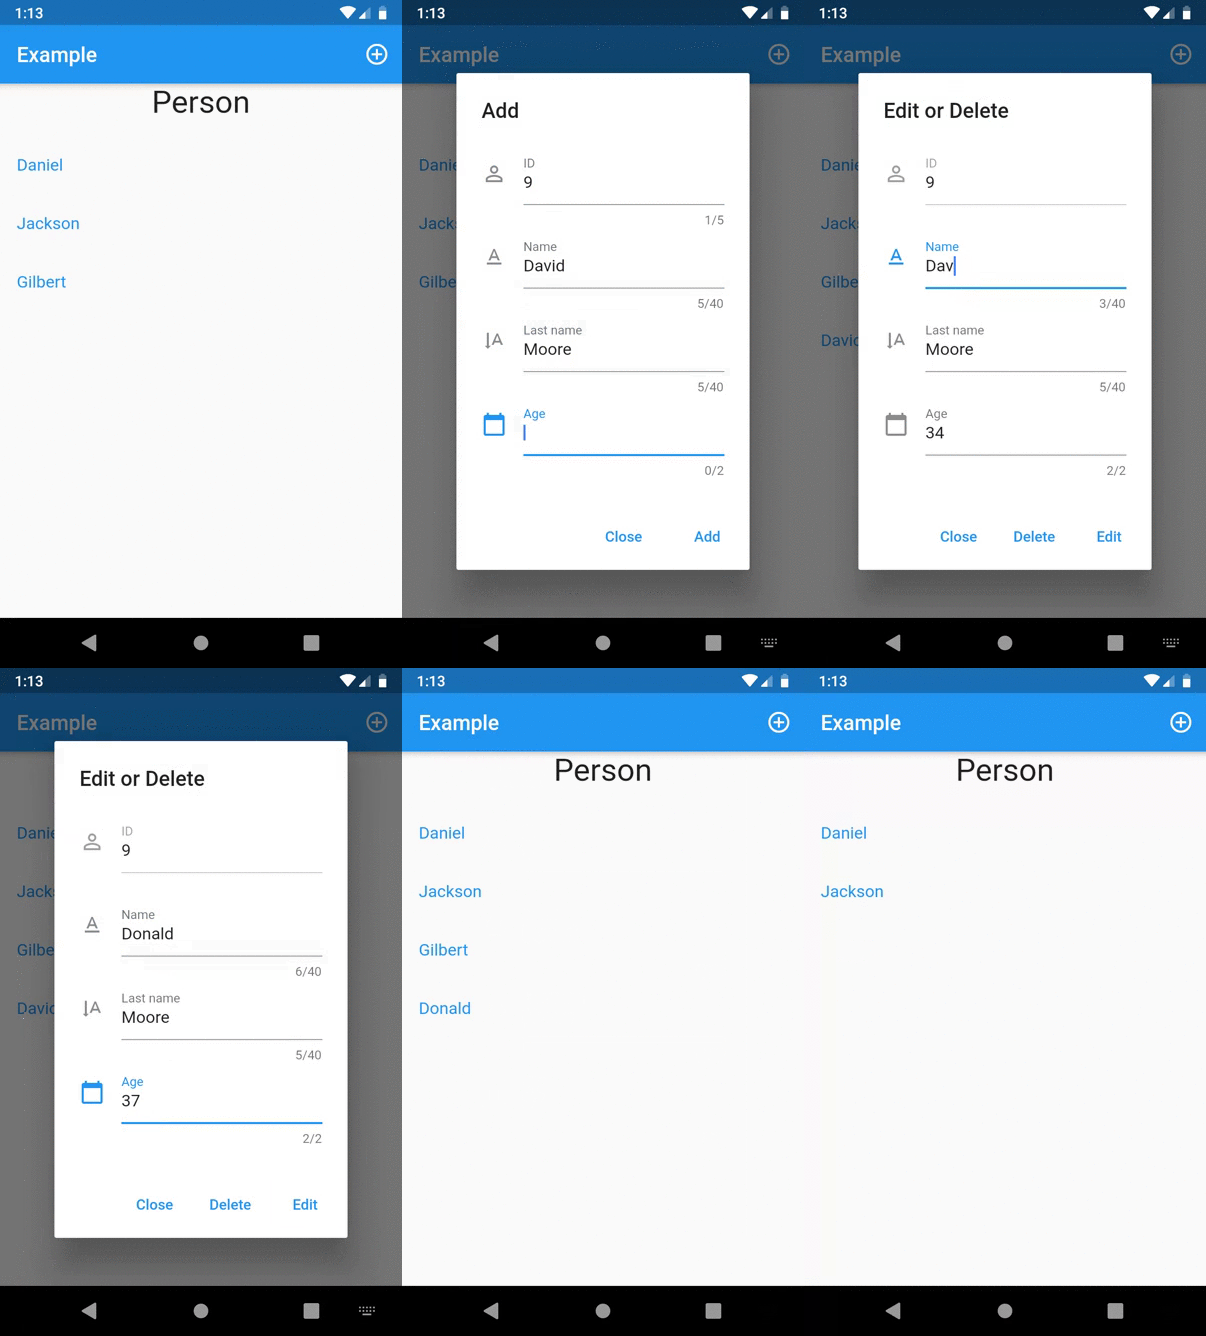
Our result!

#flutter #graphql #ios #mobile-apps #database
