Send Emails using Queue in Laravel
In Laravel, queues are a mechanism for handling time-consuming or background tasks asynchronously. This means the tasks are placed in a queue and processed in the background, separate from the main web request. This frees up your web application to respond to users faster and improves overall performance.
In this tutorial, We will learn how to send emails using Queue in Laravel 8. To send email using a Queue in Laravel 8, follow these steps.
Table of Contents
- Step 1: Install Laravel Project
- Step 2. Configuration SMTP & Database
- Step 3. Create Mail Setup
- Step 4. Queue Configuration
- Step 5. Create Queue Job
- Step 6. Create Route
- Step 7. Test Queue Jobs
Step 1: Install Laravel Project
First, open Terminal and run the following command to create a fresh laravel project:
#! /bin/bash
composer create-project --prefer-dist laravel/laravel laravel-mail-queue
or, if you have installed the Laravel Installer as a global composer dependency:
#! /bin/bash
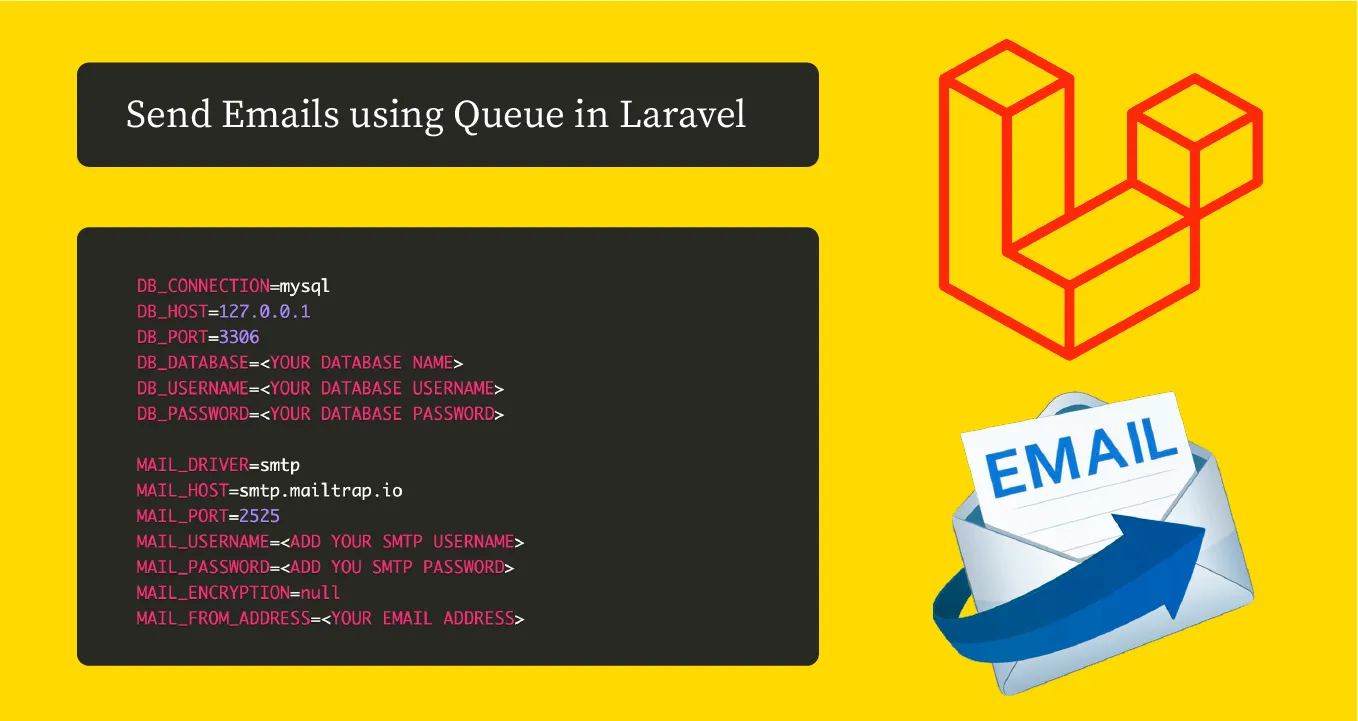
laravel new laravel-mail-queueStep 2. Configuration SMTP & Database
You need to configure SMTP details in the .env file like the following:
DB_CONNECTION=mysql
DB_HOST=127.0.0.1
DB_PORT=3306
DB_DATABASE=<YOUR DATABASE NAME>
DB_USERNAME=<YOUR DATABASE USERNAME>
DB_PASSWORD=<YOUR DATABASE PASSWORD>

MAIL_DRIVER=smtp
MAIL_HOST=smtp.mailtrap.io
MAIL_PORT=2525
MAIL_USERNAME=<ADD YOUR SMTP USERNAME>
MAIL_PASSWORD=<ADD YOU SMTP PASSWORD>
MAIL_ENCRYPTION=null
MAIL_FROM_ADDRESS=<YOUR EMAIL ADDRESS>
Step 3. Create Mail Setup
Run the following command:
#! /bin/bash
php artisan make:mail TestMail
Now you will have a new folder Mail in the app directory with the TestMail.php file. So let's copy the below code and paste into that file.
app/Mail/TestMail.php
<?php

namespace App\Mail;

use Illuminate\Bus\Queueable;
use Illuminate\Contracts\Queue\ShouldQueue;
use Illuminate\Mail\Mailable;
use Illuminate\Queue\SerializesModels;

class TestMail extends Mailable
{
    use Queueable, SerializesModels;

    /**
     * Create a new message instance.
     *
     * @return void
     */
    public function __construct()
    {
        //
    }

    /**
     * Build the message.
     *
     * @return $this
     */
    public function build()
    {
        return $this->view('emails.testMail');
    }
}
Now we require to create an email view using a blade file. So we will create a simple view file and copy the below code into that blade file.
resources/views/emails/testMail.blade.php
<!DOCTYPE html>
<html>
<head>
    <title>Laravel 8 Send Mail using Queue Tutorial - TechvBlogs</title>
</head>
<body>
    <p>Hi</p>
    <p>This is test queue mail.</p>
    <strong>Thank you</strong>
</body>
</html>
Step 4. Queue Configuration
In this step, configuration on queue driver. So open the .env file and define the database queue driver into the .env file:
QUEUE_CONNECTION=databaseWe need to generate migration and create tables for a queue. Run the following command:
#! /bin/bash
php artisan queue:table
Now, run the migration command in your terminal.
#! /bin/bash
php artisan migrate
Step 5. Create Queue Job
Now we will create a queue job by the following command. This command will create a queue job file with Queueable. So let's run the below command:
#! /bin/bash
php artisan make:job TestEmailJob
Now you have the TestEmailJob.php file in the "Jobs" directory. So let's see that file and put the below code into that file.
app/Jobs/TestEmailJob.php
<?php

namespace App\Jobs;

use Illuminate\Bus\Queueable;
use Illuminate\Contracts\Queue\ShouldQueue;
use Illuminate\Foundation\Bus\Dispatchable;
use Illuminate\Queue\InteractsWithQueue;
use Illuminate\Queue\SerializesModels;
use App\Mail\TestMail;
use Mail;

class TestEmailJob implements ShouldQueue
{
    use Dispatchable, InteractsWithQueue, Queueable, SerializesModels;

    protected $details;

    /**
     * Create a new job instance.
     *
     * @return void
     */
    public function __construct($details)
    {
        $this->details = $details;
    }

    /**
     * Execute the job.
     *
     * @return void
     */
    public function handle()
    {
        $email = new TestMail();
        Mail::to($this->details['email'])->send($email);
    }
}
Step 6. Create Route
Now it's time to test created queue job, so let's create a route with the following code for a testing created queue.
routes/web.php
Route::get('send-email-queue', function(){
    $details['email'] = '<EMAIL ADDRESS>';
    dispatch(new App\Jobs\TestEmailJob($details));
    return response()->json(['message'=>'Mail Send Successfully!!']);
});
Step 7. Test Queue Jobs
Now you can watch your queue process using the laravel queue command. Run the following command:
#! /bin/bash
php artisan queue:listen
You can also clear config cache using below command:
#! /bin/bash
php artisan config:clear
Now we can run Laravel, run the following command:
#! /bin/bash
php artisan serve
Now run your project and open the below link:
http://localhost:8000/send-email-queueConlucion
With this step-by-step guide you can now build your own Laravel 8 Queue email application,