Docker Tutorial for Beginners
In this article, you’ll learn Learn all about Docker with example
This article is part of a series:
- Docker Tutorial for Beginners, part I, This covers why Docker and the basic concepts such containers, images and Dockerfile and of course the commands you need to manage them…
- Docker Tutorial for Beginners, Part II, this is about Volumes and how we can use volumes to persist data but also how we can turn our development environment into a Volume and make our development experience considerably better
- Docker Tutorial for Beginners, Part III, this is about how to deal with Databases, putting them into containers and how to make containers talk to other containers using legacy linking but also the new standard through networks
- Docker Tutorial for Beginners, Part IV, this is how we manage more than one service using Docker Compose ( this is 1/2 part on Docker Compose)
- Docker Tutorial for Beginners, Part V, this part is the second and concluding part on Docker Compose where we cover Volumes, Environment Variables and working with Databases and Networks
Docker Tutorial for Beginners part I
Now there are a ton of articles out there for Docker but I struggle with the fact that none of them are really thorough and explains what goes on, or rather that’s my impression, feel free to disagree :). I should say I’m writing a lot of these articles for me and my own understanding and to have fun in the process :). I also hope that it can be useful for you as well.
So I decided to dig relatively deep so that you all hopefully might benefit. TLDR, this is the first part in a series of articles on Docker, this part explains the basics and the reason I think you should use Docker.
This article really is Docker Tutorial - From Beginner to Advanced, I assume no pre-knowledge, I assume nothing. Enjoy :)

In this article, we will attempt to cover the following topics
- Docker Tutorial for Beginners, part I, This covers why Docker and the basic concepts such containers, images and Dockerfile and of course the commands you need to manage them…
- Docker Tutorial for Beginners, Part II, this is about Volumes and how we can use volumes to persist data but also how we can turn our development environment into a Volume and make our development experience considerably better
- Docker Tutorial for Beginners, Part III, this is about how to deal with Databases, putting them into containers and how to make containers talk to other containers using legacy linking but also the new standard through networks
- Docker Tutorial for Beginners, Part IV, this is how we manage more than one service using Docker Compose ( this is 1/2 part on Docker Compose)
- Docker Tutorial for Beginners, Part V, this part is the second and concluding part on Docker Compose where we cover Volumes, Environment Variables and working with Databases and Networks
Remember that this is the first part of a series and that we will look into other things in this series on Docker such as Volumes, Linking, Micro Services, and Orchestration, but that will be covered in future parts.
Resources
Using Docker and containerization is about breaking apart a monolith into microservices. Throughout this series, we will learn to master Docker and all its commands. Sooner or later you will want to take your containers to a production environment. That environment is usually the Cloud. When you feel you’ve got enough Docker experience have a look at these links to see how Docker can be used in the Cloud as well:
- Docker Tutorial for Beginners, part I, This covers why Docker and the basic concepts such containers, images and Dockerfile and of course the commands you need to manage them…
- Docker Tutorial for Beginners, Part II, this is about Volumes and how we can use volumes to persist data but also how we can turn our development environment into a Volume and make our development experience considerably better
- Docker Tutorial for Beginners, Part III, this is about how to deal with Databases, putting them into containers and how to make containers talk to other containers using legacy linking but also the new standard through networks
- Docker Tutorial for Beginners, Part IV, this is how we manage more than one service using Docker Compose ( this is 1/2 part on Docker Compose)
- Docker Tutorial for Beginners, Part V, this part is the second and concluding part on Docker Compose where we cover Volumes, Environment Variables and working with Databases and Networks
Why Docker and what is it
Docker helps you create a reproducible environment. You are able to specify the specific OS, the exact version of different libraries, different environment variables and their values among other things. Most importantly you are able to run your application in isolation inside of that environment.
The big question is why we would want that?
- Docker Tutorial for Beginners, part I, This covers why Docker and the basic concepts such containers, images and Dockerfile and of course the commands you need to manage them…
- Docker Tutorial for Beginners, Part II, this is about Volumes and how we can use volumes to persist data but also how we can turn our development environment into a Volume and make our development experience considerably better
- Docker Tutorial for Beginners, Part III, this is about how to deal with Databases, putting them into containers and how to make containers talk to other containers using legacy linking but also the new standard through networks
- Docker Tutorial for Beginners, Part IV, this is how we manage more than one service using Docker Compose ( this is 1/2 part on Docker Compose)
- Docker Tutorial for Beginners, Part V, this part is the second and concluding part on Docker Compose where we cover Volumes, Environment Variables and working with Databases and Networks
What is it
Ok, so we’ve mentioned some great reasons above why you should look into Docker but let’s dive more into what Docker actually is. We’ve established that it lets us specify an environment like the OS, how to find and run the apps and the variables you need, but what else is there to know about Docker?
Docker creates stand-alone packages called containers that contain everything that is needed for you to run your application. Each container gets its own CPU, memory and network resources and does not depend on a specific operating system or kernel. The first that comes to mind when I describe the above is a Virtual Machine, but Docker differs in how it shares or dedicates resources. Docker uses a so-called layered file system which enables the containers to share common parts and the end result is that containers are way less of resource-hog on the host system than a virtual machine.
In short, the Docker containers, contain everything you need to run an application, including the source code you wrote. Containers are also isolated and secure light-weight units on your system. This makes it easy to create multiple micro-services that are written in different programming languages and that are using different versions of the same lib and even the same OS.
If you are curious about how exactly Docker does this I urge to have a look at the following links on layered file system and the library runc and also this great wikipedia overview of Docker.
Docker in action
Ok, so we covered what Docker is and some benefits. We also understood that the thing that eventually runs my application is called a [container](https://morioh.com/p/c310f568c20d "container"). But how do we get there? Well, we start out with a description file, called a [Dockerfile](https://morioh.com/p/544a7cbf0be5 "Dockerfile"). In this Dockerfile, we specify everything we need in terms of OS, environment variables and how to get our application in there.
Now we will jump in at the deep end. We will build an app and Dockerize it, so we will have our app running inside of a container, isolated from the outside world but reachable on ports that we explicitly open up.
We will take the following steps:
- Docker Tutorial for Beginners, part I, This covers why Docker and the basic concepts such containers, images and Dockerfile and of course the commands you need to manage them…
- Docker Tutorial for Beginners, Part II, this is about Volumes and how we can use volumes to persist data but also how we can turn our development environment into a Volume and make our development experience considerably better
- Docker Tutorial for Beginners, Part III, this is about how to deal with Databases, putting them into containers and how to make containers talk to other containers using legacy linking but also the new standard through networks
- Docker Tutorial for Beginners, Part IV, this is how we manage more than one service using Docker Compose ( this is 1/2 part on Docker Compose)
- Docker Tutorial for Beginners, Part V, this part is the second and concluding part on Docker Compose where we cover Volumes, Environment Variables and working with Databases and Networks
Creating our app
We will now create an Express Node.js project and it will consist of the following files:
- Docker Tutorial for Beginners, part I, This covers why Docker and the basic concepts such containers, images and Dockerfile and of course the commands you need to manage them…
- Docker Tutorial for Beginners, Part II, this is about Volumes and how we can use volumes to persist data but also how we can turn our development environment into a Volume and make our development experience considerably better
- Docker Tutorial for Beginners, Part III, this is about how to deal with Databases, putting them into containers and how to make containers talk to other containers using legacy linking but also the new standard through networks
- Docker Tutorial for Beginners, Part IV, this is how we manage more than one service using Docker Compose ( this is 1/2 part on Docker Compose)
- Docker Tutorial for Beginners, Part V, this part is the second and concluding part on Docker Compose where we cover Volumes, Environment Variables and working with Databases and Networks
To generate our package.json we just place ourselves in the projects directory and type:
This article really is Docker Tutorial - From Beginner to Advanced, I assume no pre-knowledge, I assume nothing. Enjoy :)
This will produce the package.json file with a bunch of default values.
Then we should add the dependencies we are about to use, which is the library express , we install it by typing like this:
This article really is Docker Tutorial - From Beginner to Advanced, I assume no pre-knowledge, I assume nothing. Enjoy :)### Let’s add some code
Now when we have done all the prework with generating a package.json file and installing dependencies, it’s time to add the code needed for our application to run, so we add the following code to app.js:
// app.js
const express = require('express')

const app = express()

const port = 3000

app.get('/', (req, res) => res.send('Hello World!'))

app.listen(port, () => console.log(`Example app listening on port ${port}!`))
We can try and run this application by typing:
This article really is Docker Tutorial - From Beginner to Advanced, I assume no pre-knowledge, I assume nothing. Enjoy :)
Going to a web browser on[http://localhost:3000](http://localhost:3000 "http://localhost:3000")we should now see:
Ok so that works, good :)
This article really is Docker Tutorial - From Beginner to Advanced, I assume no pre-knowledge, I assume nothing. Enjoy :)### Creating a Dockerfile
So the next step is creating our Dockerfile. Now, this file acts as a manifest but also as a build instruction file, how to get our app up and running. Ok, so what is needed to get the app up and running? We need to:
- Docker Tutorial for Beginners, part I, This covers why Docker and the basic concepts such containers, images and Dockerfile and of course the commands you need to manage them…
- Docker Tutorial for Beginners, Part II, this is about Volumes and how we can use volumes to persist data but also how we can turn our development environment into a Volume and make our development experience considerably better
- Docker Tutorial for Beginners, Part III, this is about how to deal with Databases, putting them into containers and how to make containers talk to other containers using legacy linking but also the new standard through networks
- Docker Tutorial for Beginners, Part IV, this is how we manage more than one service using Docker Compose ( this is 1/2 part on Docker Compose)
- Docker Tutorial for Beginners, Part V, this part is the second and concluding part on Docker Compose where we cover Volumes, Environment Variables and working with Databases and Networks
In a more complex application, we might need to do things like setting environment variables or set credentials for a database or run a database seed to populate the database and so on. For now, we only need the things we specified in our bullet list above. So let’s try to express that in our Dockerfile:
// Dockerfile

FROM node:latest

WORKDIR /app

COPY . .

RUN npm install

EXPOSE 3000

ENTRYPOINT ["node", "app.js"]
Let’s break the above commands down:
- Docker Tutorial for Beginners, part I, This covers why Docker and the basic concepts such containers, images and Dockerfile and of course the commands you need to manage them…
- Docker Tutorial for Beginners, Part II, this is about Volumes and how we can use volumes to persist data but also how we can turn our development environment into a Volume and make our development experience considerably better
- Docker Tutorial for Beginners, Part III, this is about how to deal with Databases, putting them into containers and how to make containers talk to other containers using legacy linking but also the new standard through networks
- Docker Tutorial for Beginners, Part IV, this is how we manage more than one service using Docker Compose ( this is 1/2 part on Docker Compose)
- Docker Tutorial for Beginners, Part V, this part is the second and concluding part on Docker Compose where we cover Volumes, Environment Variables and working with Databases and Networks
Quick overview
Ok, so now we have created all the files we need for our project and it should look like this:
app.js // our express app
Dockerfile // our instruction file that Docker will read from
/node_modules // directory created when we run npm install
package.json // npm init created this
package-lock.json // created when we installed libraries from NPM
Building an image
There are two steps that need to be taken to have our application up and running inside of a container, those are:
- Docker Tutorial for Beginners, part I, This covers why Docker and the basic concepts such containers, images and Dockerfile and of course the commands you need to manage them…
- Docker Tutorial for Beginners, Part II, this is about Volumes and how we can use volumes to persist data but also how we can turn our development environment into a Volume and make our development experience considerably better
- Docker Tutorial for Beginners, Part III, this is about how to deal with Databases, putting them into containers and how to make containers talk to other containers using legacy linking but also the new standard through networks
- Docker Tutorial for Beginners, Part IV, this is how we manage more than one service using Docker Compose ( this is 1/2 part on Docker Compose)
- Docker Tutorial for Beginners, Part V, this part is the second and concluding part on Docker Compose where we cover Volumes, Environment Variables and working with Databases and Networks
First things first, let’s create our image with the following command:
This article really is Docker Tutorial - From Beginner to Advanced, I assume no pre-knowledge, I assume nothing. Enjoy :)
The above instruction creates an image. The.at the end is important as this instructs Docker and tells it where your Dockerfile is located, in this case, it is the directory you are standing in. If you don’t have the OS image, that we ask for in theFROMcommand, it will lead to it being pulled down from Docker Hub and then your specific image is being built.
Your terminal should look something like this:
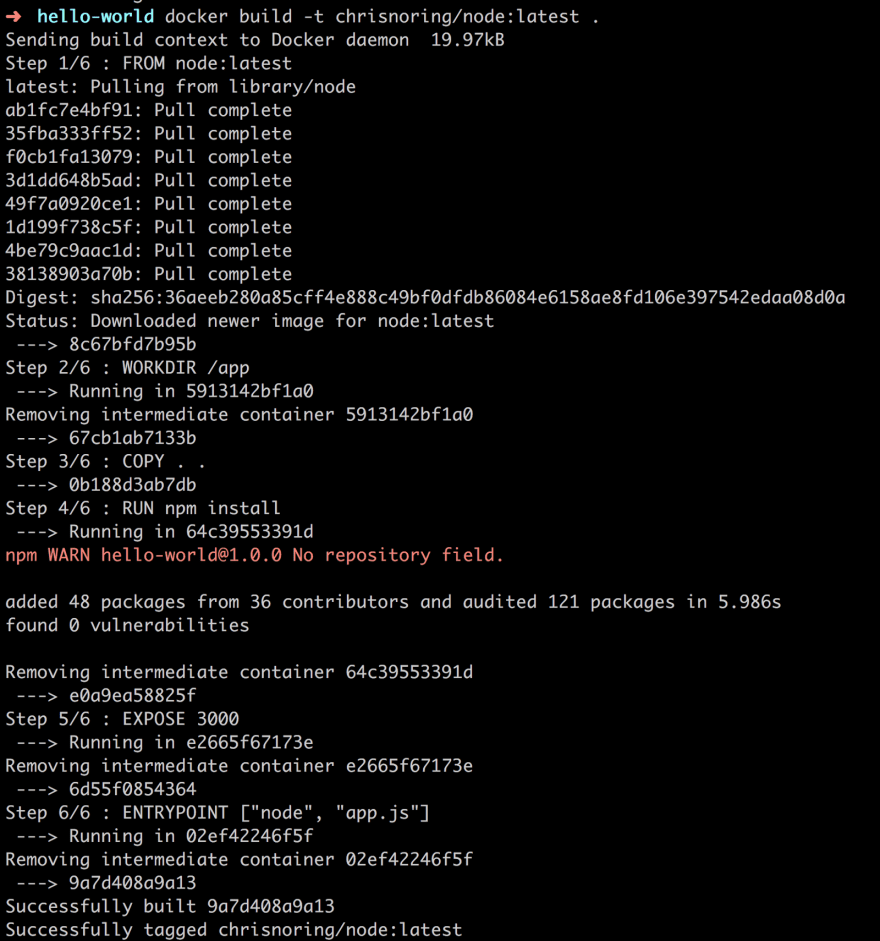
What we see above is how the OS image node:latest is being pulled down from the Docker Hub and then each of our commands is being executed like WORKDIR, RUN and so on. Worth noting is how it says removing intermediate container after each step. Now, this is Docker being smart and caching all the different file layers after each command so it goes faster. In the end, we see successfully built which is our cue that everything was constructed successfully. Let’s have a look at our image with:
This article really is Docker Tutorial - From Beginner to Advanced, I assume no pre-knowledge, I assume nothing. Enjoy :)

We have an image, success :)
Creating a container
Next step is to take our image and construct a container from it. A container is this isolated piece that runs our app inside of it. We build a container using docker run . The full command looks like this:
This article really is Docker Tutorial - From Beginner to Advanced, I assume no pre-knowledge, I assume nothing. Enjoy :)
That’s not really good enough though as we need to map the internal port of the app to an external one, on the host machine. Remember this is an app that we want to reach through our browser. We do the mapping by using the flag-plike so:
This article really is Docker Tutorial - From Beginner to Advanced, I assume no pre-knowledge, I assume nothing. Enjoy :)
Now the full command now looks like this:
This article really is Docker Tutorial - From Beginner to Advanced, I assume no pre-knowledge, I assume nothing. Enjoy :)
Ok, running this command means we should be able to visit our container by going to[http://localhost:8000](http://localhost:8000 "http://localhost:8000"),8000is our external port remember that maps to the internal port 3000. Let’s see, let’s open up a browser:

There we have it folks, a working container :D

Improving our set up with Environment Variables
Ok, so we’ve learned how to build our Docker image, we’ve learned how to run a container and thereby our app inside of it. However, we could be handling the part with PORT a bit nicer. Right now we need to keep track of the port we start the express server with, inside of our app.js , to make sure this matches what we write in the Dockerfile. It shouldn’t have to be that way, it’s just static and error-prone.
To fix it we could introduce an environment variable. This means that we need to do two things:
- Docker Tutorial for Beginners, part I, This covers why Docker and the basic concepts such containers, images and Dockerfile and of course the commands you need to manage them…
- Docker Tutorial for Beginners, Part II, this is about Volumes and how we can use volumes to persist data but also how we can turn our development environment into a Volume and make our development experience considerably better
- Docker Tutorial for Beginners, Part III, this is about how to deal with Databases, putting them into containers and how to make containers talk to other containers using legacy linking but also the new standard through networks
- Docker Tutorial for Beginners, Part IV, this is how we manage more than one service using Docker Compose ( this is 1/2 part on Docker Compose)
- Docker Tutorial for Beginners, Part V, this part is the second and concluding part on Docker Compose where we cover Volumes, Environment Variables and working with Databases and Networks
Add an environment variable
For this we need to use the command ENV, like so:
This article really is Docker Tutorial - From Beginner to Advanced, I assume no pre-knowledge, I assume nothing. Enjoy :)
Let’s add that to our Dockerfile so it now looks like so:
FROM node:latest

WORKDIR /app

COPY . .

ENV PORT=3000

RUN npm install

EXPOSE 3000

ENTRYPOINT ["node", "app.js"]
Let’s do one more change namely to update EXPOSE to use our variable, so we git rid of static values and rely on variables instead, like so:
FROM node:latest

WORKDIR /app

COPY . .

ENV PORT=3000

RUN npm install

EXPOSE $PORT

ENTRYPOINT ["node", "app.js"]
Note above how we change our EXPOSE command to $PORT, any variables we use needs to be prefixed with a $ character:
This article really is Docker Tutorial - From Beginner to Advanced, I assume no pre-knowledge, I assume nothing. Enjoy :)### Read the environment variable value in App.js
We can read values from environment variables in Node.js like so:
This article really is Docker Tutorial - From Beginner to Advanced, I assume no pre-knowledge, I assume nothing. Enjoy :)
So let’s update our app.js code to this:
// app.js
const express = require('express')

const app = express()

const port = process.env.PORT

app.get('/', (req, res) => res.send('Hello World!'))

app.listen(port, () => console.log(`Example app listening on port ${port}!`))
This article really is Docker Tutorial - From Beginner to Advanced, I assume no pre-knowledge, I assume nothing. Enjoy :)
Managing our container
Ok, so you have just started your container with docker run and you notice that you can’t shut it off in the terminal. Panic sets in ;) At this point you can go to another terminal window and do the following:
This article really is Docker Tutorial - From Beginner to Advanced, I assume no pre-knowledge, I assume nothing. Enjoy :)
This will list all running containers, you will be able to see the containers name as well as its id. It should look something like this:

As you see above we have the column CONTAINER_ID or NAMES column, both these values will work to stop our container, cause that is what we need to do, like so:
This article really is Docker Tutorial - From Beginner to Advanced, I assume no pre-knowledge, I assume nothing. Enjoy :)
We opt for using CONTAINER_ID and the three first digits, we don’t need more. This will effectively stop our container.
Daemon mode
We can do like we did above and open a separate terminal tab but running it in Daemon mode is a better option. This means that we run the container in the background and all output from it will not be visible. To make this happen we simply add the flag -d . Let’s try that out:

What we get now is just the container id back, that’s all we’re ever going to see. Now it’s easier for us to just stop it if we want, by typing docker stop 268 , that’s the three first digits from the above id.
Interactive mode
Interactive mode is an interesting one, this allows us to step into a running container and list files, or add/remove files or just about anything we can do for example bash. For this, we need the command docker exec, like so:

Above we run the command:
This article really is Docker Tutorial - From Beginner to Advanced, I assume no pre-knowledge, I assume nothing. Enjoy :)
268is the three first digits if our container and-itmeans interactive mode and our argument bash at the end means we will run a bash shell.
We also run the command ls, once we get the bash shell up and running so that means we can easily list what’s in the container so we can verify we built it correctly but it’s a good way to debug as well.
If we just want to run something on the container like a node command, for example, we can type:
This article really is Docker Tutorial - From Beginner to Advanced, I assume no pre-knowledge, I assume nothing. Enjoy :)
that will run the commandnode app.jsin the container
Docker kill vs Docker stop
So far we have been using docker stop as way to stop the container. There is another way of stopping the container namely docker kill , so what is the difference?
- Docker Tutorial for Beginners, part I, This covers why Docker and the basic concepts such containers, images and Dockerfile and of course the commands you need to manage them…
- Docker Tutorial for Beginners, Part II, this is about Volumes and how we can use volumes to persist data but also how we can turn our development environment into a Volume and make our development experience considerably better
- Docker Tutorial for Beginners, Part III, this is about how to deal with Databases, putting them into containers and how to make containers talk to other containers using legacy linking but also the new standard through networks
- Docker Tutorial for Beginners, Part IV, this is how we manage more than one service using Docker Compose ( this is 1/2 part on Docker Compose)
- Docker Tutorial for Beginners, Part V, this part is the second and concluding part on Docker Compose where we cover Volumes, Environment Variables and working with Databases and Networks
Cleaning up
During the course of development you will end up creating tons of container so ensure you clean up by typing:
This article really is Docker Tutorial - From Beginner to Advanced, I assume no pre-knowledge, I assume nothing. Enjoy :)
Summary
Ok, so we have explained Docker from the beginning. We’ve covered motivations for using it and the basic concepts. Furthermore, we’ve looked into how to Dockerize an app and in doing so covered some useful Docker commands. There is so much more to know about Docker like how to work with Databases, Volumes, how to link containers and why and how to spin up and manage multiple containers, also known as orchestration.
But this is a series of articles, we have to stop somewhere or this article will be very long. Stay tuned for the next part where we will talk about Volumes and Databases.
Docker Tutorial for Beginners, Part II
Welcome to the second part of this series about Docker. Hopefully, you have read the first part to gain some basic understanding of Dockers core concepts and its basic commands or you have acquired that knowledge elsewhere.
In this article, we will attempt to cover the following topics
- Docker Tutorial for Beginners, part I, This covers why Docker and the basic concepts such containers, images and Dockerfile and of course the commands you need to manage them…
- Docker Tutorial for Beginners, Part II, this is about Volumes and how we can use volumes to persist data but also how we can turn our development environment into a Volume and make our development experience considerably better
- Docker Tutorial for Beginners, Part III, this is about how to deal with Databases, putting them into containers and how to make containers talk to other containers using legacy linking but also the new standard through networks
- Docker Tutorial for Beginners, Part IV, this is how we manage more than one service using Docker Compose ( this is 1/2 part on Docker Compose)
- Docker Tutorial for Beginners, Part V, this part is the second and concluding part on Docker Compose where we cover Volumes, Environment Variables and working with Databases and Networks
Recap and the problem of not using a volume
Ok, so we will keep working on the application we created in the first part of this series, that is a Node.js application with the library express installed.
We will do the following in this section:
- Docker Tutorial for Beginners, part I, This covers why Docker and the basic concepts such containers, images and Dockerfile and of course the commands you need to manage them…
- Docker Tutorial for Beginners, Part II, this is about Volumes and how we can use volumes to persist data but also how we can turn our development environment into a Volume and make our development experience considerably better
- Docker Tutorial for Beginners, Part III, this is about how to deal with Databases, putting them into containers and how to make containers talk to other containers using legacy linking but also the new standard through networks
- Docker Tutorial for Beginners, Part IV, this is how we manage more than one service using Docker Compose ( this is 1/2 part on Docker Compose)
- Docker Tutorial for Beginners, Part V, this part is the second and concluding part on Docker Compose where we cover Volumes, Environment Variables and working with Databases and Networks
Run a container
As our application grows we might want to do add routes to it or change what is rendered on a specific route. Let’s show the source code we have so far:
// app.js

const express = require('express')

const app = express()

const port = process.env.PORT

app.get('/', (req, res) => res.send('Hello World!'))

app.listen(port, () => console.log(`Example app listening on port ${port}!`))
Now let’s see if we remember our basic commands. Let’s type:
This article really is Docker Tutorial - From Beginner to Advanced, I assume no pre-knowledge, I assume nothing. Enjoy :)

Ok, that looks empty. So we cleaned up last time with docker stop or docker kill , regardless of what we used we don’t have a container that we can start, so we need to build one. Let’s have a look at what images we have:
This article really is Docker Tutorial - From Beginner to Advanced, I assume no pre-knowledge, I assume nothing. Enjoy :)

Ok, so we have our image there, let’s create and run a container:
This article really is Docker Tutorial - From Beginner to Advanced, I assume no pre-knowledge, I assume nothing. Enjoy :)
That should lead to a container up and running at port 8000 and it should run in detached mode, thanks to us specifying the -d flag.

We get a container ID above, good. Let’s see if we can find our application at http://localhost:8000:

Ok, good there it is. Now we are ready for the next step which is to update our source code.
Update our app
Let’s start by changing the default route to render out hello Chris , that is add the following line:
app.get('/', (req, res) => res.send('Hello Chris!'))
Ok, so we save our change and we head back to the browser and we notice it is still saying Hello World. It seems the container is not reflecting our changes. For that to happen we need to bring down the container, remove it, rebuild the image and then run the container again. Because we need to carry out a whole host of commands, we will need to change how we build and run our container namely by actively giving it a name, so instead of running the container like so:
This article really is Docker Tutorial - From Beginner to Advanced, I assume no pre-knowledge, I assume nothing. Enjoy :)
We now type:
This article really is Docker Tutorial - From Beginner to Advanced, I assume no pre-knowledge, I assume nothing. Enjoy :)
This means our container will get the name my-container and it also means that when we refer to our container we can now use its name instead of its container ID, which for our scenario is better as the container ID will change for every setup and tear down.
docker stop my-container // this will stop the container, it can still be started if we want to

docker rm my-container // this will remove the container completely

docker build -t chrisnoring/node . // creates an image

docker run -d -p 8000:3000 --name my-container chrisnoring/node
You can chain these commands to look like this:
docker stop my-container && docker rm my-container && docker build -t chrisnoring/node . && docker run -d -p 8000:3000 --name my-container chrisnoring/node
My first seeing thought seeing that is WOW, that’s a lot of commands. There has got to be a better way right, especially when I’m in the development phase?

Well yes, there is a better way, using a volume. So let’s look at volumes next.
Using a volume
Volumes or data volumes is a way for us to create a place in the host machine where we can write files so they are persisted. Why would we want that? Well, when we are under development we might need to put the application in a certain state so we don’t have to start from the beginning. Typically we would want to store things like log files, JSON files and perhaps even databases (SQLite ) on a volume.
It’s quite easy to create a volume and we can do so in many different ways, but mainly there are two ways:
- Docker Tutorial for Beginners, part I, This covers why Docker and the basic concepts such containers, images and Dockerfile and of course the commands you need to manage them…
- Docker Tutorial for Beginners, Part II, this is about Volumes and how we can use volumes to persist data but also how we can turn our development environment into a Volume and make our development experience considerably better
- Docker Tutorial for Beginners, Part III, this is about how to deal with Databases, putting them into containers and how to make containers talk to other containers using legacy linking but also the new standard through networks
- Docker Tutorial for Beginners, Part IV, this is how we manage more than one service using Docker Compose ( this is 1/2 part on Docker Compose)
- Docker Tutorial for Beginners, Part V, this part is the second and concluding part on Docker Compose where we cover Volumes, Environment Variables and working with Databases and Networks
Creating and managing a volume
To create a volume you type the following:
This article really is Docker Tutorial - From Beginner to Advanced, I assume no pre-knowledge, I assume nothing. Enjoy :)
we can verify that our volume was created by typing:
This article really is Docker Tutorial - From Beginner to Advanced, I assume no pre-knowledge, I assume nothing. Enjoy :)

This will list all the different volumes we have. Now, this will after a while lead to you having tons of volumes created so it’s good to know how to keep down the number of volumes. For that you can type:
This article really is Docker Tutorial - From Beginner to Advanced, I assume no pre-knowledge, I assume nothing. Enjoy :)
This will remove all the volumes you currently are not using. You will be given a question if you want to proceed.

If you want to remove a single volume you can do so by typing:
This article really is Docker Tutorial - From Beginner to Advanced, I assume no pre-knowledge, I assume nothing. Enjoy :)
Another command you most likely will want to know about is the inspect command that allows us to see more details on our created volume and probably most important where it will place the persisted files.
This article really is Docker Tutorial - From Beginner to Advanced, I assume no pre-knowledge, I assume nothing. Enjoy :)
A comment on this though is that most of the time you might not care where Docker place these files but sometimes you would want to know due to debugging purposes. As we will see later in this section controlling where files are persisted can work to our advantage when we develop our application.
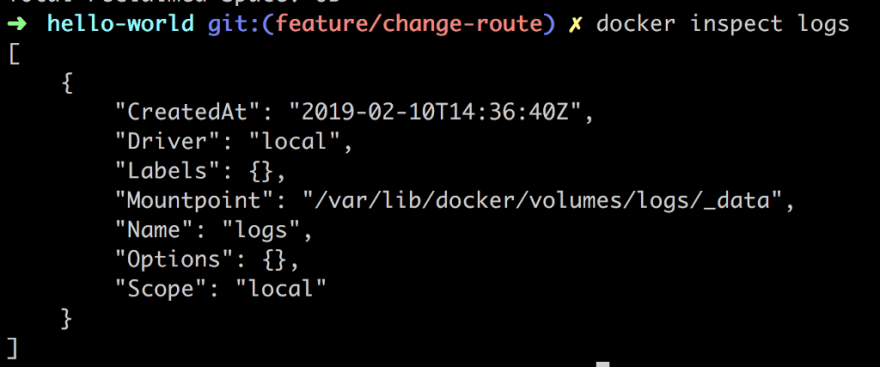
As you can see the Mountpoint field is telling us where Docker is planning to persist your files.
Mounting a volume in your application
Ok, so we have come to the point that we want to use our volume in an application. We want to be able to change or create files in our container so that when we pull it down and start it up again our changes will still be there.
For this we can use two different commands that achieve relatively the same thing with a different syntax, those are:
- Docker Tutorial for Beginners, part I, This covers why Docker and the basic concepts such containers, images and Dockerfile and of course the commands you need to manage them…
- Docker Tutorial for Beginners, Part II, this is about Volumes and how we can use volumes to persist data but also how we can turn our development environment into a Volume and make our development experience considerably better
- Docker Tutorial for Beginners, Part III, this is about how to deal with Databases, putting them into containers and how to make containers talk to other containers using legacy linking but also the new standard through networks
- Docker Tutorial for Beginners, Part IV, this is how we manage more than one service using Docker Compose ( this is 1/2 part on Docker Compose)
- Docker Tutorial for Beginners, Part V, this part is the second and concluding part on Docker Compose where we cover Volumes, Environment Variables and working with Databases and Networks
Used in conjuncture with running a container it would look like this for example:
This article really is Docker Tutorial - From Beginner to Advanced, I assume no pre-knowledge, I assume nothing. Enjoy :)
Let’s try this out. First off let’s run our container:

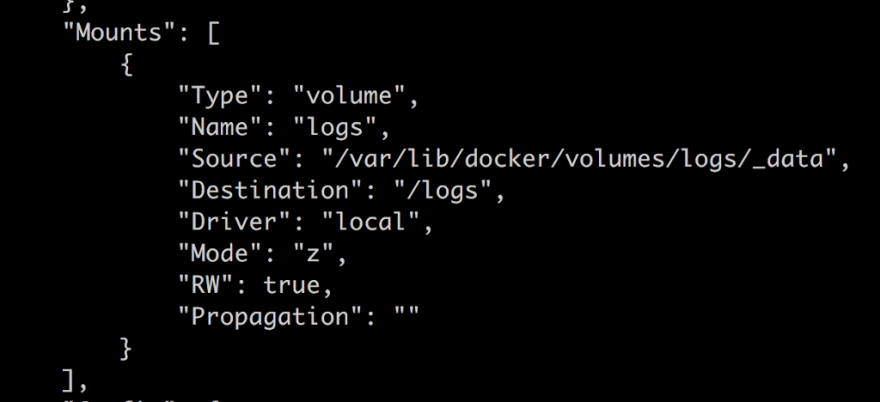
Then let’s run our inspect command to ensure our volume has been correctly mounted inside of our container. When we run said command we get a giant JSON output but we are looking for the Mounts property:
Ok, our volume is there, good. Next step is to locate our volume inside of our container. Let’s get into our container with:
This article really is Docker Tutorial - From Beginner to Advanced, I assume no pre-knowledge, I assume nothing. Enjoy :)
and thereafter navigate to our/logsdirectory:
Ok, now if we bring down our container everything we created in our volume should be persisted and everything that is not placed in the volume should be gone right? Yep, that’s the idea. Good, we understand the principle of volumes.
Mounting a subdirectory as a volume
So far we have been creating a volume and have let Docker decide on where the files are being persisted. What happens if we decide where these files are persisted?
Well if we point to a directory on our hard drive it will not only look at that directory and place files there but it will pick the pre-existing files that are in there and bring them into our mount point in the container. Let’s do the following to demonstrate what I mean:
- Docker Tutorial for Beginners, part I, This covers why Docker and the basic concepts such containers, images and Dockerfile and of course the commands you need to manage them…
- Docker Tutorial for Beginners, Part II, this is about Volumes and how we can use volumes to persist data but also how we can turn our development environment into a Volume and make our development experience considerably better
- Docker Tutorial for Beginners, Part III, this is about how to deal with Databases, putting them into containers and how to make containers talk to other containers using legacy linking but also the new standard through networks
- Docker Tutorial for Beginners, Part IV, this is how we manage more than one service using Docker Compose ( this is 1/2 part on Docker Compose)
- Docker Tutorial for Beginners, Part V, this part is the second and concluding part on Docker Compose where we cover Volumes, Environment Variables and working with Databases and Networks
The first two commands lead to us having a file structure like so:
app.js
Dockerfile
/logs
 logs.txt // contains 'logging host...'
package.json
package-lock.json
Now for the run command to get our container up and running:

Above we observe that our --volume command looks a bit different. The first argument is $(pwd)/logs which means our current working directory and the subdirectory logs. The second argument is /logs which means we are saying mount our host computers logs directory to a directory with the same name in the container.
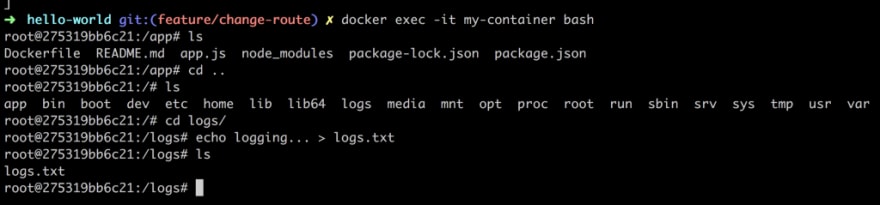
Let’s dive into the container and establish that the container has indeed pulled in the files from our host computers logs directory:

As you we can see from the above set of commands we go into the container with docker exec -it my-container bash and then we proceed to navigate ourselves to the logs directory and finally we read out the content of logs.txt with the command cat logs.txt. The result is logging host… e.g the exact file and content that we have on the host computer.
But this is a volume however which means there is a connection between the volume in the host computer and the container. Let’s edit the file next on the host computer and see what happens to the container:

Wow, it changed in the container as well without us having to tear it down or restarting it.
Treating our application as a volume
To make our whole application be treated as a volume we need to tear down the container like so:
This article really is Docker Tutorial - From Beginner to Advanced, I assume no pre-knowledge, I assume nothing. Enjoy :)
Why do we need to do all that? Well, we are about to change the Dockerfile as well as the source code and our container won’t pick up these changes, unless we use a Volume, like I am about to show you below.
Thereafter we need to rerun our container this time with a different volume argument namely --volume $(PWD):/app.
This article really is Docker Tutorial - From Beginner to Advanced, I assume no pre-knowledge, I assume nothing. Enjoy :)
The full command looks like this:

This will effectively make our entire app directory a volume and every time we change something in there our container should reflect the changes.
So let’s try adding a route in our Node.js Express application like so:
app.get("/docker", (req, res) => {

  res.send("hello from docker");

});
Ok, so from what we know from dealing with the express library we should be able to reach http://localhost:8000/docker in our browser or?

Sad face :(. It didn’t work, what did we do wrong? Well here is the thing. If you change the source in a Node.js Express application you need to restart it. This means that we need to take a step back and think how can we restart our Node.js Express web server as soon as there is a file change. There are several ways to accomplish this like for example:
- Docker Tutorial for Beginners, part I, This covers why Docker and the basic concepts such containers, images and Dockerfile and of course the commands you need to manage them…
- Docker Tutorial for Beginners, Part II, this is about Volumes and how we can use volumes to persist data but also how we can turn our development environment into a Volume and make our development experience considerably better
- Docker Tutorial for Beginners, Part III, this is about how to deal with Databases, putting them into containers and how to make containers talk to other containers using legacy linking but also the new standard through networks
- Docker Tutorial for Beginners, Part IV, this is how we manage more than one service using Docker Compose ( this is 1/2 part on Docker Compose)
- Docker Tutorial for Beginners, Part V, this part is the second and concluding part on Docker Compose where we cover Volumes, Environment Variables and working with Databases and Networks
It feels a little less cumbersome to just install a library like nodemon so let’s do that:

This means we now have another library dependency in package.json but it means we will need to change how we start our app. We need to start our app using the command nodemon app.js. This means nodemon will take care of the whole restart as soon as there is a change. While we are at it let’s add a start script to package.json, after all, that is the more Node.js -ish way of doing things:

Let’s describe what we did above, in case you are new to Node.js. Adding a start script to a package.json file means we go into a section called “scripts” and we add an entry start, like so:
// excerpt package.json
"scripts": {
  "start": "nodemon app.js"
}
By default a command defined in "scripts" is run by you typing npm run [name of command]. There are however known commands, like start and test and with known commands we can omit the keyword run, so instead of typing npm run start, we can type npm start. Let’s add another command "log" like so:
// excerpt package.json

"scripts": {
  "start": "nodemon app.js",
  "log": "echo \"Logging something to screen\""
}
To run this new command "log" we would type npm run log.
Ok, one thing remains though and that is changing the Dockerfile to change how it starts our app. We only need to change the last line from:
ENTRYPOINT ["node", "app.js"]
to
ENTRYPOINT ["npm", "start"]
Because we changed the Dockerfile this leads to us having to rebuild the image. So let’s do that:
This article really is Docker Tutorial - From Beginner to Advanced, I assume no pre-knowledge, I assume nothing. Enjoy :)
Ok, the next step is to bring up our container:
This article really is Docker Tutorial - From Beginner to Advanced, I assume no pre-knowledge, I assume nothing. Enjoy :)
Worth noting is how we expose the entire directory we are currently standing in and mapping that to/appinside the container.
Because we’ve already added the /docker route we need to add a new one, like so:
app.get('/nodemon', (req, res) => res.send('hello from nodemon'))
Now we hope that nodemon has done it’s part when we save our change in app.js :

Aaaand, we have a winner. It works to route to /nodemon . I don’t know about you but the first time I got this to work this was me:

Summary
This has brought us to the end of our article. We have learned about Volumes which is quite a cool and useful feature and more importantly I’ve shown how you can turn your whole development environment into a volume and keep working on your source code without having to restart the container.
Docker Tutorial for Beginners, Part III
This the third part of our series. In this part, we will focus on learning how we work with Databases and Docker together. We will also introduce the concept of linking as this goes tightly together with working with Databases in a containerized environment.
In this article we will cover the following:
- Docker Tutorial for Beginners, part I, This covers why Docker and the basic concepts such containers, images and Dockerfile and of course the commands you need to manage them…
- Docker Tutorial for Beginners, Part II, this is about Volumes and how we can use volumes to persist data but also how we can turn our development environment into a Volume and make our development experience considerably better
- Docker Tutorial for Beginners, Part III, this is about how to deal with Databases, putting them into containers and how to make containers talk to other containers using legacy linking but also the new standard through networks
- Docker Tutorial for Beginners, Part IV, this is how we manage more than one service using Docker Compose ( this is 1/2 part on Docker Compose)
- Docker Tutorial for Beginners, Part V, this part is the second and concluding part on Docker Compose where we cover Volumes, Environment Variables and working with Databases and Networks
Working with databases in general and MySql in particular
With databases in general we want to be able to do the following:
- Docker Tutorial for Beginners, part I, This covers why Docker and the basic concepts such containers, images and Dockerfile and of course the commands you need to manage them…
- Docker Tutorial for Beginners, Part II, this is about Volumes and how we can use volumes to persist data but also how we can turn our development environment into a Volume and make our development experience considerably better
- Docker Tutorial for Beginners, Part III, this is about how to deal with Databases, putting them into containers and how to make containers talk to other containers using legacy linking but also the new standard through networks
- Docker Tutorial for Beginners, Part IV, this is how we manage more than one service using Docker Compose ( this is 1/2 part on Docker Compose)
- Docker Tutorial for Beginners, Part V, this part is the second and concluding part on Docker Compose where we cover Volumes, Environment Variables and working with Databases and Networks
There are many more things we want to do to a database like adding indexes, adding users with different access rights and much much more but let’s focus on these four points above as a references for what we, with the help of Docker should be able to support.
Installing and connecting to MySql
There are tons of ways to install MySql not all of them are fast :/. One of the easier ways on a Linux system is typing the following:
This article really is Docker Tutorial - From Beginner to Advanced, I assume no pre-knowledge, I assume nothing. Enjoy :)
On a Mac you would be using brew and then instead type:
This article really is Docker Tutorial - From Beginner to Advanced, I assume no pre-knowledge, I assume nothing. Enjoy :)
In some other scenarios you are able to download an installer package and follow a wizard.
Once you are done installing MySql you will get some information similar to this, this will of course differ per installation package:

The above tells us we don’t have a root password yet, YIKES. We can fix that though by running mysql-secure-installation . Let’s for now just connect to the database running the suggested mysql -uroot .

NOOO, what happened? We actually got this information in the larger image above, we needed to start MySql either by running brew services start mysql , which would run it as a background service or using mysql-server start which is more of a one off. Ok, let’s enter brew services start :

The very last thing is it says Successfully started mysql :

Let’s see if Matthew is correct, can we connect ?

And we get a prompt above mysql>, we are in :D
Ok so we managed to connect using NO password, we should fix that and we dont have any database created, we should fix that too :)
Well it’s not entirely true, we do have some databases, not just any databases with content created by yourself, but rather supportive ones that we shouldn’t touch:

So next up would be to create and select the newly created database, so we can query from it:

Ok, great, but wait, we don’t have any tables? True true, we need to create those somehow. We could be creating them in the terminal but that would just be painful, lots and lots of multiline statements, so let’s see if we can feed MySql a file with the database and all the tables we want in it. Let’s first define a file that we can keep adding tables to:
// database.sql

// creates a table `tasks`
CREATE TABLE IF NOT EXISTS tasks (

task_id INT AUTO_INCREMENT,

title VARCHAR(255) NOT NULL,

start_date DATE,

due_date DATE,

status TINYINT NOT NULL,

priority TINYINT NOT NULL,

description TEXT,

PRIMARY KEY (task_id)

);
// add more tables below and indeces etc as our solution grows
Ok then, we have a file with database structure, now for getting the content in there we can use the source command like so ( masking over the user name):

If you want the full path to where your file is located just type PWD where your file is at and type source [path to sql file]/database.sql. As you can see above, we need to select a database before we run our SQL file so it targets a specific database and then we verify that the table has been created with SHOW TABLES; We can also use the same command to seed our database with data, we just give it a different file to process, one containing INSERT statements rather than CREATE TABLE…
Ok then. I think that’s enough MySql for now, let’s talk MySql in the context of Docker next.
Why we need a MySql Docker image and how to get it up and running as a container
Ok so let’s now say we want a container for our application. Let’s furthermore say that our solution needs a database. It wouldn’t make much sense to install MySql on the host the computer is running on. I mean one of the mantras of containers is that we shouldn’t have to care about the the host system the containers are running on. Ok so we need MySql in a container, but which container, the apps own container or a separate container? That’s a good question depending on your situation, you could either install MySql with your app or run it in a separate container. Some argument for that is:
- Docker Tutorial for Beginners, part I, This covers why Docker and the basic concepts such containers, images and Dockerfile and of course the commands you need to manage them…
- Docker Tutorial for Beginners, Part II, this is about Volumes and how we can use volumes to persist data but also how we can turn our development environment into a Volume and make our development experience considerably better
- Docker Tutorial for Beginners, Part III, this is about how to deal with Databases, putting them into containers and how to make containers talk to other containers using legacy linking but also the new standard through networks
- Docker Tutorial for Beginners, Part IV, this is how we manage more than one service using Docker Compose ( this is 1/2 part on Docker Compose)
- Docker Tutorial for Beginners, Part V, this part is the second and concluding part on Docker Compose where we cover Volumes, Environment Variables and working with Databases and Networks
There are a lot of arguments for and against and only you know exactly what works best for you — so you do you
MySql as stand alone image
Let’s talk about the scenario in which we pull down a MySql image. Ok, we will take this step by step so first thing we do is try to run it and as we learned from previous articles the image will be pulled down for us if we don’t have it, so here is the command:
This article really is Docker Tutorial - From Beginner to Advanced, I assume no pre-knowledge, I assume nothing. Enjoy :)
Ok, so what’s the output of that?
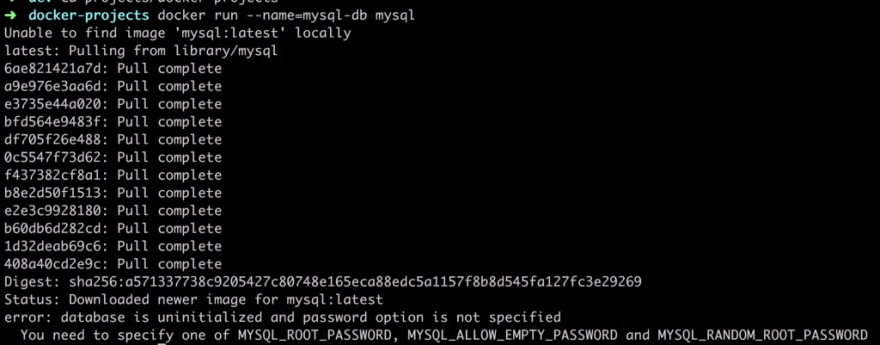
Pulling down the image, good, aaaand error.
We are doing all kinds of wrong :(.
Database is uninitialized, password option is not specified and so on. Let’s see if we can fix that:
This article really is Docker Tutorial - From Beginner to Advanced, I assume no pre-knowledge, I assume nothing. Enjoy :)
and the winner is:

Argh, our container we started before is up and running despite the error message it threw. Ok, let’s bring down the container:
This article really is Docker Tutorial - From Beginner to Advanced, I assume no pre-knowledge, I assume nothing. Enjoy :)
and let’s try to run it again with the database set like above:

Ok, we don’t get a whole bunch of logging to the terminal, because we are running in Daemon mode so let’s run docker ps to check:

At this point we want to connect to it from the outside. Our port forwarding means we need to connect to it on 0.0.0.0:8001 :
This article really is Docker Tutorial - From Beginner to Advanced, I assume no pre-knowledge, I assume nothing. Enjoy :)
Ok, just a comment above we can either specify the password or just write -p and we will be prompted for the password on the next row. Let’s have a look at the result:

Ok, we managed to connect to our database, it is reachable, great :).
But wait, can we reach a database, inside of container, from another container? Well here is where it gets tricky. This is where we need to link the two containers.
Connecting to database from Node.js
Ok let’s first add some code in our app that tries to connect to our database. First off we need to install the NPM package for mysql :
This article really is Docker Tutorial - From Beginner to Advanced, I assume no pre-knowledge, I assume nothing. Enjoy :)
Then we add the following code to the top of our app.js file:
// app.js

const mysql = require('mysql');

const con = mysql.createConnection({

host: "localhost",

port: 8001,

user: "root",

password: "complexpassword",

database: 'Customers'

});

con.connect(function (err) {

if (err) throw err;
 console.log("Connected!");
});
So let’s try this in the terminal:

Pain and misery :(
So why won’t it work.
This article really is Docker Tutorial - From Beginner to Advanced, I assume no pre-knowledge, I assume nothing. Enjoy :)
Ok so what, we try Postgres or some other database? Well we can actually fix this by connecting to our container like so:
This article really is Docker Tutorial - From Beginner to Advanced, I assume no pre-knowledge, I assume nothing. Enjoy :)
and once we are at the mysql prompt we can type the following:
mysql> ALTER USER 'root' IDENTIFIED WITH mysql_native_password BY 'complexpassword';
mysql> FLUSH PRIVILEGES;
Let’s try to run our node app.js command again and this time we get this:

Finally!
Ok, so some call to this mysql_native_password seems to fix to whole thing. Let’s go deeper into the rabbit hole, what is that?
This article really is Docker Tutorial - From Beginner to Advanced, I assume no pre-knowledge, I assume nothing. Enjoy :)
Ok, so that means MySql 8 have switched to some new pluggable authentication that our Node.js mysql library hasn’t been able to catch up on. That means we can either pull down an earlier version of MySql or revert to native authentication, your call :)
Linking
The idea of linking is that a container shouldn’t have to know any details on what IP or PORT the database, in this case, is running on. It should just assume that for example the app container and the database container can reach each other. A typical syntax looks like this:
This article really is Docker Tutorial - From Beginner to Advanced, I assume no pre-knowledge, I assume nothing. Enjoy :)
Let’s break the above down a bit:
- Docker Tutorial for Beginners, part I, This covers why Docker and the basic concepts such containers, images and Dockerfile and of course the commands you need to manage them…
- Docker Tutorial for Beginners, Part II, this is about Volumes and how we can use volumes to persist data but also how we can turn our development environment into a Volume and make our development experience considerably better
- Docker Tutorial for Beginners, Part III, this is about how to deal with Databases, putting them into containers and how to make containers talk to other containers using legacy linking but also the new standard through networks
- Docker Tutorial for Beginners, Part IV, this is how we manage more than one service using Docker Compose ( this is 1/2 part on Docker Compose)
- Docker Tutorial for Beginners, Part V, this part is the second and concluding part on Docker Compose where we cover Volumes, Environment Variables and working with Databases and Networks
Ok, so we think we kind of get the basics of linking, let’s see how that applies to our existing my-container and how we can link it to our database container mysql-db. Well because we started my-container without linking it we need to tear it down and restart it with our --link command specified as an additional argument like so:
This article really is Docker Tutorial - From Beginner to Advanced, I assume no pre-knowledge, I assume nothing. Enjoy :)
That brings down the container. Before we bring it up though, we actually need to change some code, namely the part that has to do with connecting to our database. We are about to link it with our database container using the--link mysql-db:mysqlargument which means we no longer need the IP or the PORT reference so our connection code can now look like this:
// part of app.js, the rest omitted for brevity

const con = mysql.createConnection({

**host: "mysql",**

user: "root",

password: "complexpassword",

database: 'Customers'

});

// and the rest of the code below
The difference is now our host is no longer stating localhost and the port is not explicitly stating 8001 cause the linking figures that out, all we need to focus on is knowing what alias we gave the database container when we linked e.g mysql. Because we both changed the code and we added another library myql we will need to rebuild the image, like so:
This article really is Docker Tutorial - From Beginner to Advanced, I assume no pre-knowledge, I assume nothing. Enjoy :)
now let’s get it started again, this time with a link:
This article really is Docker Tutorial - From Beginner to Advanced, I assume no pre-knowledge, I assume nothing. Enjoy :)
and let’s have a look at the output:

We use the docker logs my-container to see the logs from our app container and the very last line says Connected! which comes from the callback function that tells us we successfully connected to MySql.
You know what time it is ? BOOOM!

Expand our knowledge on linking — there is another way
Ok, so this is all well and good. We managed to place the application in one container and the database in another container. But… This linking we just looked at is considered legacy which means we need to learn another way of doing linking. Wait… It’s not as bad as you think, it actually looks better syntactically.
This new way of doing this is called creating networks or custom bridge networks. Actually, that’s just one type of network we can create. The point is that they are dedicated groups that you can say that your container should belong to. A container can exist in multiple networks if it has cross cutting concerrns for more than one group. That all sounds great so show me some syntax right?
The first thing we need to do is to create the network we want the app container and database container to belong to. We create said network with the following command:
This article really is Docker Tutorial - From Beginner to Advanced, I assume no pre-knowledge, I assume nothing. Enjoy :)
Now that we have our network we just need to create each container with the newly created network as an additional argument. Let’s start with the app container:
This article really is Docker Tutorial - From Beginner to Advanced, I assume no pre-knowledge, I assume nothing. Enjoy :)
Above we are now using the --net syntax to create a network that we call isolated_network and the rest is just the usual syntax we use to create and run our container. That was easy :)
What about the database container?
This article really is Docker Tutorial - From Beginner to Advanced, I assume no pre-knowledge, I assume nothing. Enjoy :)
As you can see above we just create and run our database container but with the added --net isolated_network .
Looking back at this way of doing it, we no longer need to explicitly say that one container needs to be actively linked to another, we only place a container in a specific network and the containers in that network knows how to talk to each other.
There is a lot more to learn about networks, there are different types and a whole host of commands. I do think we got the gist of it, e.g how it differs from legacy linking. Have a look at this link to learn more docs on networking
General database management in a container setting
Ok, so we talked at the beginning of this section how we can create the database structure as a file and how we even can create our seed data as a file and how we can run those once we are at the MySql prompt after we connected to it. Here is the thing. How we get that structure and seed data in there is a little bit up to you but I will try to convey some general guidelines and ideas:
- Docker Tutorial for Beginners, part I, This covers why Docker and the basic concepts such containers, images and Dockerfile and of course the commands you need to manage them…
- Docker Tutorial for Beginners, Part II, this is about Volumes and how we can use volumes to persist data but also how we can turn our development environment into a Volume and make our development experience considerably better
- Docker Tutorial for Beginners, Part III, this is about how to deal with Databases, putting them into containers and how to make containers talk to other containers using legacy linking but also the new standard through networks
- Docker Tutorial for Beginners, Part IV, this is how we manage more than one service using Docker Compose ( this is 1/2 part on Docker Compose)
- Docker Tutorial for Beginners, Part V, this part is the second and concluding part on Docker Compose where we cover Volumes, Environment Variables and working with Databases and Networks
Summary
Ok, this article managed to cover some general information on MySql and discussed how we could get some structural things in there like tables and we also talked about an initial/test seed and how to get it into the database using standalone files.
Then we discussed why we should run databases in Docker container rather than installed on the host and went on to show how we could get two containers to talk to each other using a legacy linking technique. We did also spend some time cursing at MySql 8 and the fact the mysql Node.js module is not in sync which forced us to fix it.
Once we covered the legacy linking bit we couldn’t really stop there but we needed to talk about the new way we link containers, namely using networks.
Lastly we shared some general guidelines on database management and hopefully, you are now at a point where you understand how we can add databases to our app and keep developing the app.
Docker Tutorial for Beginners, Part IV
This article really is Docker Tutorial - From Beginner to Advanced, I assume no pre-knowledge, I assume nothing. Enjoy :)
TLDR; Docker Compose is a huge topic, for that reason this article is split into two parts. In this part, we will describe why Docker Compose and show when it shines. In the second part on Docker Compose we will cover more advanced topics like Environment Variables, Volumes and Databases.
In this part we will cover:
- Docker Tutorial for Beginners, part I, This covers why Docker and the basic concepts such containers, images and Dockerfile and of course the commands you need to manage them…
- Docker Tutorial for Beginners, Part II, this is about Volumes and how we can use volumes to persist data but also how we can turn our development environment into a Volume and make our development experience considerably better
- Docker Tutorial for Beginners, Part III, this is about how to deal with Databases, putting them into containers and how to make containers talk to other containers using legacy linking but also the new standard through networks
- Docker Tutorial for Beginners, Part IV, this is how we manage more than one service using Docker Compose ( this is 1/2 part on Docker Compose)
- Docker Tutorial for Beginners, Part V, this part is the second and concluding part on Docker Compose where we cover Volumes, Environment Variables and working with Databases and Networks
Why Docker Compose
Docker Compose is meant to be used when we need to manage many services independently. What we are describing is something called a microservice architecture.
Microservice architecture
Let’s define some properties on such an architecture:
- Docker Tutorial for Beginners, part I, This covers why Docker and the basic concepts such containers, images and Dockerfile and of course the commands you need to manage them…
- Docker Tutorial for Beginners, Part II, this is about Volumes and how we can use volumes to persist data but also how we can turn our development environment into a Volume and make our development experience considerably better
- Docker Tutorial for Beginners, Part III, this is about how to deal with Databases, putting them into containers and how to make containers talk to other containers using legacy linking but also the new standard through networks
- Docker Tutorial for Beginners, Part IV, this is how we manage more than one service using Docker Compose ( this is 1/2 part on Docker Compose)
- Docker Tutorial for Beginners, Part V, this part is the second and concluding part on Docker Compose where we cover Volumes, Environment Variables and working with Databases and Networks
We should maybe have started with the question of why we want this architecture? It’s clear from the properties listed above that it offers a lot of flexibility, it has less to no dependencies and so on. That sounds like all good things, so is that the new architecture that all apps should have?
As always it depends. There are some criteria where Microservices will shine as opposed to a Monolithic architecture such as:
- Docker Tutorial for Beginners, part I, This covers why Docker and the basic concepts such containers, images and Dockerfile and of course the commands you need to manage them…
- Docker Tutorial for Beginners, Part II, this is about Volumes and how we can use volumes to persist data but also how we can turn our development environment into a Volume and make our development experience considerably better
- Docker Tutorial for Beginners, Part III, this is about how to deal with Databases, putting them into containers and how to make containers talk to other containers using legacy linking but also the new standard through networks
- Docker Tutorial for Beginners, Part IV, this is how we manage more than one service using Docker Compose ( this is 1/2 part on Docker Compose)
- Docker Tutorial for Beginners, Part V, this part is the second and concluding part on Docker Compose where we cover Volumes, Environment Variables and working with Databases and Networks
There are a ton more arguments on why Micro services over Monolithic architecture. The interested reader is urged to have a look at the following link .
The case for Docker Compose
The description of a Microservice architecture tells us that we need a bunch of services organized around business capabilities. Furthermore, they need to be independently deployable and we need to be able to use different tech stacks and many more things. In my opinion, this sounds like Docker would be a great fit generally. The reason we are making a case for Docker Compose over Docker is simply the sheer size of it. If we have more than two containers the amount of commands we need to type suddenly grows in a linear way. Let’s explain in the next section what features Docker Compose have that makes it scale so well when the number of services increase.
Docker Compose features overview
Now Docker Compose enables us to scale really well in the sense that we can easily build several images at once, start several containers and many more things. A complete listing of features is as follows:
- Docker Tutorial for Beginners, part I, This covers why Docker and the basic concepts such containers, images and Dockerfile and of course the commands you need to manage them…
- Docker Tutorial for Beginners, Part II, this is about Volumes and how we can use volumes to persist data but also how we can turn our development environment into a Volume and make our development experience considerably better
- Docker Tutorial for Beginners, Part III, this is about how to deal with Databases, putting them into containers and how to make containers talk to other containers using legacy linking but also the new standard through networks
- Docker Tutorial for Beginners, Part IV, this is how we manage more than one service using Docker Compose ( this is 1/2 part on Docker Compose)
- Docker Tutorial for Beginners, Part V, this part is the second and concluding part on Docker Compose where we cover Volumes, Environment Variables and working with Databases and Networks
As we can see it takes care of everything we could possibly need when we need to manage a microservice architecture consisting of many services.
When plain Docker isn’t enough anymore
Let’s recap on how Docker operates and what commands we need and let’s see where that takes us when we add a service or two.
To dockerize something, we know that we need to:
- Docker Tutorial for Beginners, part I, This covers why Docker and the basic concepts such containers, images and Dockerfile and of course the commands you need to manage them…
- Docker Tutorial for Beginners, Part II, this is about Volumes and how we can use volumes to persist data but also how we can turn our development environment into a Volume and make our development experience considerably better
- Docker Tutorial for Beginners, Part III, this is about how to deal with Databases, putting them into containers and how to make containers talk to other containers using legacy linking but also the new standard through networks
- Docker Tutorial for Beginners, Part IV, this is how we manage more than one service using Docker Compose ( this is 1/2 part on Docker Compose)
- Docker Tutorial for Beginners, Part V, this part is the second and concluding part on Docker Compose where we cover Volumes, Environment Variables and working with Databases and Networks
Now, using Docker Compose we still need to do the part with the Dockerfile but Docker Compose will take care of building the images and managing the containers. Let’s illustrate what the commands might look like with plain Docker:
This article really is Docker Tutorial - From Beginner to Advanced, I assume no pre-knowledge, I assume nothing. Enjoy :)
Followed by
This article really is Docker Tutorial - From Beginner to Advanced, I assume no pre-knowledge, I assume nothing. Enjoy :)
Now that’s not a terrible amount to write, but imagine you have three different services you need to do this for, then it suddenly becomes six commands and then you have the tear down which is two more commands and, that doesn’t really scale.

Enter docker-compose.yaml
This is where Docker Compose really shines. Instead of typing two commands for every service you want to build you can define all services in your project in one file, a file we call docker-compose.yaml. You can configure the following topics inside of a docker-compose.yaml file:
- Docker Tutorial for Beginners, part I, This covers why Docker and the basic concepts such containers, images and Dockerfile and of course the commands you need to manage them…
- Docker Tutorial for Beginners, Part II, this is about Volumes and how we can use volumes to persist data but also how we can turn our development environment into a Volume and make our development experience considerably better
- Docker Tutorial for Beginners, Part III, this is about how to deal with Databases, putting them into containers and how to make containers talk to other containers using legacy linking but also the new standard through networks
- Docker Tutorial for Beginners, Part IV, this is how we manage more than one service using Docker Compose ( this is 1/2 part on Docker Compose)
- Docker Tutorial for Beginners, Part V, this part is the second and concluding part on Docker Compose where we cover Volumes, Environment Variables and working with Databases and Networks
Docker compose in action
Ok so at this point we understand that Docker Compose can take care of pretty much anything we can do on the command line and that it also relies on a file docker-compose.yaml to know what actions to carry out.
Authoring a docker-compose.yml file
Let’s actually try to create such a file and let’s give it some instructions. First, though let’s do a quick review of a typical projects file structure. Below we have a project consisting of two services, each having their own directory. Each directory has a Dockerfile that contains instructions on how to build a service.
It can look something like this:
docker-compose.yaml
/product-service
  app.js
  package.json
  Dockerfile
/inventory-service
  app.js
  package.json
  Dockerfile
Worth noting above is how we create the docker-compose.yaml file at the root of our project. The reason for doing so is that all the services we aim to build and how to build and start them should be defined in one file, our docker-compose.yml.
Ok, let’s open docker-compose.yaml and enter our first line:
// docker-compose.yaml
version: '3'
Now, it actually matters what you specify here. Currently, Docker supports three different major versions. 3 is the latest major version, read more here how the different versions differ, cause they do support different functionality and the syntax might even differ between them Docker versions offical docs
Next up let’s define our services:
// docker-compose.yaml
version: '3'
services:
  product-service:
    build:
      context: ./product-service
    ports:
      - "8000:3000"
Ok, that was a lot at once, let’s break it down:
- Docker Tutorial for Beginners, part I, This covers why Docker and the basic concepts such containers, images and Dockerfile and of course the commands you need to manage them…
- Docker Tutorial for Beginners, Part II, this is about Volumes and how we can use volumes to persist data but also how we can turn our development environment into a Volume and make our development experience considerably better
- Docker Tutorial for Beginners, Part III, this is about how to deal with Databases, putting them into containers and how to make containers talk to other containers using legacy linking but also the new standard through networks
- Docker Tutorial for Beginners, Part IV, this is how we manage more than one service using Docker Compose ( this is 1/2 part on Docker Compose)
- Docker Tutorial for Beginners, Part V, this part is the second and concluding part on Docker Compose where we cover Volumes, Environment Variables and working with Databases and Networks
All this corresponds to the following two commands:
docker build -t [default name]/product-service .
docker run -p 8000:3000 --name [default name]/product-service
Well, it’s almost true, we haven’t exactly told Docker Compose yet to carry out the building of the image or to create and run a container. Let’s learn how to do that starting with how to build an image:
This article really is Docker Tutorial - From Beginner to Advanced, I assume no pre-knowledge, I assume nothing. Enjoy :)
The above will build every single service you have specified indocker-compose.yaml. Let’s look at the output of our command:
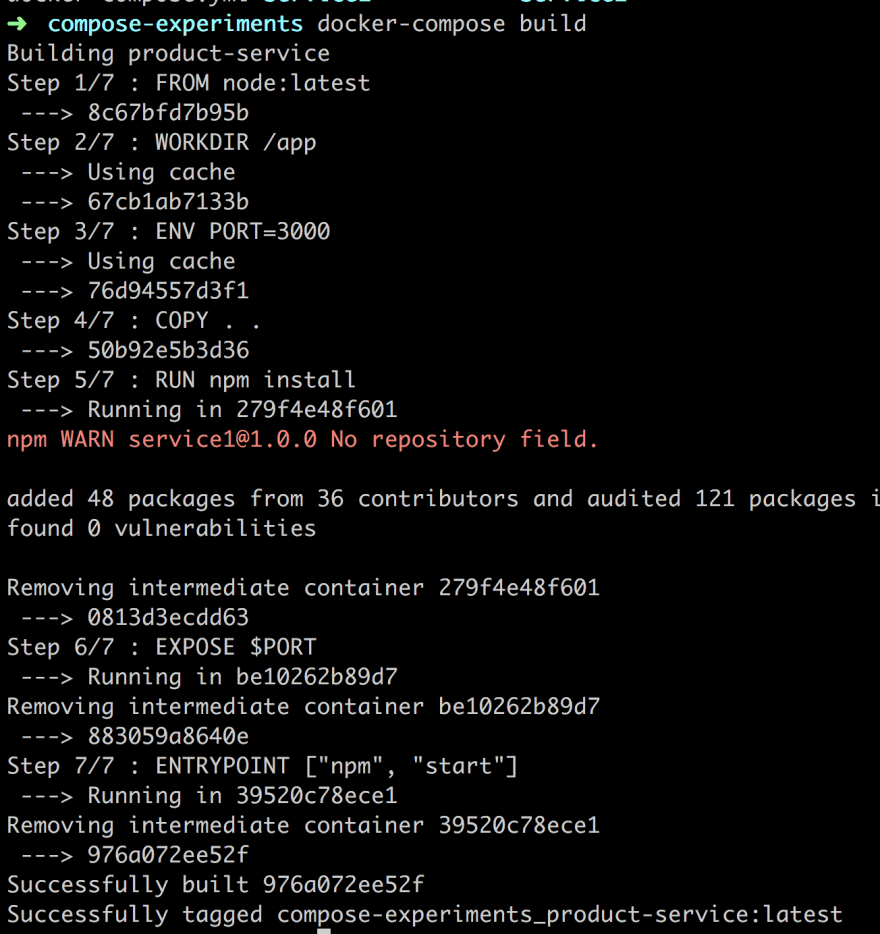
Above we can see that our image is being built and we also see it is given the full name compose-experiments_product-service:latest, as indicated by the last row. The name is derived from the directory we are in, that is compose-experiments and the other part is the name we give the service in the docker-compose.yaml file.
Ok as for spinning it up we type:
This article really is Docker Tutorial - From Beginner to Advanced, I assume no pre-knowledge, I assume nothing. Enjoy :)
This will again read ourdocker-compose.yamlfile but this time it will create and run a container. Let’s also make sure we run our container in the background so we add the flag-d, so full command is now:
This article really is Docker Tutorial - From Beginner to Advanced, I assume no pre-knowledge, I assume nothing. Enjoy :)
Ok, above we can see that our service is being created. Let’s rundocker psto verify the status of our newly created container:
It seems to be up and running on port 8000. Let’s verify:
Ok, so went to the terminal and we can see we got a container. We know we can bring it down with either docker stop or docker kill but let’s do it the docker-compose way:
This article really is Docker Tutorial - From Beginner to Advanced, I assume no pre-knowledge, I assume nothing. Enjoy :)
As we can see above the logs is saying that it is stopping and removing the container, it seems to be doing bothdocker stop [id]anddocker rm [id]for us, sweet :)
It should be said if all we want to do is stop the containers we can do so with:
This article really is Docker Tutorial - From Beginner to Advanced, I assume no pre-knowledge, I assume nothing. Enjoy :)
I don’t know about you but at this point, I’m ready to stop usingdocker build,docker run,docker stopanddocker rm. Docker compose seems to take care of the full life cycle :)
Docker compose showing off
Let’s do a small recap so far. Docker compose takes care of the full life cycle of managing services for us. Let’s try to list the most used Docker commands and what the corresponding command in Docker Compose would look like:
- Docker Tutorial for Beginners, part I, This covers why Docker and the basic concepts such containers, images and Dockerfile and of course the commands you need to manage them…
- Docker Tutorial for Beginners, Part II, this is about Volumes and how we can use volumes to persist data but also how we can turn our development environment into a Volume and make our development experience considerably better
- Docker Tutorial for Beginners, Part III, this is about how to deal with Databases, putting them into containers and how to make containers talk to other containers using legacy linking but also the new standard through networks
- Docker Tutorial for Beginners, Part IV, this is how we manage more than one service using Docker Compose ( this is 1/2 part on Docker Compose)
- Docker Tutorial for Beginners, Part V, this part is the second and concluding part on Docker Compose where we cover Volumes, Environment Variables and working with Databases and Networks
The above in itself is pretty great but what’s even greater is how easy it is to keep on expanding our solution and add more and more services to it.
Building out our solution
Let’s add another service, just to see how easy it is and how well it scales. We need to do the following:
- Docker Tutorial for Beginners, part I, This covers why Docker and the basic concepts such containers, images and Dockerfile and of course the commands you need to manage them…
- Docker Tutorial for Beginners, Part II, this is about Volumes and how we can use volumes to persist data but also how we can turn our development environment into a Volume and make our development experience considerably better
- Docker Tutorial for Beginners, Part III, this is about how to deal with Databases, putting them into containers and how to make containers talk to other containers using legacy linking but also the new standard through networks
- Docker Tutorial for Beginners, Part IV, this is how we manage more than one service using Docker Compose ( this is 1/2 part on Docker Compose)
- Docker Tutorial for Beginners, Part V, this part is the second and concluding part on Docker Compose where we cover Volumes, Environment Variables and working with Databases and Networks
Let’s have a look at our docker-compose.yaml file and let’s add the necessary info for our next service:
// docker-compose.yaml

version: '3'
services:
  product-service:
    build:
      context: ./product-service
    ports:
      - "8000:3000"
  inventory-service:
    build:
      context: ./inventory-service
    ports:
        - "8001:3000"
Ok then, let’s get these containers up and running, including our new service:
This article really is Docker Tutorial - From Beginner to Advanced, I assume no pre-knowledge, I assume nothing. Enjoy :)
Wait, aren’t you supposed to rundocker-compose build? Well, actually we don’t need todocker-compose updoes it all for us, building images, creating and running containers.

CAVEAT, it’s not so simple, that works fine for a first-time build + run, where no images exist previously. If you are doing a change to a service, however, that needs to be rebuilt, that would mean you need to run docker-compose build first and then you need to run docker-compose up.
Summary
Here is where we need to put a stop to the first half of covering Docker Compose, otherwise it would just be too much. We have been able to cover the motivation behind Docker Compose and we got a lightweight explanation to Microservice architecture. Furthermore, we talked about Docker versus Docker Compose and finally, we were able to contrast and compare the Docker Compose command to plain Docker commands.
Thereby we hopefully were able to show how much easier it is to use Docker Compose and specify all your services in a docker-compose.yaml file.
We did say that there was much more to Docker Compose like Environment variables, Networks, and Databases but that will come in the next part.
Docker Tutorial for Beginners, Part V
We will keep working on our project introduced in Part IV and in doing so we will showcase more Docker Compose features and essentially build out our project to cover everything you might possibly need.
In this part, we will cover:
- Docker Tutorial for Beginners, part I, This covers why Docker and the basic concepts such containers, images and Dockerfile and of course the commands you need to manage them…
- Docker Tutorial for Beginners, Part II, this is about Volumes and how we can use volumes to persist data but also how we can turn our development environment into a Volume and make our development experience considerably better
- Docker Tutorial for Beginners, Part III, this is about how to deal with Databases, putting them into containers and how to make containers talk to other containers using legacy linking but also the new standard through networks
- Docker Tutorial for Beginners, Part IV, this is how we manage more than one service using Docker Compose ( this is 1/2 part on Docker Compose)
- Docker Tutorial for Beginners, Part V, this part is the second and concluding part on Docker Compose where we cover Volumes, Environment Variables and working with Databases and Networks
If you at any point should feel confused here is the repo this article is based on:
This article really is Docker Tutorial - From Beginner to Advanced, I assume no pre-knowledge, I assume nothing. Enjoy :)
Environment variables
One of the things I’ve shown you in previous articles is how we can specify environment variables. Now variables can be set in the Dockerfile but we can definitely set them on the command line and thereby also in Docker Compose and specifically in docker-compose.yaml:
// docker-compose.yaml

version: '3'
services:
 product-service:
   build:
     context: ./product-service
   ports:
     - "8000:3000"
   environment:
     - test=testvalue
 inventory-service:
   build:
     context: ./inventory-service
   ports:
   - "8001:3000"
Above we are creating an environment variable by defining environment followed by -test=testvalue, which means we create the variable test with value, testvalue.
We can easily test that this works by reading from process.env.test in our app.js file for the product-service directory.
Another way to test this is to run Docker compose and query for what environment variables are available, like so:
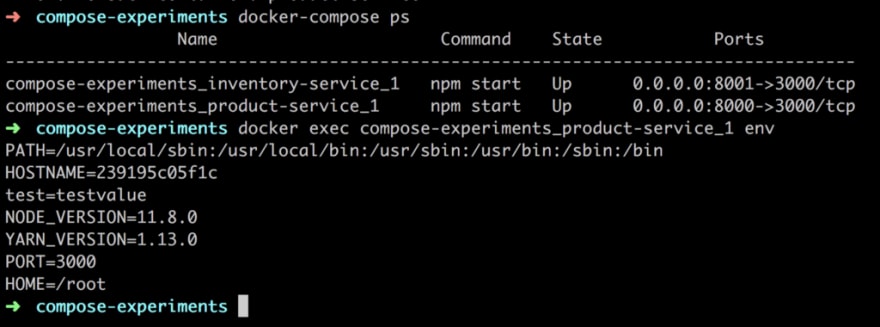
As you can see above we first run docker-compose ps and get the containers that are part of this Docker Compose session and then we run docker exec [container name] env to list the environment variables. A third option is to run docker exec -it [container name] bash and enter the container and use bash to echo out the variable value. There are quite a few ways to manage environment variables with Docker compose so have a read in the official docs, what else you can do.
Volumes
We’ve covered volumes in an earlier part of this series and we found them to be a great way to:
- Docker Tutorial for Beginners, part I, This covers why Docker and the basic concepts such containers, images and Dockerfile and of course the commands you need to manage them…
- Docker Tutorial for Beginners, Part II, this is about Volumes and how we can use volumes to persist data but also how we can turn our development environment into a Volume and make our development experience considerably better
- Docker Tutorial for Beginners, Part III, this is about how to deal with Databases, putting them into containers and how to make containers talk to other containers using legacy linking but also the new standard through networks
- Docker Tutorial for Beginners, Part IV, this is how we manage more than one service using Docker Compose ( this is 1/2 part on Docker Compose)
- Docker Tutorial for Beginners, Part V, this part is the second and concluding part on Docker Compose where we cover Volumes, Environment Variables and working with Databases and Networks
Create a persistent space
Let’s see how we can deal with Volumes in Docker compose:
// docker-compose.yml

version: '3'
services:
 product-service:
   build:
     context: ./product-service
   ports:
     - "8000:3000"
   environment:
     - test=testvalue
 inventory-service:
   build:
     context: ./inventory-service
   ports:
     - "8001:3000"
  volumes:
    - my-volume:/var/lib/data

volumes:
  my-volume:
Above we are creating a volume by the command volumes at the end of the file and on the second row we give it the name my-volume. Furthermore, in the inventory-service portion of our file, we refer to the just created volume and create a mapping to /var/lib/data which is a directory in the volume that will be persisted, through teardowns. Let’s look that it is correctly mapped:
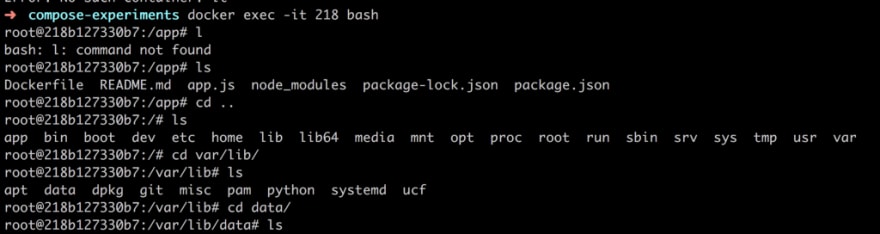
As can be seen, by the above command, we first enter the container with docker exec followed by us navigating to our mapping directory, it is there, great :).
Let’s create a file in the data directory so we can prove that our volume mapping really works:
This article really is Docker Tutorial - From Beginner to Advanced, I assume no pre-knowledge, I assume nothing. Enjoy :)
The above command creates a filepersist.logwith the content persist . Nothing fancy but it does create a file that we can look for after tearing down and restarting our container.
Now we can exit the container. Next, let’s recap on some useful Volume commands:
This article really is Docker Tutorial - From Beginner to Advanced, I assume no pre-knowledge, I assume nothing. Enjoy :)

The above lists all the currently mounted volumes. We can see that our created Volume is there compose-experiments_my-volume .
We can dive into more details with:
This article really is Docker Tutorial - From Beginner to Advanced, I assume no pre-knowledge, I assume nothing. Enjoy :)
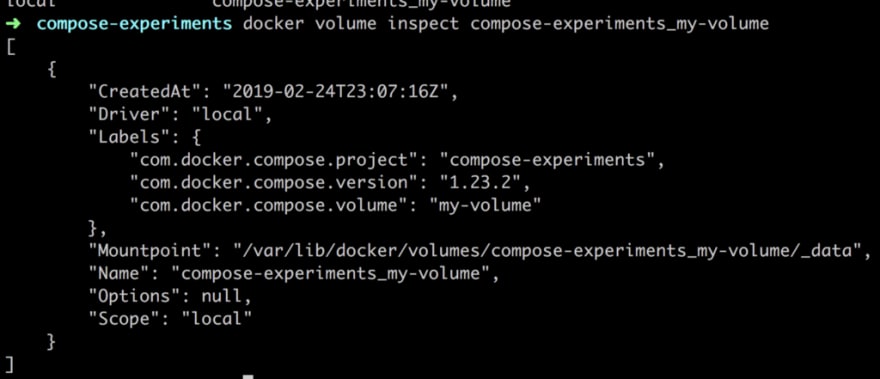
Ok, so it’s giving us some details about our volume such as Mountpoint, which is where files will be persisted when we write to our volume mapping directory in the container.
Let’s now bring down our containers with:
This article really is Docker Tutorial - From Beginner to Advanced, I assume no pre-knowledge, I assume nothing. Enjoy :)
This means that the Volume should still be there so let’s bring them all up with:
This article really is Docker Tutorial - From Beginner to Advanced, I assume no pre-knowledge, I assume nothing. Enjoy :)
Let’s enter the container next and see if our persist.log file is there:
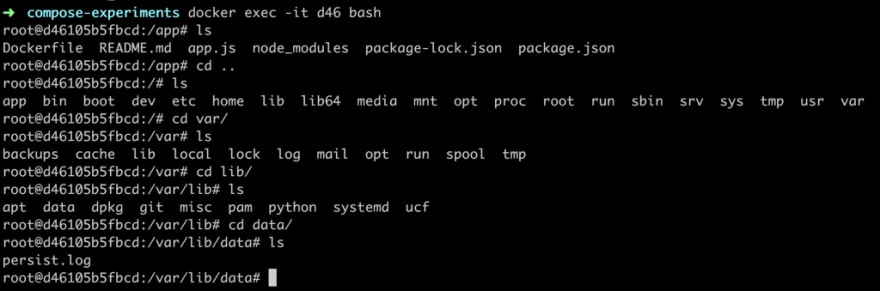
Oh yeah, it works.
Turn your current directory into a Volume
Ok, for this we need to add a new volume and we need to point out a directory on our computer and a place in the container that should be in sync. Your docker-compose.yaml file should look like the following:
// docker-compose.yaml

version: '3'
services:
  product-service:
    build:
      context: ./product-service
    ports:
      - "8000:3000"
    environment:
      - test=testvalue
    volumes:
      - type: bind
      source: ./product-service
      target: /app
  inventory-service:
    build:
      context: ./inventory-service
    ports:
      - "8001:3000"
    volumes:
      - my-volume:/var/lib/data

volumes:
  my-volume:
The new addition is added to the product-service. We can see that we are specifying a volumes command with one entry. Let’s break down that entry:
- Docker Tutorial for Beginners, part I, This covers why Docker and the basic concepts such containers, images and Dockerfile and of course the commands you need to manage them…
- Docker Tutorial for Beginners, Part II, this is about Volumes and how we can use volumes to persist data but also how we can turn our development environment into a Volume and make our development experience considerably better
- Docker Tutorial for Beginners, Part III, this is about how to deal with Databases, putting them into containers and how to make containers talk to other containers using legacy linking but also the new standard through networks
- Docker Tutorial for Beginners, Part IV, this is how we manage more than one service using Docker Compose ( this is 1/2 part on Docker Compose)
- Docker Tutorial for Beginners, Part V, this part is the second and concluding part on Docker Compose where we cover Volumes, Environment Variables and working with Databases and Networks
Networks and databases
Ok then, this is the last part we aim to cover in this article. Let’s start with databases. All major vendors have a Docker image like Sql Server, Postgres, MySQL and so on. This means we don’t need to do the build-step to get them up and running but we do need to set things like environment variables and of course open up ports so we can interact with them. Let’s have a look at how we can add a MySQL database to our solution, that is our docker-compose.yml file.
Adding a database
Adding a database to docker-compose.yaml is about adding an already premade image. Lucky for us MySQL already provides a ready-made one. To add it we just need to add another entry under services: like so:
// docker-compose.yaml

product-db:
  image: mysql
  environment:
    - MYSQL_ROOT_PASSWORD=complexpassword
  ports:
    - 8002:3306
Let’s break it down:
- Docker Tutorial for Beginners, part I, This covers why Docker and the basic concepts such containers, images and Dockerfile and of course the commands you need to manage them…
- Docker Tutorial for Beginners, Part II, this is about Volumes and how we can use volumes to persist data but also how we can turn our development environment into a Volume and make our development experience considerably better
- Docker Tutorial for Beginners, Part III, this is about how to deal with Databases, putting them into containers and how to make containers talk to other containers using legacy linking but also the new standard through networks
- Docker Tutorial for Beginners, Part IV, this is how we manage more than one service using Docker Compose ( this is 1/2 part on Docker Compose)
- Docker Tutorial for Beginners, Part V, this part is the second and concluding part on Docker Compose where we cover Volumes, Environment Variables and working with Databases and Networks
Let’s see if we can get the database and the rest of our services up and running:
This article really is Docker Tutorial - From Beginner to Advanced, I assume no pre-knowledge, I assume nothing. Enjoy :)

Let’s verify with:
This article really is Docker Tutorial - From Beginner to Advanced, I assume no pre-knowledge, I assume nothing. Enjoy :)

Looks, good, our database service experiments_product-db_1 seems to be up and running on port 8002. Let’s see if we can connect to the database next. The below command will connect us to the database, fingers crossed ;)
mysql -uroot -pcomplexpassword -h 0.0.0.0 -P 8002

and the winner is…

Great, we did it. Next up let’s see if we can update one of our services to connect to the database.
Connecting to the database
There are three major ways we could be connecting to the database:
- Docker Tutorial for Beginners, part I, This covers why Docker and the basic concepts such containers, images and Dockerfile and of course the commands you need to manage them…
- Docker Tutorial for Beginners, Part II, this is about Volumes and how we can use volumes to persist data but also how we can turn our development environment into a Volume and make our development experience considerably better
- Docker Tutorial for Beginners, Part III, this is about how to deal with Databases, putting them into containers and how to make containers talk to other containers using legacy linking but also the new standard through networks
- Docker Tutorial for Beginners, Part IV, this is how we manage more than one service using Docker Compose ( this is 1/2 part on Docker Compose)
- Docker Tutorial for Beginners, Part V, this part is the second and concluding part on Docker Compose where we cover Volumes, Environment Variables and working with Databases and Networks
We will focus on the third choice, connecting to a database through our app. The database and the app will exist in different containers. So how do we get them to connect? The answer is:
- Docker Tutorial for Beginners, part I, This covers why Docker and the basic concepts such containers, images and Dockerfile and of course the commands you need to manage them…
- Docker Tutorial for Beginners, Part II, this is about Volumes and how we can use volumes to persist data but also how we can turn our development environment into a Volume and make our development experience considerably better
- Docker Tutorial for Beginners, Part III, this is about how to deal with Databases, putting them into containers and how to make containers talk to other containers using legacy linking but also the new standard through networks
- Docker Tutorial for Beginners, Part IV, this is how we manage more than one service using Docker Compose ( this is 1/2 part on Docker Compose)
- Docker Tutorial for Beginners, Part V, this part is the second and concluding part on Docker Compose where we cover Volumes, Environment Variables and working with Databases and Networks
Let’s start with the first item here. How do we get the database and the container into the same network? Easy, we create a network and we place each container in that network. Let’s show this in docker-compose.yaml:
// excerpt from docker-compose.yaml

networks:
  products:
We need to assign this network to each service, like so:
// excerpt from docker-compose.yaml

services:
  some-service:
    networks:
      - products
Now, for the second bullet point, how do we know that the database is finished initializing? Well, we do have a property called depends_on, with that property, we are able to specify that one container should wait for another container to start up first. That means we can specify it like so:
// excerpt from docker-compose.yaml

services:
 some-service:
   depends_on: db
 db:
   image: mysql
Great so that solves it or? Nope nope nope, hold your horses:

So in Docker compose version 2 there used to be an alternative where we could check for a service’s health, if health was good we could process to spin up our container. It looked like so:
depends_on:
 db:
   condition: service_healthy
This meant that we could wait for a database to initialize fully. This was not to last though, in version 3 this option is gone. Here is doc page that explains why, control startup and shutdown order. The gist of it is that now it’s up to us to find out when our database is done and ready to connect to. Docker suggests several scripts for this:
- Docker Tutorial for Beginners, part I, This covers why Docker and the basic concepts such containers, images and Dockerfile and of course the commands you need to manage them…
- Docker Tutorial for Beginners, Part II, this is about Volumes and how we can use volumes to persist data but also how we can turn our development environment into a Volume and make our development experience considerably better
- Docker Tutorial for Beginners, Part III, this is about how to deal with Databases, putting them into containers and how to make containers talk to other containers using legacy linking but also the new standard through networks
- Docker Tutorial for Beginners, Part IV, this is how we manage more than one service using Docker Compose ( this is 1/2 part on Docker Compose)
- Docker Tutorial for Beginners, Part V, this part is the second and concluding part on Docker Compose where we cover Volumes, Environment Variables and working with Databases and Networks
All these scripts have one thing in common, the idea is to listen to a specific host and port and when that replies back, then we run our app. So what do we need to do to make that work? Well let’s pick one of these scripts, namely wait-for-it and let’s list what we need to do:
- Docker Tutorial for Beginners, part I, This covers why Docker and the basic concepts such containers, images and Dockerfile and of course the commands you need to manage them…
- Docker Tutorial for Beginners, Part II, this is about Volumes and how we can use volumes to persist data but also how we can turn our development environment into a Volume and make our development experience considerably better
- Docker Tutorial for Beginners, Part III, this is about how to deal with Databases, putting them into containers and how to make containers talk to other containers using legacy linking but also the new standard through networks
- Docker Tutorial for Beginners, Part IV, this is how we manage more than one service using Docker Compose ( this is 1/2 part on Docker Compose)
- Docker Tutorial for Beginners, Part V, this part is the second and concluding part on Docker Compose where we cover Volumes, Environment Variables and working with Databases and Networks
Let’s start with copying the script from GitHub into our product-service directory so it now looks like this:
/product-service
  wait-for-it.sh
  Dockerfile
  app.js
  package.json
Now let’s open up the Dockerfile and add the following:
// Dockerfile

FROM node:latest

WORKDIR /app

ENV PORT=3000

COPY . .

RUN npm install

EXPOSE $PORT

COPY wait-for-it.sh /wait-for-it.sh

RUN chmod +x /wait-for-it.sh
Above we are copying the wait-for-it.sh file to our container and on the line below we are giving it execution rights. Worth noting is how we also remove the ENTRYPOINT from our Dockerfile, we will instead instruct the container to start from the docker-compose.yaml file. Let’s have a look at said file next:
// excerpt from docker-compose.yaml

services:
 product-service:
 command: ["/wait-for-it.sh", "db:8002", "--", "npm", "start"]
 db:
 // definition of db service below
Above we are telling it to run the wait-for-it.sh file and as an argument use db:8002 and after it gets a satisfactory response then we can go on to run npm start which will then start up our service. That sounds nice, will it work?
For full disclosure let’s show our full docker-compose.yaml file:
version: '3.3'
  services:
    product-service:
      depends_on:
        - "db"
      build:
        context: ./product-service
      command: ["/wait-for-it.sh", "db:8002", "--", "npm", "start"]
    ports:
      - "8000:3000"
    environment:
      - test=testvalue
      - DATABASE_PASSWORD=complexpassword
      - DATABASE_HOST=db
    volumes:
      - type: bind
      source: ./product-service
      target: /app
    networks:
      - products
   db:
     build: ./product-db
       restart: always
     environment:
       - "MYSQL_ROOT_PASSWORD=complexpassword"
       - "MYSQL_DATABASE=Products"
     ports:
       - "8002:3306"
     networks:
       - products
   inventory-service:
     build:
       context: ./inventory-service
     ports:
       - "8001:3000"
     volumes:
       - my-volume:/var/lib/data

volumes:
 my-volume:

networks:
 products:
Ok, so to recap we placed product-service and db in the network products and we downloaded the script wait-for-it.sh and we told it to run before we spun up the app and in the process listen for the host and port of the database that would respond as soon as the database was ready for action. That means we have one step left to do, we need to adjust the app.js file of the product-service, so let’s open that file up:
// app.js

const express = require('express')
const mysql = require('mysql');
const app = express()
const port = process.env.PORT || 3000;
const test = process.env.test;

let attempts = 0;

const seconds = 1000;

function connect() {
  attempts++;

  console.log('password', process.env.DATABASE_PASSWORD);
  console.log('host', process.env.DATABASE_HOST);
  console.log(`attempting to connect to DB time: ${attempts}`);

 const con = mysql.createConnection({
   host: process.env.DATABASE_HOST,
   user: "root",
   password: process.env.DATABASE_PASSWORD,
   database: 'Products'
 });

  con.connect(function (err) {
   if (err) {
     console.log("Error", err);
     setTimeout(connect, 30 * seconds);
   } else {
     console.log('CONNECTED!');
   }

  });

  conn.on('error', function(err) {
    if(err) {
      console.log('shit happened :)');
      connect()
    }
  });

}
connect();

app.get('/', (req, res) => res.send(`Hello product service, changed ${test}`))

app.listen(port, () => console.log(`Example app listening on port ${port}!`))
Above we can see that we have defined a connect() method that creates a connection by invoking createConnection() with an object as an argument. That input argument needs to know host, user, password and database. That seems perfectly reasonable. We also add a bit of logic to the connect() method call namely we invoke setTimeout(), this means that it will attempt to do another connection after 30 seconds. Now, because we use wait-for-it.sh that functionality isn’t really needed but we could rely on application code alone to ensure we get a connection. However, we also call conn.on('error') and the reason for doing so is that we can loose a connection and we should be good citizens and ensure we can get that connection back.
Anyway, we’ve done everything in our power, but because we’ve introduced changes to Dockerfile let’s rebuild everything with docker-compose build and then let’s bring everything up with:
This article really is Docker Tutorial - From Beginner to Advanced, I assume no pre-knowledge, I assume nothing. Enjoy :)
and….
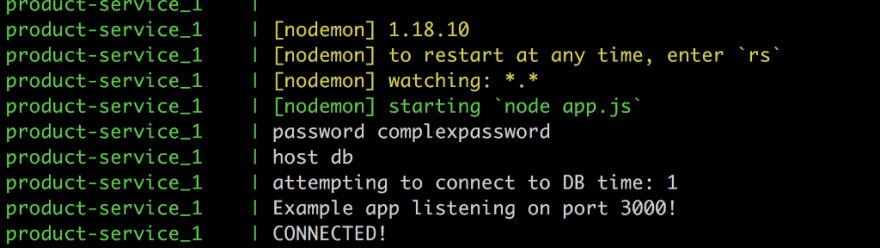
There it is, Houston WE HAVE A CONNECTION, or as my friend Barney likes to put it:

Setting up the database — fill it with structure and data
Ok, maybe you were wondering about the way we built the service db ? That part of docker-compose.yaml looked like this:
// docker-compose.yaml

db:
  build: ./product-db
  restart: always
  environment:
    - "MYSQL_ROOT_PASSWORD=complexpassword"
    - "MYSQL_DATABASE=Products"
  ports:
    - "8002:3306"
  networks:
    - products
I would you to look at build especially. We mentioned at the beginning of this article that we can pull down ready-made images of databases. That statement is still true but by creating our own Dockerfile for this, we can not only specify the database we want but we can also run commands like creating our database structure and insert seed data. Let’s have a close look at the directory product-db:
/product-db
  Dockerfile
  init.sql
Ok, we have a Dockerfile, let’s look at that first:
// Dockerfile

FROM mysql:5.6

ADD init.sql /docker-entrypoint-initdb.d
We specify that init.sql should be copied and renamed to docker-entrypoint-initdb.d which means it will run the first thing that happens. Great, what about the content of init.sql?
// init.sql

CREATE DATABASE IF NOT EXISTS Products;

# create tables here
# add seed data inserts here
As you can see it doesn’t contain much for the moment but we can definitely expand it, which is important.
Summary
We have now come full circle in this series, we have explained everything from the beginning. The basic concepts, the core commands, how to deal with volumes and databases and also how to be even more effective with Docker Compose. This series will continue of course and go deeper and deeper into Docker but this should hopefully take you a bit on the way.
Thanks for reading ❤
If you liked this post, share it with all of your programming buddies!
Follow me on Facebook | Twitter
Further reading
☞ Docker and Kubernetes: The Complete Guide
☞ Docker Mastery: The Complete Toolset From a Docker Captain
☞ Docker for the Absolute Beginner - Hands On - DevOps
☞ How to debug Node.js in a Docker container?
☞ Docker Containers for Beginners
☞ Deploy Docker Containers With AWS CodePipeline
☞ Build Docker Images and Host a Docker Image Repository with GitLab
☞ How to create a full stack React/Express/MongoDB app using Docker
#docker #devops