How to Create a Smart Credit Card Acquisition With Google Home and RPA
Introduction
Google Home is a smart device used to receive voice commands and act accordingly to such commands. Depending on the task it is asked to develop, it may play some music from any subscribed music provider service, make an appointment in your calendar, and you can even ask it to tell a joke. However, if you want to use your Google Home not only for amusement purposes but also for running a business, you may want to get informed about the capabilities of using Dialogflow and Google Home.
Dialogflow is a human-computer interaction developer based on natural language conversation. Dialogflow has the tools to create a conversation flow so that, when connected to something like a chatbot, this chatbot can follow and understand the different utterances the user is giving it and get the work done. Since Dialogflow is owned by Google, it is possible to connect the conversation flows you created not only to a chatbot as an endpoint to hit when an answer is needed, but also, it can be easily connected to your Android Device’s Google Assistant and Google Home Device.
Although this may offer you a stronger solution, you still need to get the data the user is giving to your device. In order to be able to get such data and to process it, you need to connect this to your back-end. This is possible thanks to Dialogflow. Dialogflow can hit a public URL and send/receive data from the conversation taking place with your device.
Until now, you would have a somehow complete solution. But, what if you would like to record in a database the interaction your device is having? You might be thinking of the Node.js MySQL driver, since your webhook may be coded in NodeJS; however, if you wish to scale your solution to develop automatic activities once the user finishes the interaction with your device, like filling forms, sending emails, accessing and writing into databases, etc, you can solve this with something called RPA.
RPA is a way of activities automation based on virtual agents or robots. A popular software for this is called UiPath. Funded in 2005 and being the most-downloaded RPA software, it offers a Community Version (free) and an Enterprise Version. UiPath helps in the completion of tasks that can be repetitive and time wasting, like copying and pasting data from one file to another.
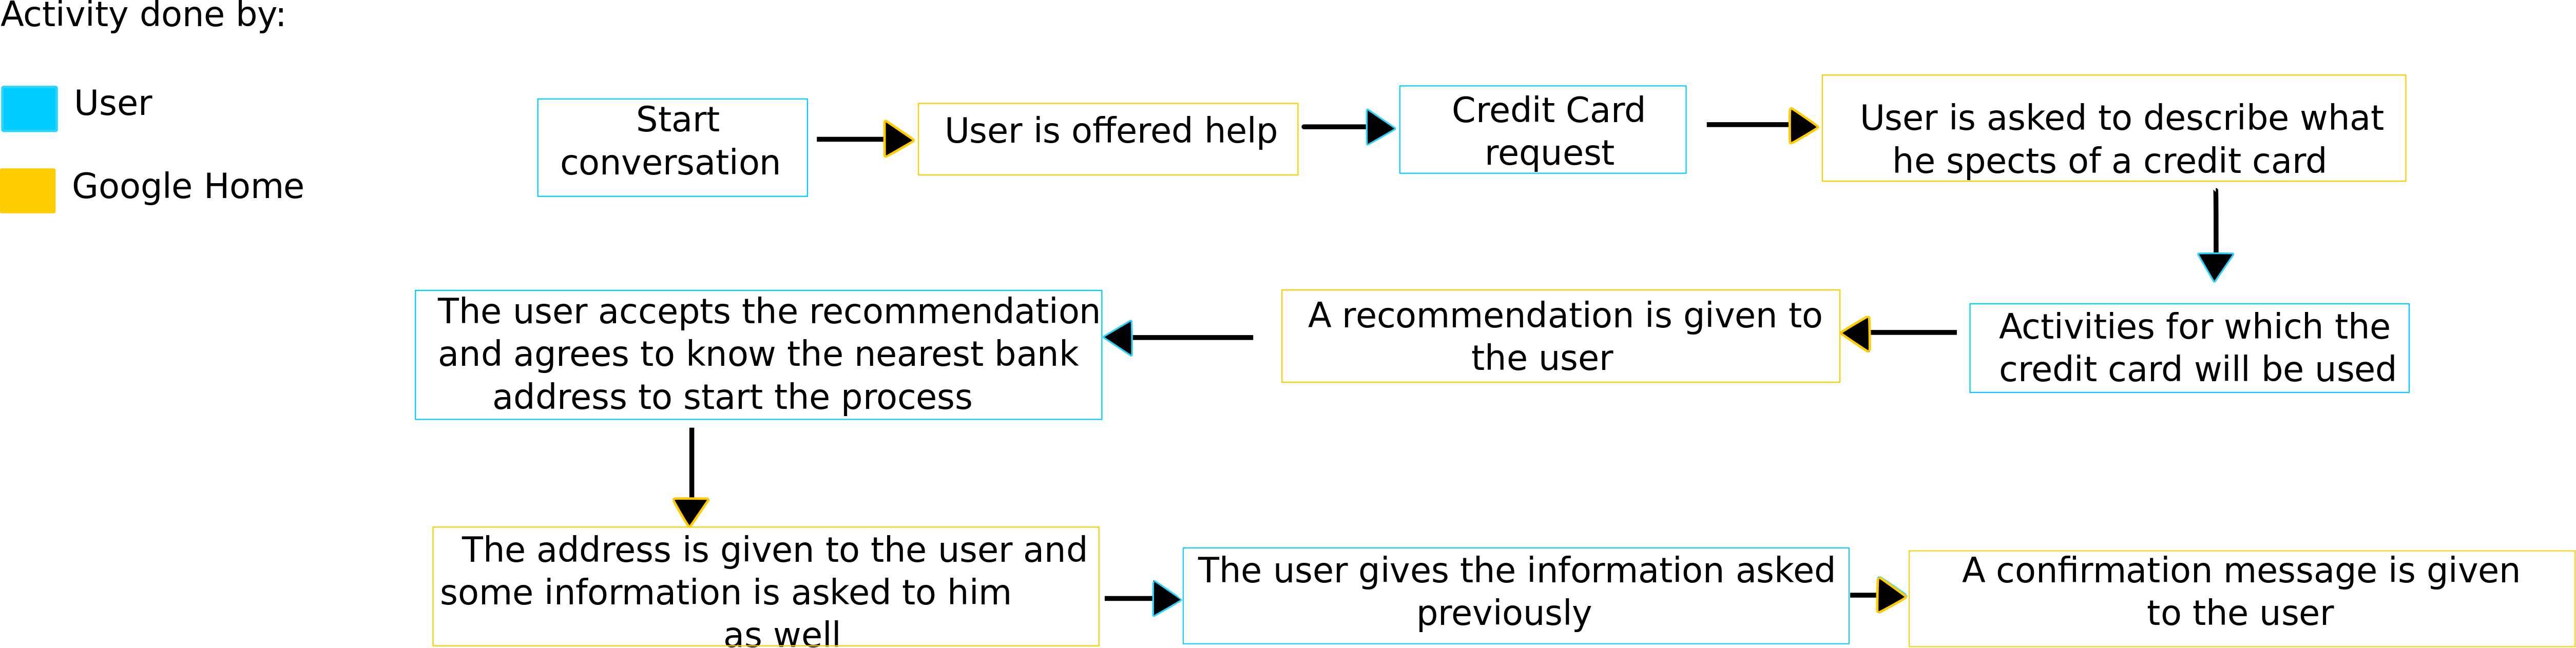
Since the solution is an end-to-end credit card acquisition process, first, it is necessary to build a conversation flow in Dialogflow. In the next image, a diagram of the flow can be seen.
Next, a webhook is developed inside a server, which will help in the data acquisition and the credit card selection. Something to take into account is that, when a person is doing his first approach to the bank to get a credit card, it is not to get the card in that precise moment; what the person usually does is ask which card fits the person’s needs, like traveling a lot or paying in any currency available in the world. Hence, a recommendation system was embedded inside the webhook so that the person can express with natural language his necessities.
The conversation flow was then connected with Google Home so that the process is followed with this device and not with a web page or any other web resource.
Once the suitable credit card has been chosen, the user will be asked if he wants to acquire the recommended card. If not, he will be thanked and Google Home will wait until the user makes a new request; if yes, the user will be asked to give some information, like his name, e-mail, and phone number. Such information will be obtained and sent by Dialog Flow to the webhook. Then, the user will be asked if he wants to know the nearest bank address to his position. In case the user answers yes, the global position (latitude and longitude) will be retrieved from Google and the Google maps Service will be used to look for the nearest bank and it will be sent to the webhook as well.
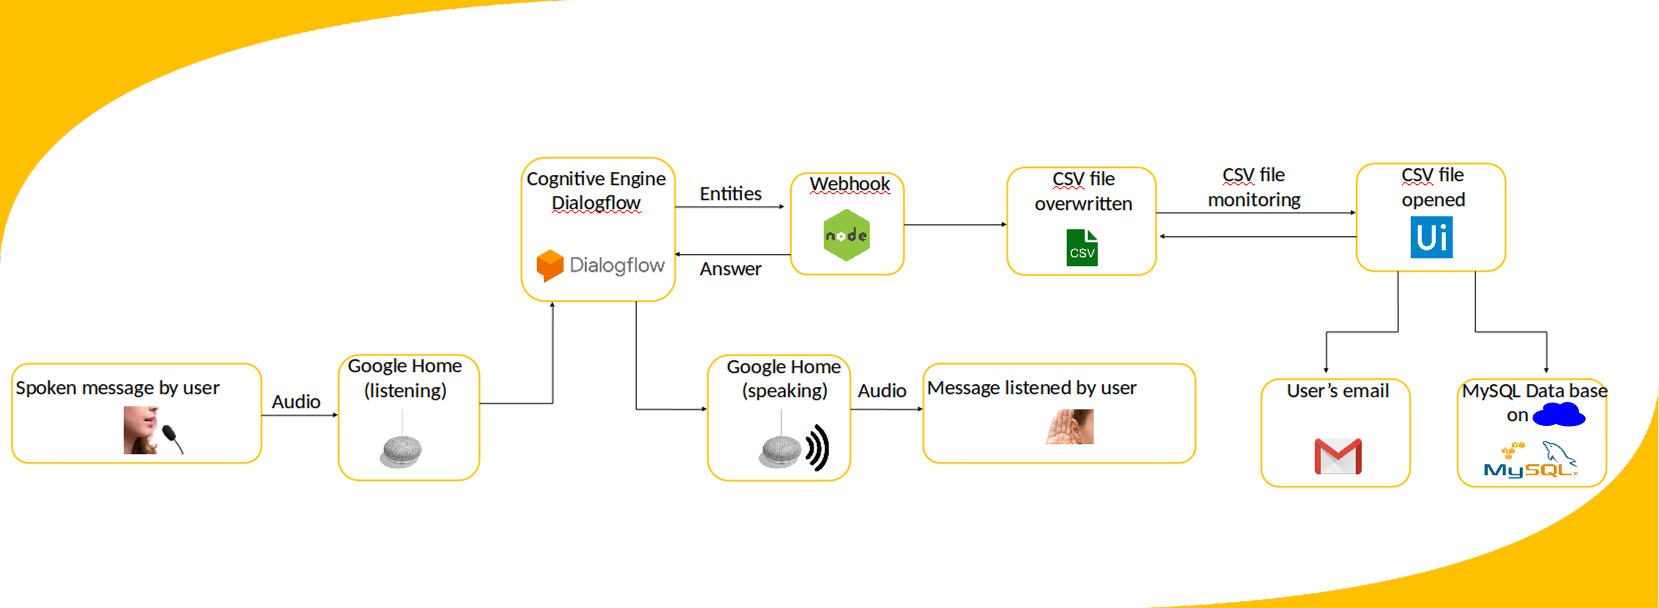
After this, the webhook will write a CSV file with the name, phone, email, nearest bank address, and a card request ID. This CSV file has a specific name because UiPath is monitoring this file and, once the file is overwritten, will launch an activity that will read the recently overwritten CSV file to get the information in it. Once the data is acquired, a mail will be sent to the user’s e-mail containing the name of the user, their phone, e-mail, nearest bank address, and the card request ID. Later, UiPath will connect to a MySQL database via the cloud and add a new element containing three parameters: the user’s name, phone, e-mail, and card request ID.
The next image shows the architecture of the solution presented here.
 Implementation
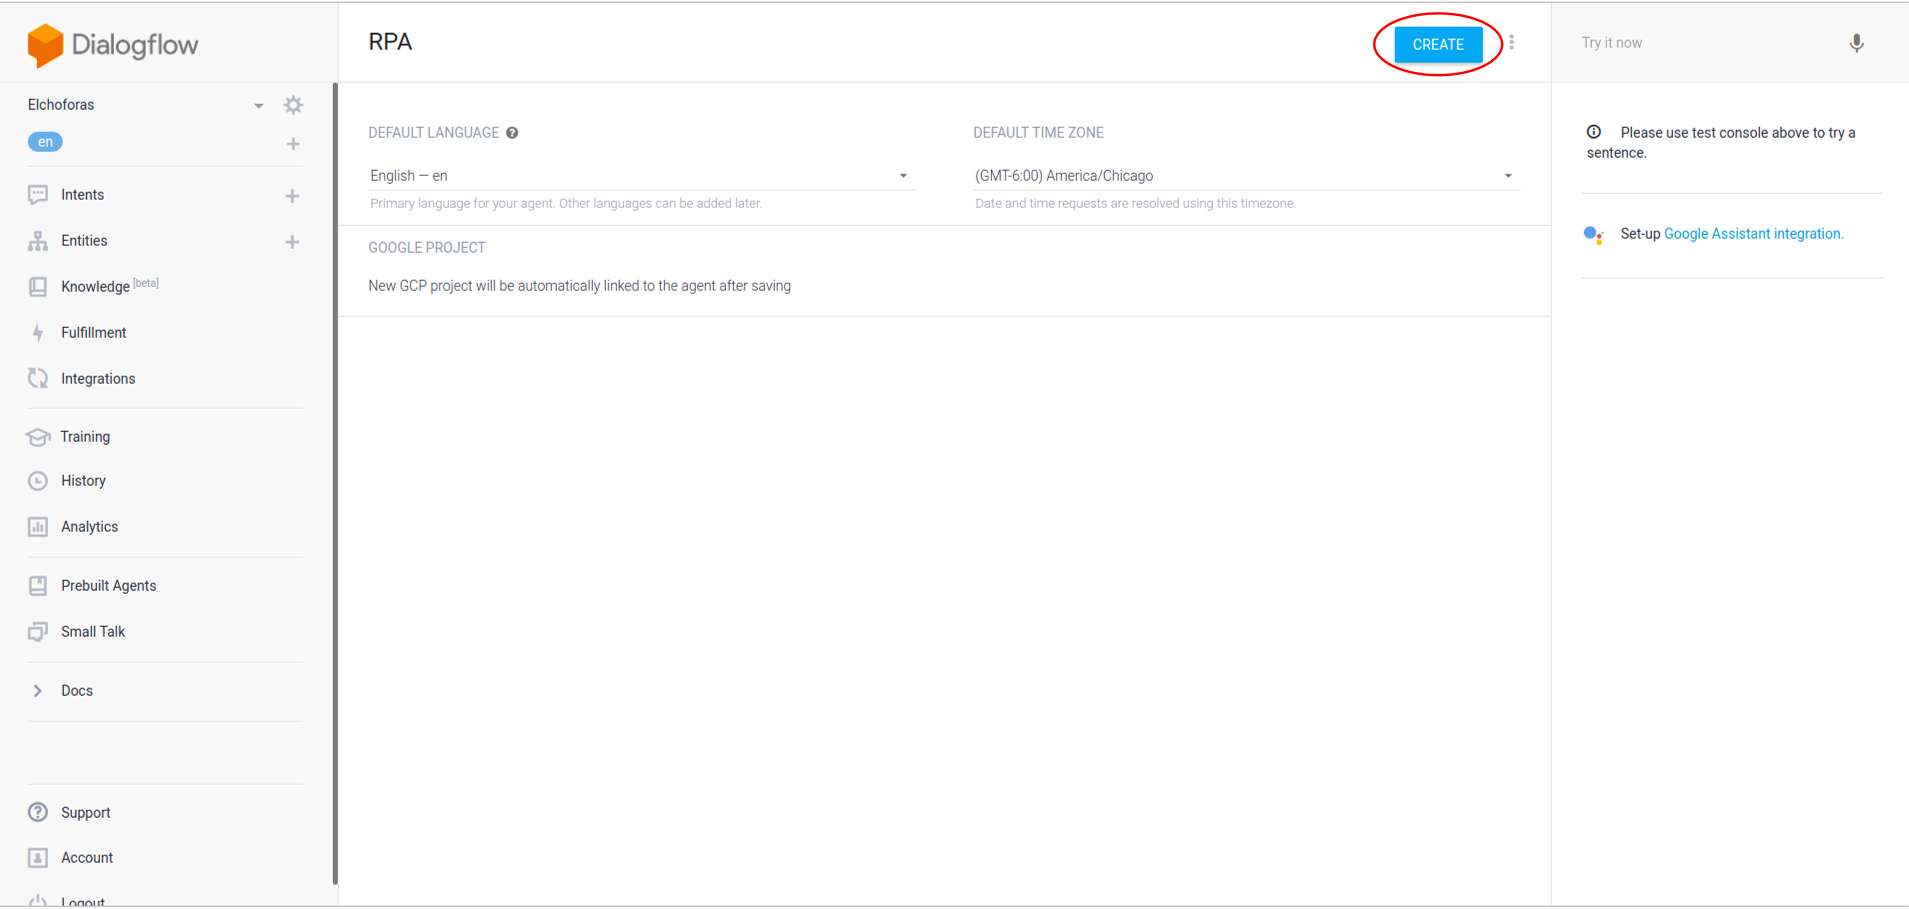
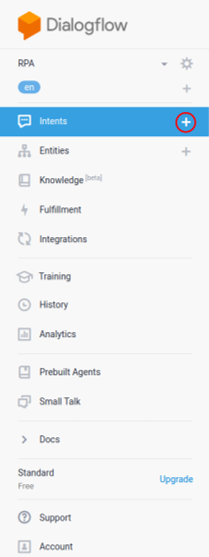
First, let us create a new Agent in Dialogflow. Go to the left column and click on the arrow to open the menu. Next, click on “Create new agent,” as shown in the image.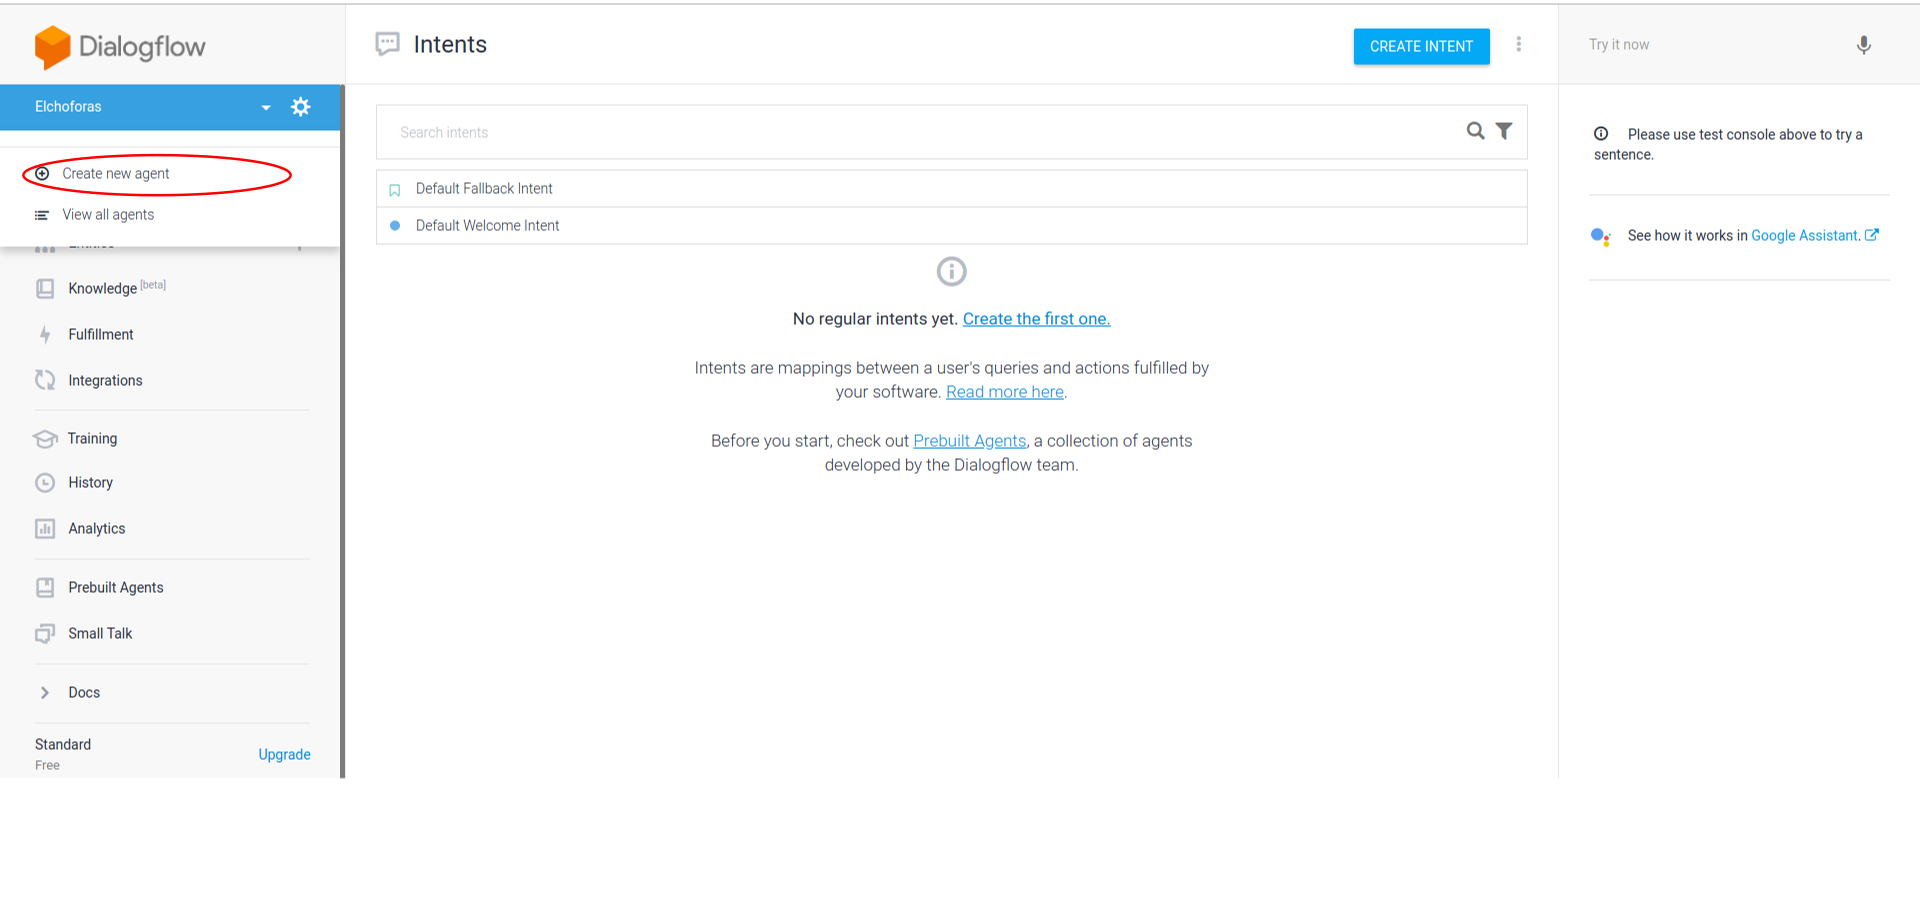 Then, name your agent as you wish; we named it RPA. Click on the Create button.
After you click on the Create button, it will turn into a “working” charging bar. Once it is done, you will be shown the list of intents you have and, since you have just created it, it will only show you the default ones.
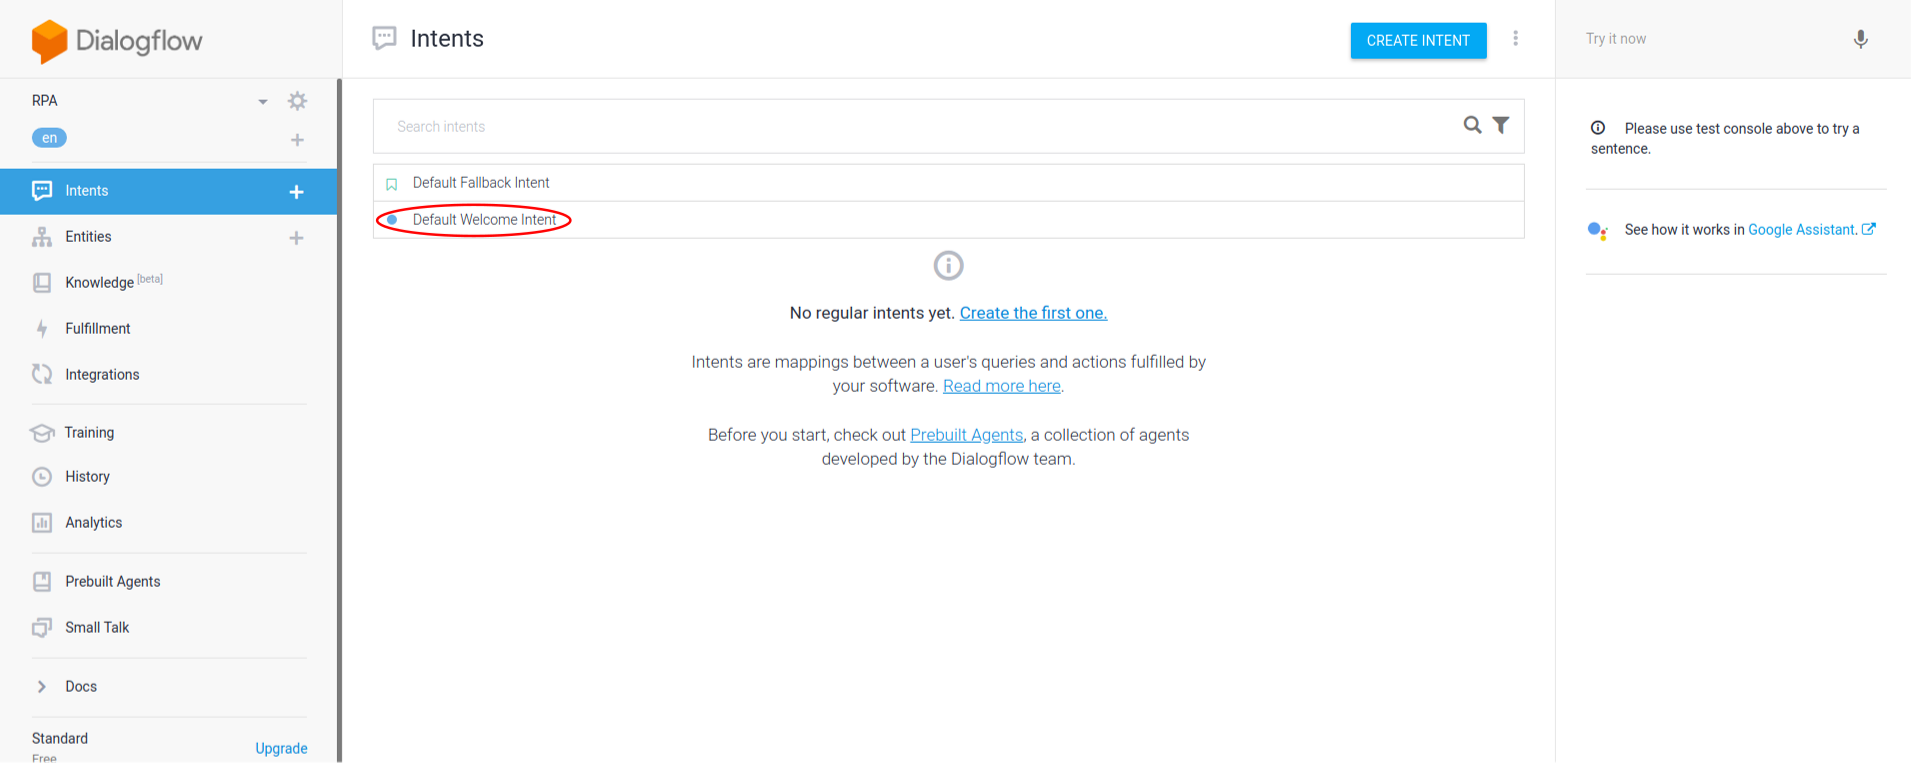
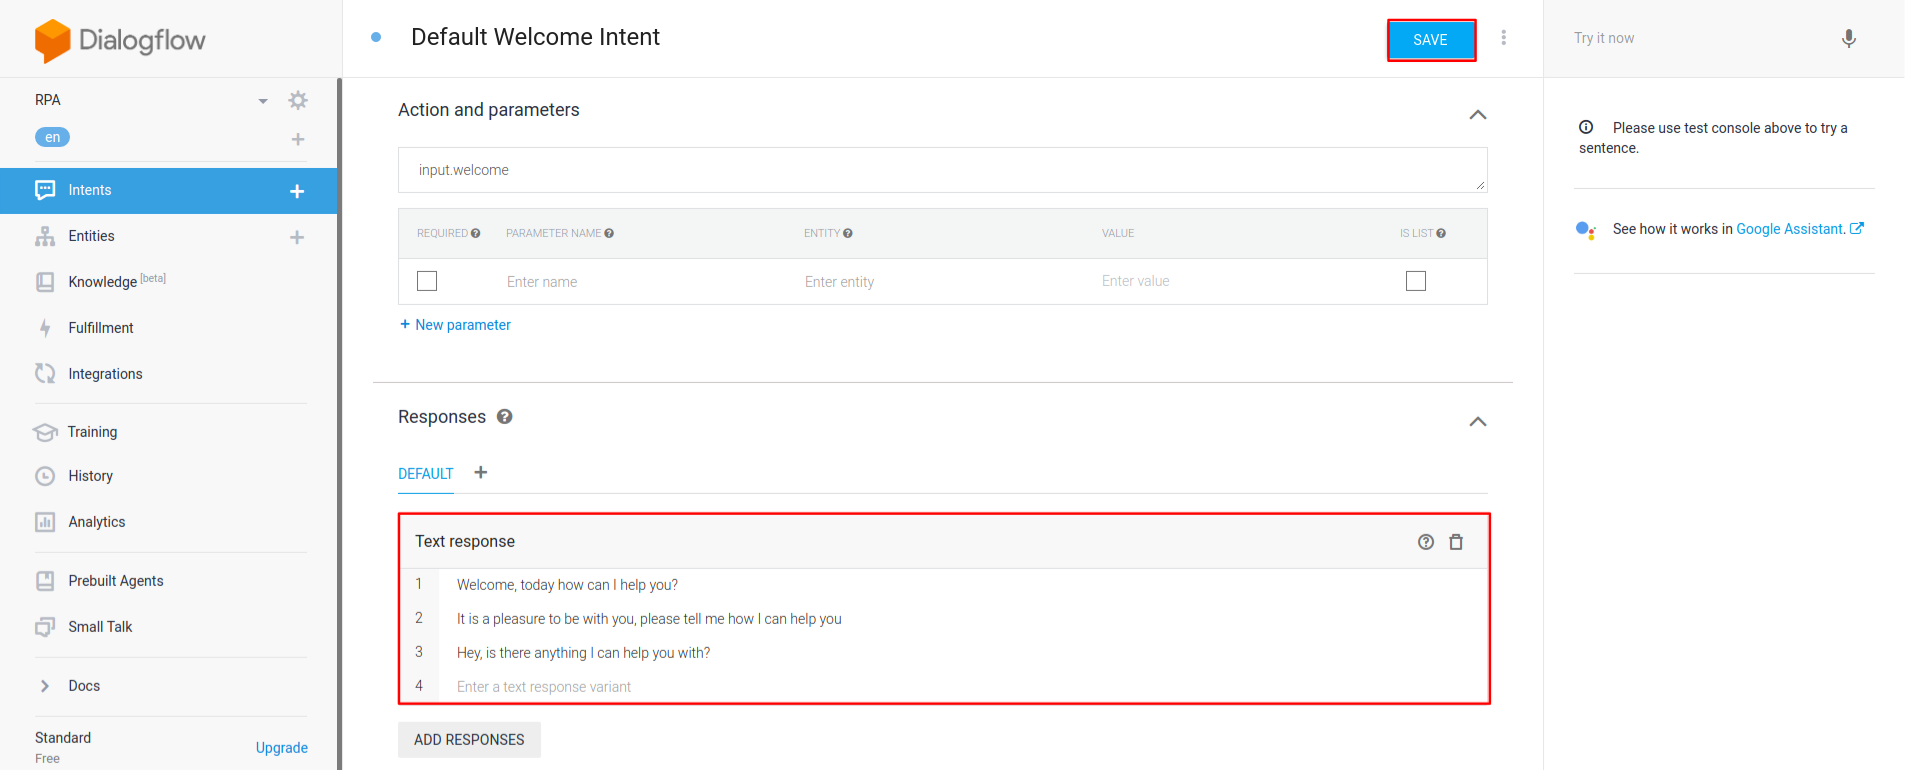
Click now in the “Default Welcome intent,” and inside it, you can add the message your agent will say to your customer. After you are done, click Save.
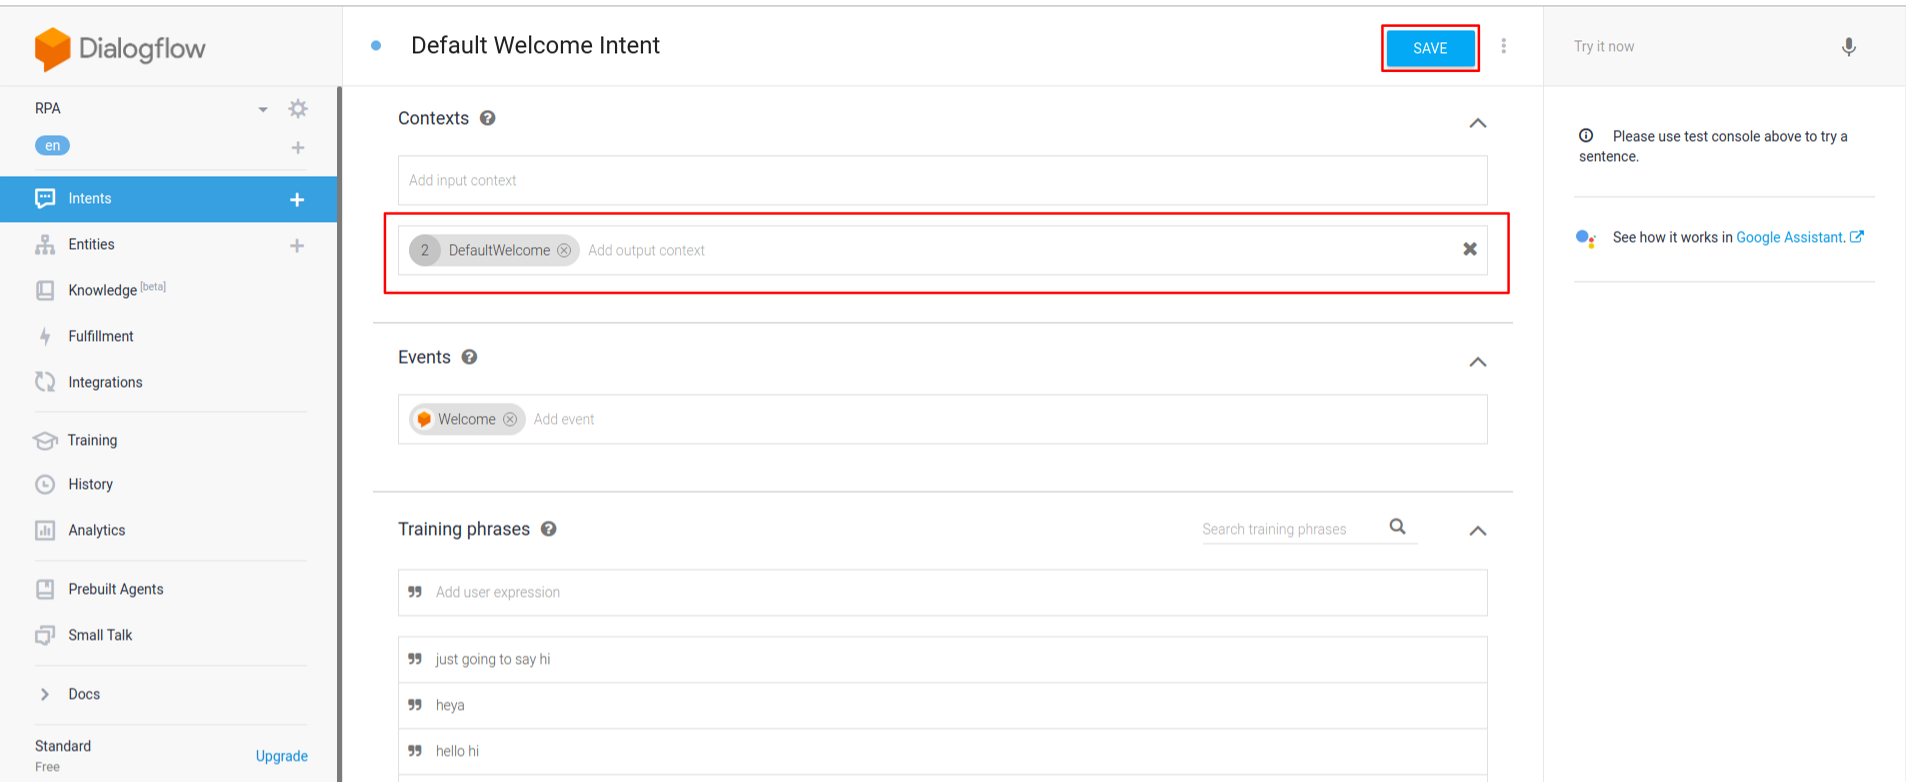
Since we are building a pretty straightforward dialog, we would expect (for this example) that the customer will say “I want to acquire a credit card please.” So, let us create a new intent that will help us out. Something to take into account is that the output context of your newly created Default Welcome Intent has to match the new intent we are creating. For this, we name the output context DefaultWelcome and we click the Save button again.
Now, it is time to create the intent we talked about. Create a new intent by clicking on the plus sign next to the Intent text in the left side menu.
Now, insert the Input context as DefaultWelcome, the output context as CreditCardRequest, and add some training phrases so that your agent can detect when the customer is saying something related to getting a credit card.
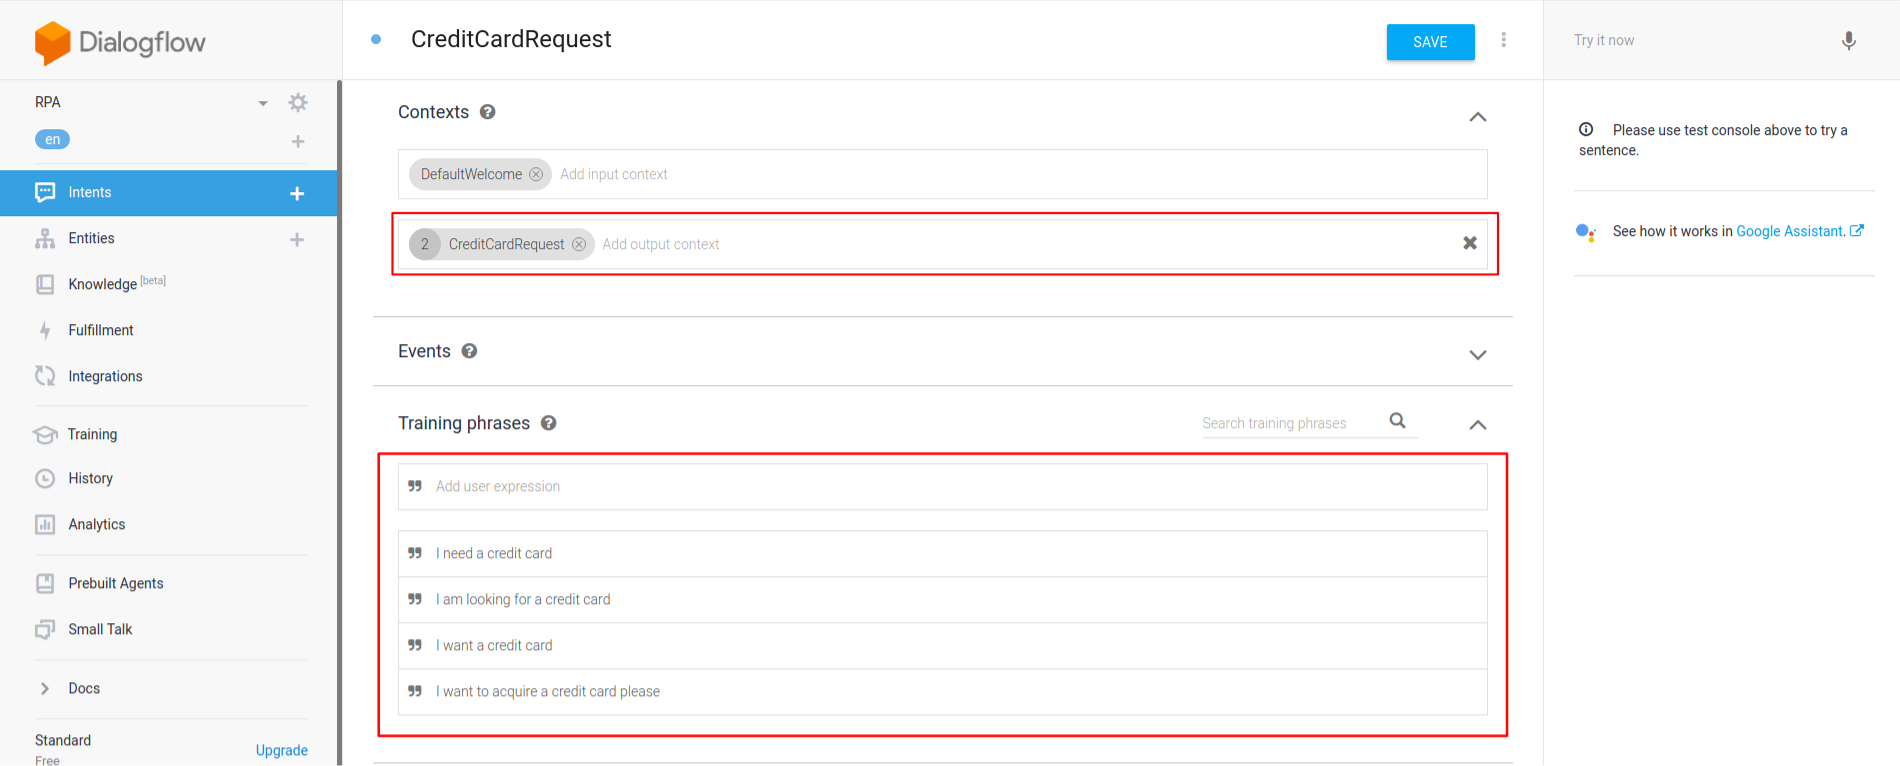
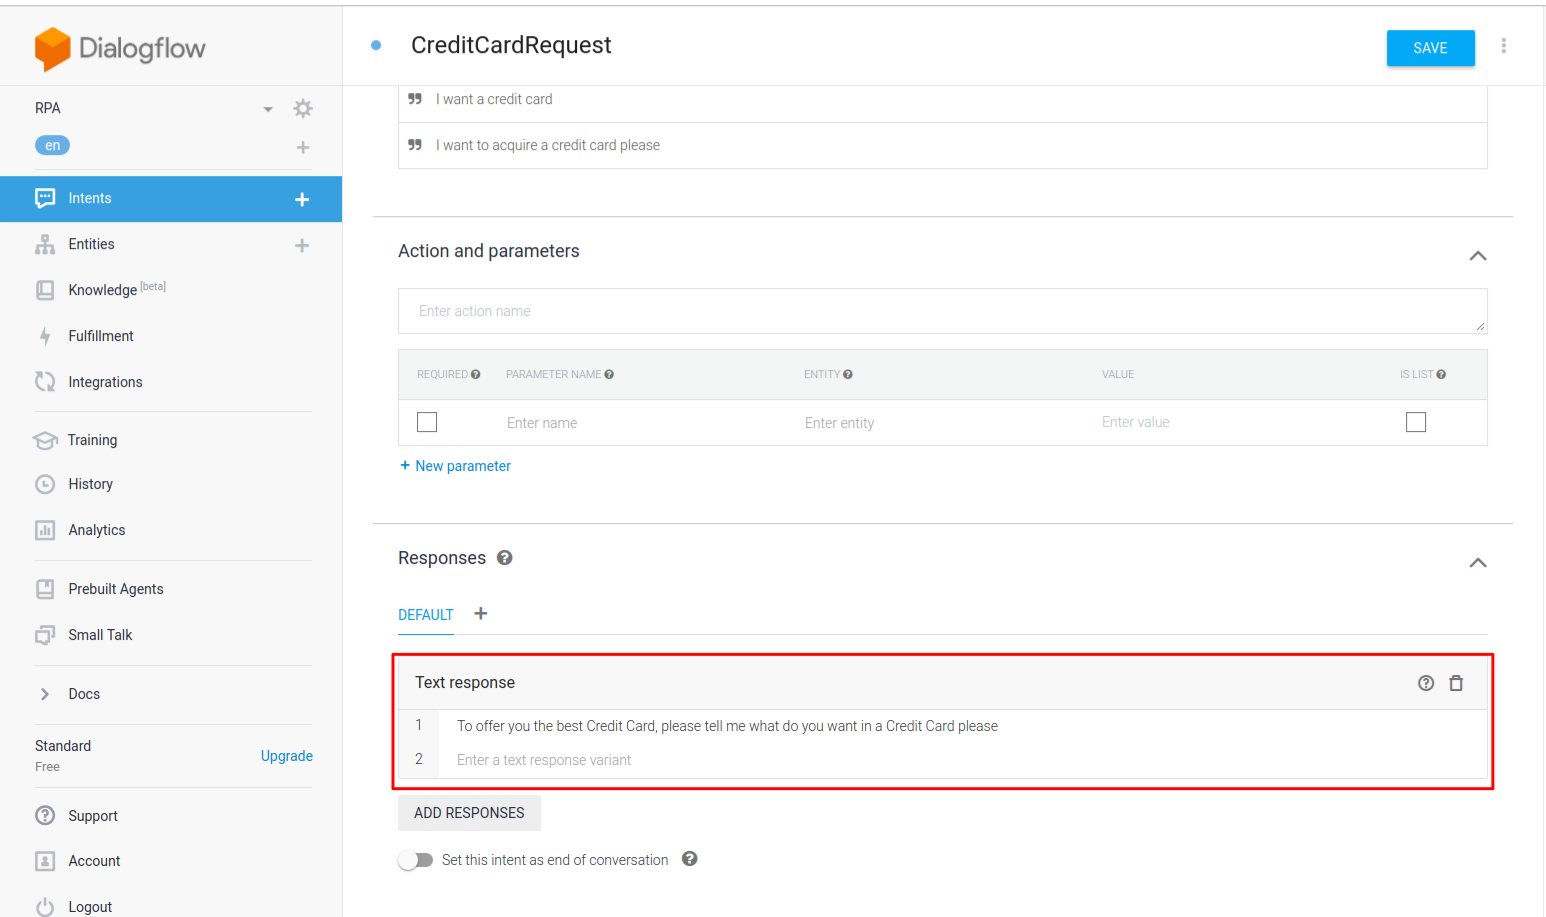
After that, we add some responses to this interaction. Let us recall that the persons who are acquiring a credit card are mostly wanting to be given the one that better fits them by telling the uses they will give to the card, so it is important that we make a question stating this.
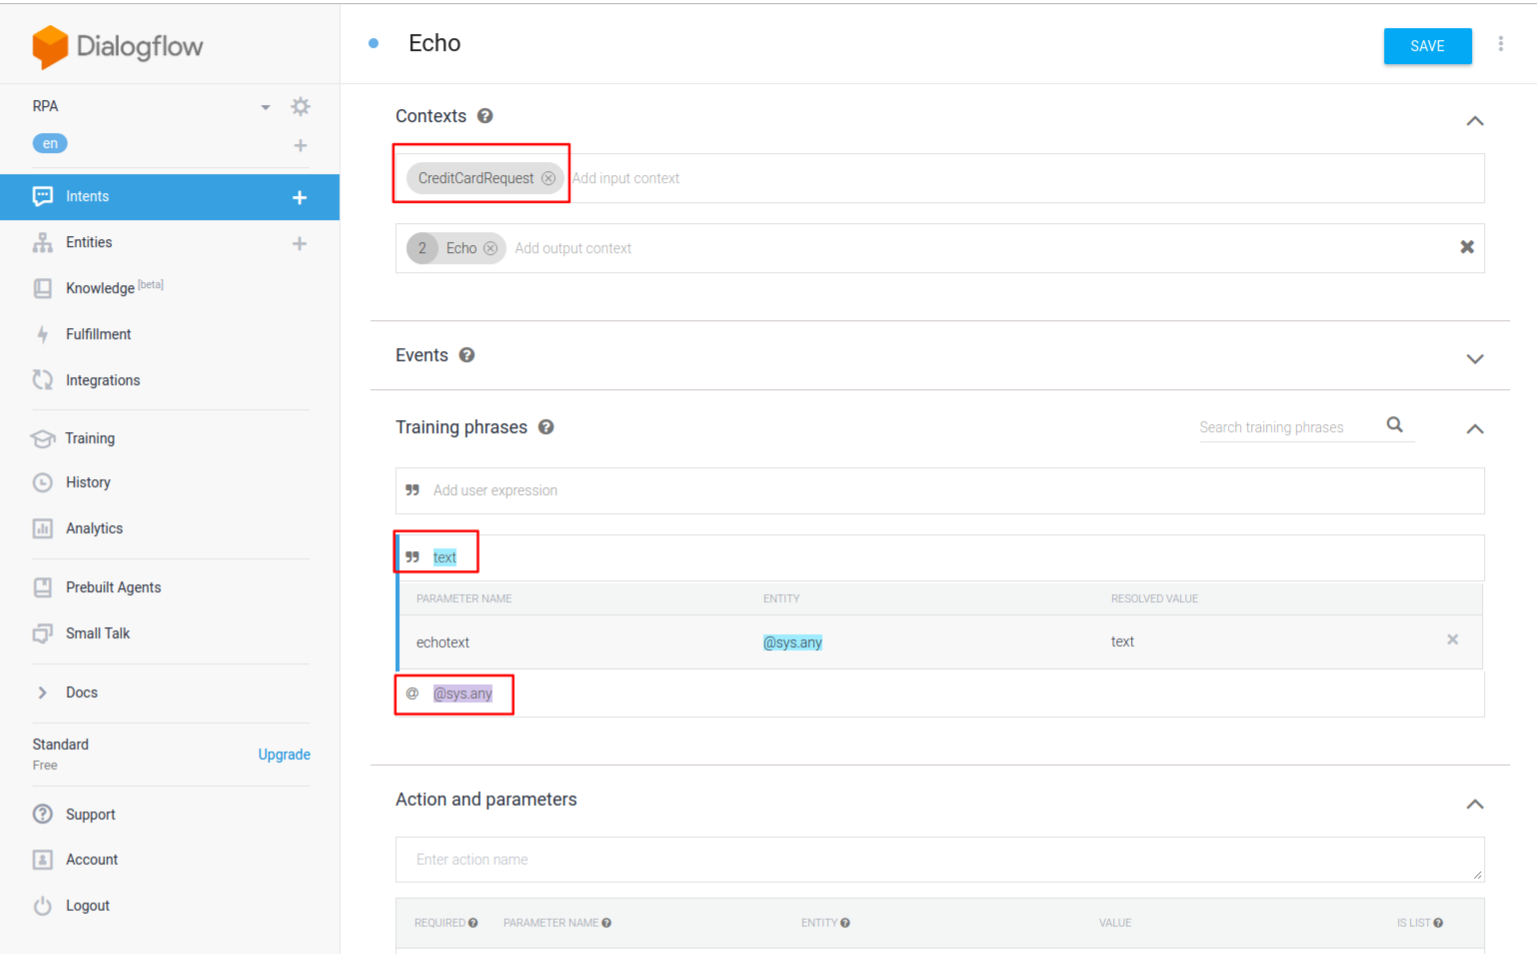
After this, we need to create a new intent where we will gather the card information that will be sent to the webhook and will return a suitable card. We are calling this new intent Echo. Since we are going to get anything the user says, we need to use a prebuilt entity called @sys.any, which will save the utterance entered by the user inside a variable. We also put the input context as CreditCardRequest and the output context as Echo. Inside the training phrases, we first put it in template mode and write @sys.any and press enter to add it as an example. Next, we put the training phrase in example mode and write only text, and it will give us the option to mark it as a @sys.any entity.
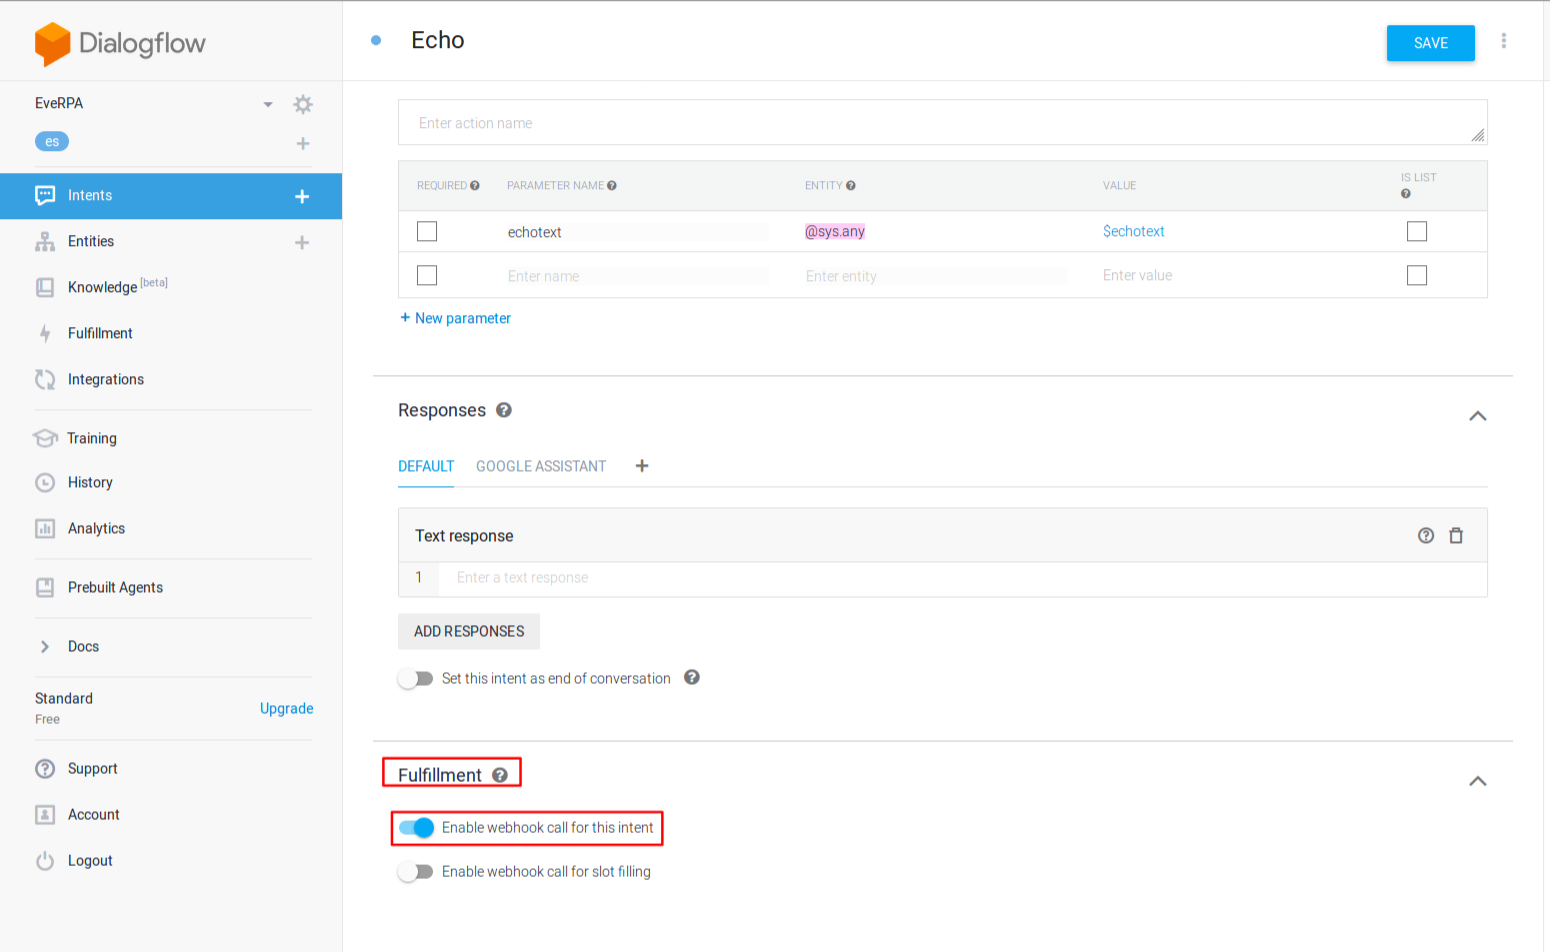
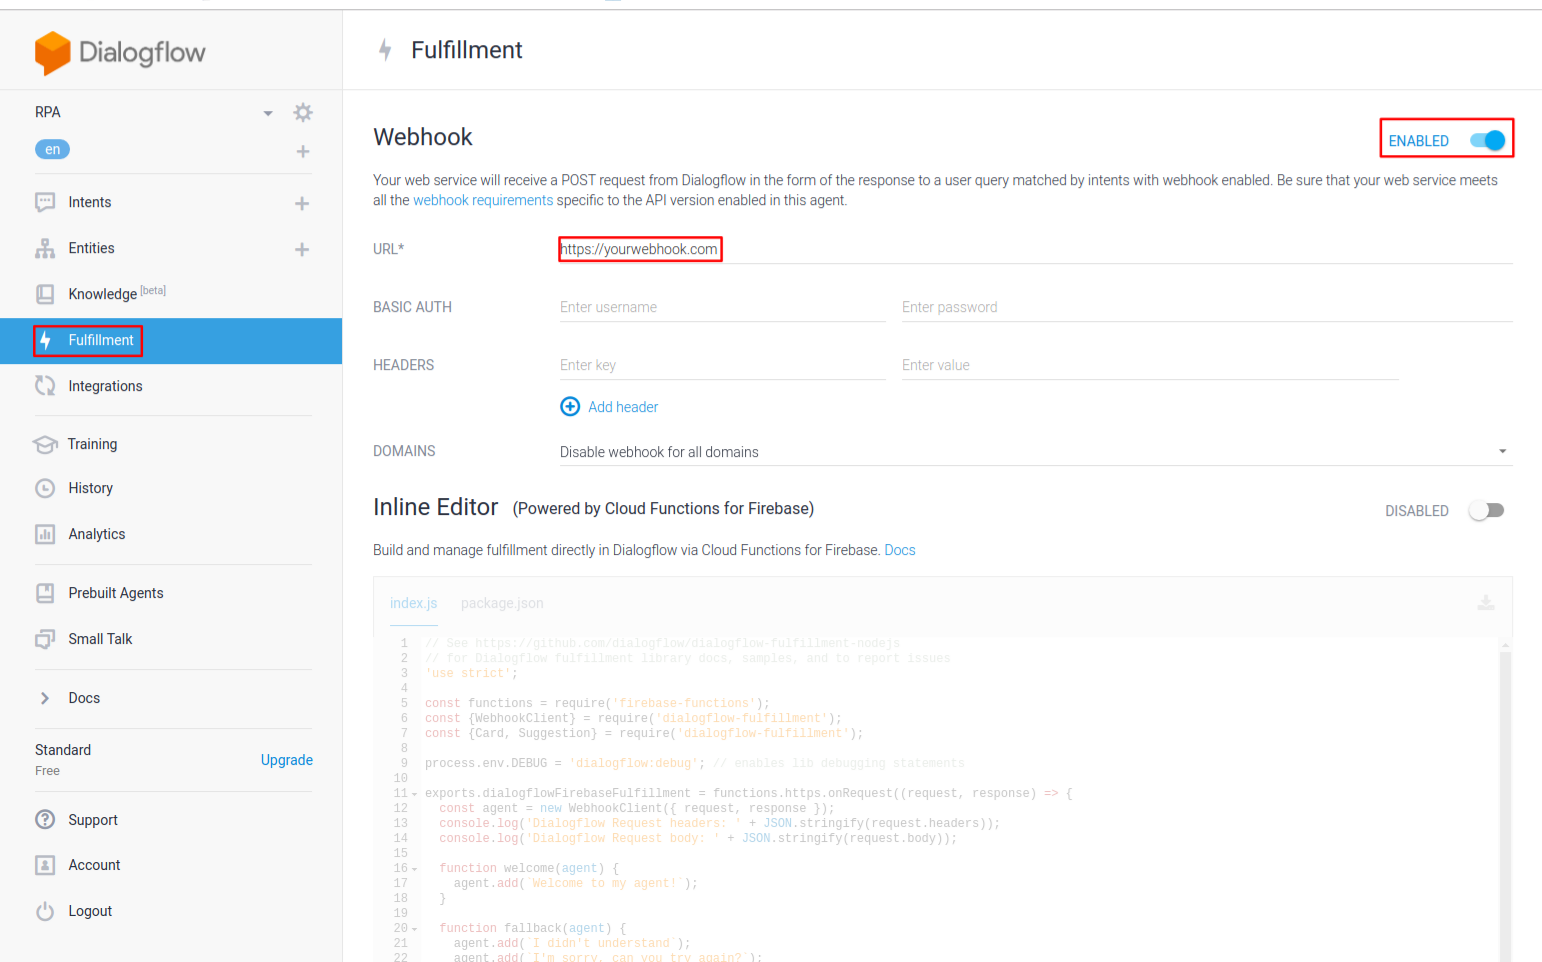
Now, we have to scroll down until we reach the Fulfillment section and we click on the toggle button (turns to blue) on the Enable webhook call for this intent.
Once this is done, click on the left menu on the Fulfillment option. Then, click on the toggle button on the same height as the Webhook (turns into blue) and add the URL of your webhook
Now that a webhook is set up, we need to get that answer and make use of an external service. To do so, we will need to have a server and start a Node JS with a public IP to call it.
First things first, add this code into a JSON file and execute npm install nameofyourfile.json inside the folder where your NodeJS will be running.
{
  "name": "webhook-echo-sample",
  "version": "1.0.0",
  "description": "Webhook echo sample",
  "main": "index.js",
  "scripts": {
    "start": "node index.js"
  },
  "author": "Sunil Syal",
  "dependencies": {
    "@google/maps": "",
    "actions-on-google": "^2.2.0",
    "body-parser": "^1.15.0",
    "dialogflow": "^0.1.0",
    "dialogflow-fulfillment": "^0.4.1",
    "express": "^4.13.4",
    "firebase-admin": "^4.2.1",
    "firebase-functions": "^0.5.7",
    "nodemailer": "^4.6.8",
    "request": "",
    "sync-request": ""
  }
}
After this, create a new JavaScript file and add the following code to it:
"use strict";
const express = require("express");
const bodyParser = require("body-parser");
// Dialogflow dependencies ////
const functions = require('firebase-functions');
const {WebhookClient} = require('dialogflow-fulfillment');
const {Card, Suggestion} = require('dialogflow-fulfillment');
const {dialogflow} = require('actions-on-google');
const {Permission} = require('actions-on-google');
const requestNode = require('request');
var nodemailer = require('nodemailer');
var googleMapsClient = require('@google/maps').createClient({
  key: 'yourKey'
});
var sync = require('sync-request');
process.env.DEBUG = 'dialogflow:debug'; // enables lib debugging statements
const restService = express();
var CARD = "";
var BANK = "";
restService.use(
  bodyParser.urlencoded({
    extended: true
  })
);
restService.use(bodyParser.json());
restService.post("/echo/", function(request, response) {
  const agent = new WebhookClient({ request, response });
  const app = dialogflow({debug: true});
  function recommendation(agent){
    let conv = agent.conv();
    //TODO create a recommendation system and return it inside the text, we save the value of the recommended card inside the CARD variable and we prompt the message back to Dialogflow
    CARD = yourRecommendationFunctionWhichReturnsTheFittingCard;
    conv.ask("Thanks for your answers, the ideal card for you is:  \""+ CARD +"\". ¿Would you like to acquire it?");
    agent.add(conv);
  }
  let intentMap = new Map();
  intentMap.set('Echo', recommendation);
});
restService.listen(process.env.PORT || 5201, function() {
  console.log("Server up and listening");
});
Now, as you may see, we created a recommendation function where our card recommendation system was developed. We encourage you to develop it based on this link (or you can fix an answer as a walkaround).
Also, please notice how we are mapping the detected intent (Echo) to a function inside our Webhook (recommendation).
Notice that the answer Dialogflow will prompt is “Thanks for your answers, the ideal card for you is… …¿Would you like to acquire it?” Here, we may add two follow-up intents back in Dialogflow — one if the answer is no, and another if the answer is yes.
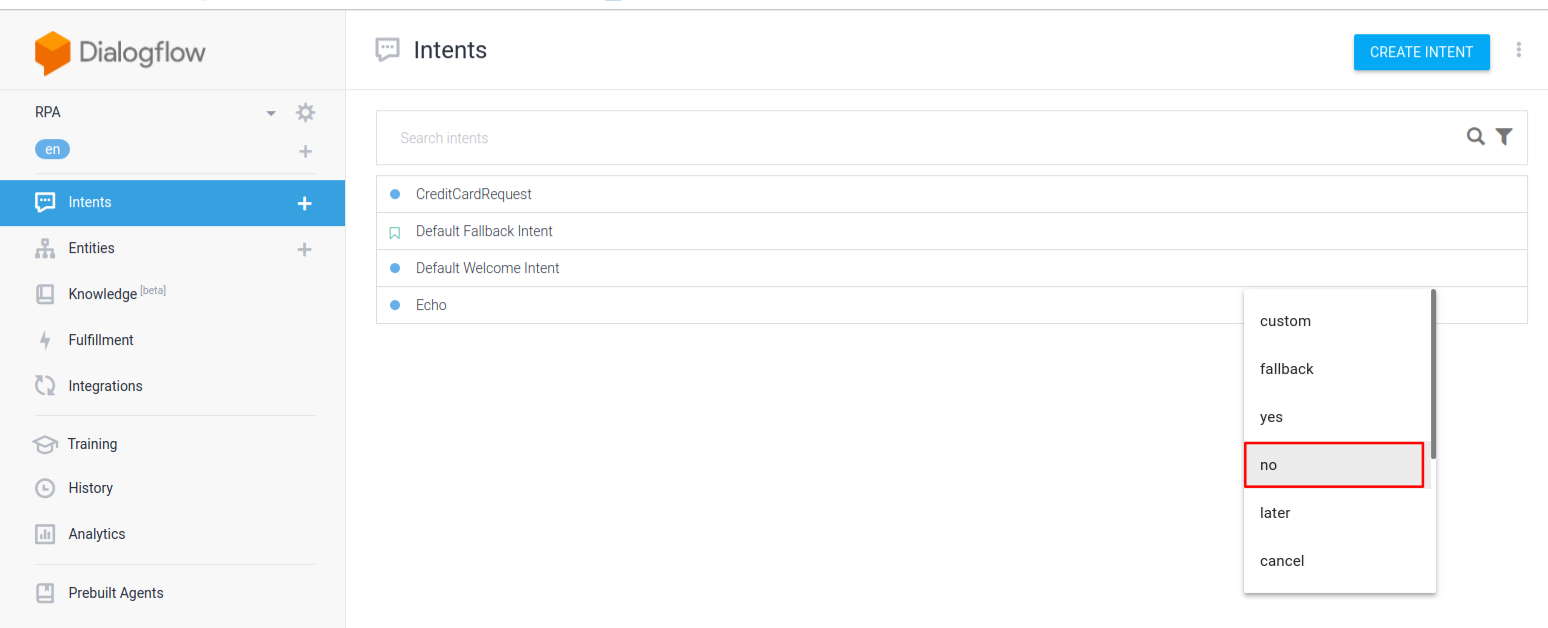
First, let us add the Echo-no follow up. Hover the mouse over the Echo intent and click on the Add follow-up intent:

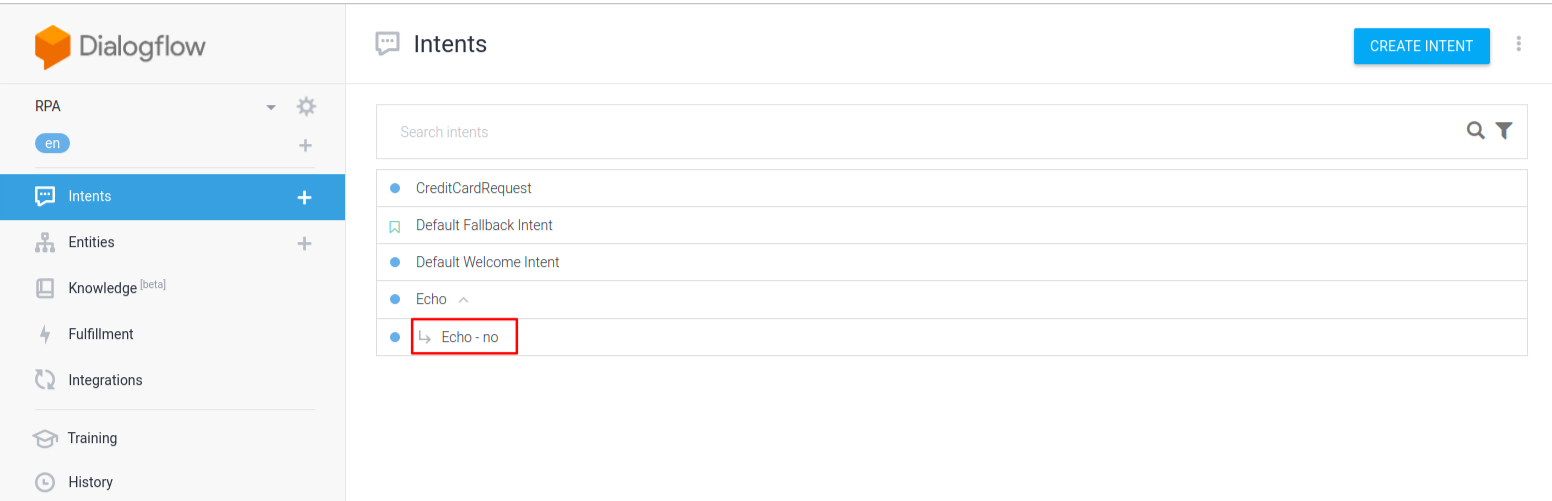
And then, select the option no; this will add a new intent named Echo – no.
And then, click on it to start editing it.
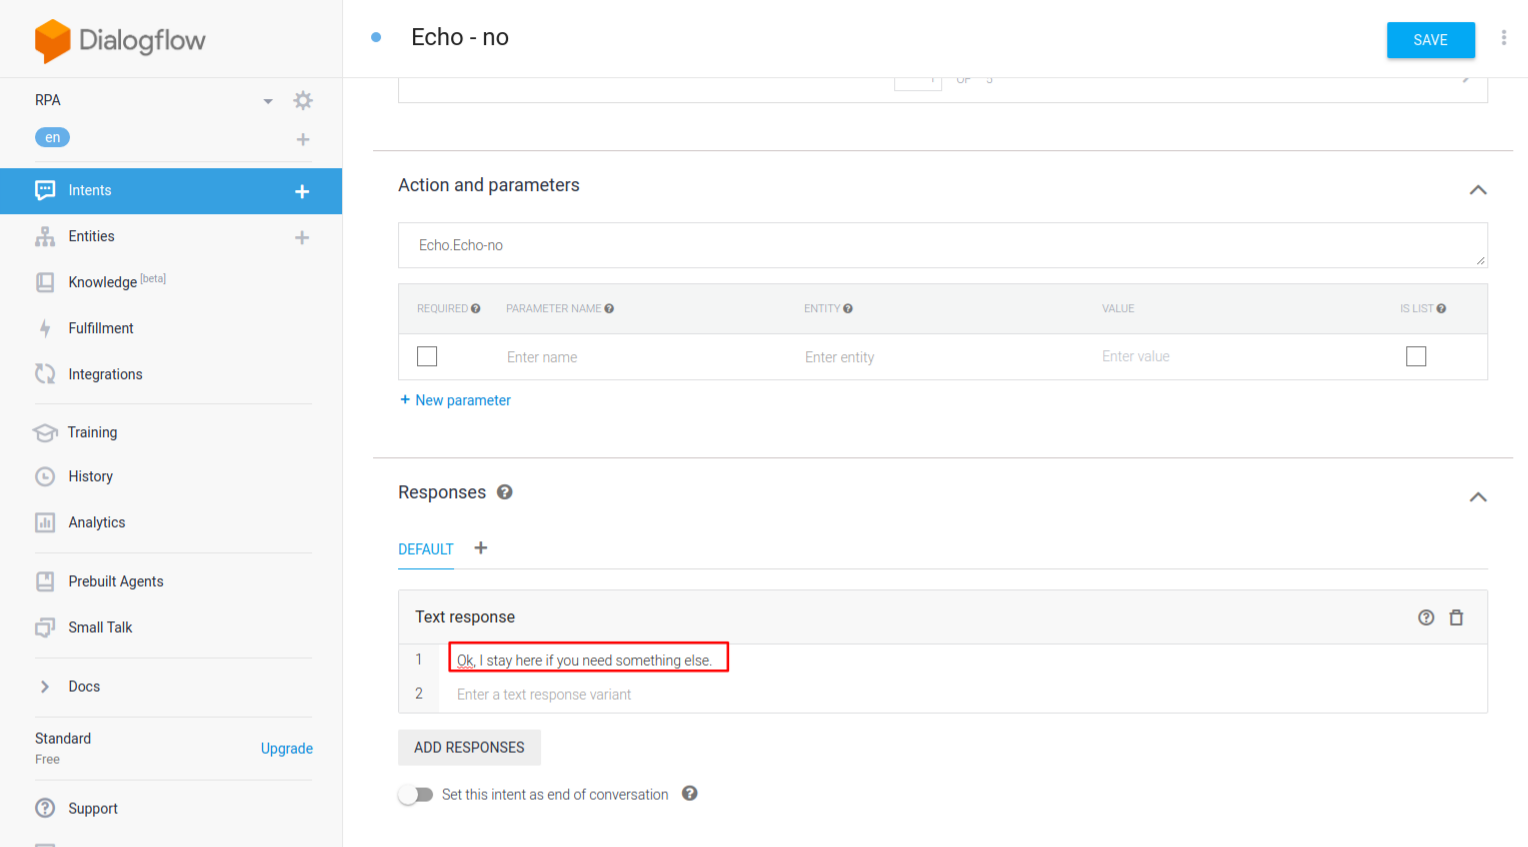
In fact, you shall notice that it is prefilled with some examples. The only thing we need to do is add an answer to interact with the user.
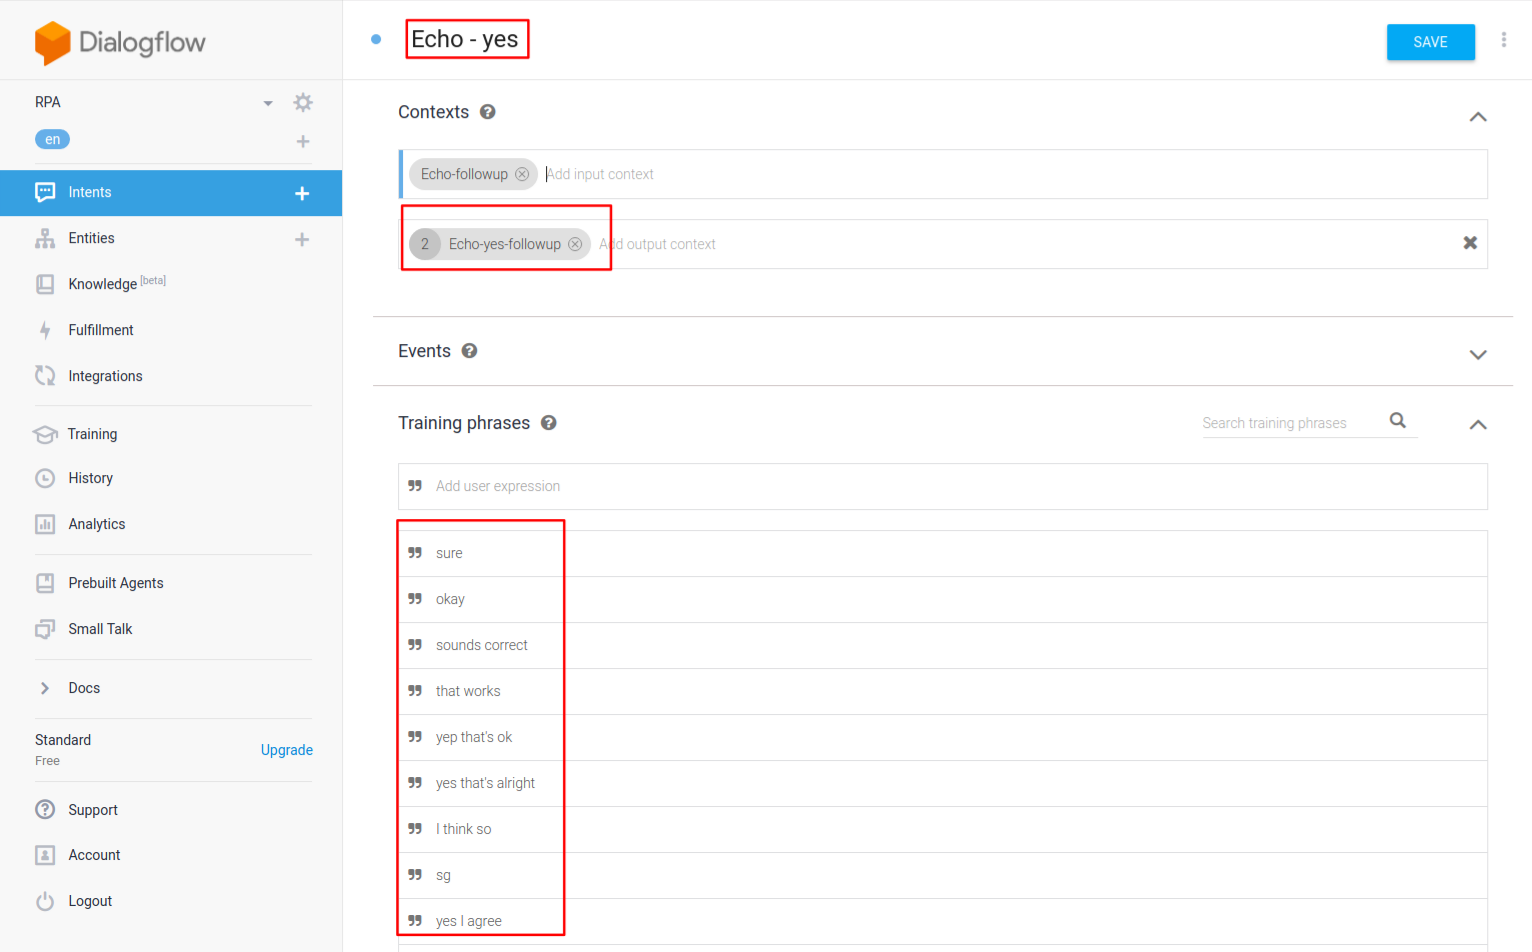
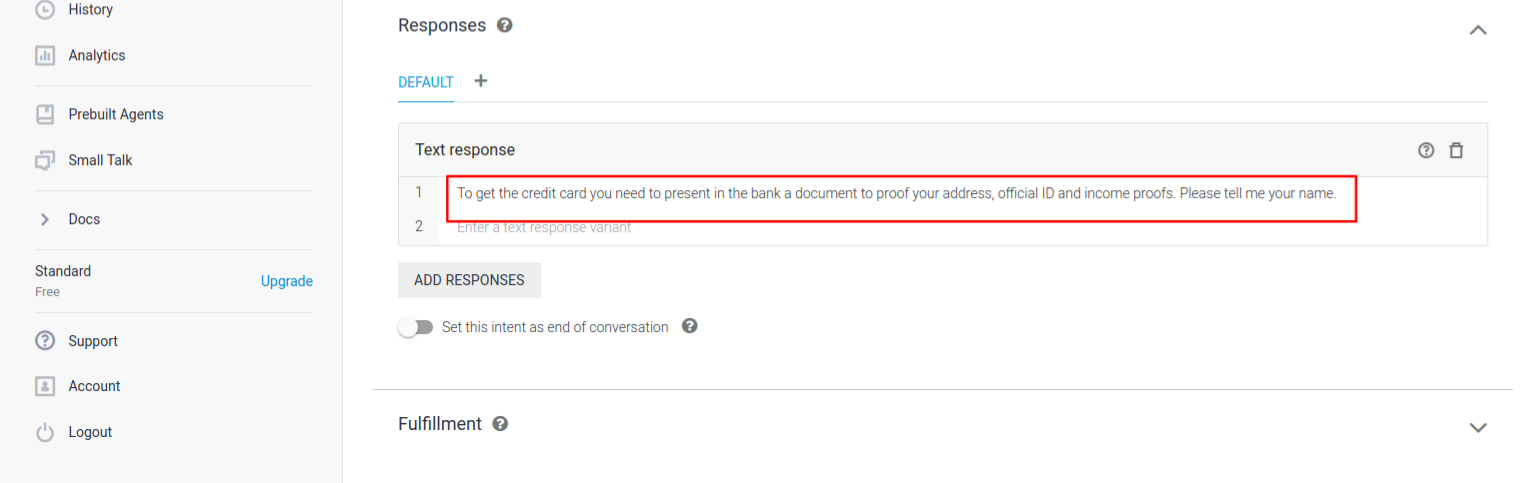
Now, let us add the intent to catch if the user wants indeed to acquire the card. We follow the same steps as above. We will hover over the Echo intent, click on the Add follow-up intent, and then click on the yes option. This creates an intent called Echo – yes, and as the one intent before, this one will be pre-filled as well. Since our customer wants to acquire the offered credit card, we can give him the necessary documents to bring to the bank and ask him some information about himself, like his name, phone number, etc.
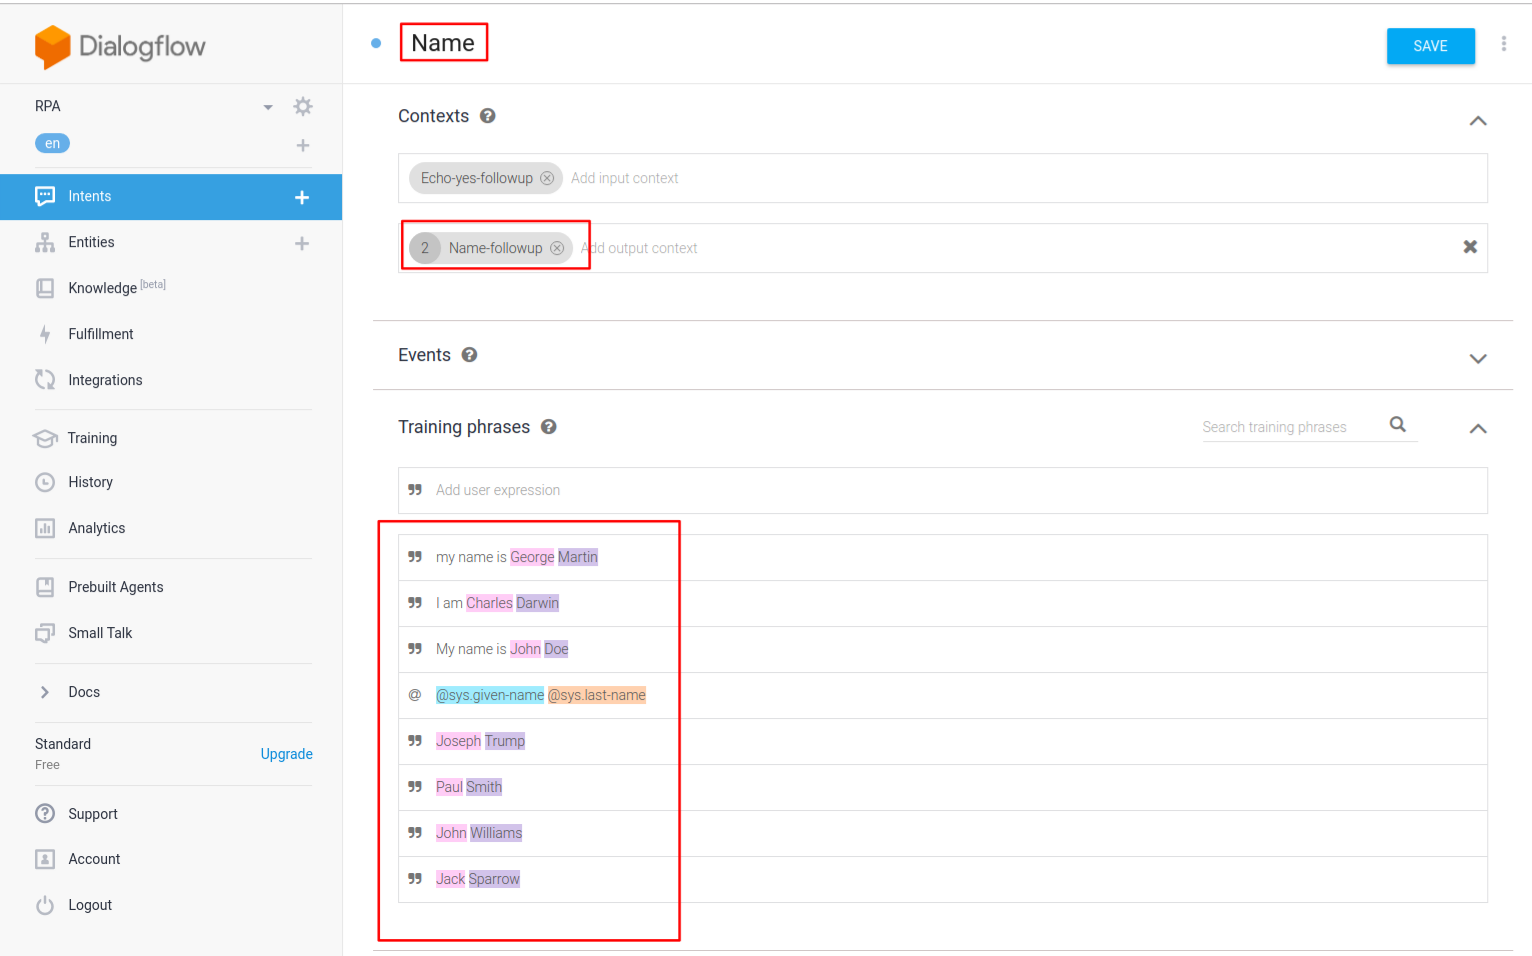
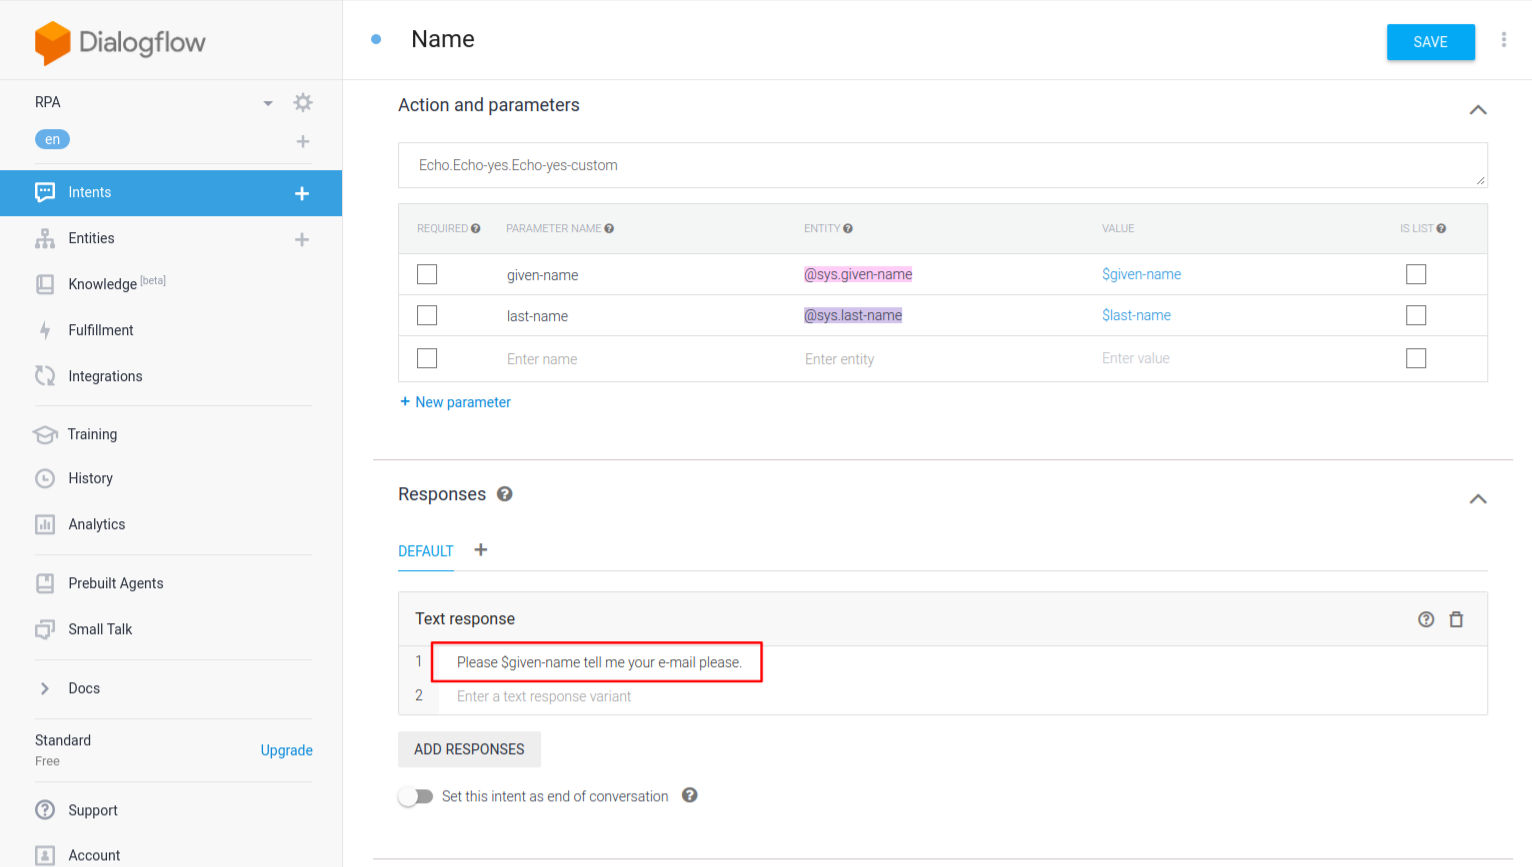
Now, let us create a new intent to catch the name of the user. We create it as we did with the follow-up intents showed before, but this time, instead of being a yes or no type, it will be a none type. We rename it as Name. We put Name-followup as the output context and we add some examples that we would expect from our costumers.
Once we have caught the name, we now ask the user to give us his e-mail by giving an answer like the one below.
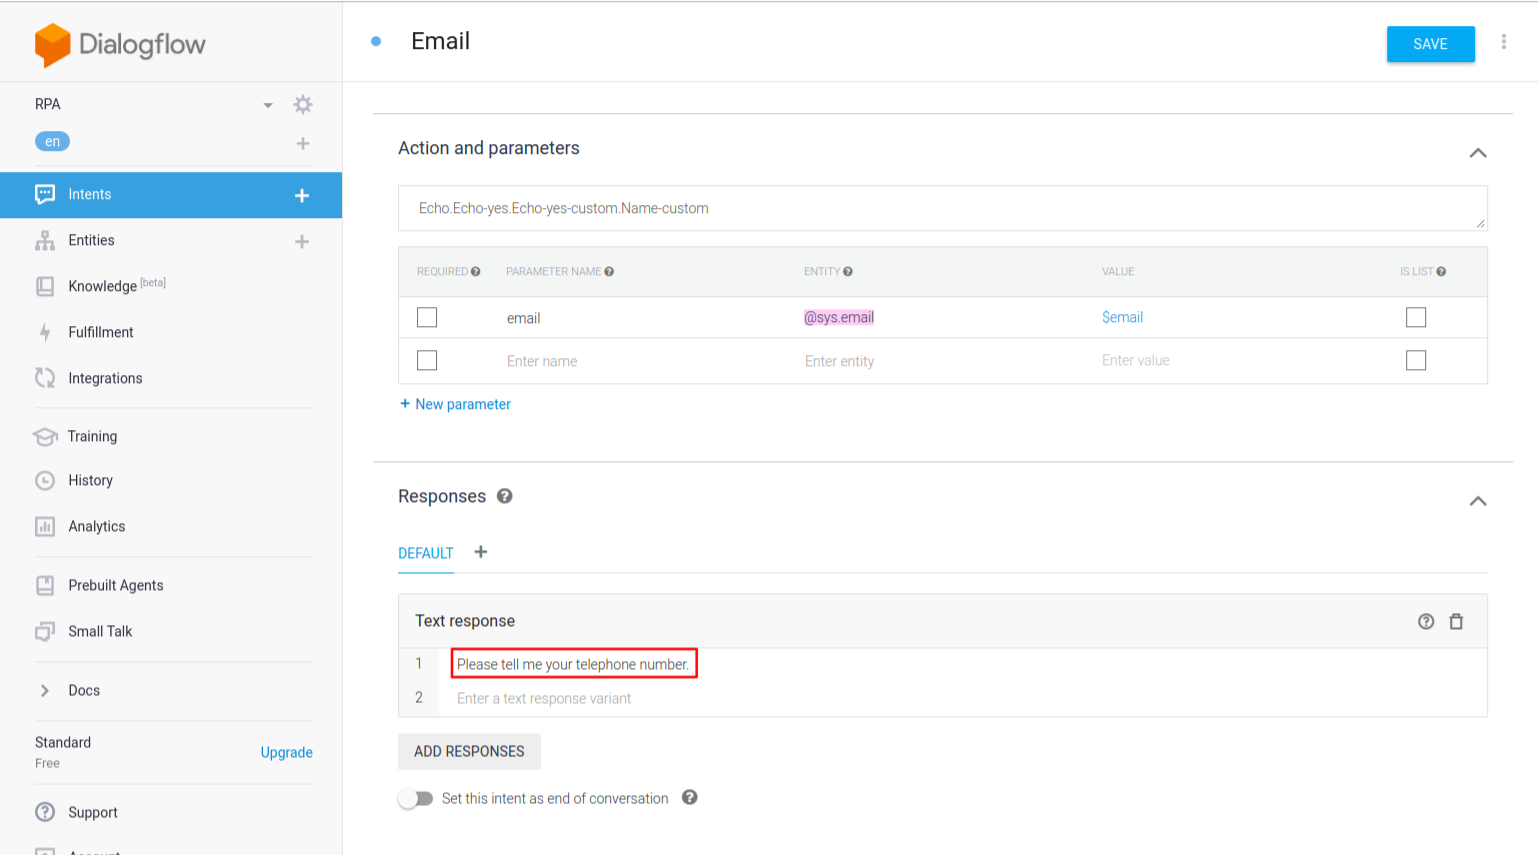
Now, let us create a new custom follow-up intent to catch the email address. We name this intent email and add some examples the user would give to share his email address. There is a prebuilt entity called @sys.email, which will help us to identify when the user mentions his email.
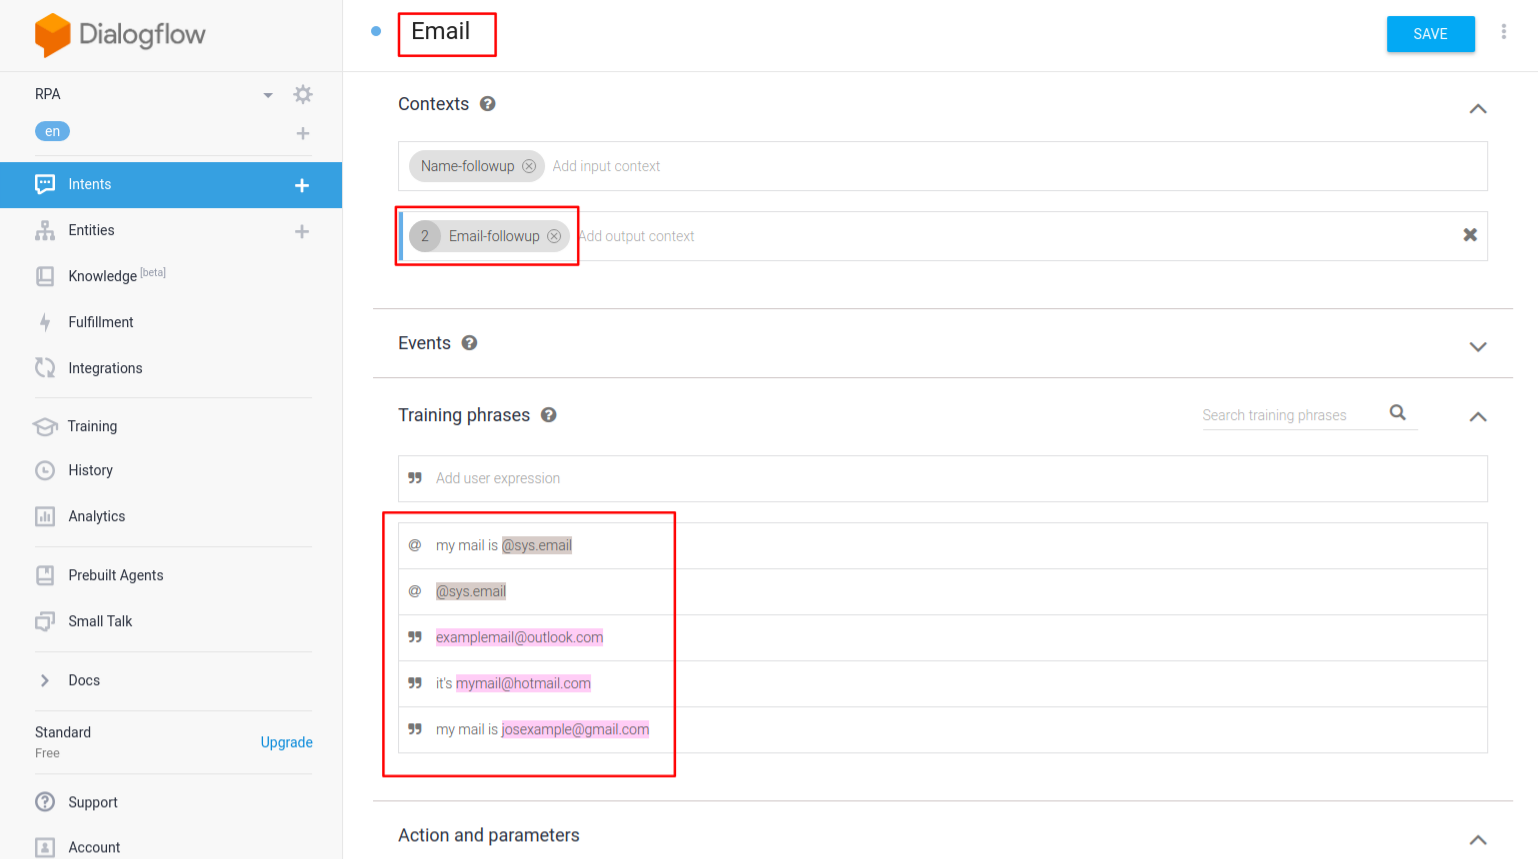
After the email address is given, we ask for his telephone number.
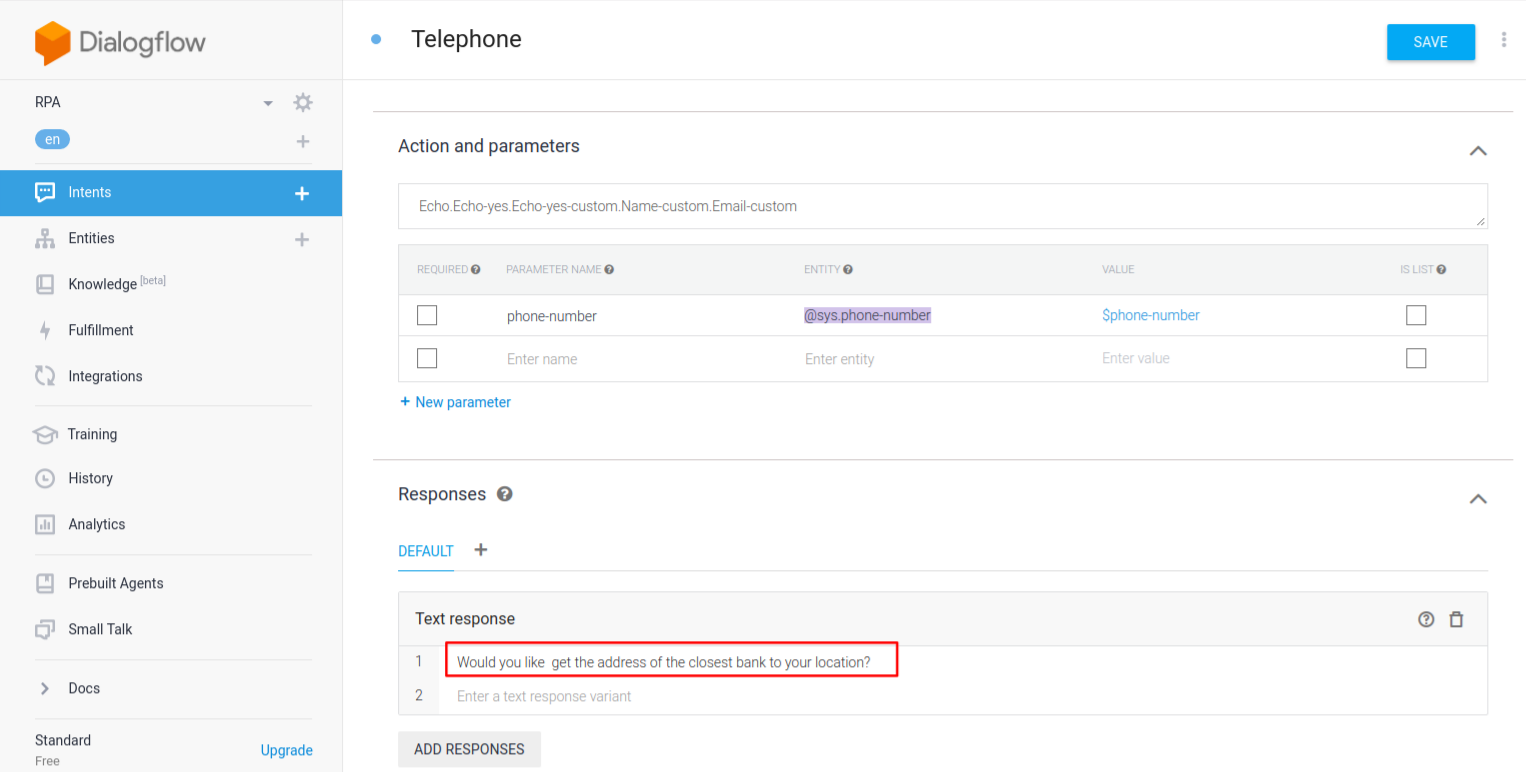
To catch the telephone number, we create another custom follow-up intent called Phone. We add an output context called Telephone-followup and make use of a prebuilt entity called @sys.phone-number to detect when the user shares his telephone number.
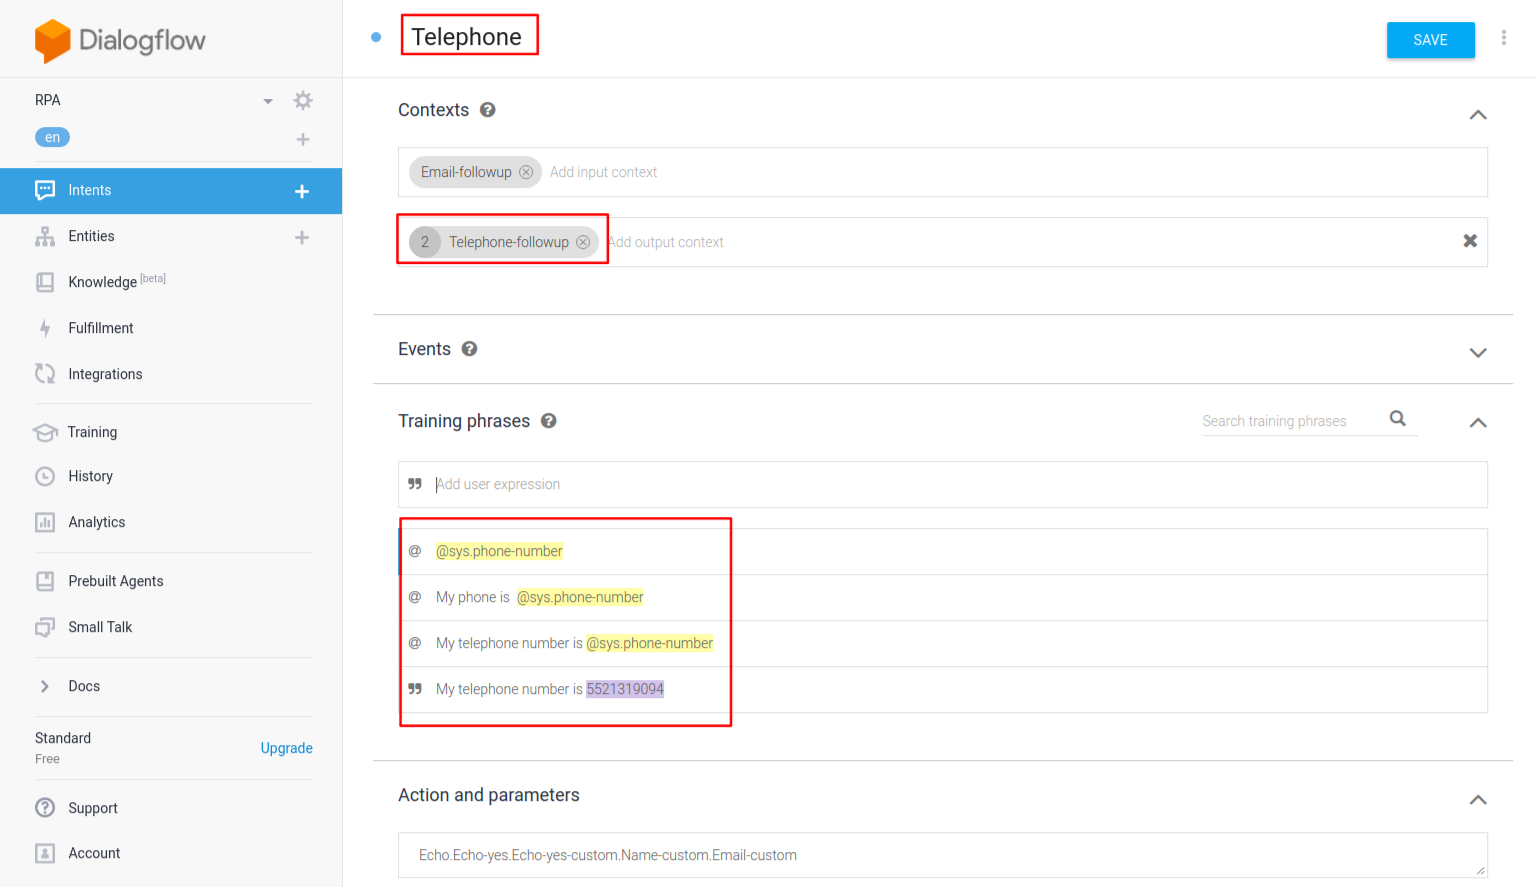
After we caught the user information, we ask the user if he would like to know the closest bank address.
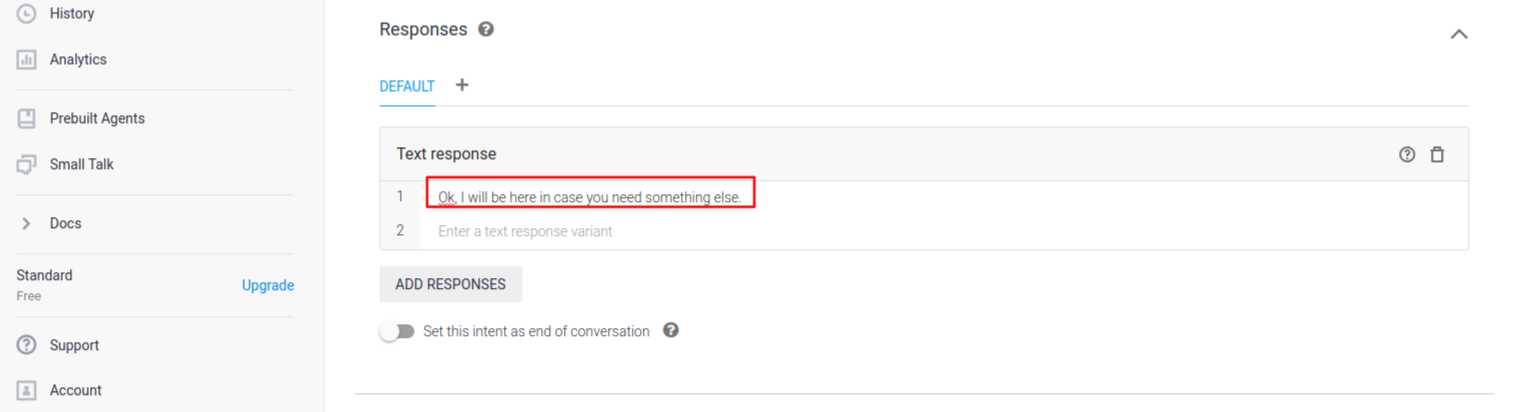
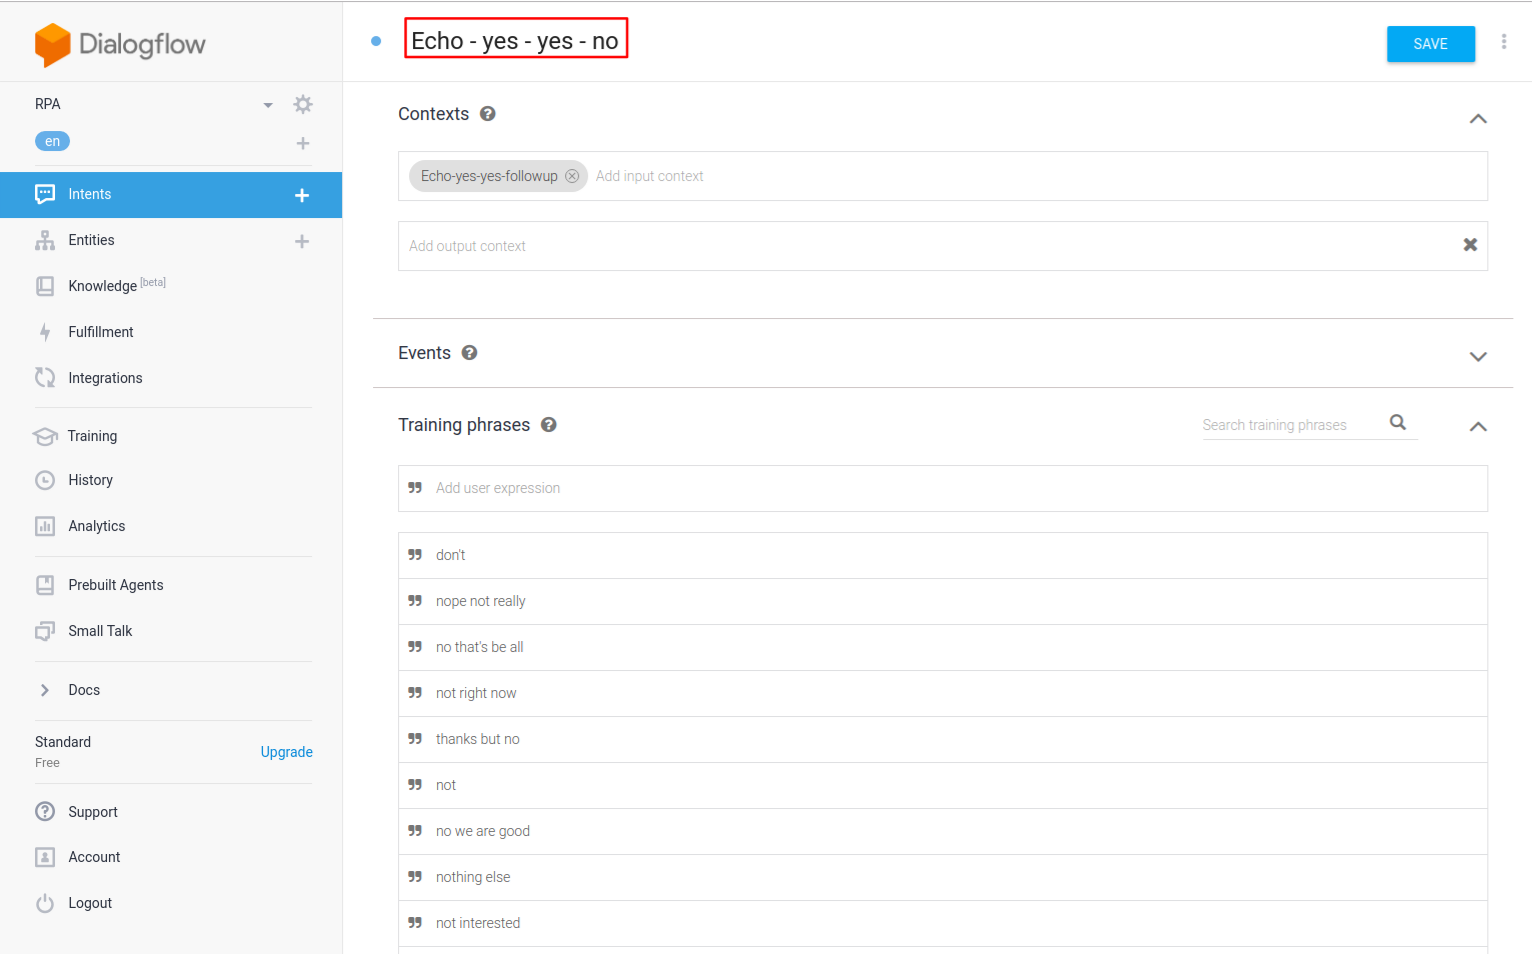
Now, we have to create two new followup-intents to the Telephone intent — one when the user answers no and the other one when the user answers yes. Let us start with the no follow-up intent. We are calling this intent Echo – yes – no.
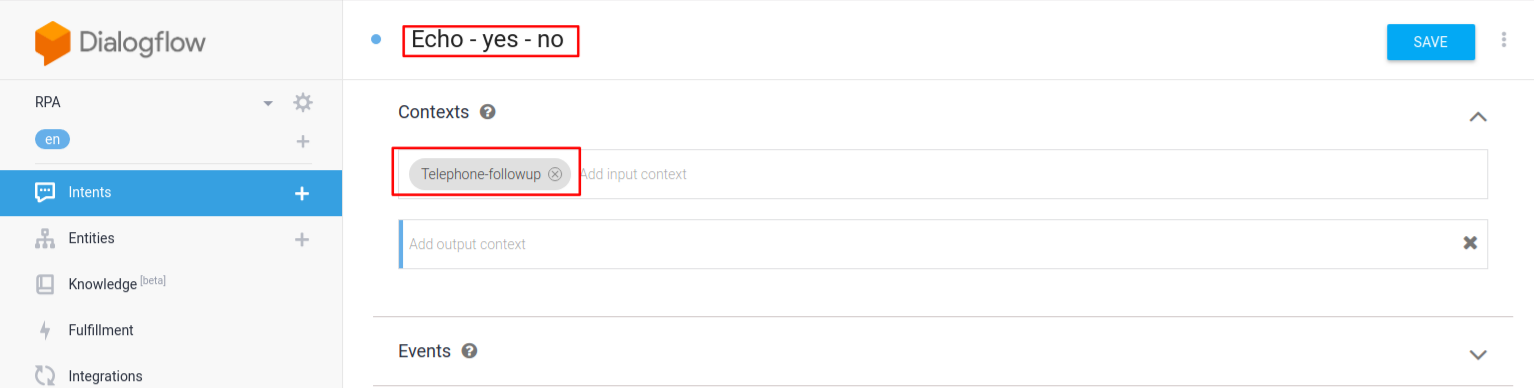
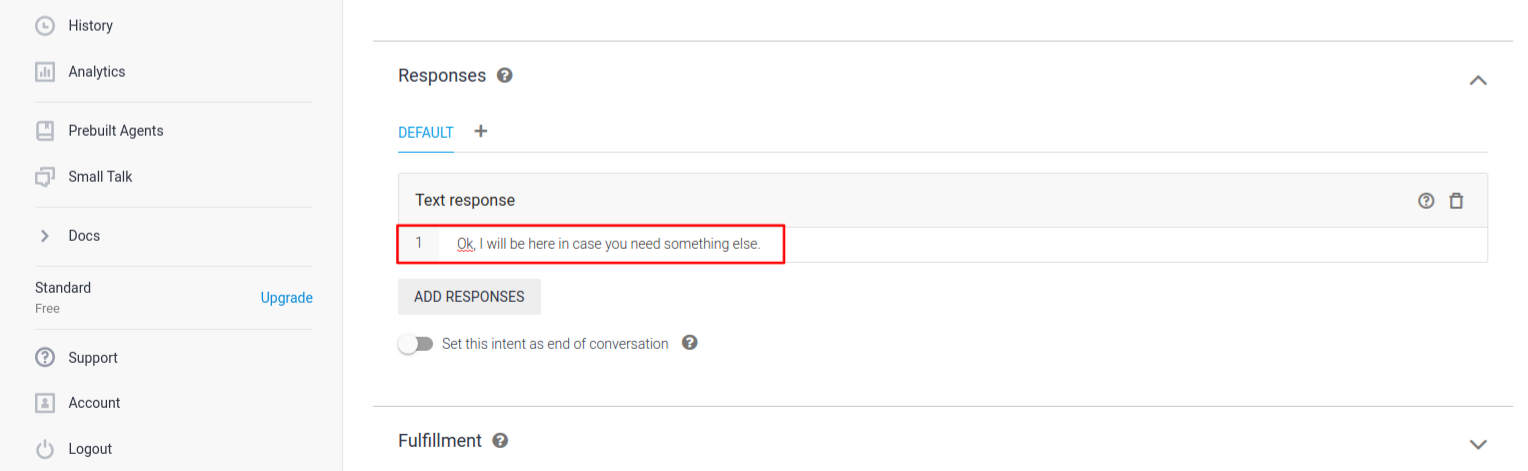
Since, in this case, the user does not want to get the address, we just let him know that the agent will be waiting for a new request.
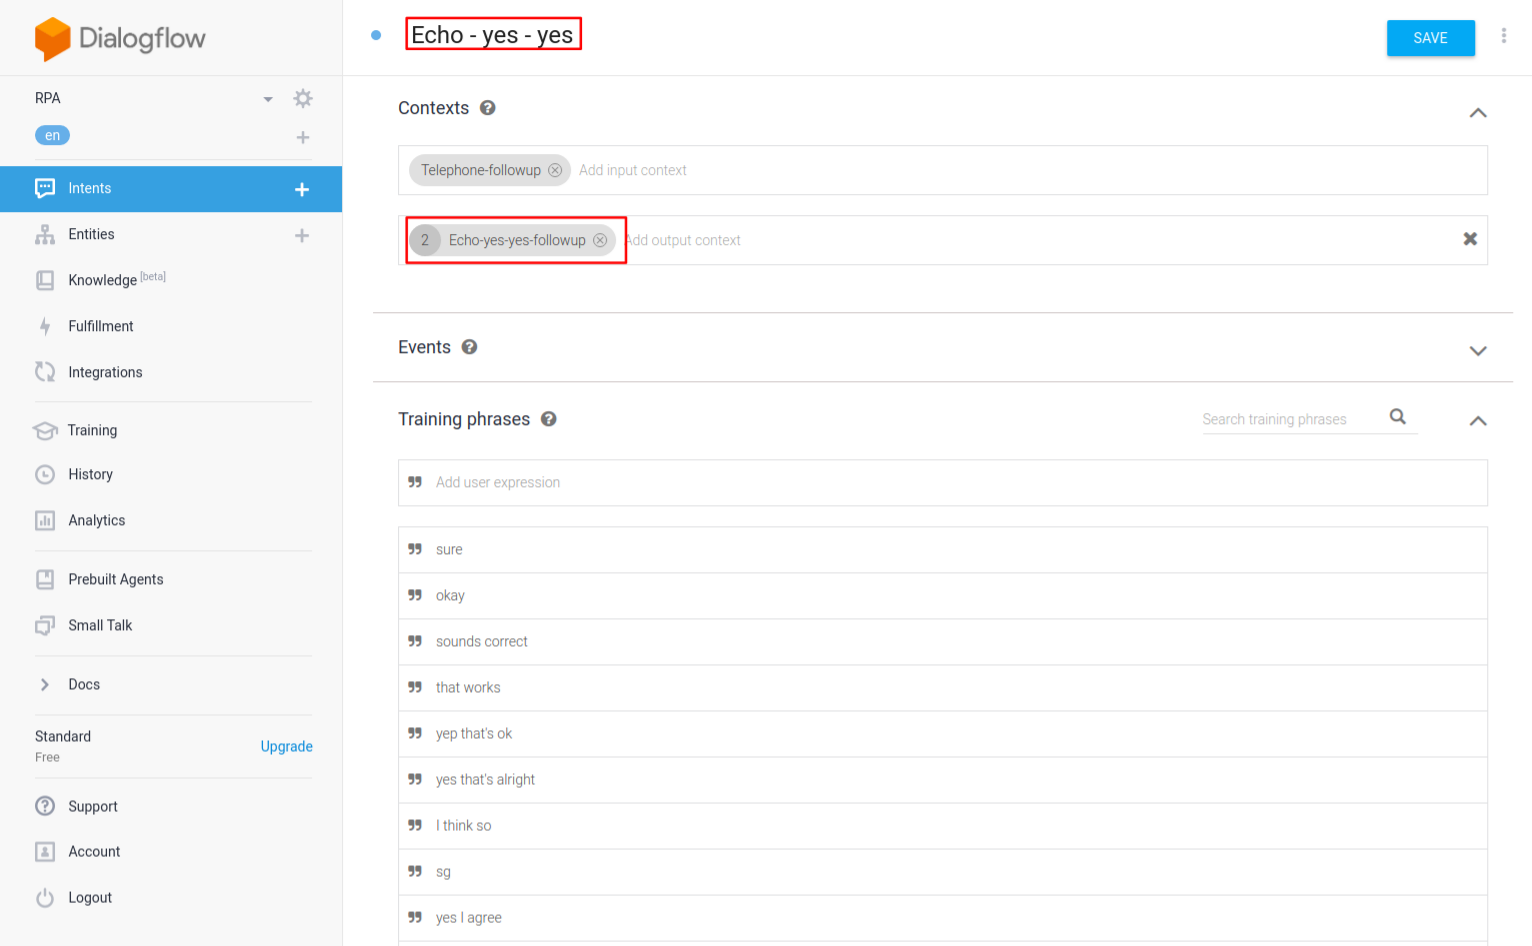
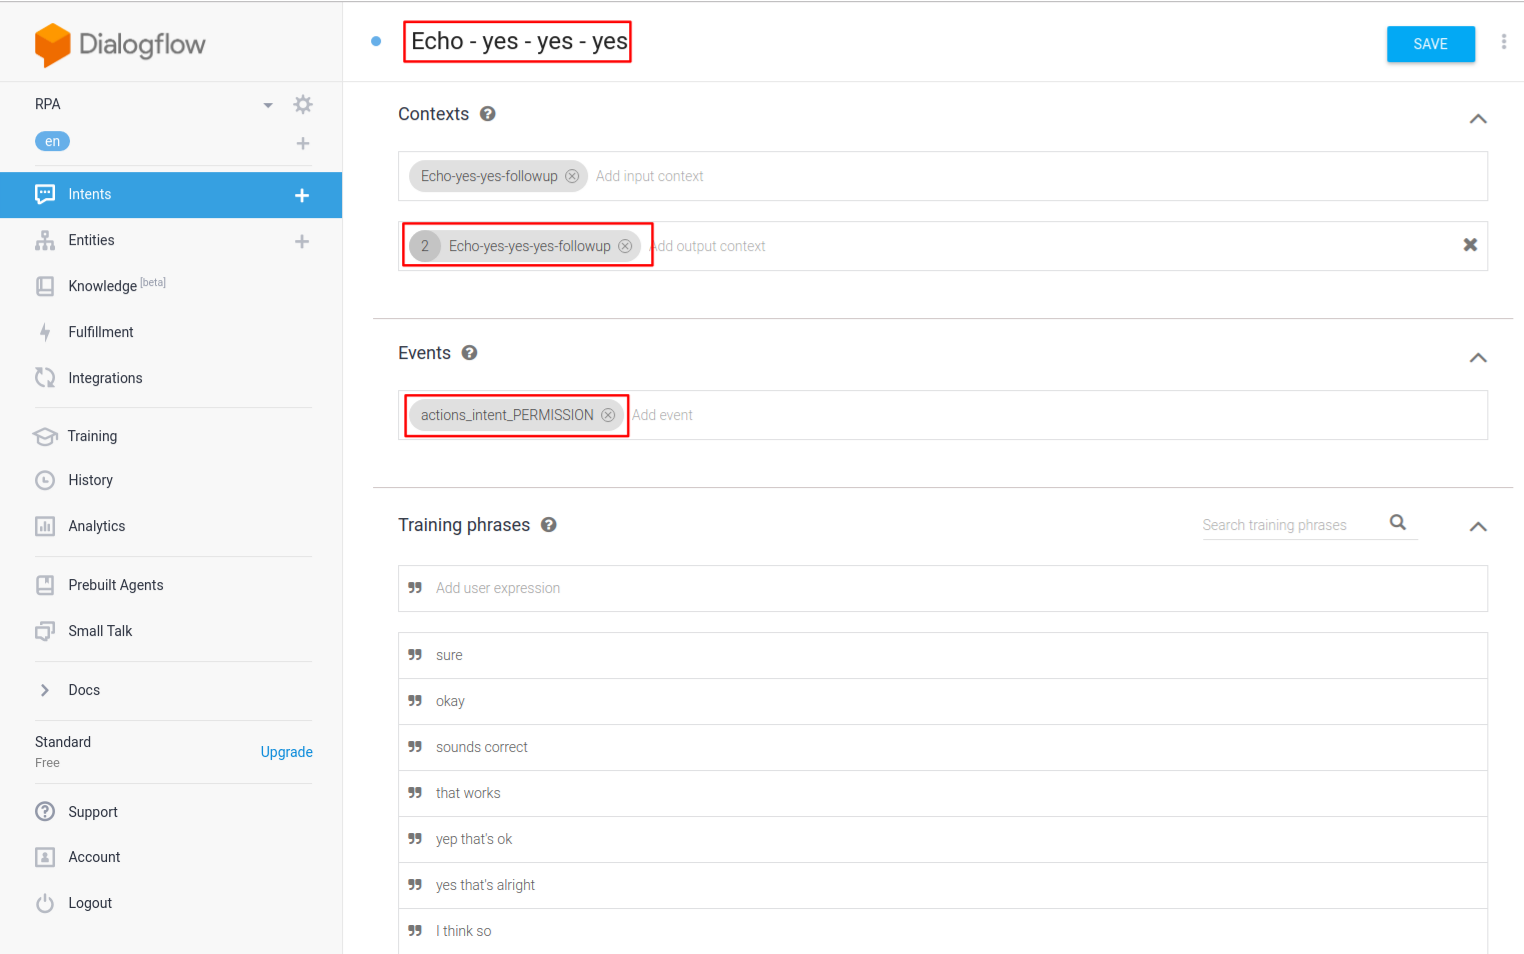
Now, let us create the yes follow-up intent and call it Echo – yes – yes. We add Echo-yes-yes-follow-up as an output context.
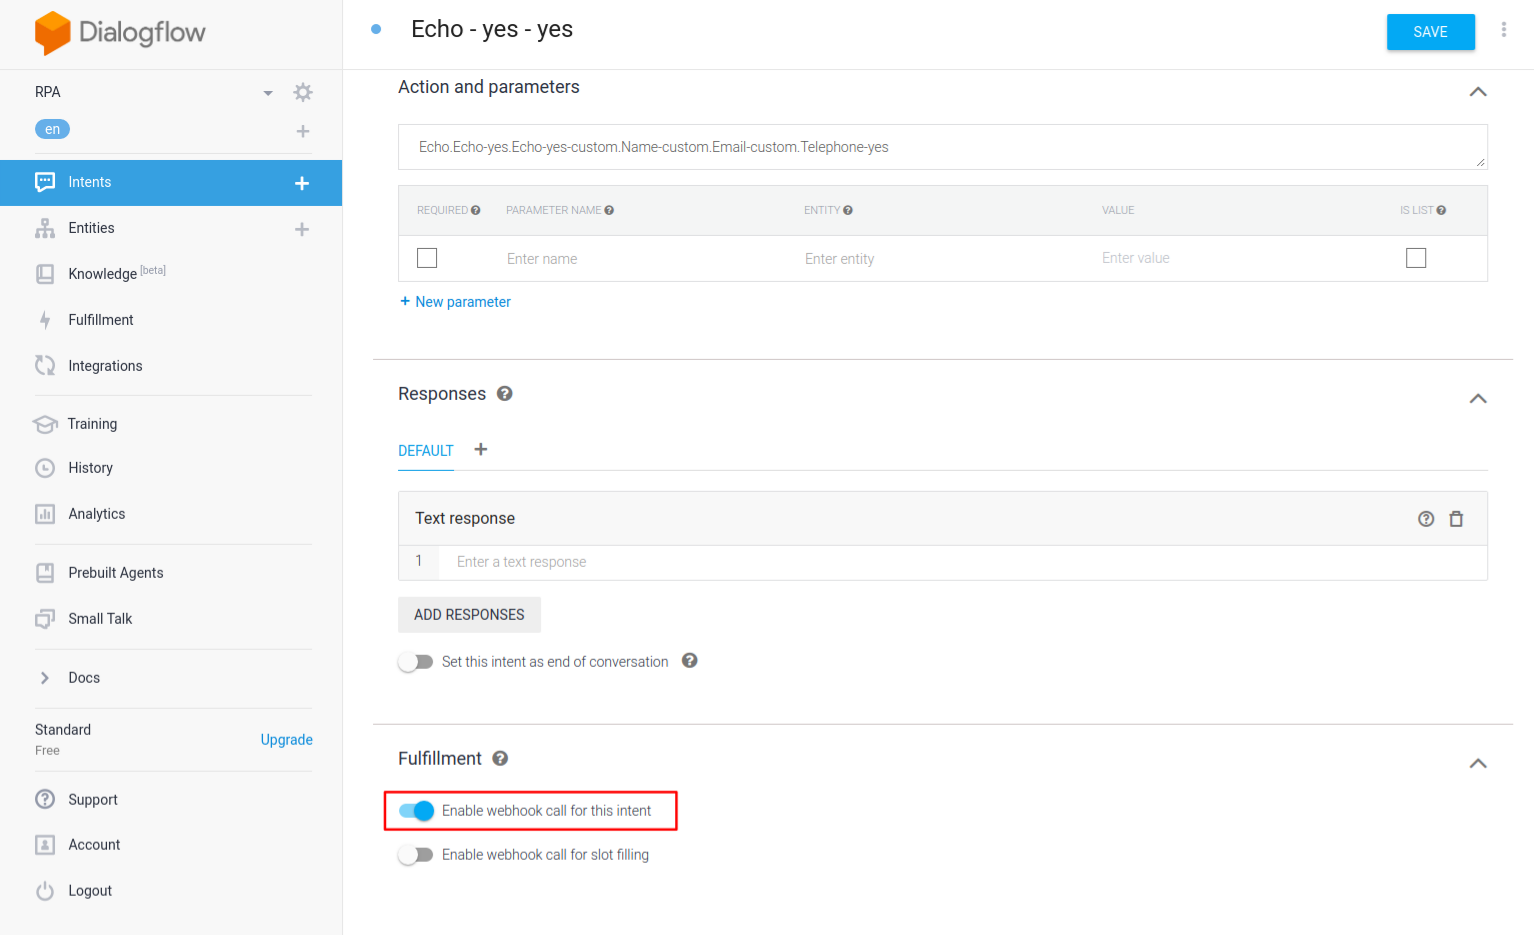
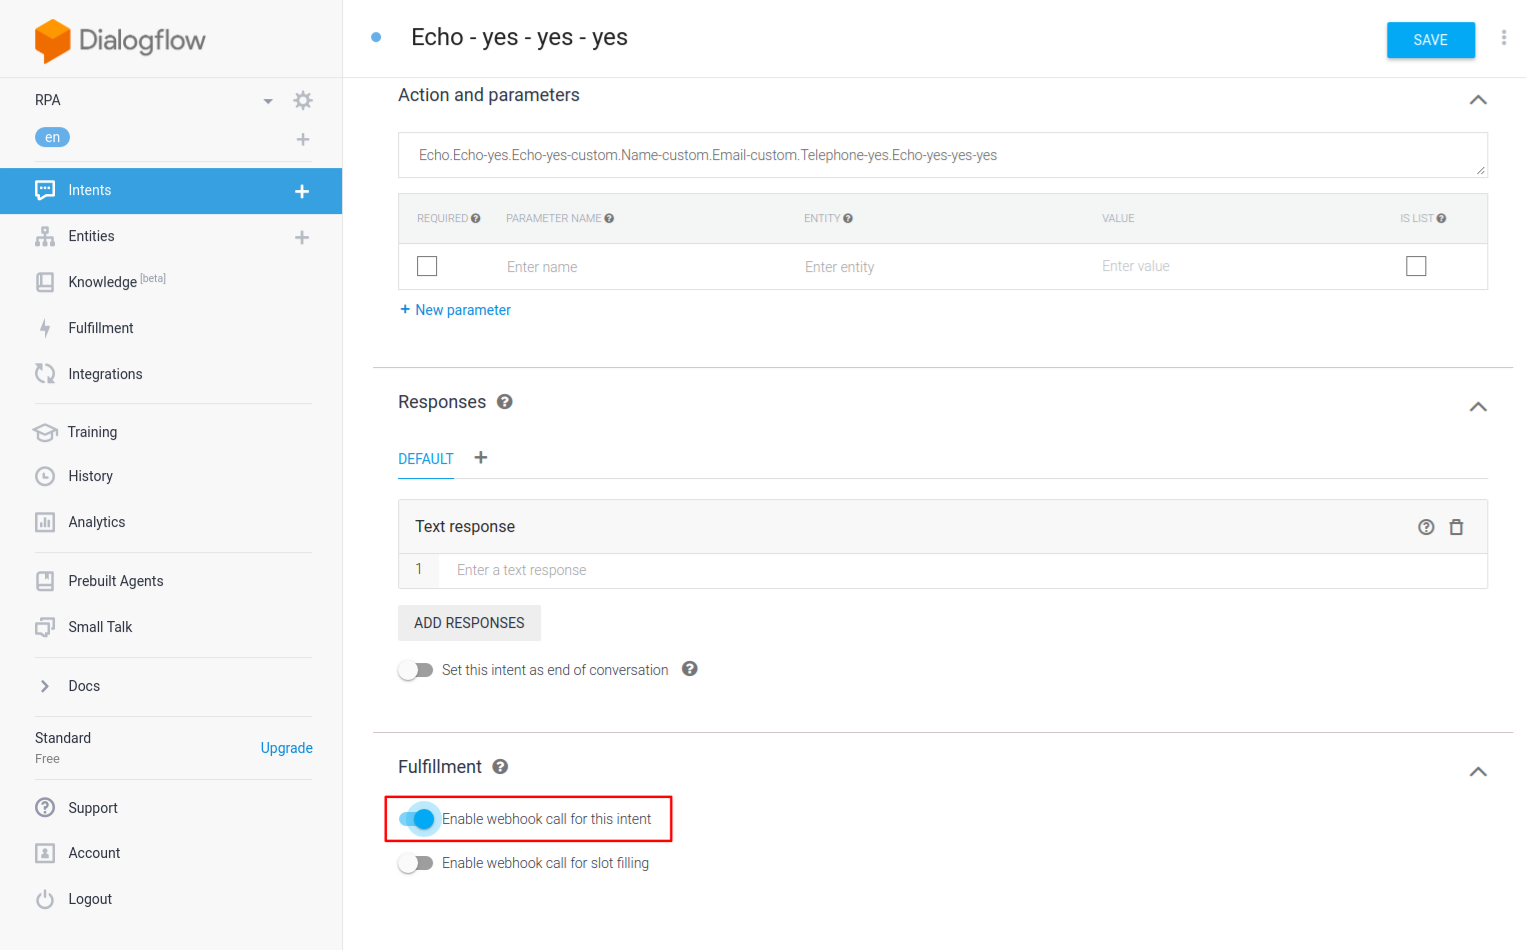
Since our intention is to give back the address of the closest bank, we would need to access the position of the costumer. To do so, we have to access our webhook and give it permissions. Remember to click on the Enable webhook call for this intent.
Now, inside our Webhook, add this code below to the recommendation function.
   function NearBank(agent) {
    let conv = agent.conv();
    if (conv.user.permissions.indexOf("DEVICE_PRECISE_LOCATION")<0 )
    {
        console.log("Dialogflow Conversation1"+JSON.stringify(conv.user) );
        const options = {
            permissions: ['DEVICE_PRECISE_LOCATION'],
          };
        conv.ask(new Permission(options));
        agent.add(conv);
    }
  }
And then, add a map so that your webhook can direct correctly the handler of such intent.
intentMap.set('Echo - yes - yes', NearBank);
After this, Google will ask you to give permission to access your current location, and depending on your answer, two things will happen — if you answer no, the dialog just stops right there and gives you the message that the agent will be waiting for your interaction; if the answer is yes, we would have to access the webhook again and retrieve the closest bank address. Hence, we need to create two more follow-up intents to cover those cases. First, let us create the no follow-up intent. We will let the name Echo – yes – yes – no so that it makes sense. In the section answer, we just say that the agent will be waiting for the user to interact with it.
Now, let us add the next follow-up intent. This intent is for the case when the user grants access to its position. We leave the name as it is (Echo – yes – yes – yes), so we put Echo-yes-yes-yes-followup as the output context and add in the Event section a sentence: actions_intent_PERMISSION so that the permission is granted.
We also allow this intent call in our webhook
Now, let us add the following code with the function called NearBank:
    function localizationRPA(agent){
    let conv = agent.conv();
    try{
    console.log("Dialogflow Conversation Confirmacion Cov"+JSON.stringify(conv.user.permissions) );
    const {divice} = conv.device;
    var latitud = conv.device.location.coordinates.latitude
    var longitud = conv.device.location.coordinates.longitude
    console.log(" request to Google Maps ")
    var bankName = "write the name of the bank you are looking for|"
    var res = sync('GET','https://maps.googleapis.com/maps/api/place/nearbysearch/json?location='+latitud+','+longitud+'&radius=1500&type=bank&keyword='+bankNamek+'&key=AIzaSyBzDMshJyJ7D9SfQeZv8IaQQjNsX_i2fR8')
    res = JSON.parse(res.getBody('utf8'))
    var nameofBank =  res.results[0].name
    var bankAddress = res.results[0].vicinity
    BANK = "Bank "+nameofBank + " located in " + bankAddress;
    console.log("Google Maps request finished")
    //Let us retrieve the information given to the agent
    var email = conv.body.queryResult.outputContexts[0].parameters.email;
    var nameF = conv.body.queryResult.outputContexts[0].parameters["given-name.original"];
    var nameS = conv.body.queryResult.outputContexts[0].parameters["last-name.original"];
    var phone = conv.body.queryResult.outputContexts[0].parameters["phone-number"];
    var FinalName = nameF + " " + nameS;
    //Now let us create a code to identify the user's process
    var code = CodeGenerator(FinalName);
    //Write the information inside a csv file in your computer, this will trigger the RPA process
    WriteCSV(email, FinalName, code, CARD, Documents, BANK, phone)
    conv.ask("The closest bank is "+nameofBank+" located in "+ bankAddress+". " );
    agent.add(conv);
    }
    catch(error) {
    conv.ask("Sorry, an error occurred" );
        agent.add(conv);
    }
  }
Remember to add the map in order for the webhook to call the right function when the intent is detected.
intentMap.set('Echo - yes - yes - yes',localizationRPA)
Now, below everything, add the code that will generate the user’s process code and write a CSV file containing the information given previously.
function WriteCSV(mail, name, id, card, documents, bank, phone){
//Write CSV
var fs = require('fs');
var csv = require('fast-csv');
var ws = fs.createWriteStream('user_info.csv');
csv.
write([
["Mail","Name","ID","Card","Documents","Bank","Phone"],
[mail, name, id, card, documents, bank, phone]
], {headers:true, delimiter: '|'})
.pipe(ws);
}
//<- Generate Code
function CodeGenerator(name){
var randnum = Math.floor((Math.random() * 1000) + 1);
var nameArray = name.split(" ")
var finalNameArray = [];
for(var i in nameArray){
  if (nameArray[i]){
      finalNameArray.push(nameArray[i]);
      //console.log(nameArray[i]);
  }
}
var code = finalNameArray[0][0] + randnum + finalNameArray[1][0] + finalNameArray[1][2];
return code;
}
Now, let us put this last intent as the end of the conversation
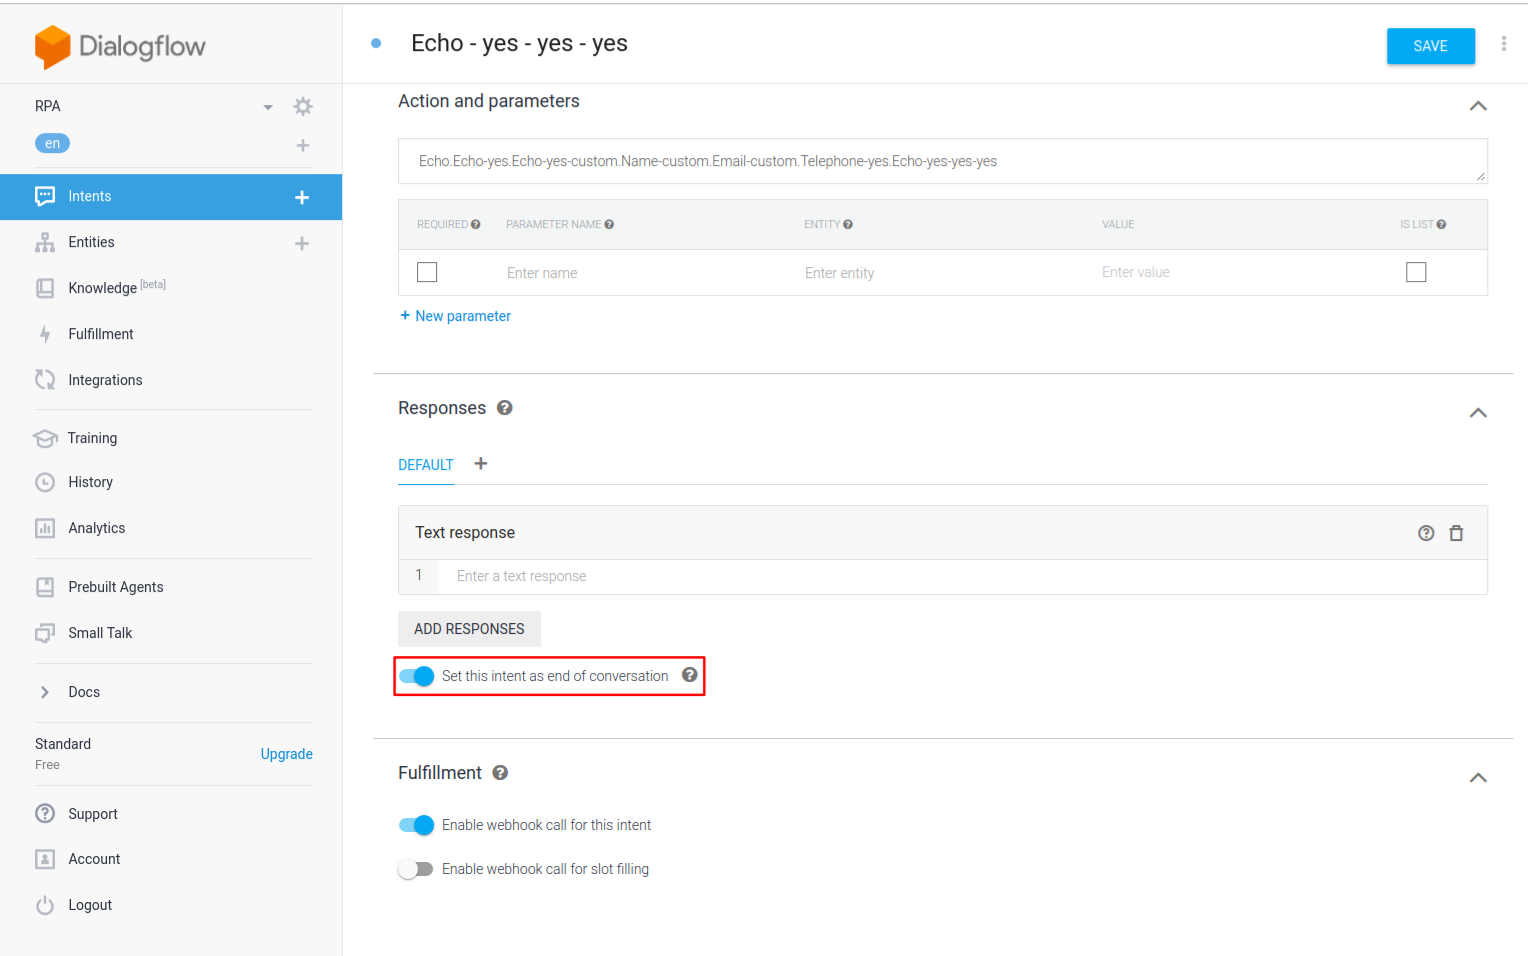
This completes the Assistant built-in Google Home. Your webhook code should look like this at this point.
"use strict";
const express = require("express");
const bodyParser = require("body-parser");
// Dialogflow dependencies ////
const functions = require('firebase-functions');
const {WebhookClient} = require('dialogflow-fulfillment');
const {Card, Suggestion} = require('dialogflow-fulfillment');
const {dialogflow} = require('actions-on-google');
const {Permission} = require('actions-on-google');
const requestNode = require('request');
var nodemailer = require('nodemailer');
var googleMapsClient = require('@google/maps').createClient({
  key: 'your key'
});
var sync = require('sync-request');
process.env.DEBUG = 'dialogflow:debug'; // enables lib debugging statements
const restService = express();
var CARD = "";
var BANK = "";
restService.use(
  bodyParser.urlencoded({
    extended: true
  })
);
restService.use(bodyParser.json());
restService.post("/echo/everbank/", function(request, response) {
  const agent = new WebhookClient({ request, response });
  const app = dialogflow({debug: true});
  function recommendation(agent){
    let conv = agent.conv();
    //TODO create a recommendation system and return it inside the text, we save the value of the recommended card inside the CARD variable and we prompt the message back to Dialogflow
    CARD = yourRecommendationFunctionWhichReturnsTheFittingCard;
    conv.ask("Thanks for your answers, the ideal card for you is:  \""+ CARD +"\". ¿Would you like to acquire it?");
    agent.add(conv);
  }
  function NearBank(agent) {
    let conv = agent.conv();
    if (conv.user.permissions.indexOf("DEVICE_PRECISE_LOCATION")<0 )
    {
        console.log("Dialogflow Conversation1"+JSON.stringify(conv.user) );
        const options = {
            permissions: ['DEVICE_PRECISE_LOCATION'],
          };
        conv.ask(new Permission(options));
        agent.add(conv);
    }
  }
    function localizationRPA(agent){
    let conv = agent.conv();
    try{
    console.log("Dialogflow Conversation Confirmacion Cov"+JSON.stringify(conv.user.permissions) );
    const {divice} = conv.device;
    var latitud = conv.device.location.coordinates.latitude
    var longitud = conv.device.location.coordinates.longitude
    console.log(" request to Google Maps ")
    var bankName = "write the name of the bank you are looking for|"
    var res = sync('GET','https://maps.googleapis.com/maps/api/place/nearbysearch/json?location='+latitud+','+longitud+'&radius=1500&type=bank&keyword='+bankNamek+'&key=AIzaSyBzDMshJyJ7D9SfQeZv8IaQQjNsX_i2fR8')
    res = JSON.parse(res.getBody('utf8'))
    var nameofBank =  res.results[0].name
    var bankAddress = res.results[0].vicinity
    BANK = "Bank "+nameofBank + " located in " + bankAddress;
    console.log("Google Maps request finished")
    //Let us retrieve the information given to the agent
    var email = conv.body.queryResult.outputContexts[0].parameters.email;
    var nameF = conv.body.queryResult.outputContexts[0].parameters["given-name.original"];
    var nameS = conv.body.queryResult.outputContexts[0].parameters["last-name.original"];
    var phone = conv.body.queryResult.outputContexts[0].parameters["phone-number"];
    var FinalName = nameF + " " + nameS;
    //Now let us create a code to identify the user's process
    var code = CodeGenerator(FinalName);
    //Write the information inside a csv file in your computer, this will trigger the RPA process
    WriteCSV(email, FinalName, code, CARD, Documents, BANK, phone)
    conv.ask("The closest bank is "+nameofBank+" located in "+ bankAddress+". " );
    agent.add(conv);
    }
    catch(error) {
    conv.ask("Sorry, an error occurred" );
        agent.add(conv);
    }
  }
  let intentMap = new Map();
  intentMap.set('Echo', recommendation);
  intentMap.set('Echo - yes - yes', NearBank);
  intentMap.set('Echo - yes - yes - yes',localizationRPA)
});
restService.listen(process.env.PORT || 5201, function() {
  console.log("Server up and listening");
});
function WriteCSV(mail, name, id, card, documents, bank, phone){
//Write CSV
var fs = require('fs');
var csv = require('fast-csv');
var ws = fs.createWriteStream('user_info.csv');
csv.
write([
["Mail","Name","ID","Card","Documents","Bank","Phone"],
[mail, name, id, card, documents, bank, phone]
], {headers:true, delimiter: '|'})
.pipe(ws);
}
//<- Generate Code
function CodeGenerator(name){
var randnum = Math.floor((Math.random() * 1000) + 1);
var nameArray = name.split(" ")
var finalNameArray = [];
for(var i in nameArray){
  if (nameArray[i]){
      finalNameArray.push(nameArray[i]);
      //console.log(nameArray[i]);
  }
}
var code = finalNameArray[0][0] + randnum + finalNameArray[1][0] + finalNameArray[1][2];
return code;
}
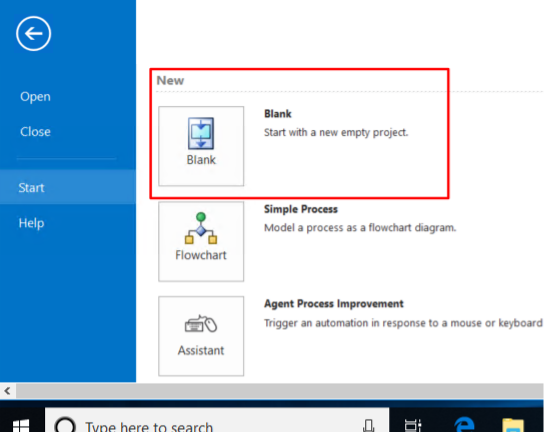
Now that we have our agent complete, it is time to use it alongside the RPA software UiPath. So, let us download it. An advantage of UiPath is that it has a Community Version, which has all the same support and is completely free. So, download it and install it (available only for Windows). Once it is installed, start the software. It will ask you for activation. Just click on free and it will let you use it. After this, click on the Blank project
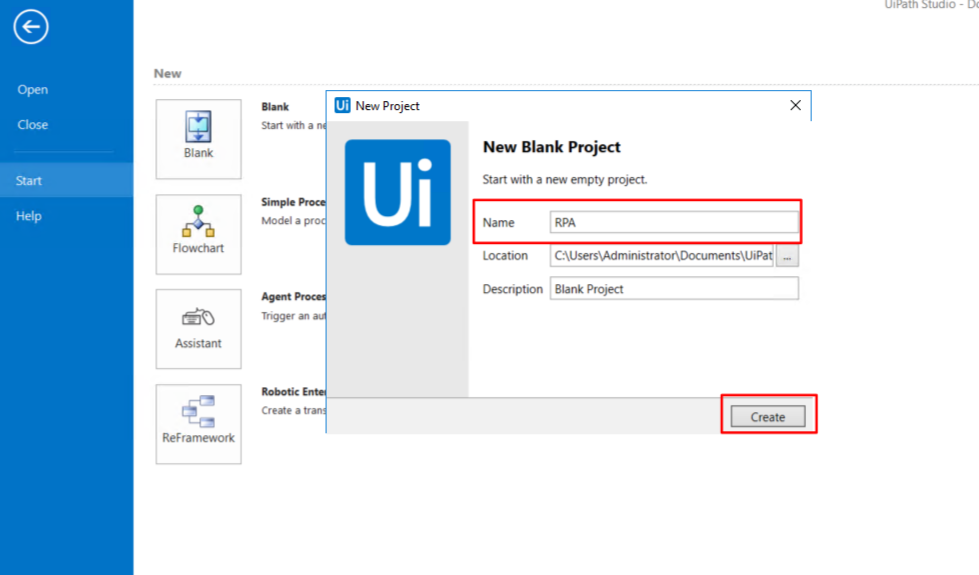
Next, give it the name you want and click on Create
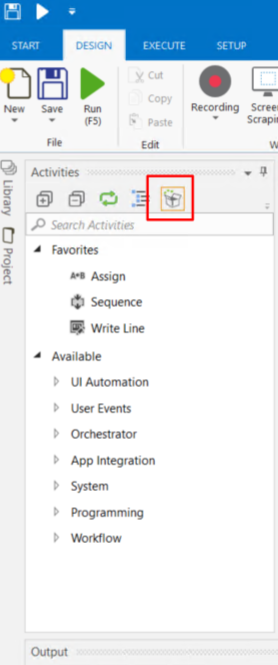
Now, click on the Manage package button to install what we will need to read a CSV
Then, click on Available and click on the area to start typing
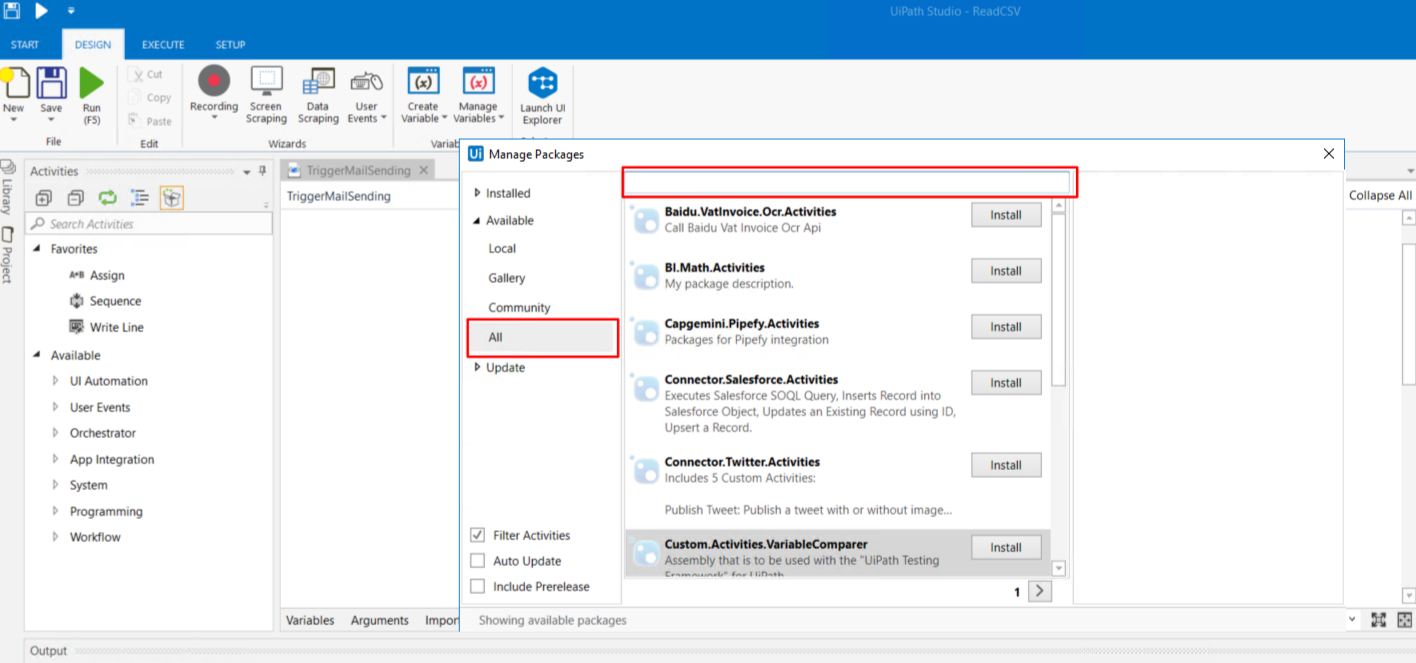
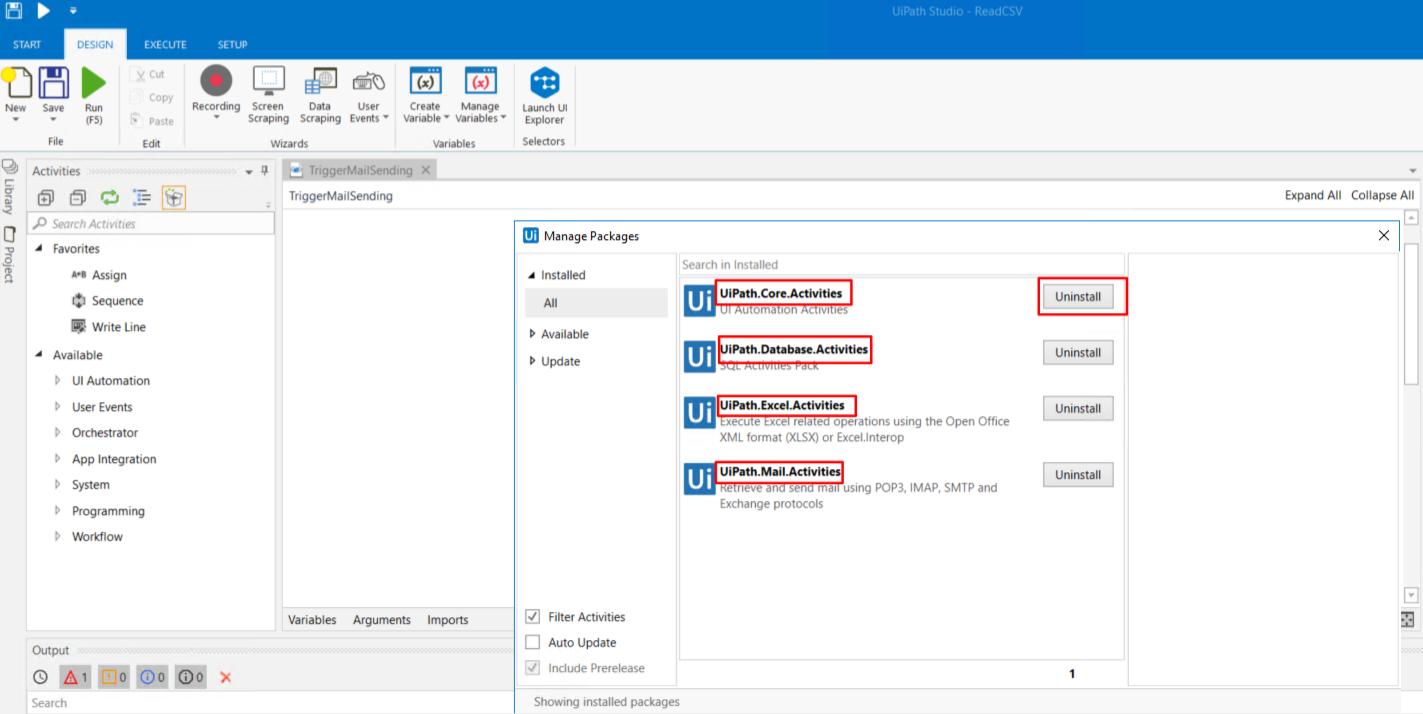
Next, type the package’s names and click on install. In my case, I have them installed and the only button for me to click on (which I will not) is uninstall.
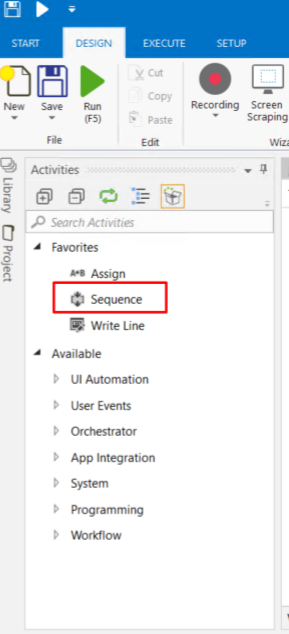
Once you have installed the necessary packages, click on Sequence and drag it into your workspace
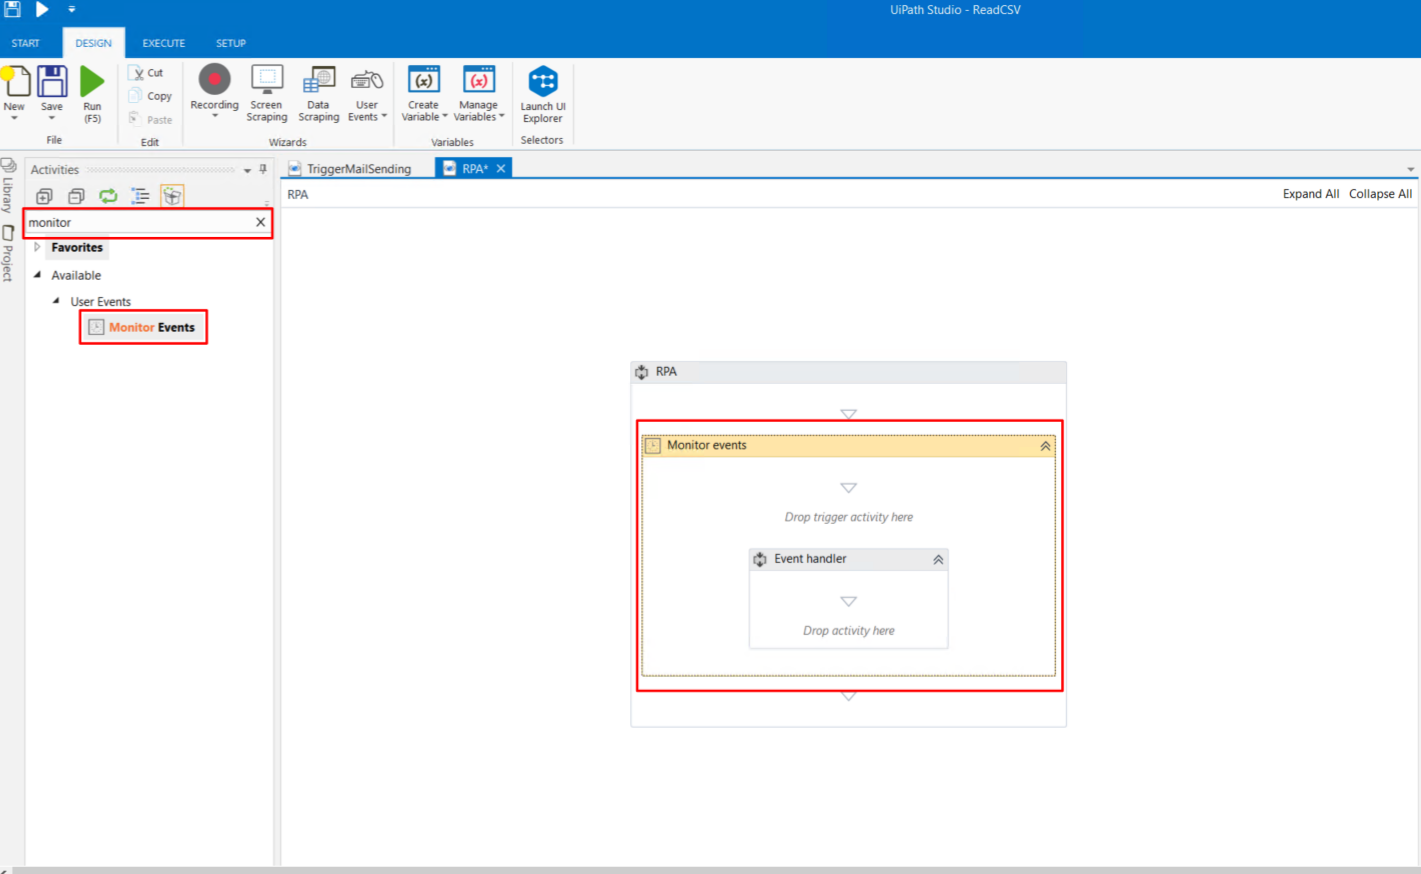
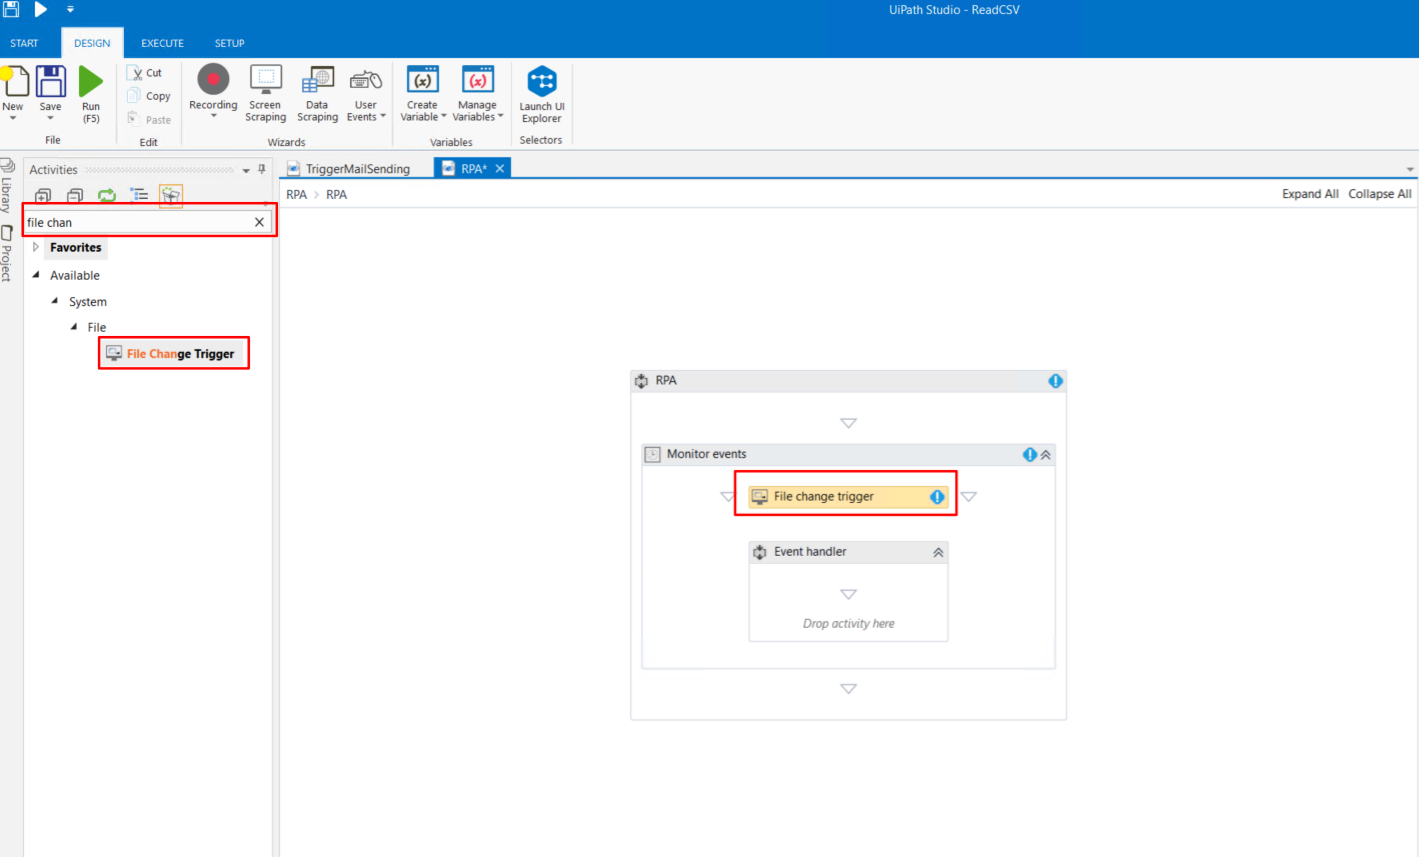
Once you drop it, type in the search field for the Monitor event Activity. Once you find it, drag it inside the Sequence activity.
Then, type likewise when looking for the before event but now for an activity called File Change Trigger, drag it inside the monitor event just above the window called Event Handler, and some blue signs will appear on the top right corner. This means that we have errors inside the last activity added, which is normal since we have not configured it.
After this, we proceed to configure the newly added activity. Since we would like to trigger the activity once the CSV file is changed, we put the ChangeType as Changed and NotifyFitlers as LastWrite. Next in FileName as “*.csv,” since we expect to have only one CSV file in the path file, we are going to add in the field Path (add yours depending on where you will have your file written).
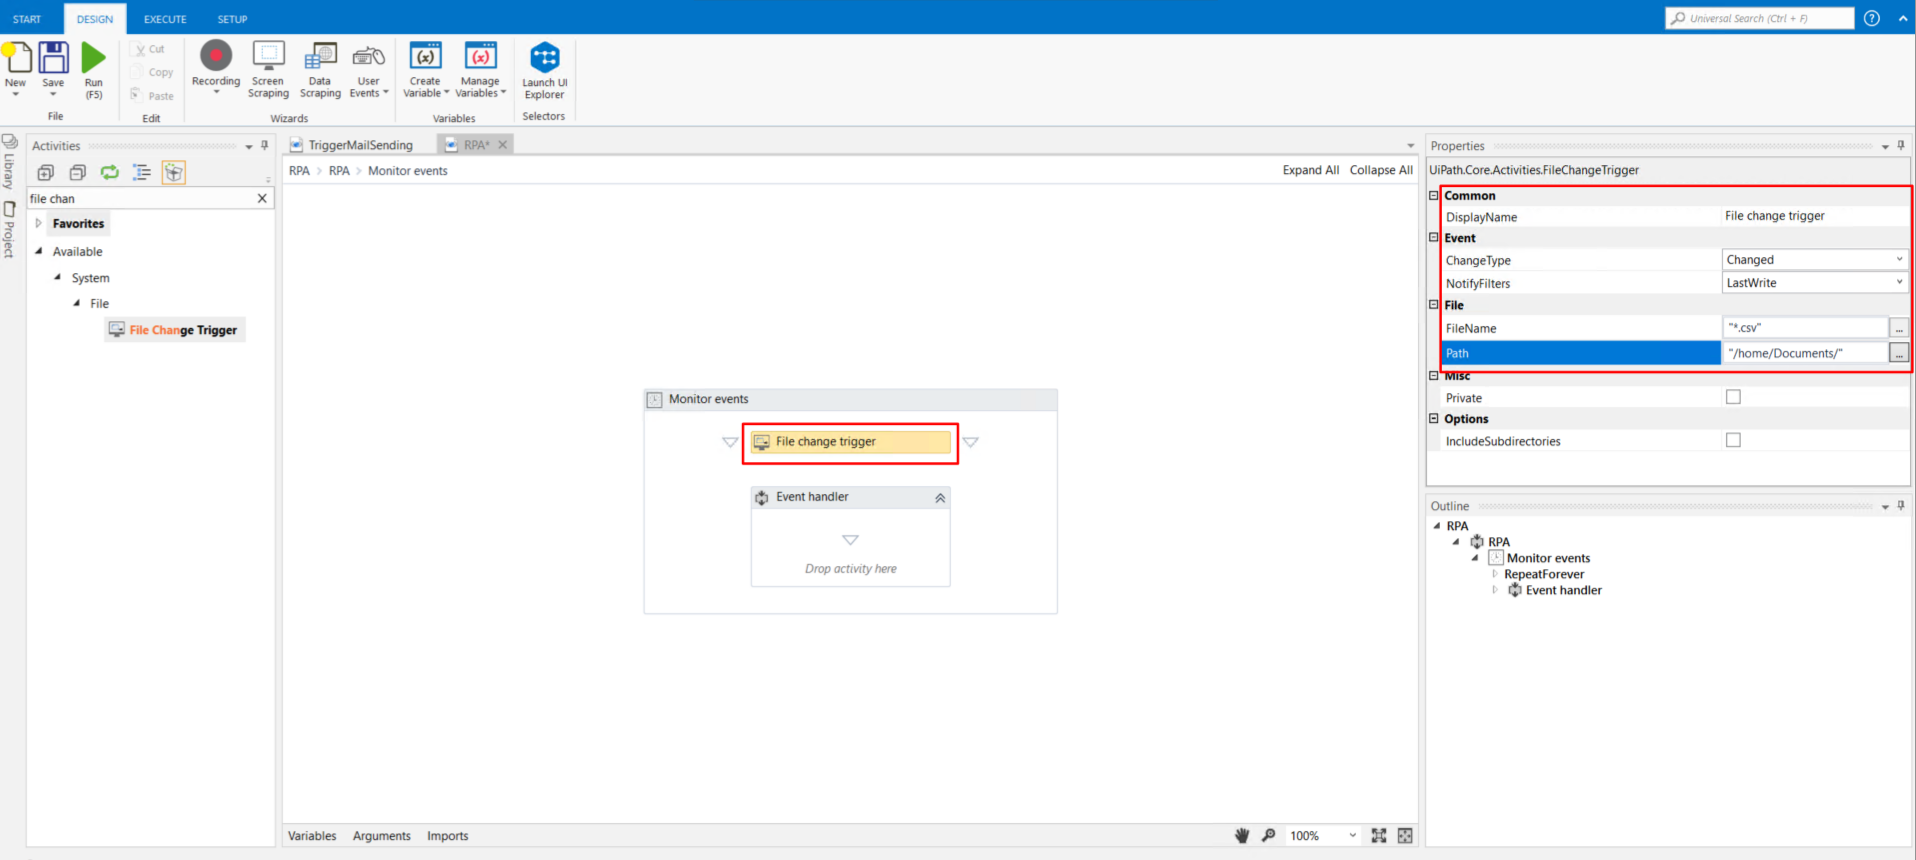
As you might have noticed, the blue error signs have disappeared.
Now, it is time to add the activity to read the recently overwritten file and extract its information. Go to the search field and type Read CSV, drag the activity that appeared, and put it inside the Event Handler activity.
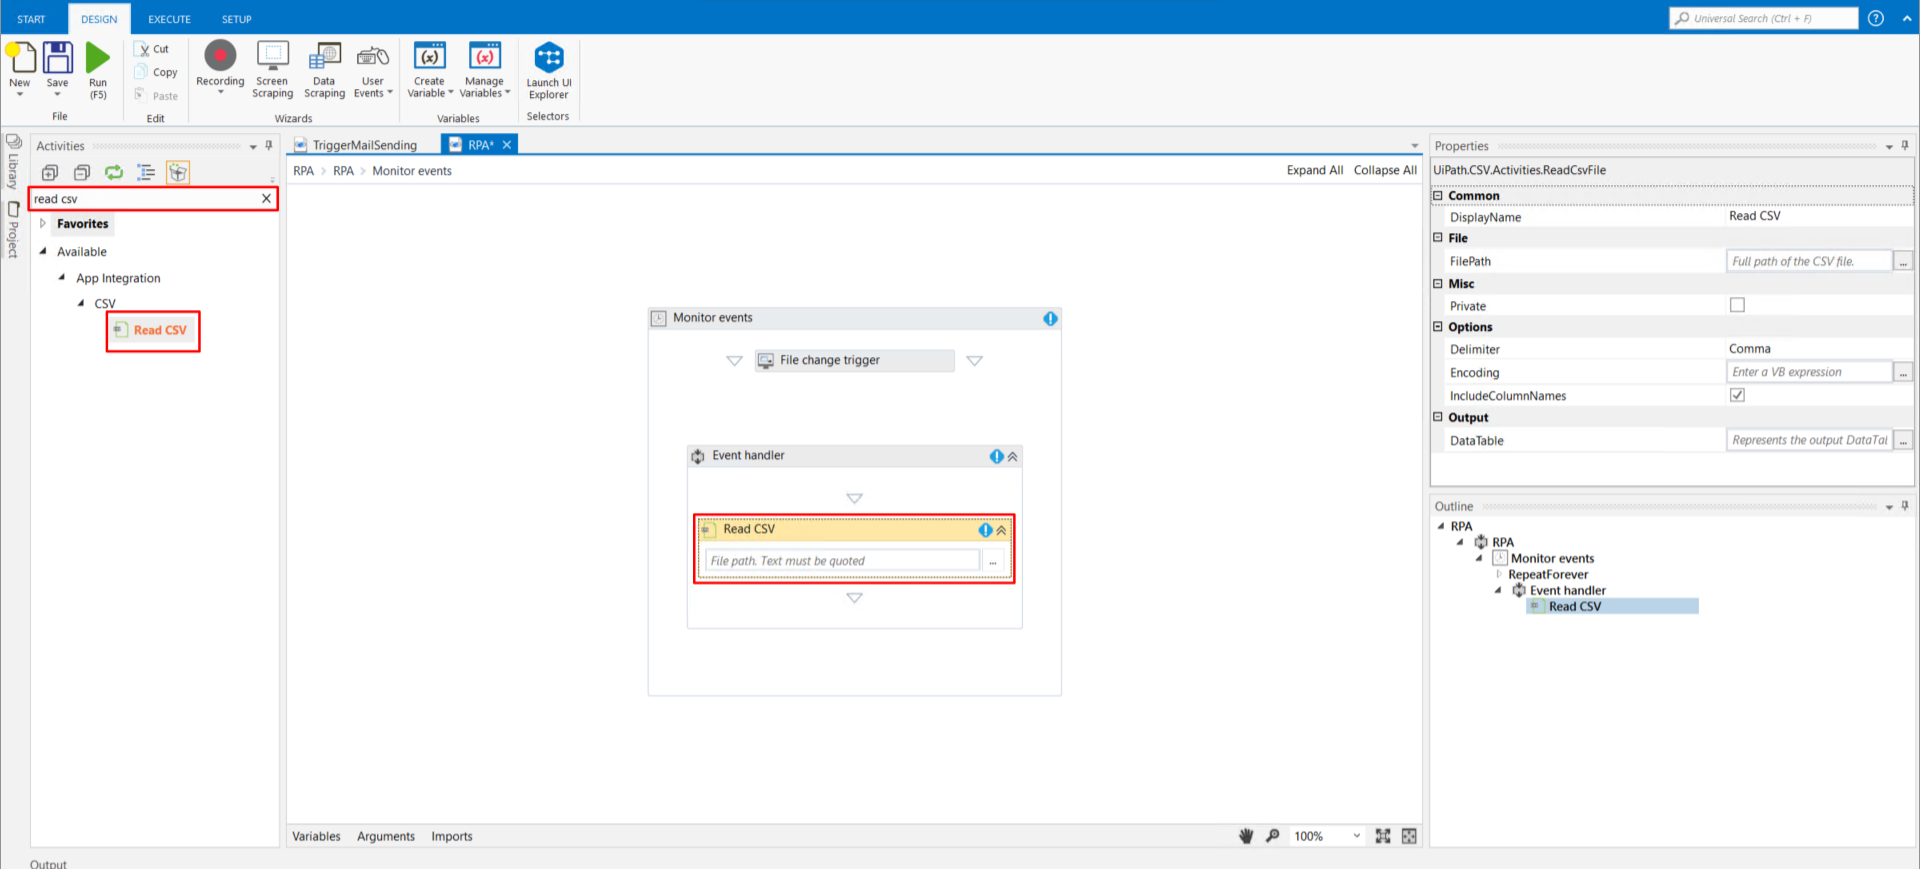
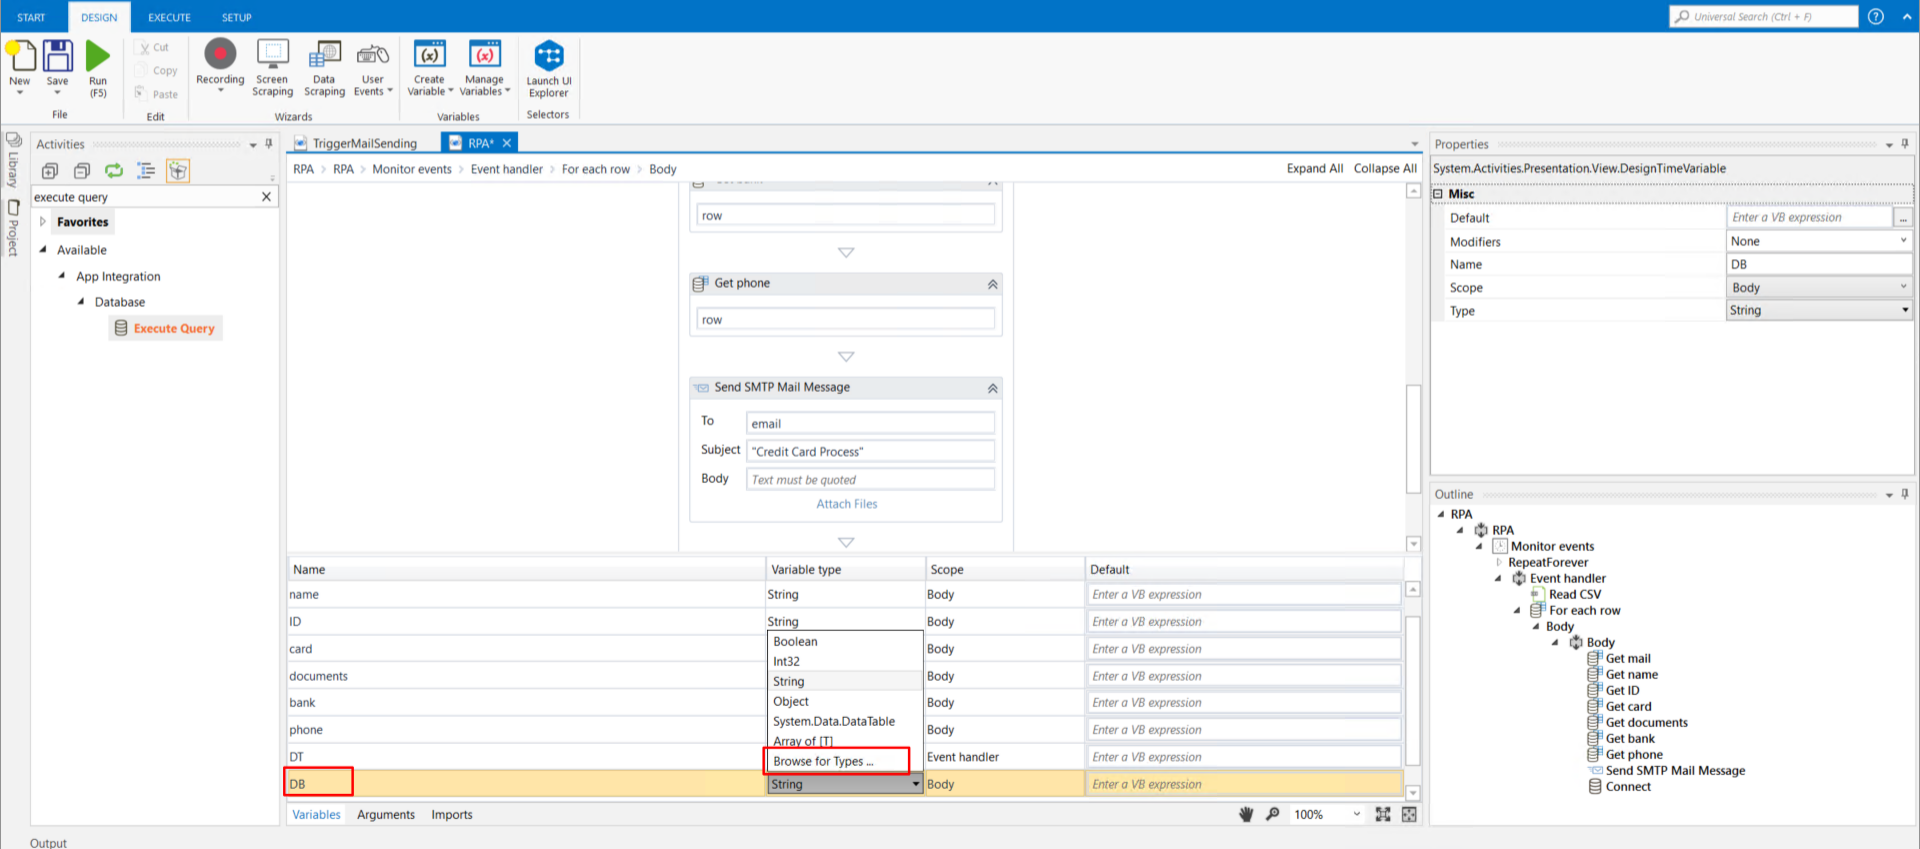
Once again, we have the blue error signs; let us configure the Read CSV activity. First, we have to create a new variable. We will name it DT. Click on the drop-down menu down the variable type and click on the Browse for types.
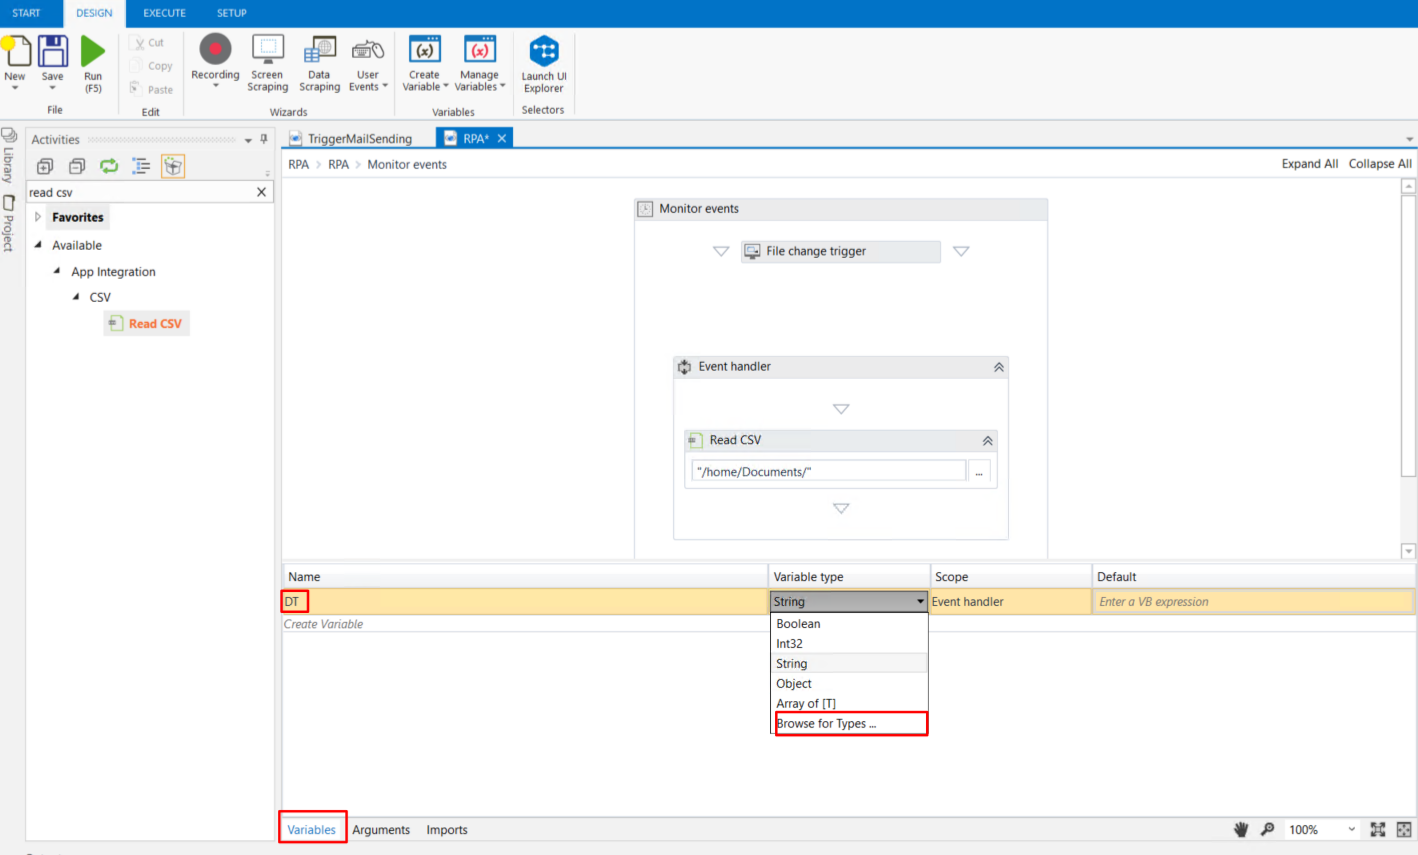
Now, let’s look for the type of the variable, which is DataTable. Once we find it, click on it.
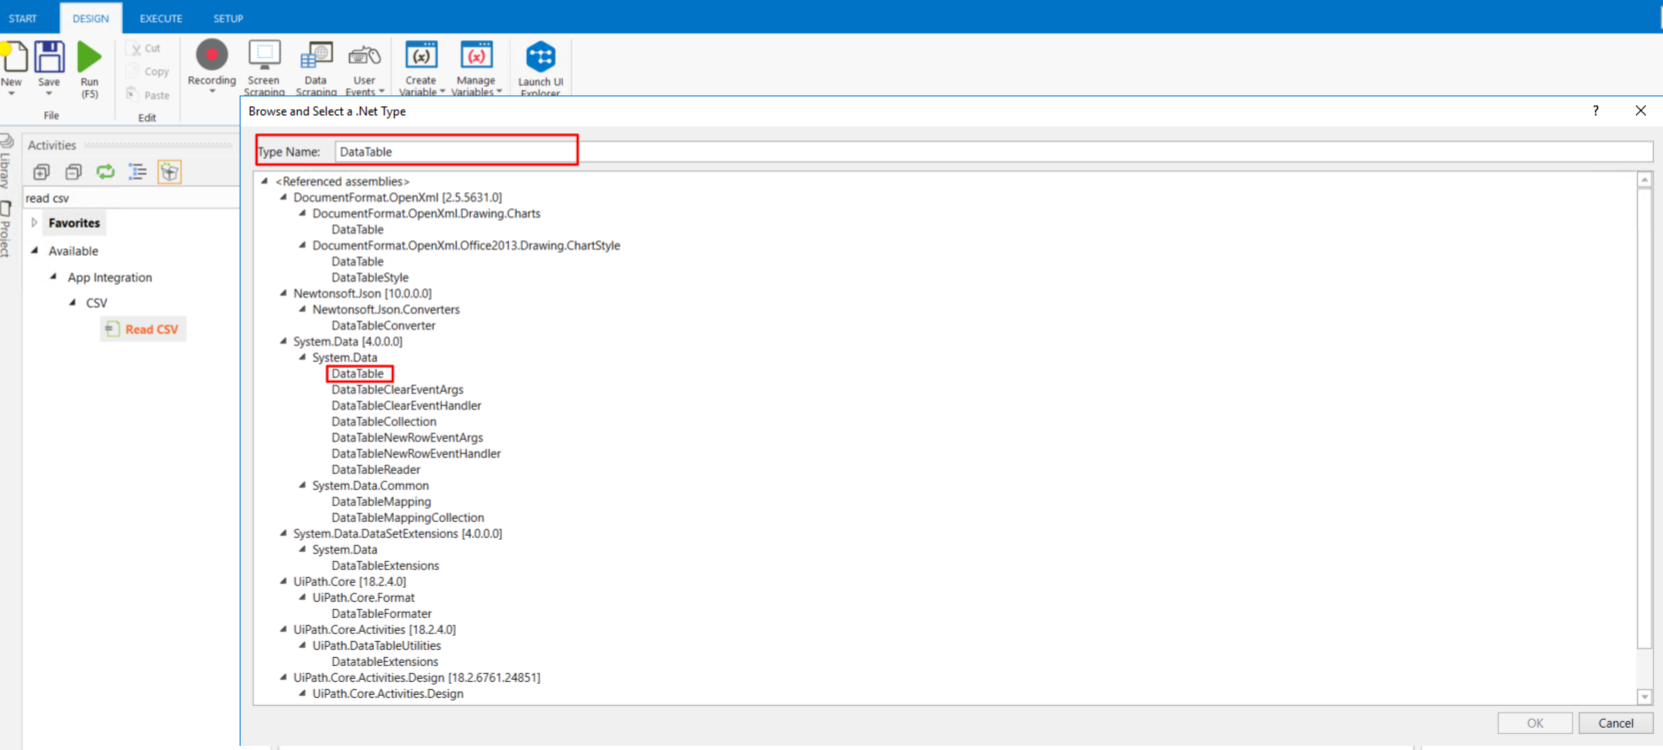
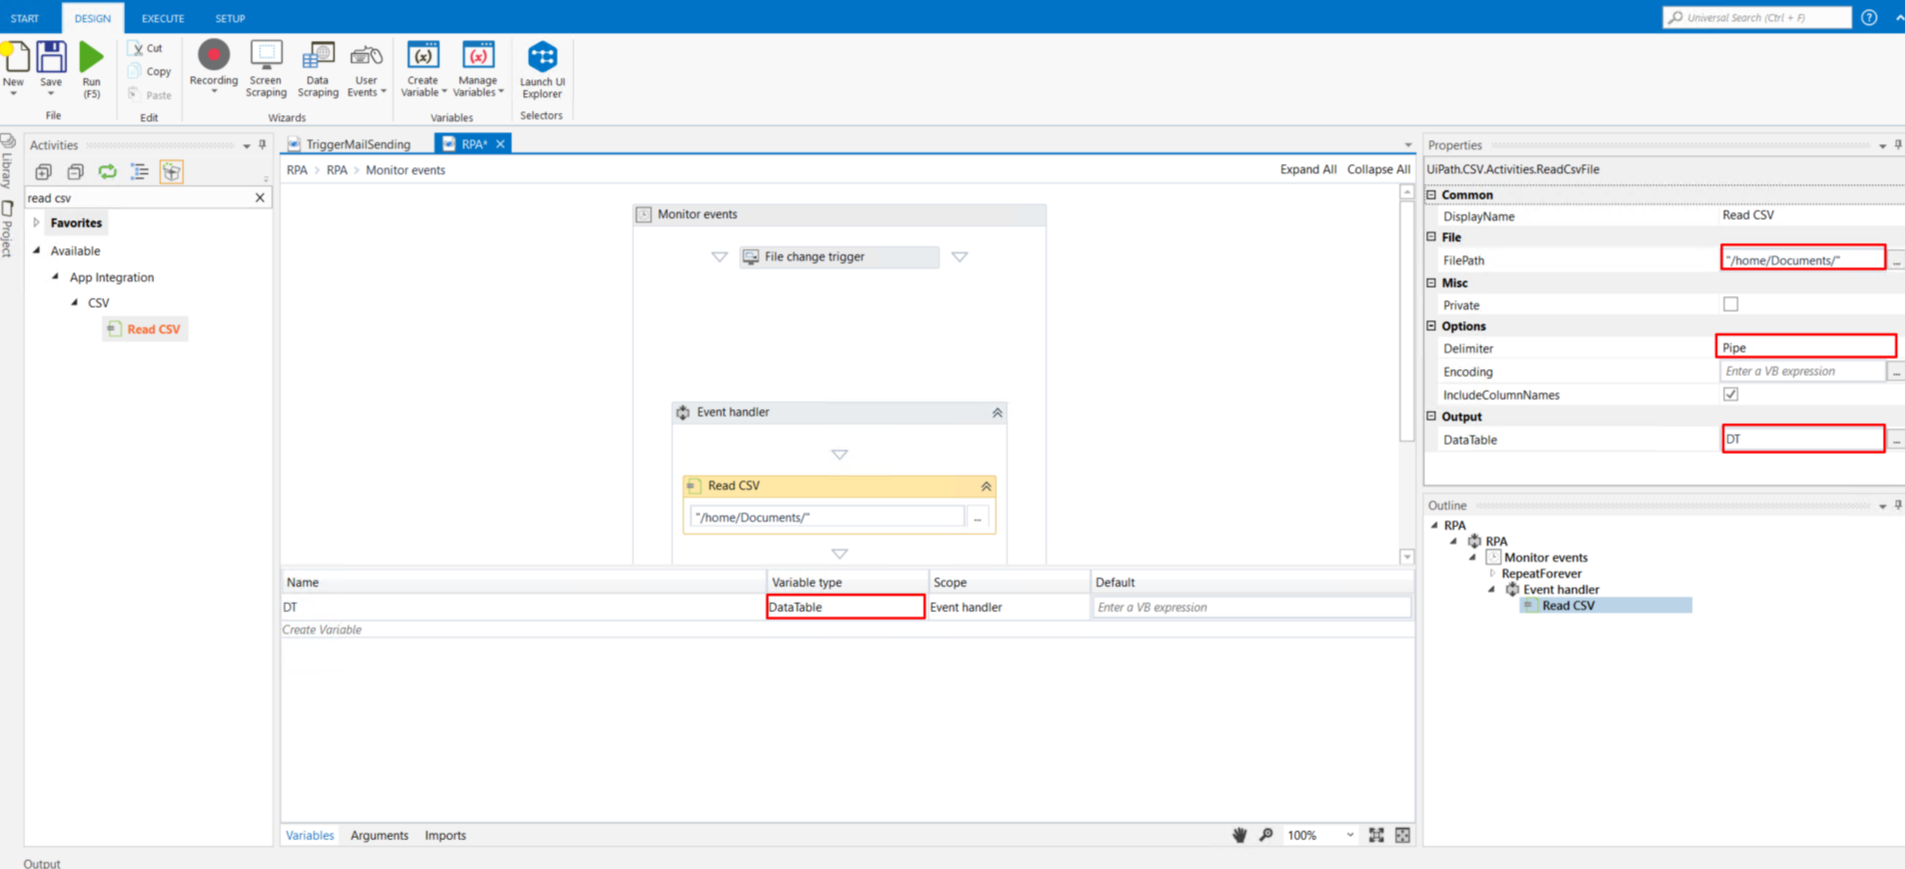
Then, our variable is the DataTable type. Let’s configure the fields required to read the CSV and extract the information in it. In the FilePath, you will need to write where your file is located. Now in order to read a CSV file, we need to specify what are the delimiters. In this case, we used pipes. Lastly, in the DataTable field, write the name of our variable (DT in our example). That should get rid of the blue error signs.
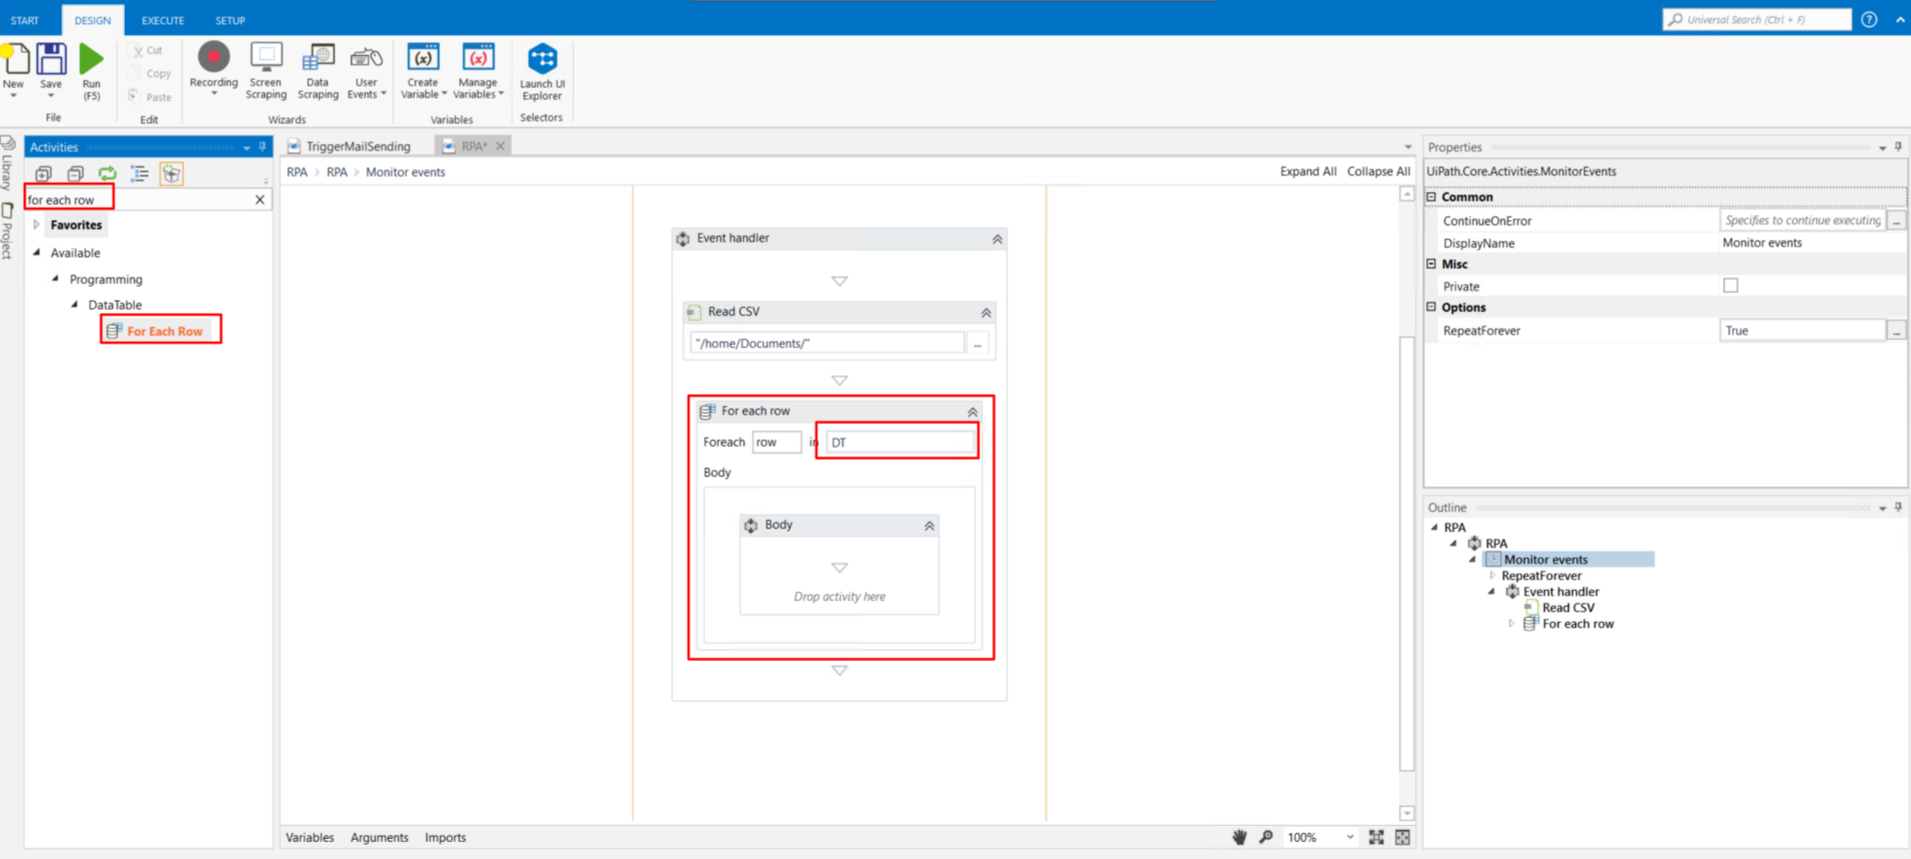
Let’s search for an activity called For each row. Once you find it, drag it down below the Read CSV activity, and in the box with the words Enter a VB expression, write the variable we created (DT).
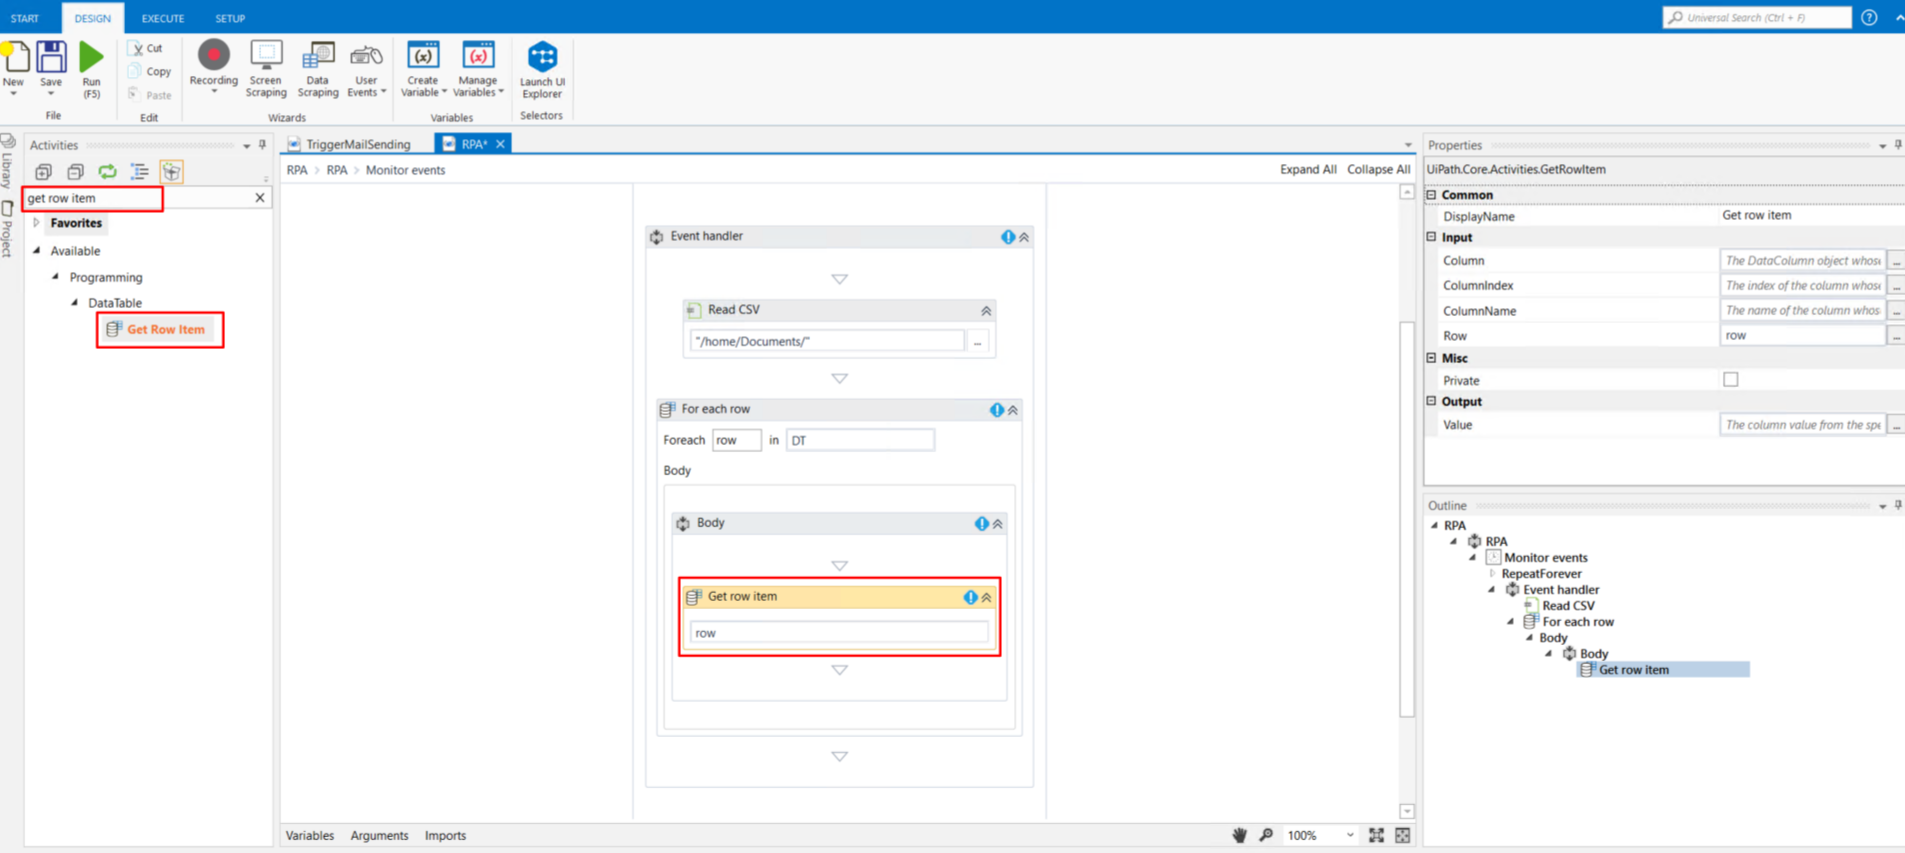
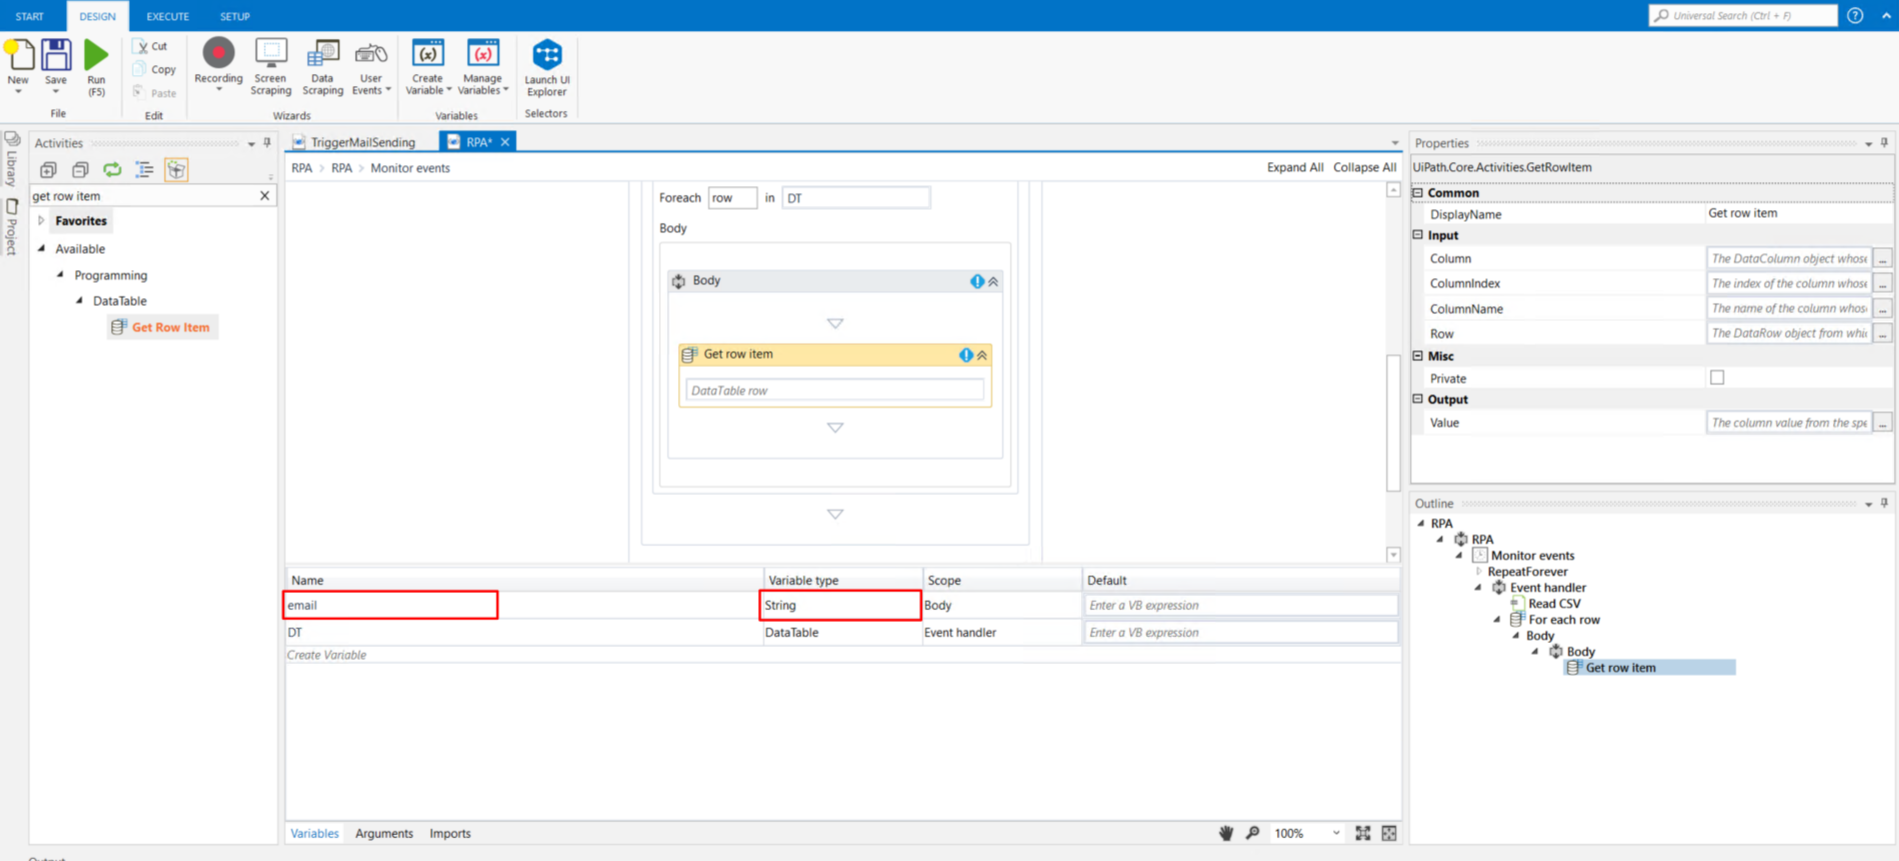
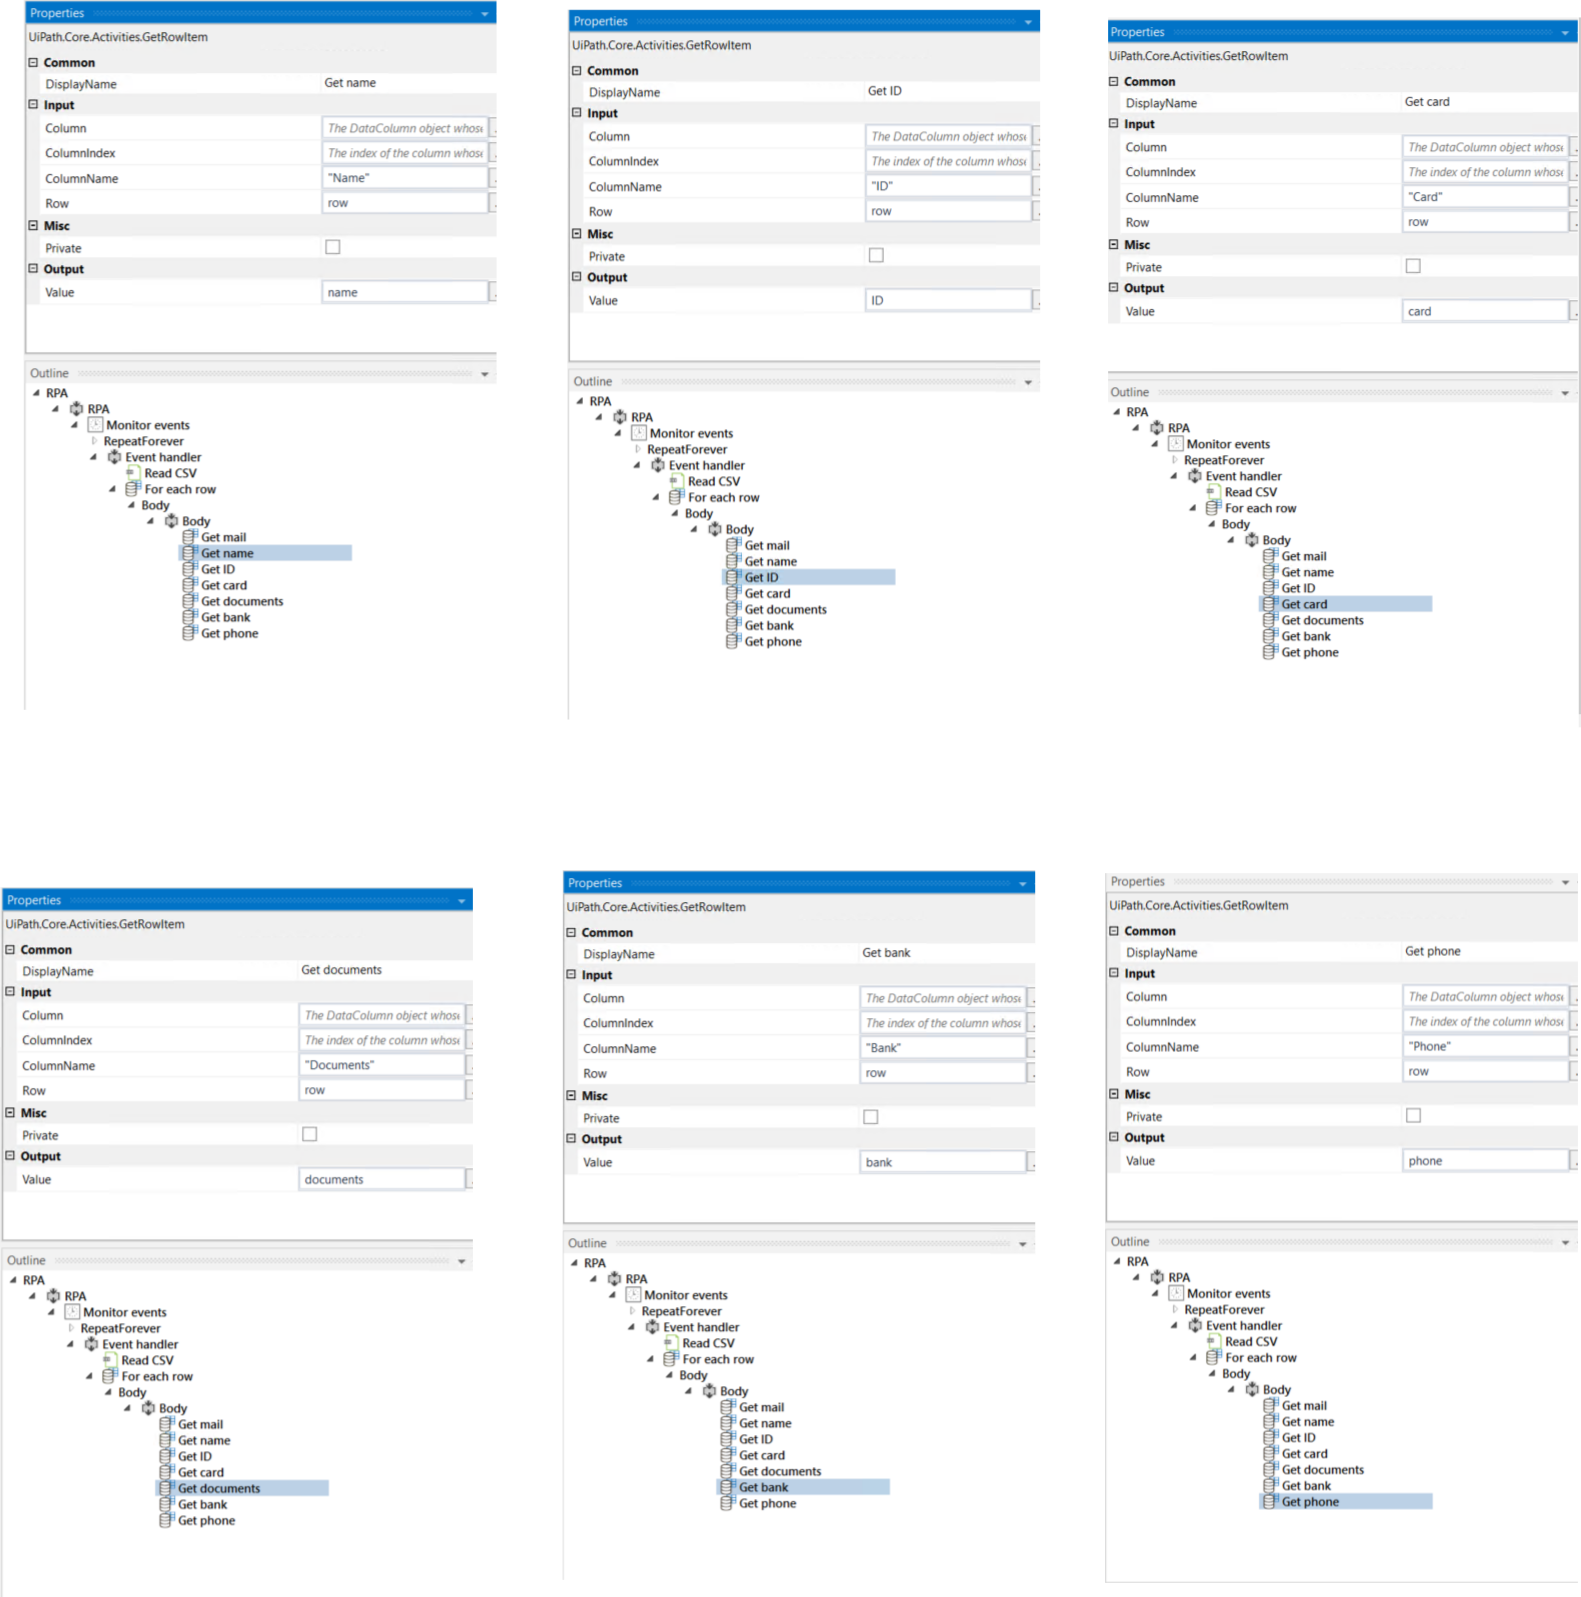
After this, we look for an activity called Get Row Item. After we find it, drag it inside the body activity, and inside the DataTable row of the Get Row Item activity, write row (which is the variable iterating inside the CSV file).
Now, let us create a new variable called email of String type. In this variable, we will save the email information found inside the CSV file.
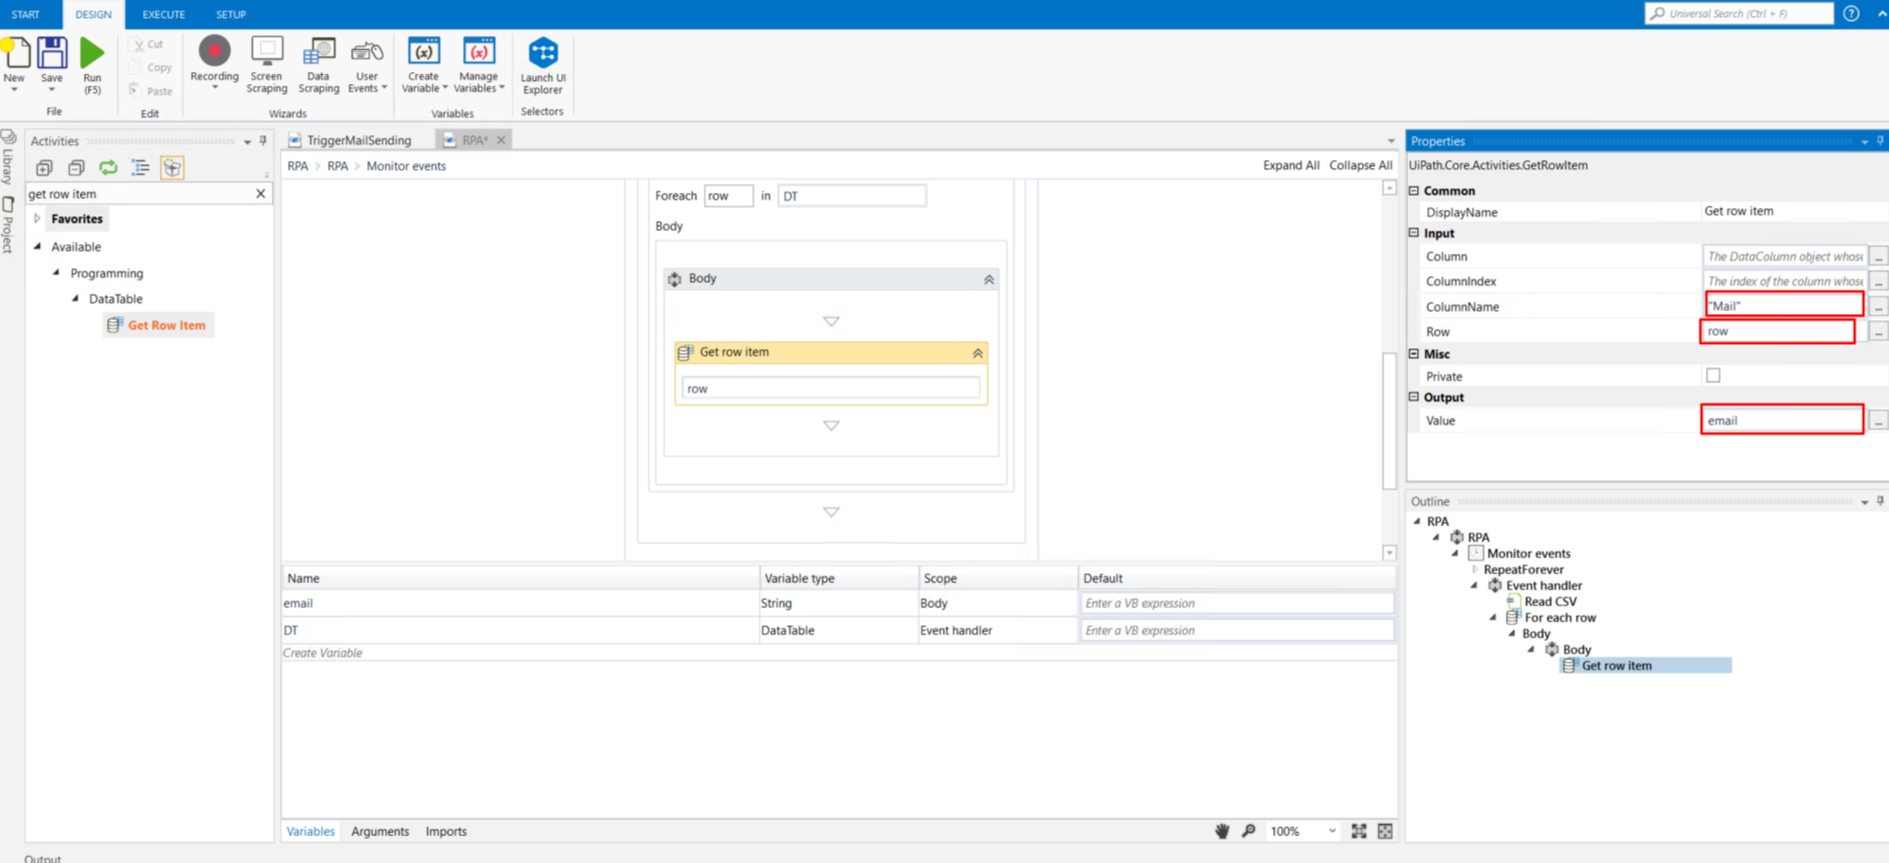
After we have created the email variable, let us configure the Get Row Item Activity. In the ColumnIndex field, write the name of the column where we can find the email saved inside the CSV (in our example, it is Mail). Next, in the Row field, write row (the variable iterating inside our CSV file), and in the Value field, write the name of the variable where the email will be saved.
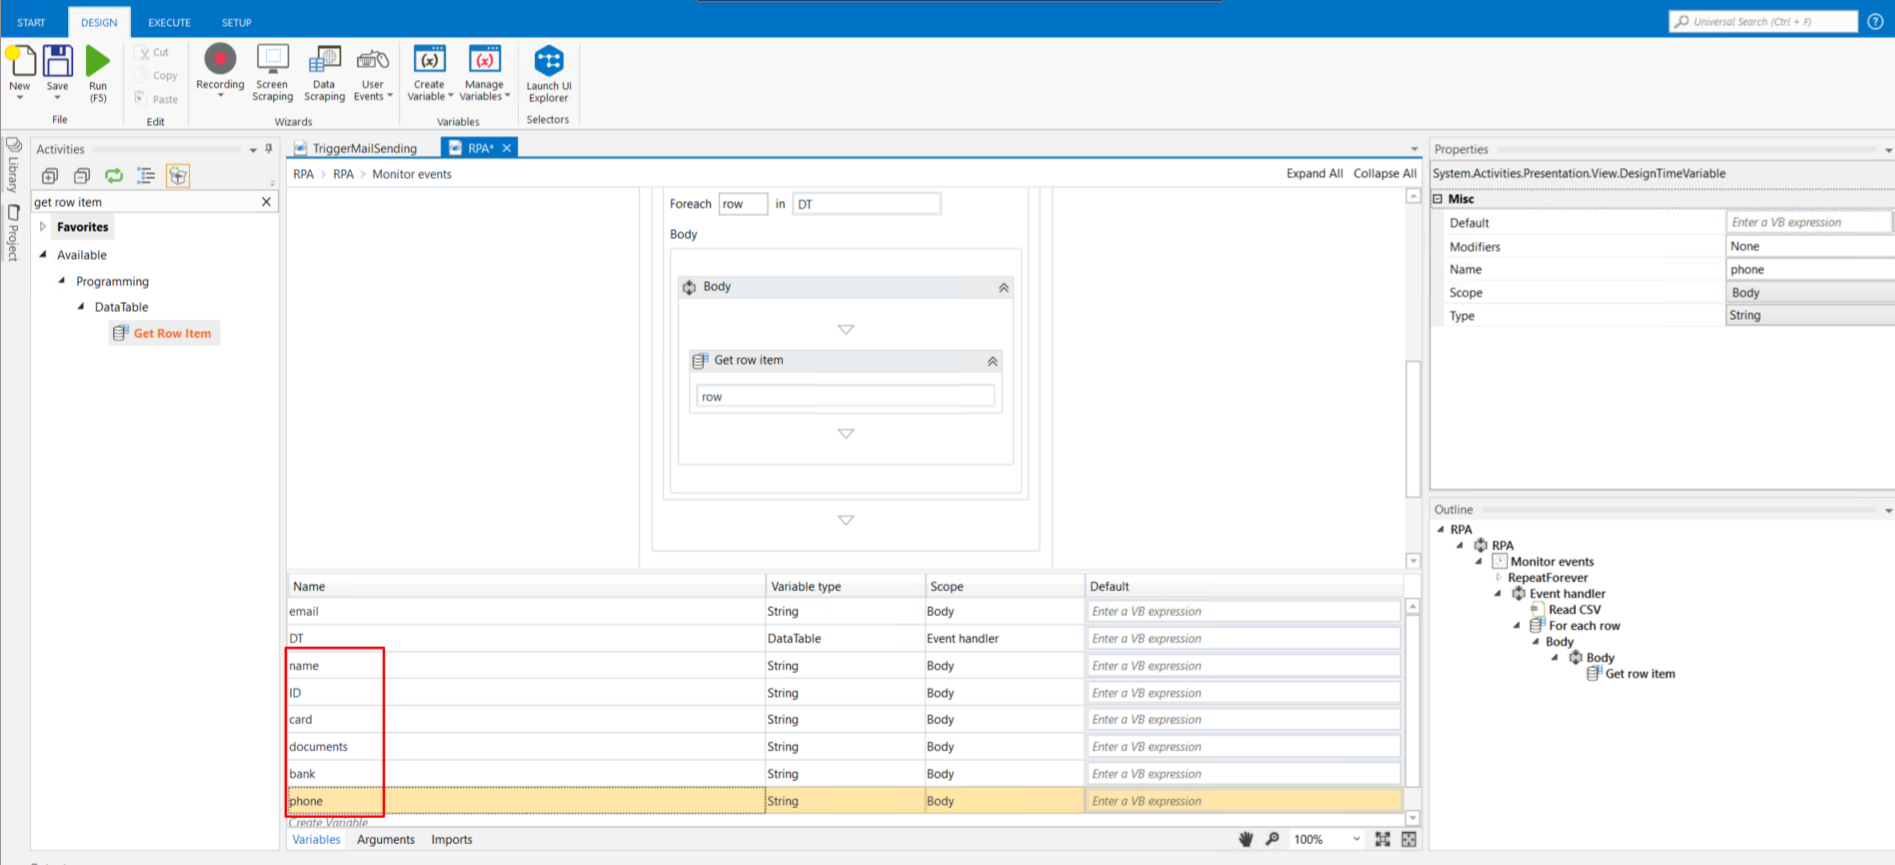
We will have to do the same for every value we would like to retrieve from our CSV file. In our example, we have six more topics to retrieve: name, ID, card, documents, bank, and phone number. So, we created six more variables related to the information we want to extract, as shown in the image.
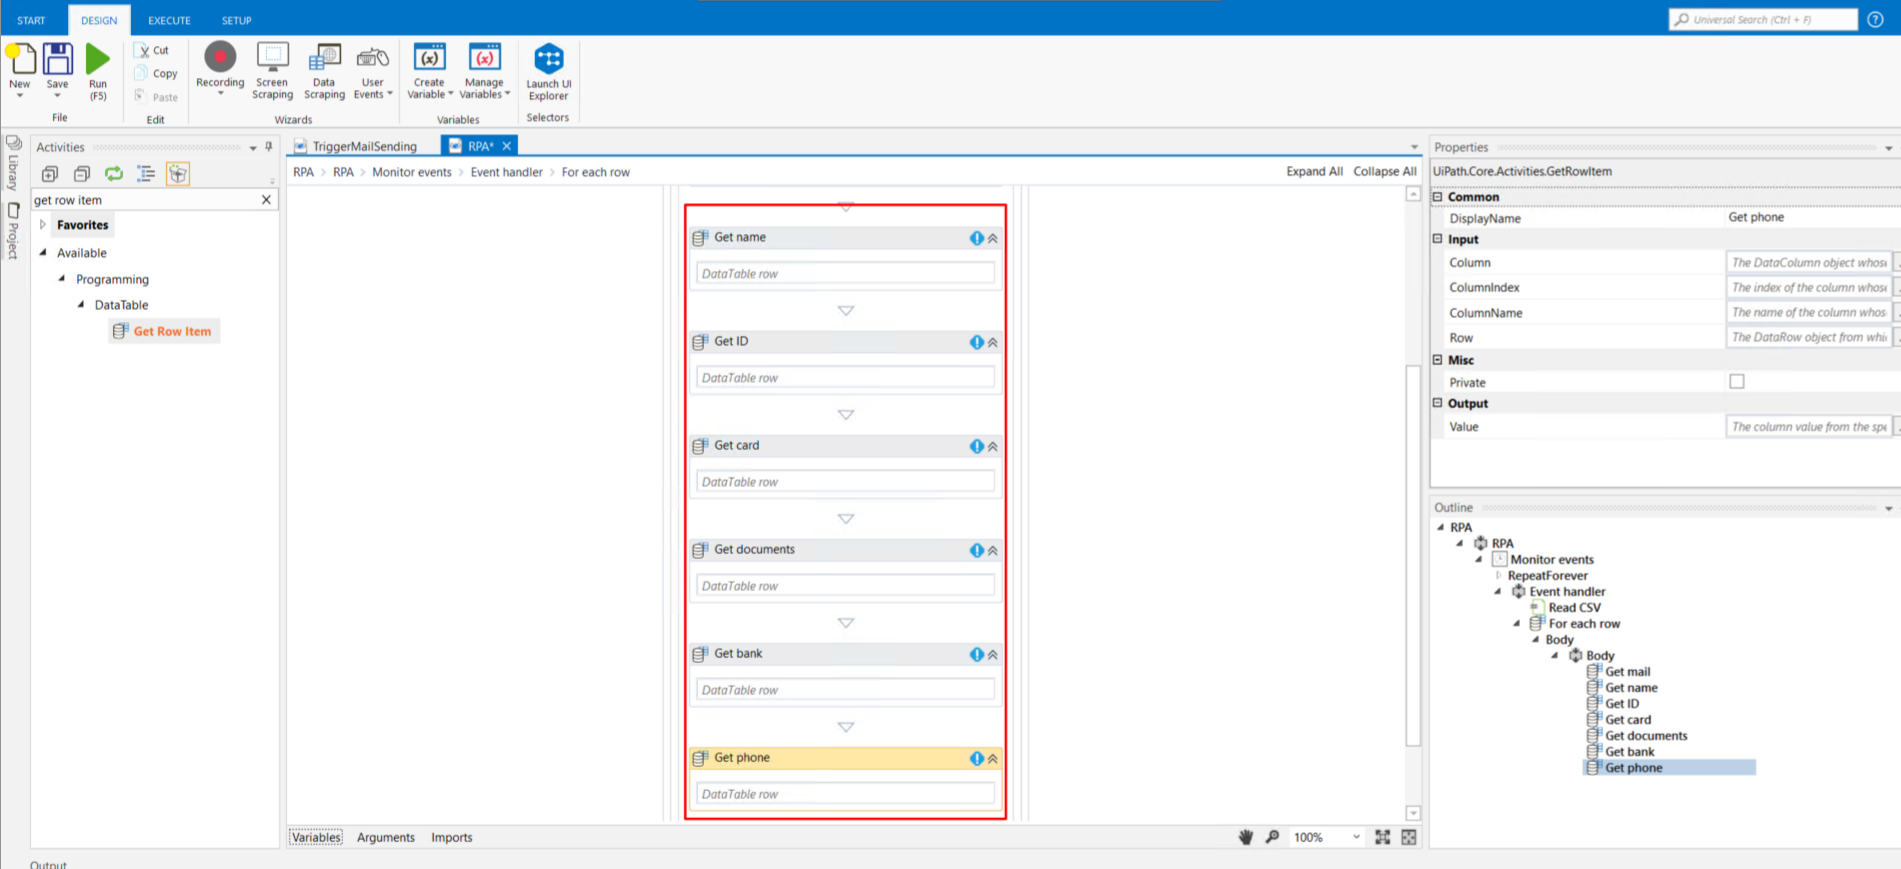
The next thing to do is to drag six more Get row item activities and configure them accordingly to the information the activity will get from the CSV file. We rename the Get row item so that their names make sense with the information they are retrieving.
Now that we have assigned the values to the variables, it is time to send the mail to the user. For this purpose, we have to add a new activity called Send SMTP Mail Message. So, we look for it in the activities and we drag it below the Get phone activity.
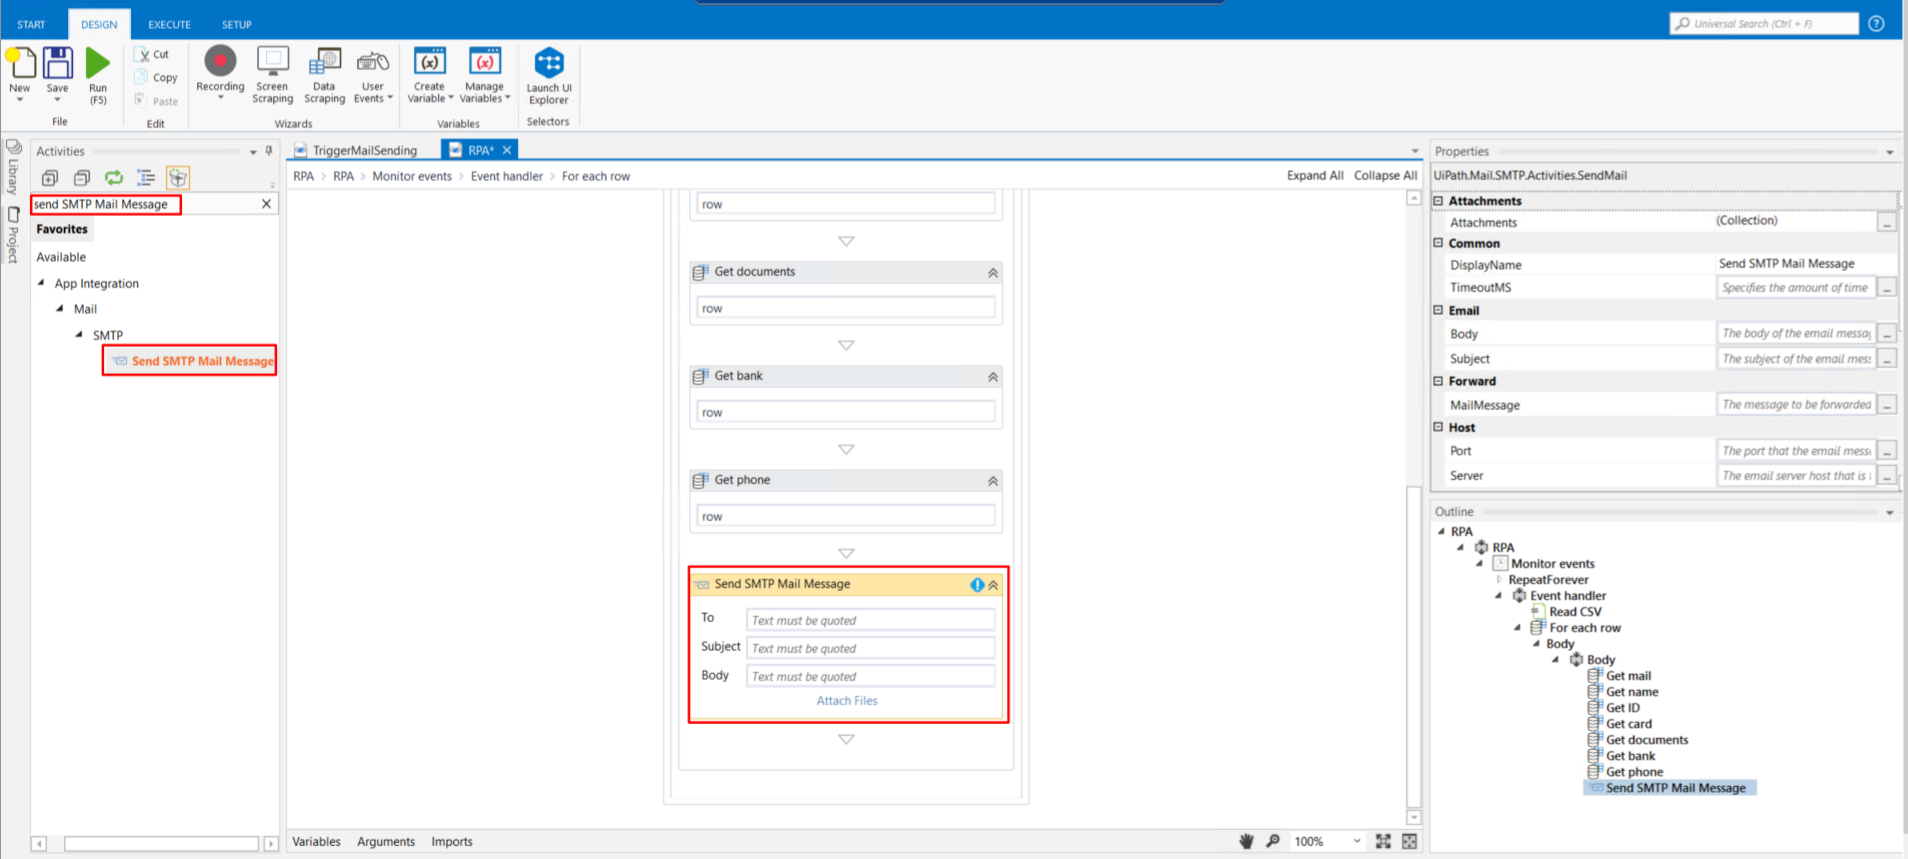
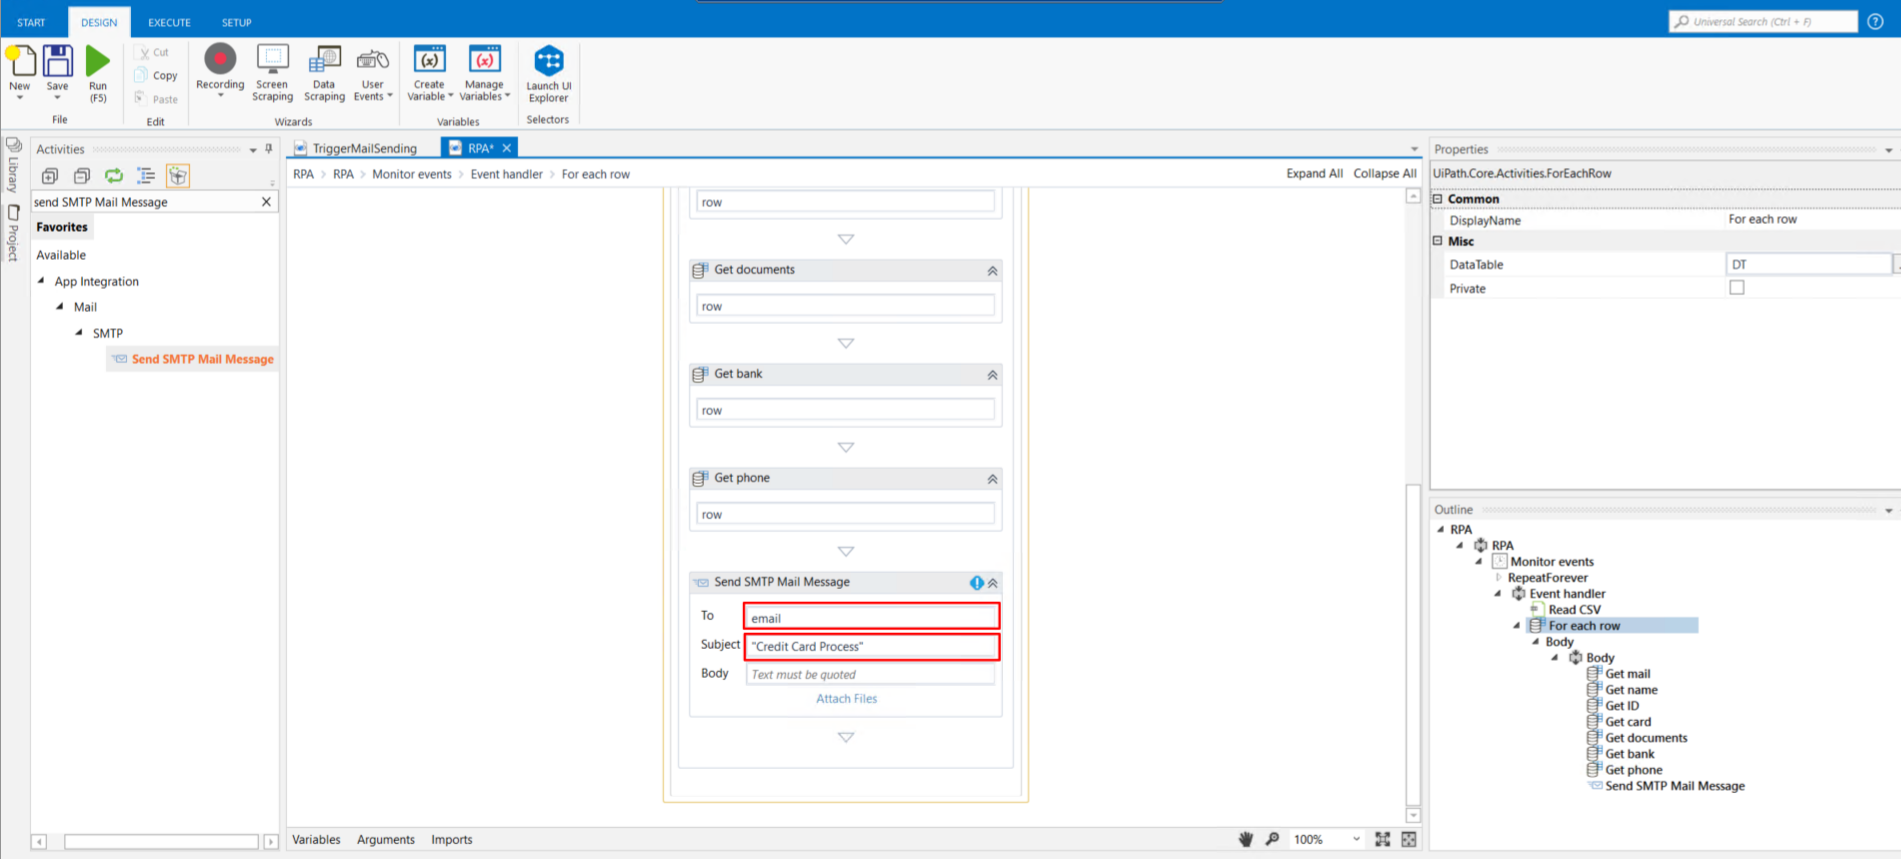
Now, we configure it. Inside the Send SMTP Mail Message activity on the To field, we write the mail of the user and put a proper subject related to the process the user is going through.
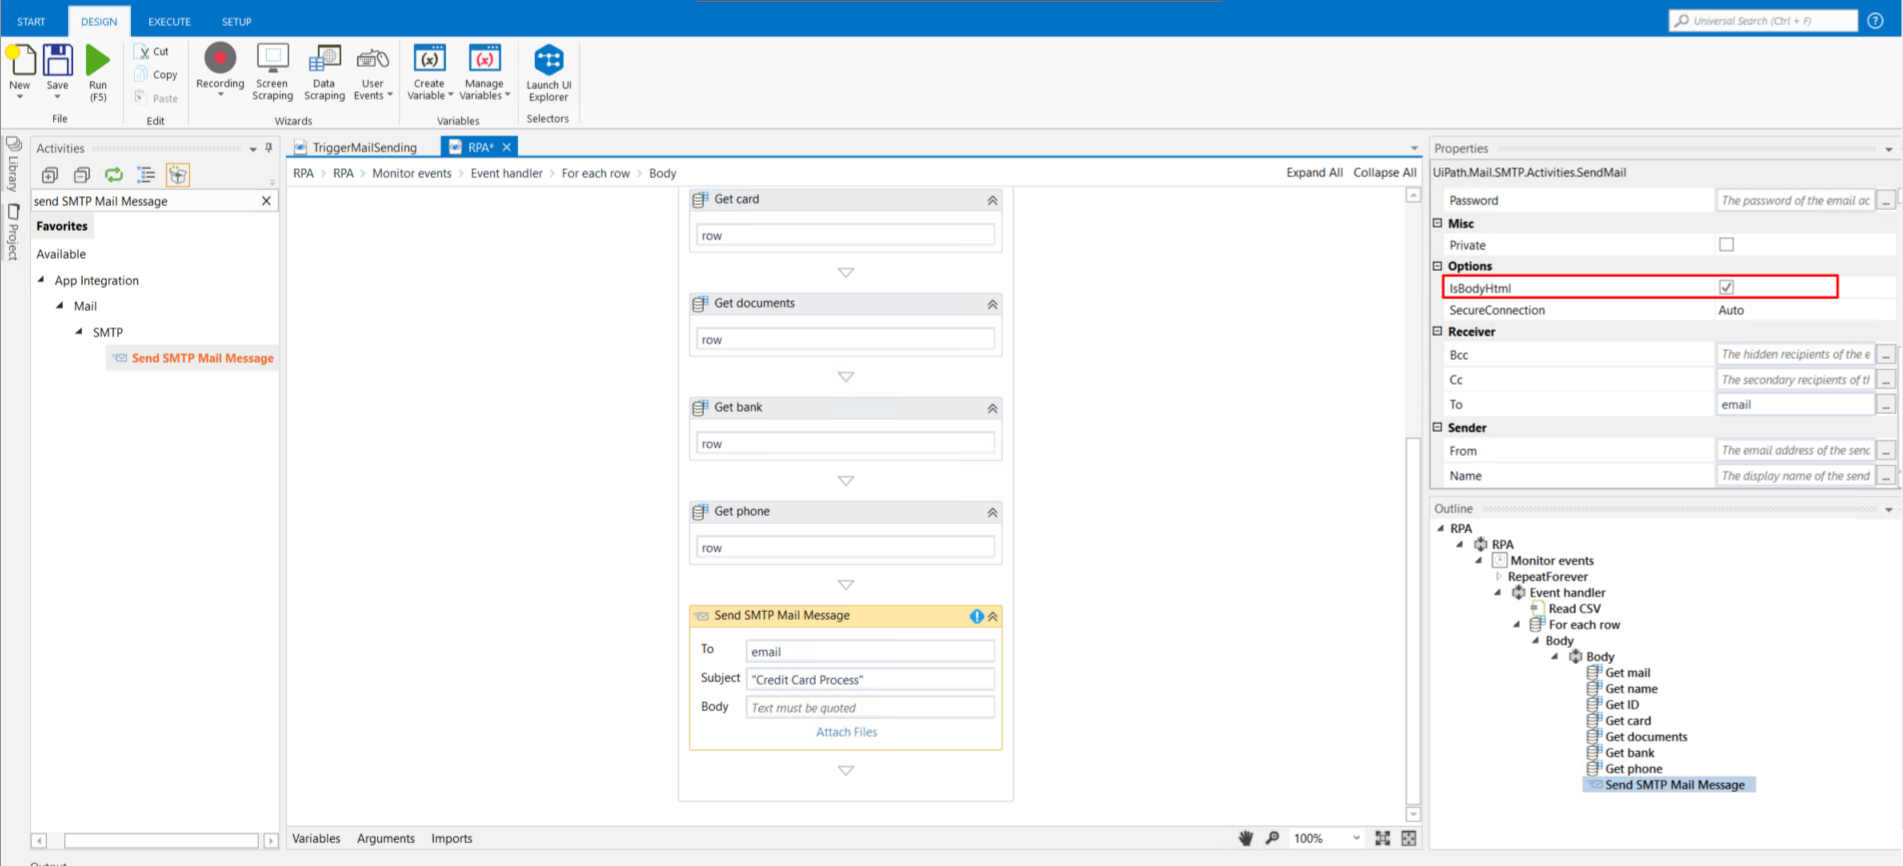
Next, we write the body. To do so, we need to give it some kind of format; hence, we tell UiPath that the text we are writing has to be interpreted as HTML and we put the next code inside the Body field.
      Name: "+name+"
      Phone: "+phone+"
      Card Petition ID: "+ID+"
      Card: "+card+"
      Documents: "+documents+"
      Bank: "+bank+"
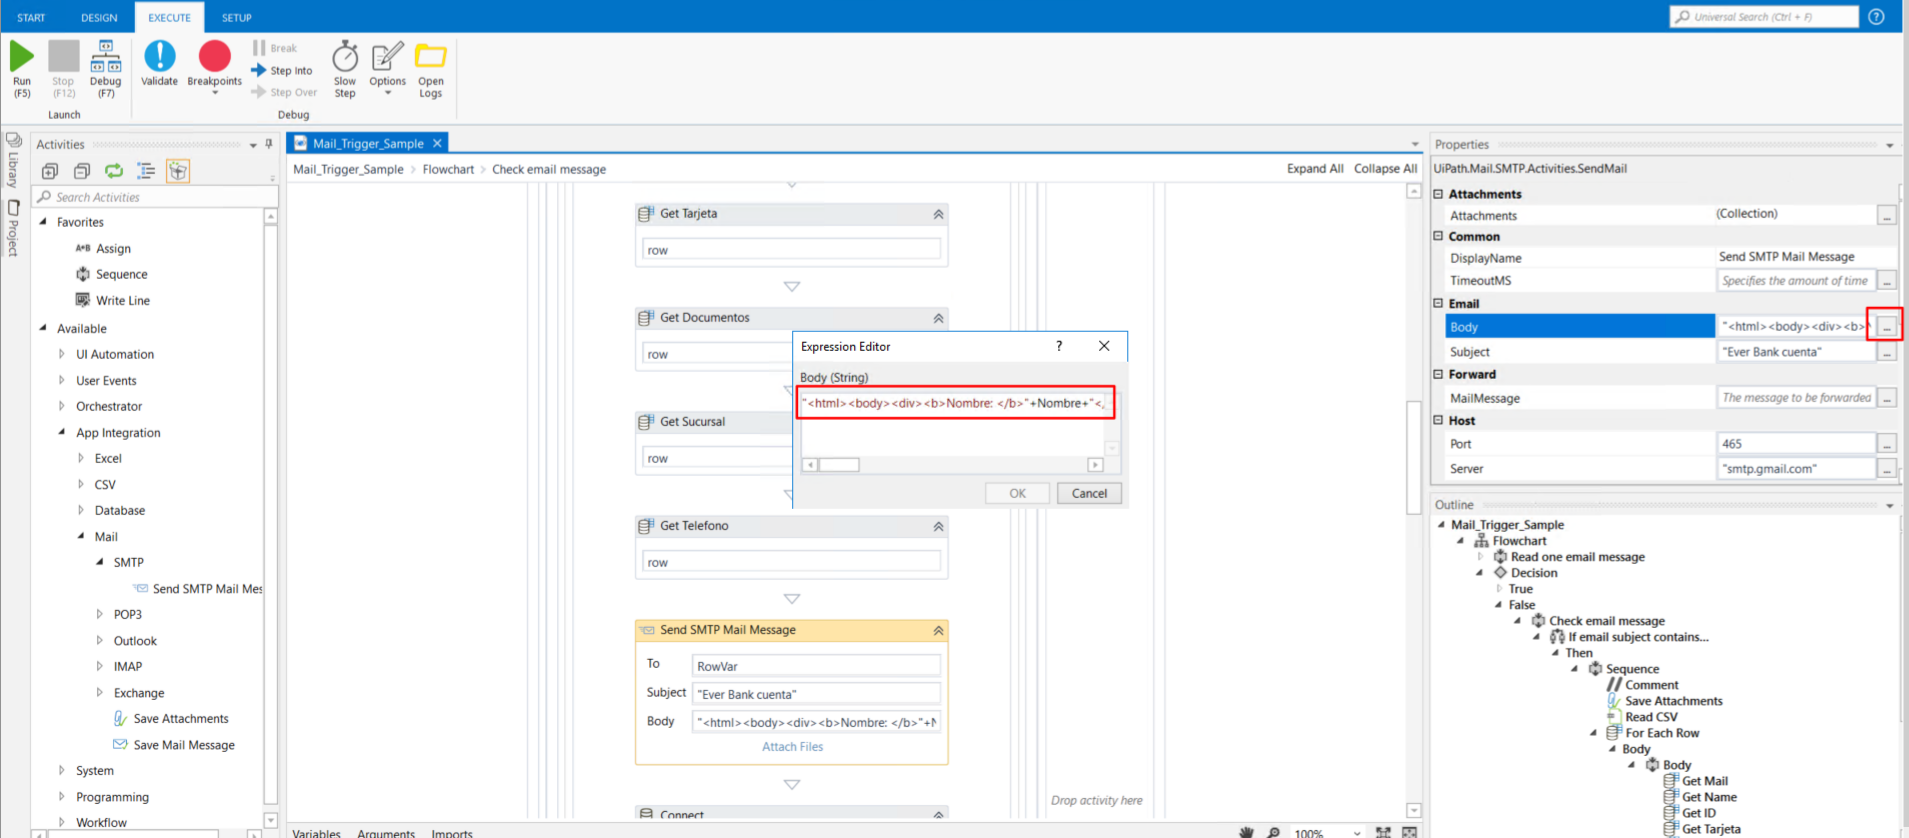
Now, let us configure the mail account that will send the mail to the user. Click on the Send SMTP Mail Message, go to the right side menu, and scroll down until you find the Host and Logon fields. Copy the Host part inside the image below and put the email and password of your mail (the mail account will send the email to the user).
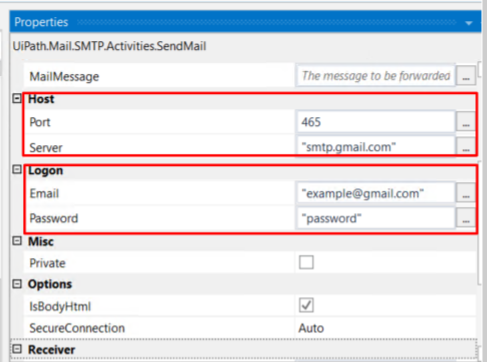
We will also need to configure our mail account to permit the UiPath to send emails. To do so, please read inside this link where it is explained and how to allow outside apps to use our mail.
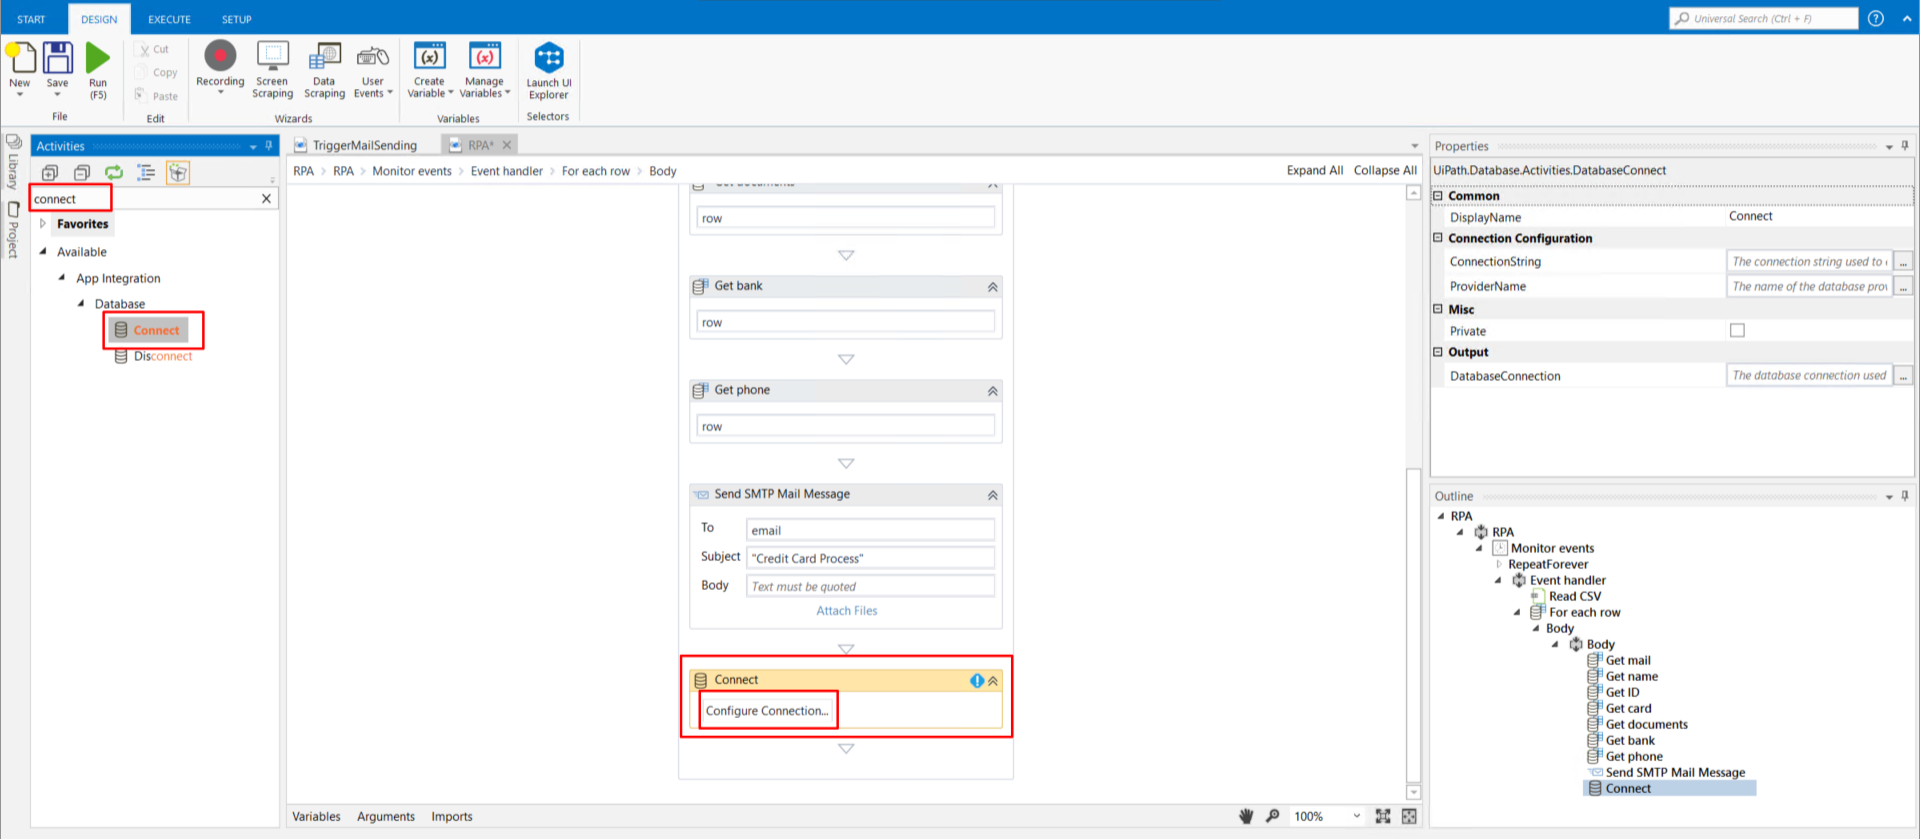
After this, a mail will be sent to the user’s email address containing the information we gave to Google Home. Now, let’s write that information inside a database. Please download the file inside this link and install it in the machine where UiPath is running.
Once it is installed, please add the activity Connect down the Send SMTP Mail Message and click on Configure Connection.
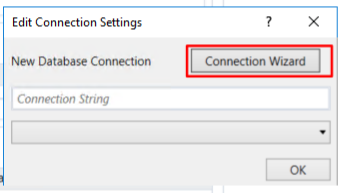
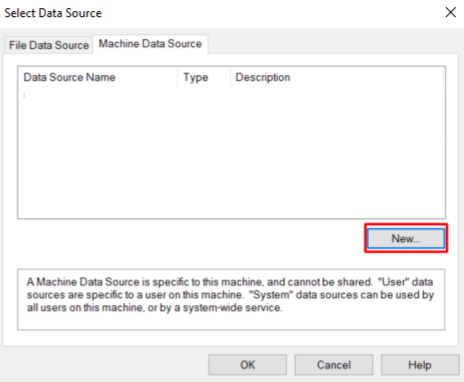
A window will pop up, click on the button named Connection Wizard:
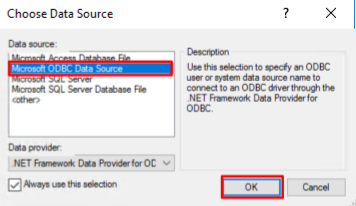
Then, choose the Microsoft ODBC Data Source and click Ok.
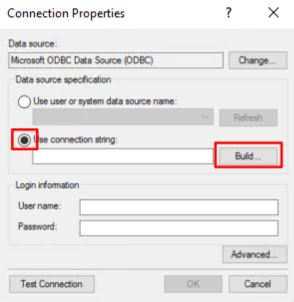
Then, select the Use connection string option and click on the Build button.
Now, click on new.
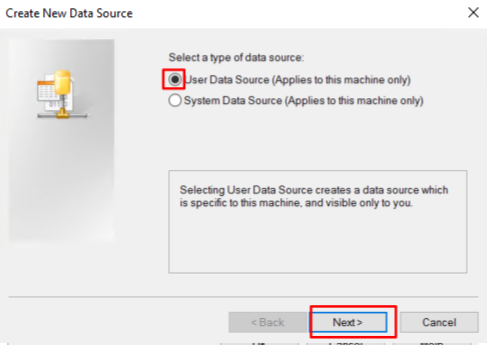
Then, select the User Data Source Option and click on Next
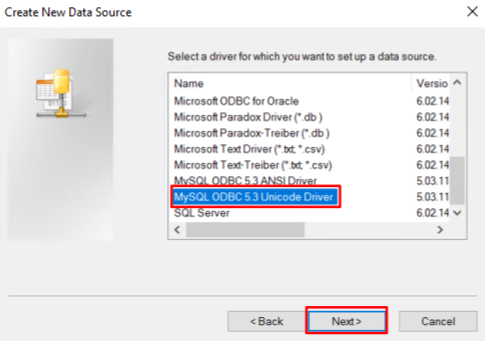
Now, scroll down and select MySQL ODBC 5.3 Unicode Driver and click on Next
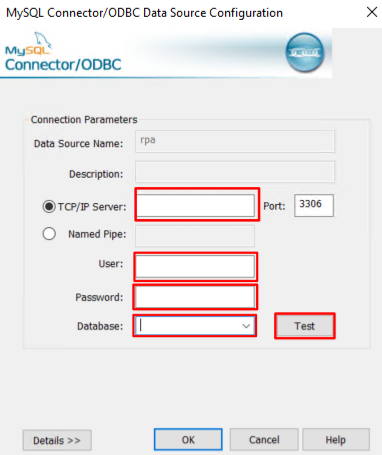
Then, a new window will pop up. You will fill the fields according to the MySQL database that you are using and click on Test
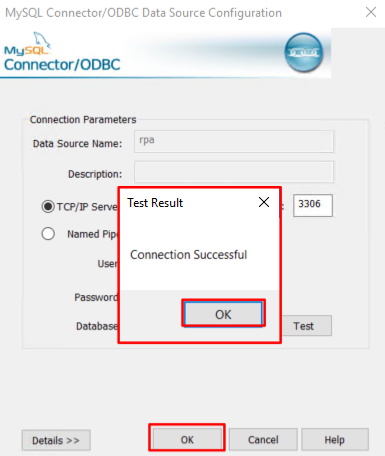
If everything is in order, a message like this will appear. Click on Ok, and then again, click on Ok.
After that, click on Advanced (you do not have to worry if your window does not look like the one below, we erased our database information)
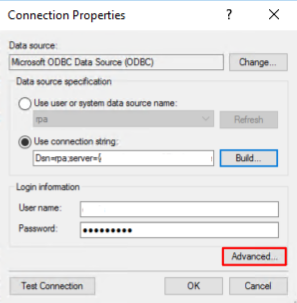
A window will be shown, write in the Driver field ODBC Driver and click Ok.
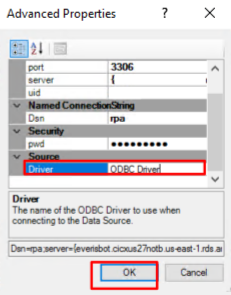
Finally, click on Ok.
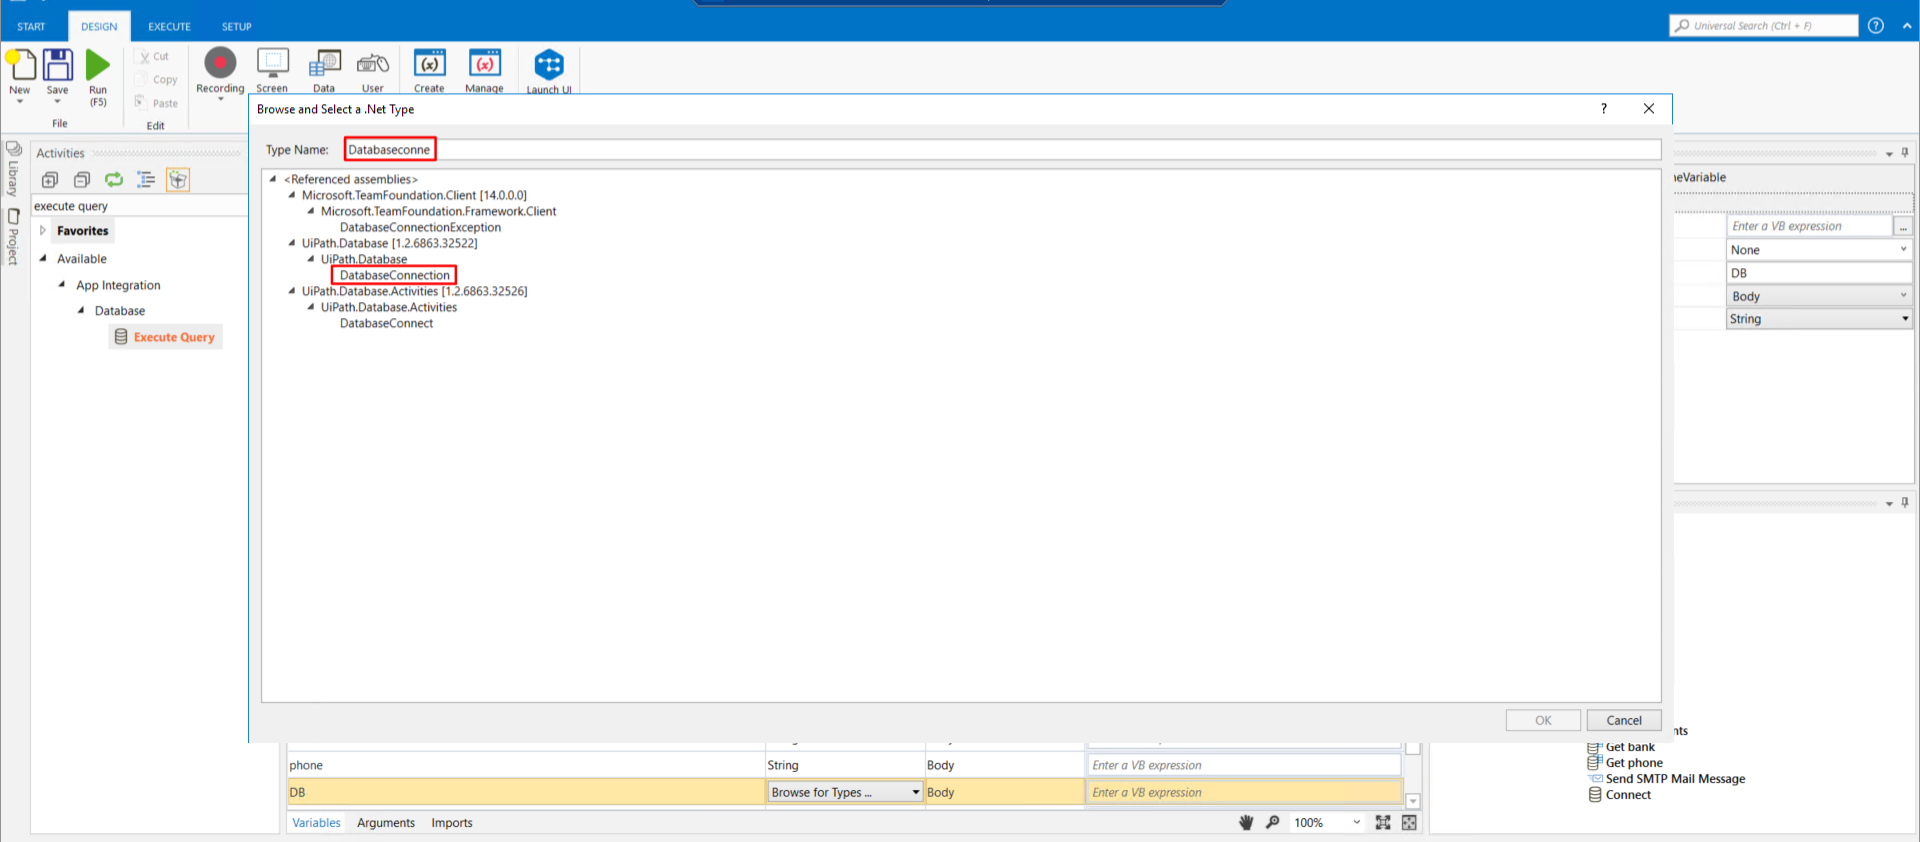
Next, we will create a new Variable called DB. This variable will hold the database connection. Hence, its type is Database connection.
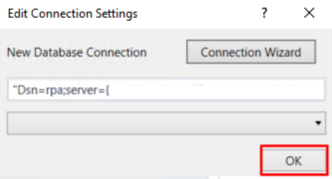
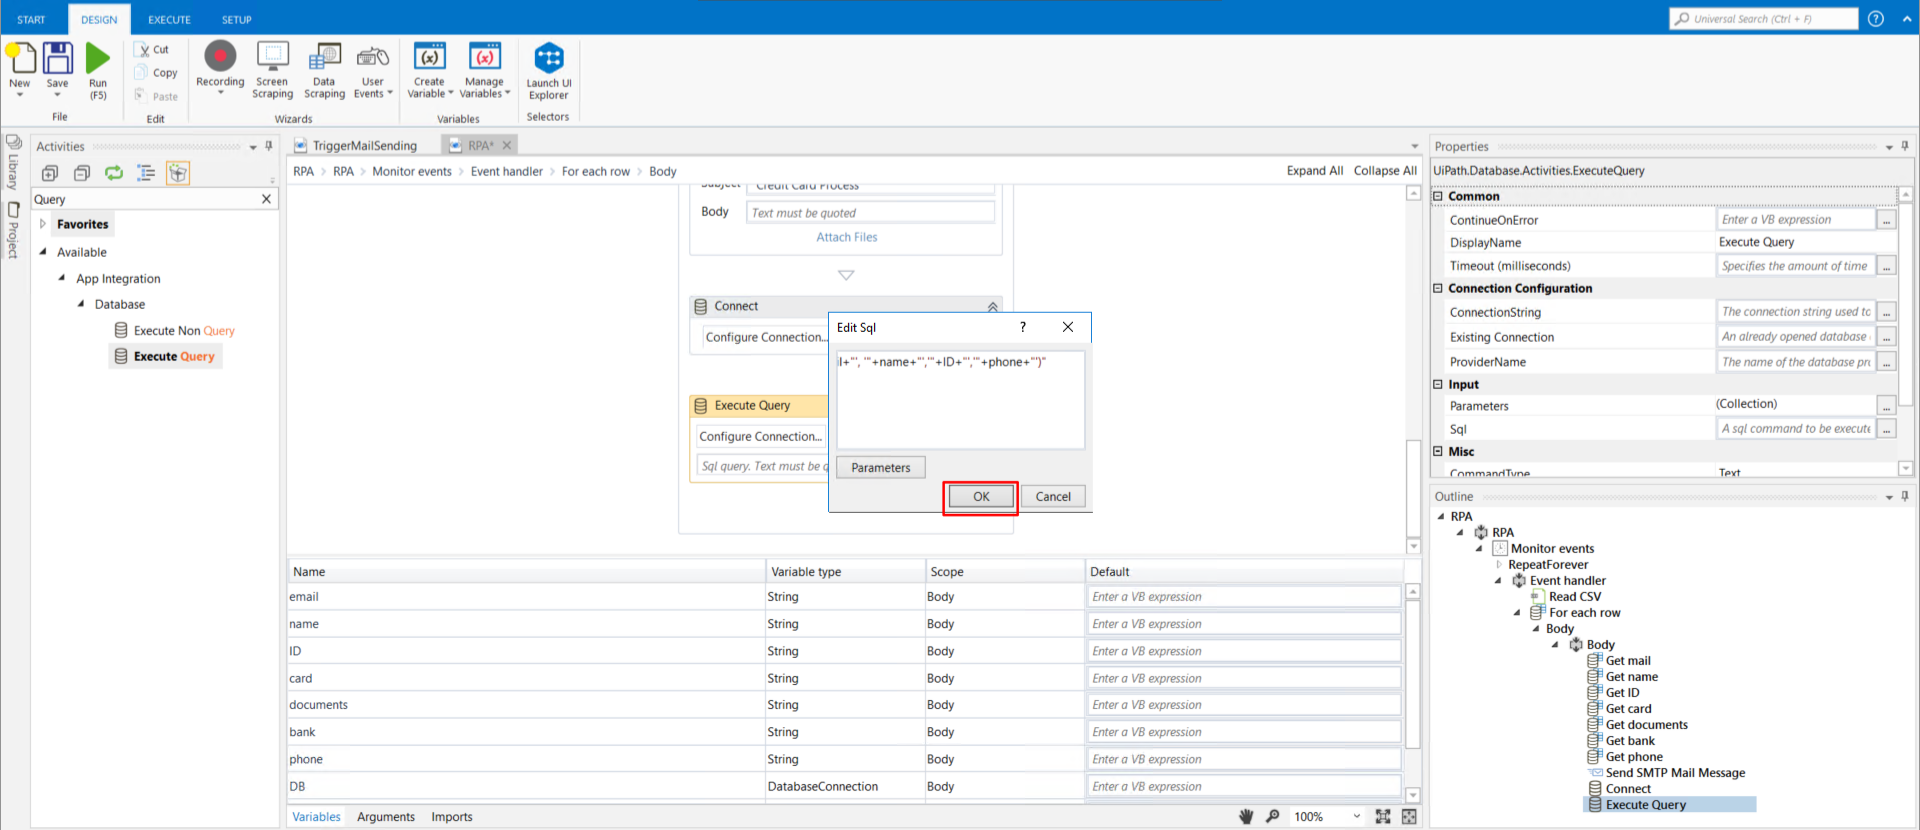
Now, let’s look for an activity called Execute Query and drag it down the Connect Activity and click on Edit Query button.

Then, let’s add the next text:
"insert into TABLENAME ("+email+","+name+","+ID+","+telephone+")"
Remember to change TABLENAME with your table name. In case you do not have a created table for this, execute the next code inside MySQL to create it.
CREATE TABLE IF NOT EXISTS tablename (
    email VARCHAR(50) NOT NULL,
    name VARCHAR(50) NOT NULL,
    id VARCHAR(50) NOT NULL,
    telephone VARCHAR(50) NOT NULL,
);
Then, click on Ok.
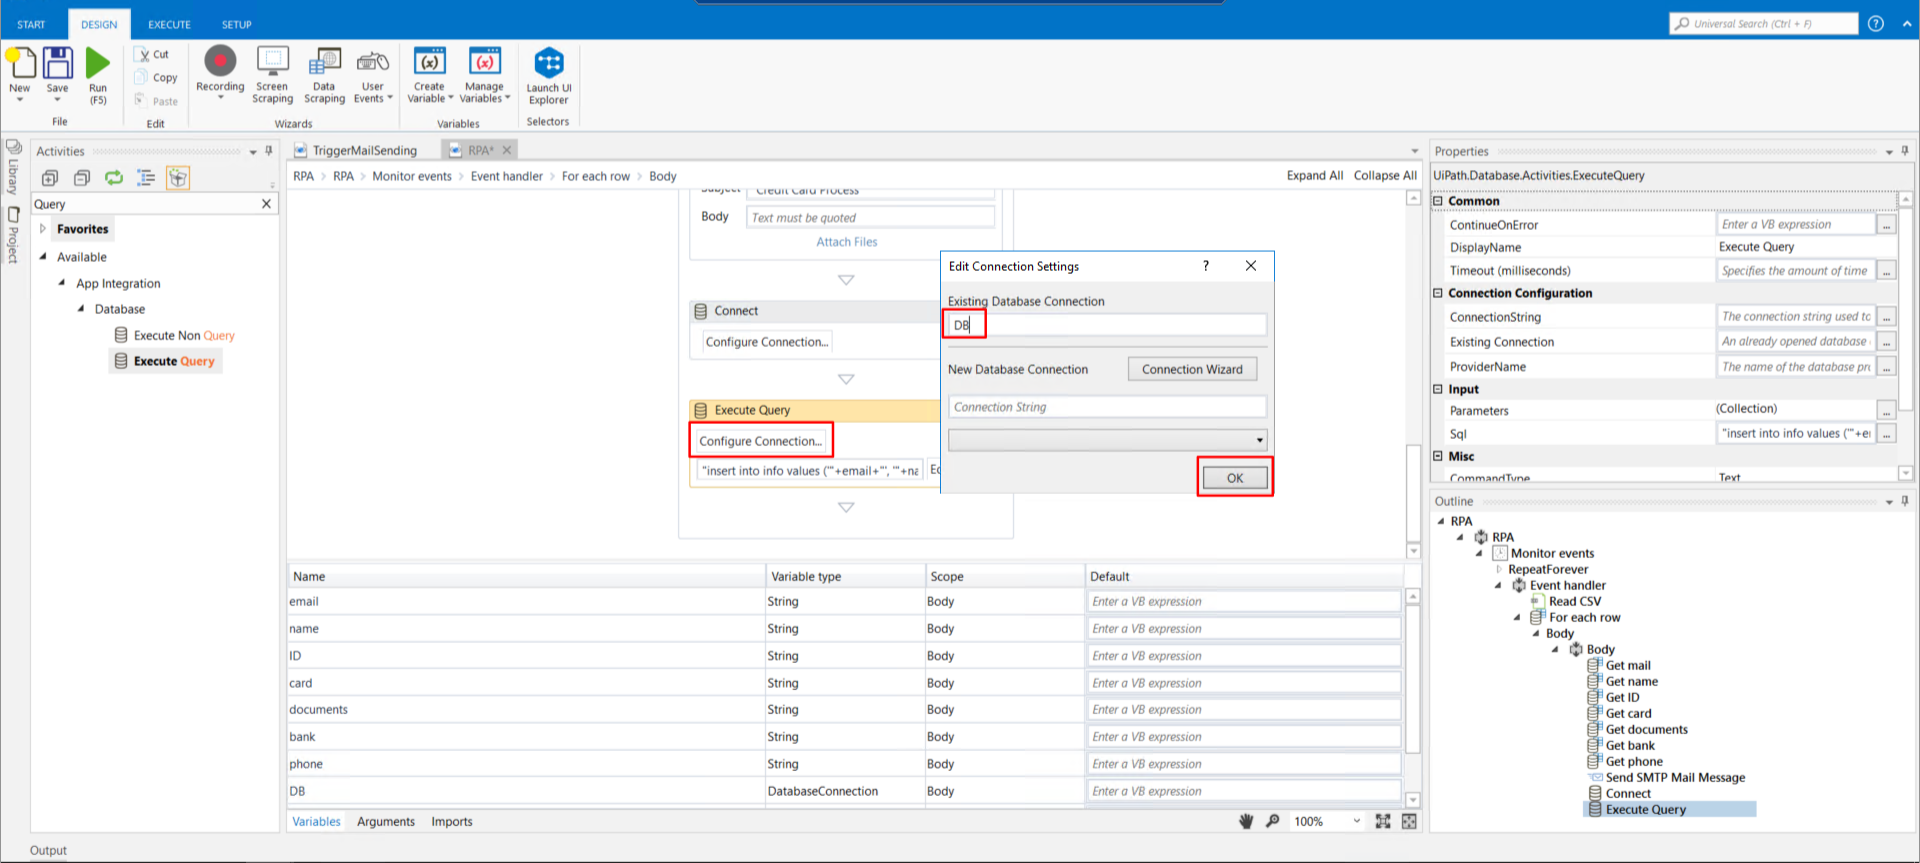
Now, click on Configure Connection, write the name of our variable DB, and then click Ok.
Until now, we are done configuring UiPath. Next, click on the Run button.
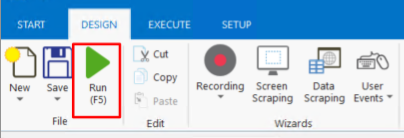
You will see a new white icon in the down bar — congrats! That means it is running.

Now, test it in your Google Home. Say: “Open Agent” and give it a whirl. You will soon see it in the email you gave with a message containing all the information!
Thanks for reading ❤
If you liked this post, share it with all of your programming buddies!
Follow us on Facebook | Twitter
#web-development #dialogflow