PyTorch Tutorial for Beginners
Introduction
Today deep learning is going viral and is applied to a variety of machine learning problems such as image recognition, speech recognition, machine translation, and others. There is a wide range of highly customizable neural network architectures, which can suit almost any problem when given enough data. Each neural network should be elaborated to suit the given problem well enough. You have to fine tune the hyperparameters of the network (the learning rate, dropout coefficients, weight decay, and many others) as well as the number of hidden layers, and the number of units in each layer. Choosing the right activation function for each layer is also crucial and may have a significant impact on metric scores and the training speed of the model.
Activation Functions
The activation function is an essential building block for every neural network. We can choose from a huge list of popular activation functions from popular Deep Learning frameworks, like ReLU, Sigmoid, Tanh, and many others.
However, to create a state of the art model, customized particularly for your task, you may need to use a custom activation function, which is absent in Deep Learning framework you are using. Activation functions can be roughly classified into the following groups by complexity:
- Simple activation functions like SiLU, Inverse Square Root Unit (ISRU). You can quickly implement these functions using any Deep Learning framework.
- Activation functions with trainable parameters like Soft Exponentialactivation or S-shaped Rectified Linear Unit (SReLU).
- Activation functions, which are not differentiable at some points and require the custom implementation of the backward step, for example, Bipolar Rectified Linear Unit (BReLU).
In this tutorial, I cover the implementation and demo examples for all of these types of functions with PyTorch framework. You can find all the code for this article on GitHub.
Setting Up
To go through the examples of the implementation of activation functions, you would require:
- To install PyTorch,
- To add the necessary imports to your script,
# Import basic libraries
import numpy as np # linear algebra
import pandas as pd # data processing, CSV file I/O (e.g. pd.read_csv)
from collections import OrderedDict

# Import PyTorch
import torch # import main library
from torch.autograd import Variable
import torch.nn as nn # import modules
from torch.autograd import Function # import Function to create custom activations
from torch.nn.parameter import Parameter # import Parameter to create custom activations with learnable parameters
from torch import optim # import optimizers for demonstrations
import torch.nn.functional as F # import torch functions
from torchvision import datasets, transforms # import transformations to use for demo
The necessary imports
- To prepare a dataset for the demonstration. We will use the well known Fashion MNIST dataset.
  # Define a transform
  transform = transforms.Compose([transforms.ToTensor()])

  # Download and load the training data for Fashion MNIST
  trainset = datasets.FashionMNIST('~/.pytorch/F_MNIST_data/', download=True, train=True, transform=transform)
  trainloader = torch.utils.data.DataLoader(trainset, batch_size=64, shuffle=True)
Prepare the dataset
The last thing is to set up a sample function, which runs the model training process and prints out the training loss for each epoch:
# helper function to train a model
def train_model(model, trainloader):
    '''
    Function trains the model and prints out the training log.
    INPUT:
        model - initialized PyTorch model ready for training.
        trainloader - PyTorch dataloader for training data.
    '''
    #setup training

    #define loss function
    criterion = nn.NLLLoss()
    #define learning rate
    learning_rate = 0.003
    #define number of epochs
    epochs = 5
    #initialize optimizer
    optimizer = optim.Adam(model.parameters(), lr=learning_rate)

    #run training and print out the loss to make sure that we are actually fitting to the training set
    print('Training the model. Make sure that loss decreases after each epoch.\n')
    for e in range(epochs):
        running_loss = 0
        for images, labels in trainloader:
            images = images.view(images.shape[0], -1)
            log_ps = model(images)
            loss = criterion(log_ps, labels)

            optimizer.zero_grad()
            loss.backward()
            optimizer.step()

            running_loss += loss.item()
        else:
            # print out the loss to make sure it is decreasing
            print(f"Training loss: {running_loss}")
A sample model training function
Now everything is ready for the creation of models with custom activation functions.
Implementing Simple Activation Functions
The most simple common activation functions
- are differentiable and don’t need the manual implementation of the backward step,
- don’t have any trainable parameters. All their parameters should be set in advance.
One of the examples of such simple functions is Sigmoid Linear Unit or just SiLU, also known as Swish-1:


SiLU
Such a simple activation function can be implemented just as easy as a Python function:
# simply define a silu function
def silu(input):
    '''
    Applies the Sigmoid Linear Unit (SiLU) function element-wise:

        SiLU(x) = x * sigmoid(x)
    '''
    return input * torch.sigmoid(input) # use torch.sigmoid to make sure that we created the most efficient implemetation based on builtin PyTorch functions

# create a class wrapper from PyTorch nn.Module, so
# the function now can be easily used in models
class SiLU(nn.Module):
    '''
    Applies the Sigmoid Linear Unit (SiLU) function element-wise:

        SiLU(x) = x * sigmoid(x)

    Shape:
        - Input: (N, *) where * means, any number of additional
          dimensions
        - Output: (N, *), same shape as the input

    References:
        -  Related paper:
        https://arxiv.org/pdf/1606.08415.pdf

    Examples:
        >>> m = silu()
        >>> input = torch.randn(2)
        >>> output = m(input)

    '''
    def __init__(self):
        '''
        Init method.
        '''
        super().__init__() # init the base class

    def forward(self, input):
        '''
        Forward pass of the function.
        '''
        return silu(input) # simply apply already implemented SiLU
So now SiLU can be used in models created with nn.Sequential:
# use SiLU with model created with Sequential

# initialize activation function
activation_function = SiLU()

# Initialize the model using nn.Sequential
model = nn.Sequential(OrderedDict([
                      ('fc1', nn.Linear(784, 256)),
                      ('activation1', activation_function), # use SiLU
                      ('fc2', nn.Linear(256, 128)),
                      ('bn2', nn.BatchNorm1d(num_features=128)),
                      ('activation2', activation_function), # use SiLU
                      ('dropout', nn.Dropout(0.3)),
                      ('fc3', nn.Linear(128, 64)),
                      ('bn3', nn.BatchNorm1d(num_features=64)),
                      ('activation3', activation_function), # use SiLU
                      ('logits', nn.Linear(64, 10)),
                      ('logsoftmax', nn.LogSoftmax(dim=1))]))

# Run training
train_model(model)
Or in a simple model, which extends nn.Module class:
# create class for basic fully-connected deep neural network
class ClassifierSiLU(nn.Module):
    '''
    Demo classifier model class to demonstrate SiLU
    '''
    def __init__(self):
        super().__init__()

        # initialize layers
        self.fc1 = nn.Linear(784, 256)
        self.fc2 = nn.Linear(256, 128)
        self.fc3 = nn.Linear(128, 64)
        self.fc4 = nn.Linear(64, 10)

    def forward(self, x):
        # make sure the input tensor is flattened
        x = x.view(x.shape[0], -1)

        # apply silu function
        x = silu(self.fc1(x))

        # apply silu function
        x = silu(self.fc2(x))

        # apply silu function
        x = silu(self.fc3(x))

        x = F.log_softmax(self.fc4(x), dim=1)

        return x

# Create demo model
model = ClassifierSiLU()

# Run training
train_model(model)
Implementing Activation Function with Trainable Parameters
There are lots of activation functions with parameters, which can be trained with gradient descent while training the model. A great example for one of these is Soft Exponential function:

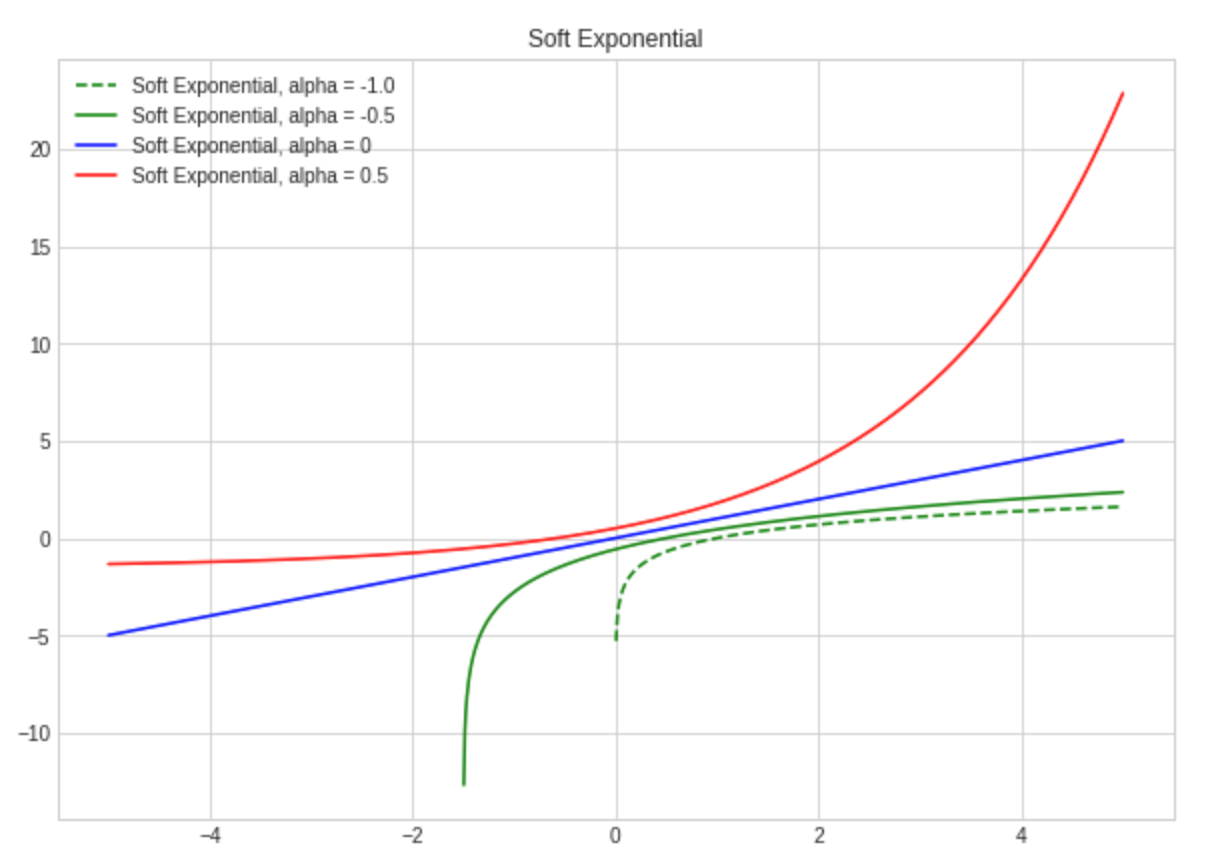
Soft Exponential
To implement an activation function with trainable parameters we have to:
- derive a class from nn.Module and make the parameter one of its members,
- wrap the parameter as a PyTorch Parameter and set requiresGrad attribute to True.
Here is an example for Soft Exponential:
class soft_exponential(nn.Module):
    '''
    Implementation of soft exponential activation.

    Shape:
        - Input: (N, *) where * means, any number of additional
          dimensions
        - Output: (N, *), same shape as the input

    Parameters:
        - alpha - trainable parameter

    References:
        - See related paper:
        https://arxiv.org/pdf/1602.01321.pdf

    Examples:
        >>> a1 = soft_exponential(256)
        >>> x = torch.randn(256)
        >>> x = a1(x)
    '''
    def __init__(self, in_features, alpha = None):
        '''
        Initialization.
        INPUT:
            - in_features: shape of the input
            - aplha: trainable parameter
            aplha is initialized with zero value by default
        '''
        super(soft_exponential,self).__init__()
        self.in_features = in_features

        # initialize alpha
        if alpha == None:
            self.alpha = Parameter(torch.tensor(0.0)) # create a tensor out of alpha
        else:
            self.alpha = Parameter(torch.tensor(alpha)) # create a tensor out of alpha

        self.alpha.requiresGrad = True # set requiresGrad to true!

    def forward(self, x):
        '''
        Forward pass of the function.
        Applies the function to the input elementwise.
        '''
        if (self.alpha == 0.0):
            return x

        if (self.alpha < 0.0):
            return - torch.log(1 - self.alpha * (x + self.alpha)) / self.alpha

        if (self.alpha > 0.0):
            return (torch.exp(self.alpha * x) - 1)/ self.alpha + self.alpha
And now we can use Soft Exponential in our models as follows:
# create class for basic fully-connected deep neural network
class ClassifierSExp(nn.Module):
    '''
    Basic fully-connected network to test Soft Exponential activation.
    '''
    def __init__(self):
        super().__init__()

        # initialize layers
        self.fc1 = nn.Linear(784, 256)
        self.fc2 = nn.Linear(256, 128)
        self.fc3 = nn.Linear(128, 64)
        self.fc4 = nn.Linear(64, 10)

        # initialize Soft Exponential activation
        self.a1 = soft_exponential(256)
        self.a2 = soft_exponential(128)
        self.a3 = soft_exponential(64)

    def forward(self, x):
        # make sure the input tensor is flattened
        x = x.view(x.shape[0], -1)

        # apply Soft Exponential unit
        x = self.a1(self.fc1(x))
        x = self.a2(self.fc2(x))
        x = self.a3(self.fc3(x))
        x = F.log_softmax(self.fc4(x), dim=1)

        return x

model = ClassifierSExp()
train_model(model)
Implementing Activation Function with Custom Backward Step
The perfect example of an activation function, which needs implementation of a custom backward step is BReLU (Bipolar Rectified Linear Unit):

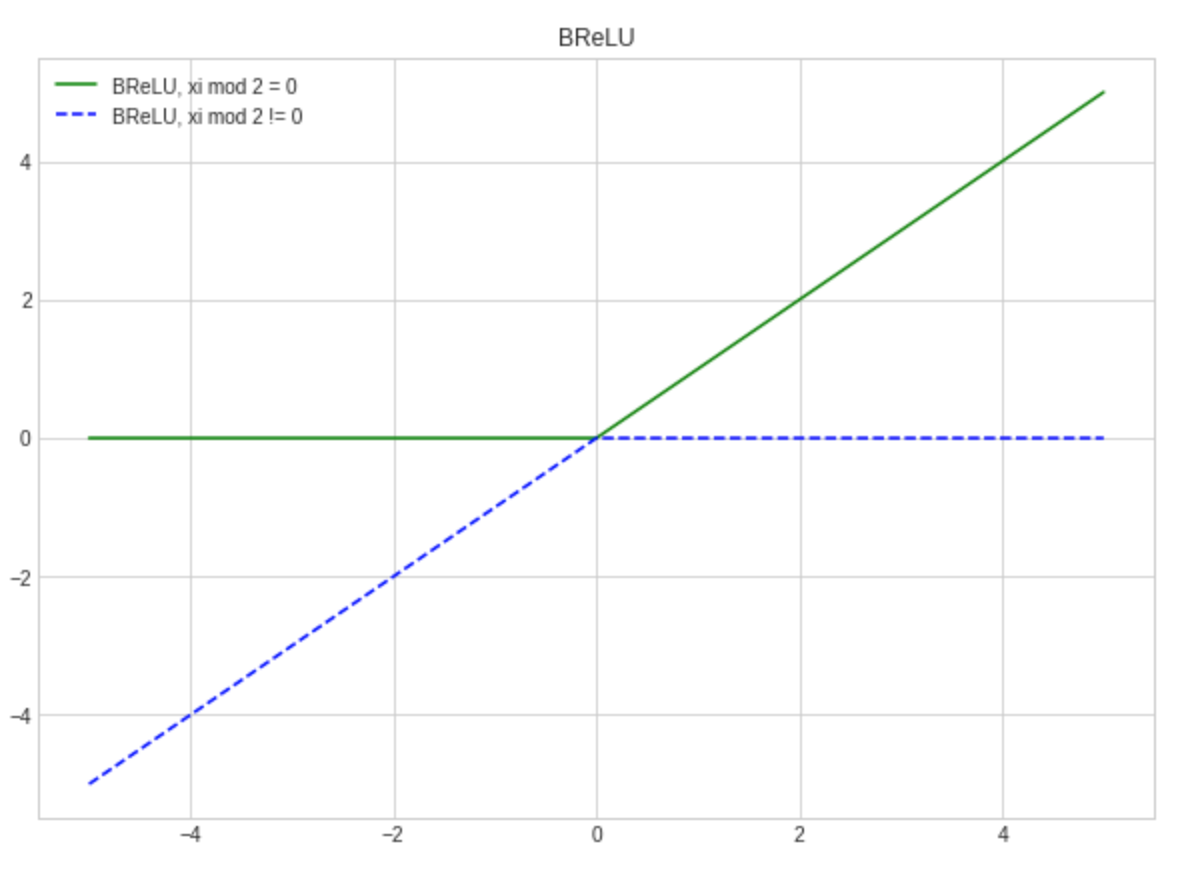
BReLU
This function is not differentiable at 0, so automatic gradient computation might fail. That’s why we should provide a custom backward step to ensure stable computation.
To impement custom activation function with backward step we should:
- create a class which, inherits Function from torch.autograd,
- override static forward and backward methods. Forward method just applies the function to the input. Backward method computes the gradient of the loss function with respect to the input given the gradient of the loss function with respect to the output.
Let’s see an example for BReLU:
class brelu(Function):
    '''
    Implementation of BReLU activation function.

    Shape:
        - Input: (N, *) where * means, any number of additional
          dimensions
        - Output: (N, *), same shape as the input

    References:
        - See BReLU paper:
        https://arxiv.org/pdf/1709.04054.pdf

    Examples:
        >>> brelu_activation = brelu.apply
        >>> t = torch.randn((5,5), dtype=torch.float, requires_grad = True)
        >>> t = brelu_activation(t)
    '''
    #both forward and backward are @staticmethods
    @staticmethod
    def forward(ctx, input):
        """
        In the forward pass we receive a Tensor containing the input and return
        a Tensor containing the output. ctx is a context object that can be used
        to stash information for backward computation. You can cache arbitrary
        objects for use in the backward pass using the ctx.save_for_backward method.
        """
        ctx.save_for_backward(input) # save input for backward pass

        # get lists of odd and even indices
        input_shape = input.shape[0]
        even_indices = [i for i in range(0, input_shape, 2)]
        odd_indices = [i for i in range(1, input_shape, 2)]

        # clone the input tensor
        output = input.clone()

        # apply ReLU to elements where i mod 2 == 0
        output[even_indices] = output[even_indices].clamp(min=0)

        # apply inversed ReLU to inversed elements where i mod 2 != 0
        output[odd_indices] = 0 - output[odd_indices] # reverse elements with odd indices
        output[odd_indices] = - output[odd_indices].clamp(min = 0) # apply reversed ReLU

        return output

    @staticmethod
    def backward(ctx, grad_output):
        """
        In the backward pass we receive a Tensor containing the gradient of the loss
        with respect to the output, and we need to compute the gradient of the loss
        with respect to the input.
        """
        grad_input = None # set output to None

        input, = ctx.saved_tensors # restore input from context

        # check that input requires grad
        # if not requires grad we will return None to speed up computation
        if ctx.needs_input_grad[0]:
            grad_input = grad_output.clone()

            # get lists of odd and even indices
            input_shape = input.shape[0]
            even_indices = [i for i in range(0, input_shape, 2)]
            odd_indices = [i for i in range(1, input_shape, 2)]

            # set grad_input for even_indices
            grad_input[even_indices] = (input[even_indices] >= 0).float() * grad_input[even_indices]

            # set grad_input for odd_indices
            grad_input[odd_indices] = (input[odd_indices] < 0).float() * grad_input[odd_indices]

        return grad_input
We can now use *BReLU *in our models as follows:
class ClassifierBReLU(nn.Module):
    '''
    Simple fully-connected classifier model to demonstrate BReLU activation.
    '''
    def __init__(self):
        super(ClassifierBReLU, self).__init__()

        # initialize layers
        self.fc1 = nn.Linear(784, 256)
        self.fc2 = nn.Linear(256, 128)
        self.fc3 = nn.Linear(128, 64)
        self.fc4 = nn.Linear(64, 10)

        # create shortcuts for BReLU
        self.a1 = brelu.apply
        self.a2 = brelu.apply
        self.a3 = brelu.apply

    def forward(self, x):
        # make sure the input tensor is flattened
        x = x.view(x.shape[0], -1)

        # apply BReLU
        x = self.a1(self.fc1(x))
        x = self.a2(self.fc2(x))
        x = self.a3(self.fc3(x))
        x = F.log_softmax(self.fc4(x), dim=1)

        return x

model = ClassifierBReLU()
train_model(model)
Conclusion
In this tutorial I covered:
- How to create a simple custom activation function with PyTorch,
- How to create an** activation function with trainable parameters**, which can be trained using gradient descent,
- How to create an activation function with a custom backward step.
All code from this tutorial is available on GitHub. Other examples of implemented custom activation functions for PyTorch and Keras you can find in this GitHub repository.
#python #deep-learning #machine-learning