Deep Learning Using TensorFlow
In this TensorFlow tutorial for professionals and enthusiasts who are interested in applying Deep Learning Algorithm using TensorFlow to solve various problems.
TensorFlow is an open source deep learning library that is based on the concept of data flow graphs for building models. It allows you to create large-scale neural networks with many layers. Learning the use of this library is also a fundamental part of the AI & Deep Learning course curriculum. Following are the topics that will be discussed in this TensorFlow tutorial:
- What is TensorFlow
- TensorFlow Code Basics
- TensorFlow UseCase
What are Tensors?
In this TensorFlow tutorial, before talking about TensorFlow, let us first understand what are tensors. **Tensors **are nothing but a de facto for representing the data in deep learning.
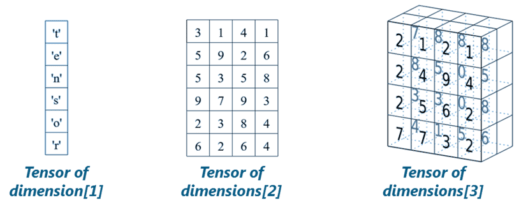
As shown in the image above, tensors are just multidimensional arrays, that allows you to represent data having higher dimensions. In general, Deep Learning you deal with high dimensional data sets where dimensions refer to different features present in the data set. In fact, the name “TensorFlow” has been derived from the operations which neural networks perform on tensors. It’s literally a flow of tensors. Since, you have understood what are tensors, let us move ahead in this **TensorFlow **tutorial and understand – what is TensorFlow?
What is TensorFlow?
**TensorFlow **is a library based on Python that provides different types of functionality for implementing Deep Learning Models. As discussed earlier, the term TensorFlow is made up of two terms – Tensor & Flow:
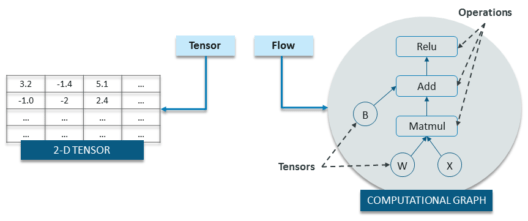
In TensorFlow, the term tensor refers to the representation of data as multi-dimensional array whereas the term flow refers to the series of operations that one performs on tensors as shown in the above image.
Now we have covered enough background about TensorFlow.
Next up, in this TensorFlow tutorial we will be discussing about TensorFlow code-basics.
TensorFlow Tutorial: Code Basics
Basically, the overall process of writing a TensorFlow program involves two steps:
- Building a Computational Graph
- Running a Computational Graph
Let me explain you the above two steps one by one:
1. Building a Computational Graph
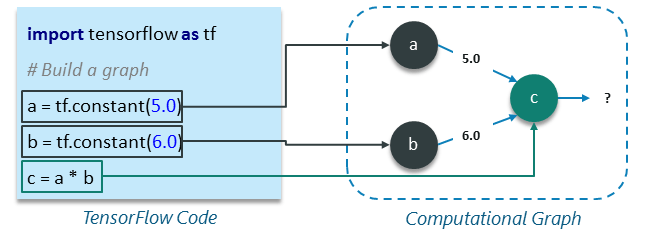
So, what is a computational graph? Well, a computational graph is a series of TensorFlow operations arranged as nodes in the graph. Each nodes take 0 or more tensors as input and produces a tensor as output. Let me give you an example of a simple computational graph which consists of three nodes – a, b & c as shown below:
Explanation of the Above Computational Graph:
**What is TensorFlowTensorFlow Code BasicsTensorFlow UseCase **
Basically, one can think of a computational graph as an alternative way of conceptualizing mathematical calculations that takes place in a TensorFlow program. The operations assigned to different nodes of a Computational Graph can be performed in parallel, thus, providing a better performance in terms of computations.
Here we just describe the computation, it doesn’t compute anything, it does not hold any values, it just defines the operations specified in your code.
2. Running a Computational Graph
Let us take the previous example of computational graph and understand how to execute it. Following is the code from previous example:
Example 1:
import tensorflow as tf

# Build a graph
a = tf.constant(5.0)
b = tf.constant(6.0)
c = a * b
Now, in order to get the output of node c, we need to run the computational graph within a session. Session places the graph operations onto Devices, such as CPUs or GPUs, and provides methods to execute them.
A session encapsulates the control and state of the *TensorFlow *runtime i.e. it stores the information about the order in which all the operations will be performed and passes the result of already computed operation to the next operation in the pipeline. Let me show you how to run the above computational graph within a session (Explanation of each line of code has been added as a comment):
# Create the session object
sess = tf.Session()

#Run the graph within a session and store the output to a variable
output_c = sess.run(c)

#Print the output of node c
print(output_c)

#Close the session to free up some resources
sess.close()
Output:
30
So, this was all about session and running a computational graph within it. Now, let us talk about variables and placeholders that we will be using extensively while building deep learning model using TensorFlow.
Constants, Placeholder and Variables
In TensorFlow, constants, placeholders and variables are used to represent different parameters of a deep learning model. Since, I have already discussed constants earlier, I will start with placeholders.
Placeholder:
A TensorFlow constant allows you to store a value but, what if, you want your nodes to take inputs on the run? For this kind of functionality, placeholders are used which allows your graph to take external inputs as parameters. Basically, a placeholder is a promise to provide a value later or during runtime. Let me give you an example to make things simpler:
import tensorflow as tf

# Creating placeholders
a = tf. placeholder(tf.float32)
b = tf. placeholder(tf.float32)

# Assigning multiplication operation w.r.t. a & b to node mul
mul = a*b

# Create session object
sess = tf.Session()

# Executing mul by passing the values [1, 3] [2, 4] for a and b respectively
output = sess.run(mul, {a: [1,3], b: [2, 4]})
print('Multiplying a b:', output)
Output:
[2. 12.]
Points to Remember about placeholders:
**What is TensorFlowTensorFlow Code BasicsTensorFlow UseCase **
Now, let us move ahead and understand – what are variables?
Variables
In deep learning, placeholders are used to take arbitrary inputs in your model or graph. Apart from taking input, you also need to modify the graph such that it can produce new outputs w.r.t. same inputs. For this you will be using variables. In a nutshell, a variable allows you to add such parameters or node to the graph that are trainable i.e. the value can be modified over the period of a time. Variables are defined by providing their initial value and type as shown below:
var = tf.Variable( [0.4], dtype = tf.float32 )
**Note: **
**What is TensorFlowTensorFlow Code BasicsTensorFlow UseCase **
Constants are initialized when you call tf.constant, and their value can never change. On the contrary, variables are not initialized when you call tf.Variable. To initialize all the variables in a TensorFlow program, you must explicitly call a special operation as shown below:
init = tf.global_variables_initializer()
sess.run(init)
Always remember that a variable must be initialized before a graph is used for the first time.
Note: TensorFlow variables are in-memory buffers that contain tensors, but unlike normal tensors that are only instantiated when a graph is run and are immediately deleted afterwards, variables survive across multiple executions of a graph.
Now that we have covered enough basics of TensorFlow, let us go ahead and understand how to implement a linear regression model using TensorFlow.
Linear Regression Model Using TensorFlow
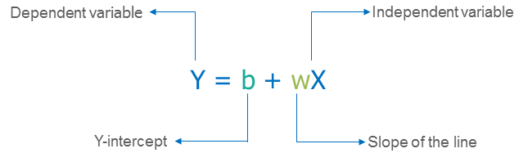
Linear Regression Model is used for predicting the unknown value of a variable (Dependent Variable) from the known value of another variables (Independent Variable) using linear regression equation as shown below:
Therefore, for creating a linear model, you need:
- Building a Computational Graph
- Running a Computational Graph
So, let us begin building linear model using TensorFlow:
Copy the code by clicking the button given below:
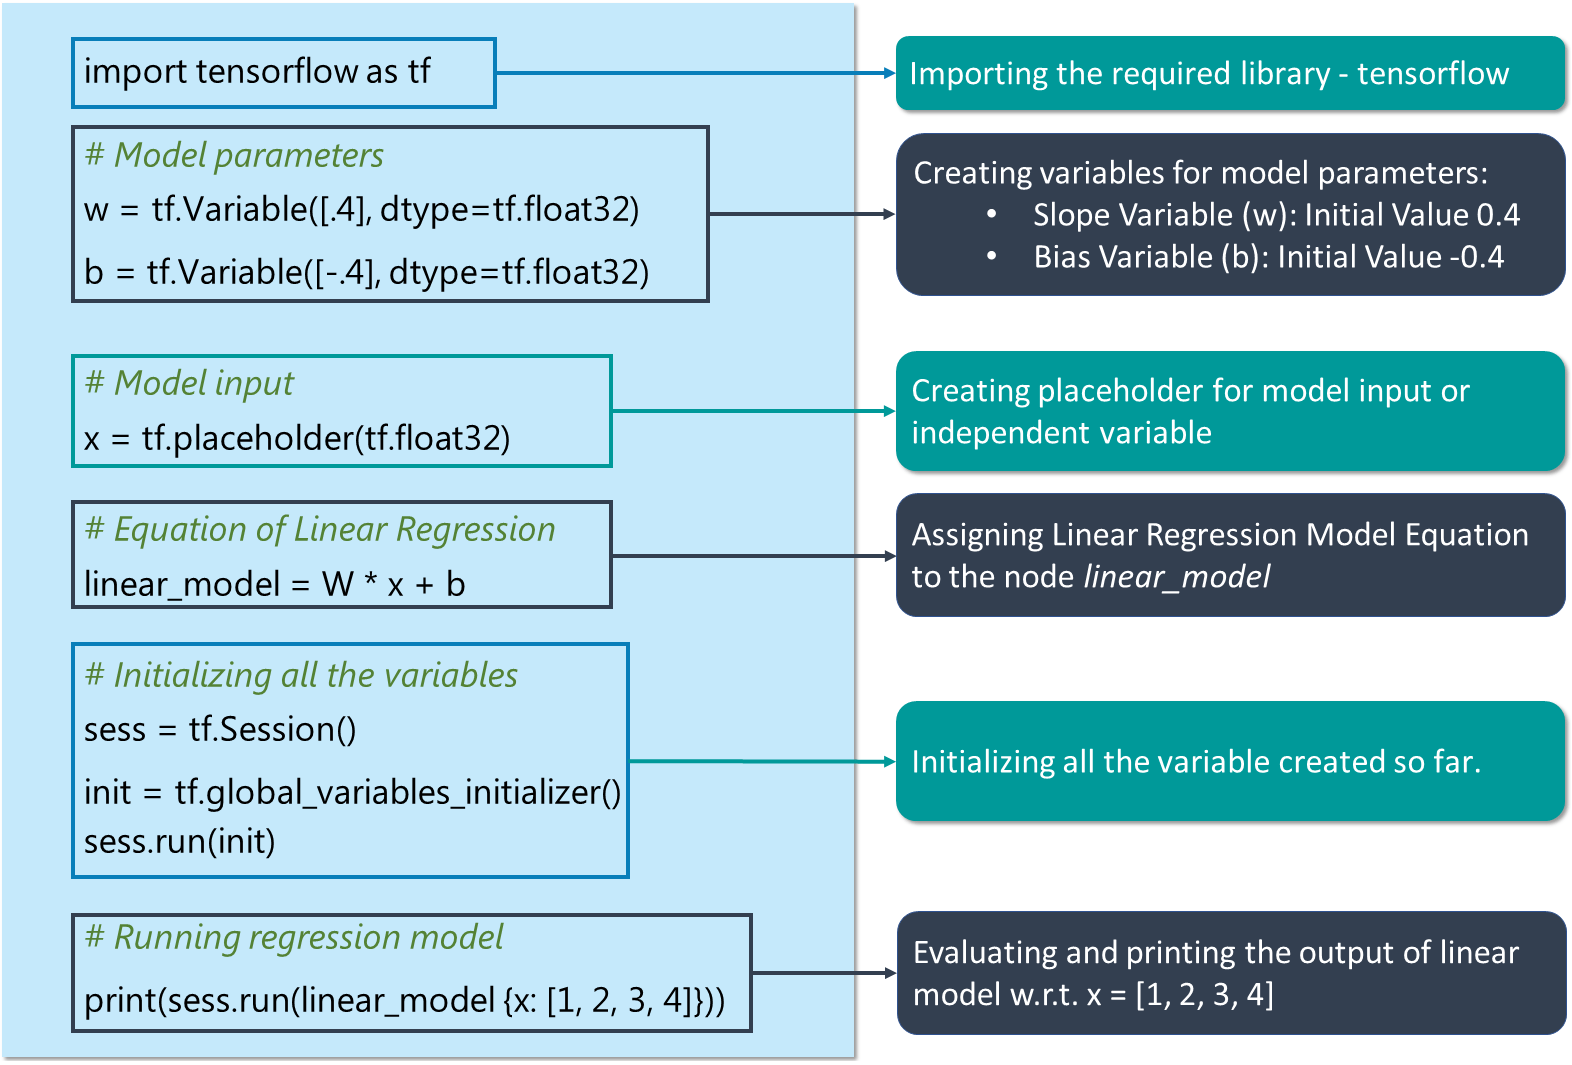
# Creating variable for parameter slope (W) with initial value as 0.4
W = tf.Variable([.4], tf.float32)

#Creating variable for parameter bias (b) with initial value as -0.4
b = tf.Variable([-0.4], tf.float32)

# Creating placeholders for providing input or independent variable, denoted by x
x = tf.placeholder(tf.float32)

# Equation of Linear Regression
linear_model = W * x + b

# Initializing all the variables
sess = tf.Session()
init = tf.global_variables_initializer()
sess.run(init)

# Running regression model to calculate the output w.r.t. to provided x values
print(sess.run(linear_model {x: [1, 2, 3, 4]}))
Output:
[ 0. 0.40000001 0.80000007 1.20000005]
The above stated code just represents the basic idea behind the implementation of regression model i.e. how you follow the equation of regression line so as to get output w.r.t. a set of input values. But, there are two more things left to be added in this model to make it a complete regression model:
**What is TensorFlowTensorFlow Code BasicsTensorFlow UseCase **
Now let us understand how can I incorporate the above stated functionalities into my code for regression model.
Loss Function – Model Validation
A loss function measures how far apart the current output of the model is from that of the desired or target output. I’ll use a most commonly used loss function for my linear regression model called as Sum of Squared Error or SSE. SSE calculated w.r.t. model output (represent by linear_model) and desired or target output (y) as: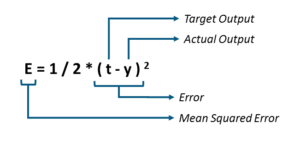
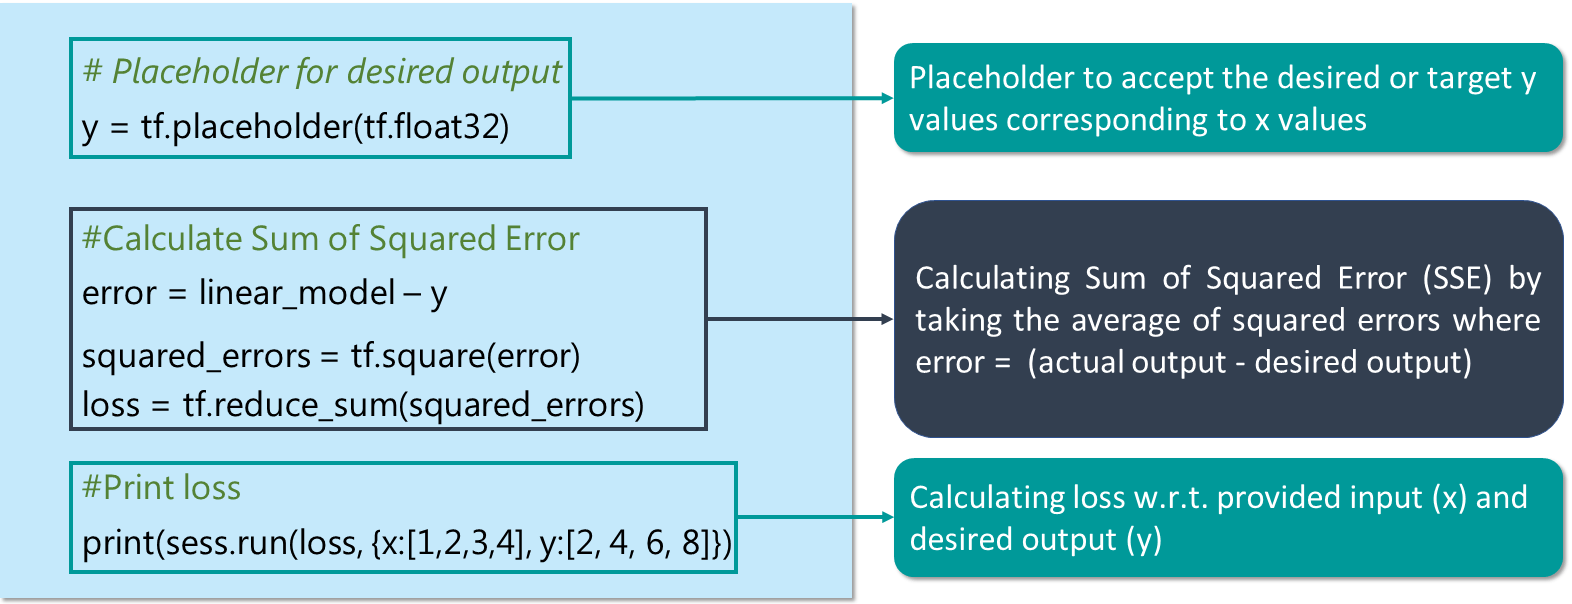
y = tf.placeholder(tf.float32)
error = linear_model - y
squared_errors = tf.square(error)
loss = tf.reduce_sum(squared_errors)
print(sess.run(loss, {x:[1,2,3,4], y:[2, 4, 6, 8]})
Output:
90.24
As you can see, we are getting a high loss value. Therefore, we need to adjust our weights (W) and bias (b) so as to reduce the error that we are receiving.
tf.train API – Training the Model
TensorFlow provides optimizers that slowly change each variable in order to minimize the loss function or error. The simplest optimizer is gradient descent. It modifies each variable according to the magnitude of the derivative of loss with respect to that variable.
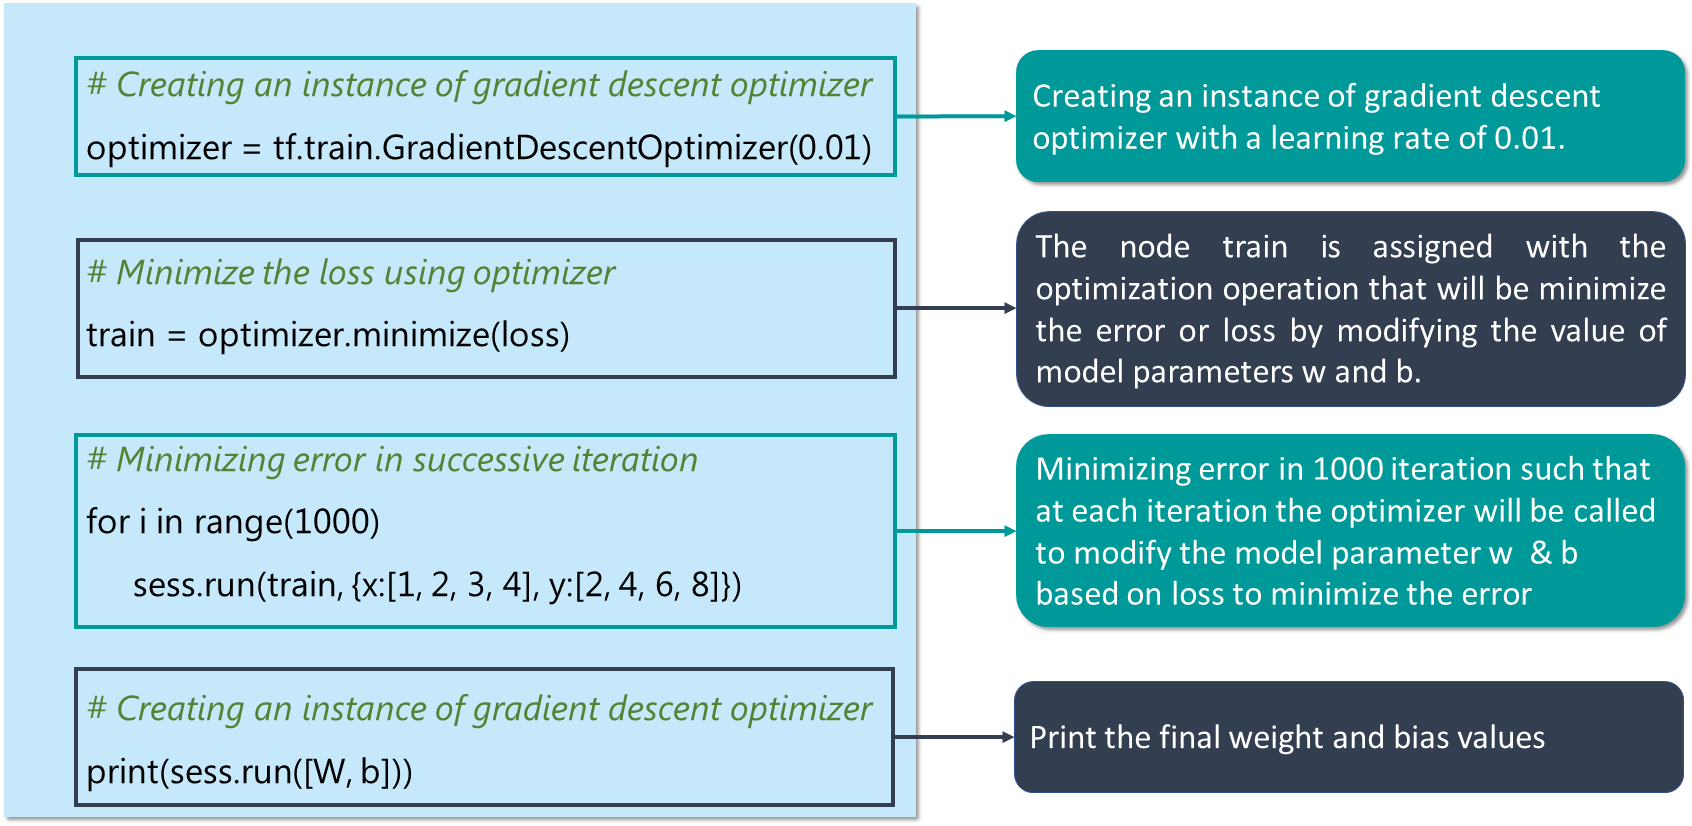
#Creating an instance of gradient descent optimizer
optimizer = tf.train.GradientDescentOptimizer(0.01)

train = optimizer.minimize(loss)

for i in range(1000):
     sess.run(train, {x:[1, 2, 3, 4], y:[2, 4, 6, 8]})
print(sess.run([W, b]))
Output:
 [array([ 1.99999964], dtype=float32), array([ 9.86305167e-07], dtype=float32)]
So, this is how you create a linear model using TensorFlow and train it to get the desired output.
#tensorflow #python #deep-learning #machine-learning #data-science