How to develop an Angular Application using MySQL
Originally published by Holger Schmitz at https://developer.okta.com
The MySQL database has been a reliable workhorse for web applications for many years. It is the M in the LAMP stack, and powers a huge number of web servers across the world.
MySQL is also a relational database, with data stored in tables with strict data definitions. Rows in tables correspond to data entries and rows in one table can be referenced from another table through their index. Plenty of literature covers the fundamentals of SQL and best practices in designing relational databases for large applications.
Recently, MariaDB was created by some of the original developers of MySQL as an open-source alternative to MySQL, which is owned by Oracle. To keep all features available to the open-source community, MariaDB was created as a fork of MySQL. In fact, if you are using the default installation of MySQL on a modern Linux distribution, you are likely using MariaDB.
In this tutorial, I will show you how to develop an Angular application using MySQL. Instead of the old established LAMP stack, I will use a variant of the MEAN stack, where the M in MEAN refers to the MySQL database, with the Express.js framework to power the backend, and Angular.js for the client. The application will create a simple timeline in which the user can add and edit events, with a simple CRUD API.
I will assume that you have some familiarity with Node and the npm package manager and that both of these are installed on your system.
Setting up MySQL
If you don’t have installed MySQL on your system, follow the instructions on the MySQL website to do so. Depending on your operating system, you might be able to use the system’s package manager to install the MySQL server.
Once you have installed MySQL you can create the database that you will use in this tutorial. Log into the database using the MySQL client using the login details of the database administrator.
$ mysql -u root -p
The -p option indicates that you are required to supply a password when connecting to the MySQL server. You might not need this option, depending on how the database is set up on your system. You should now see the MySQL command line prompt.
mysql>
Create a new database and switch into it by using the following command.
create database timeline;
use timeline;
Next, create a user associated with this database. It is always a good idea to have separate users for each database on the system. The following commands will create the user and grant them all permissions on the timeline database.
create user 'timeline'@'localhost' identified by 'password';
grant all on timeline.* to 'timeline'@'localhost';
In the first line, replace password with a more complex password. The rest of this tutorial assumes you used “password”, so if you change it, please make sure and change it in all the code snippets below.
Now you are ready to create the events table in the new database by specifying the data schema.
create table events (
 id INT AUTO_INCREMENT,
 owner VARCHAR(255) NOT NULL,
 name VARCHAR(255) NOT NULL,
 description TEXT,
 date DATE,
 PRIMARY KEY (id),
 INDEX (owner, date)
);
he table contains several columns called id, owner, name, description, and date. The id column acts as the primary key for accessing individual rows. Since you will need to look up entries by owner and date, I added a secondary index using these two fields to speed up the lookup. This completes the setup of the database and you can now exit the MySQL client by using the quit command.
Set up a Simple CRUD Node Express Server
To create the Express server, navigate into a directory of your choice and create a new folder called timeline-server. Open a terminal in this directory and initialize the Node project using npm.
npm init
Answer all the questions using the default answer and when asked about the entry point, set it to src/index.js. Next, install some libraries you will need.
npm install --save-exact express@4.17.1 cors@2.8.5 mysql@2.17.1
Next, use your favorite editor and create a file src/index.js and paste the following code into it.
const express = require('express');
const cors = require('cors');
const bodyParser = require('body-parser');
const mysql = require('mysql');
const events = require('./events');
const connection = mysql.createConnection({

 host    : ‘localhost’,

 user    : ‘timeline’,

 password : ‘password’,

 database : ‘timeline’

});
connection.connect();
const port = process.env.PORT || 8080;
const app = express()

 .use(cors())

 .use(bodyParser.json())

 .use(events(connection));
app.listen(port, () => {

 console.log(Express server listening on port ${port});

});
At the top of the file, you can see several imports. express contains the Express framework for creating REST APIs, cors is a middleware responsible for allowing cross-origin requests, and body-parser makes sure that the bodies of the incoming requests are read and attached to the request object.
The mysql object allows us to connect to your MySQL database and is seen in the code immediately below the require statements. In the options to createConnection, you will need to replace password with the password that you have stored in your MySQL server above. In the bottom part of src/index.js, the Express server is configured with the middleware and the events router and then started.
The last require statement imports the events router. To create the router, create a new file called src/events.js and paste the following code.
const express = require(‘express’);function createRouter(db) {
const router = express.Router();
const owner = ‘’;// the routes are defined here
return router;
}module.exports = createRouter;
This piece of code defines a function that takes the database connection as an argument and creates a router. I deliberately left the main part of the function blank. Soon, you will define the individual routes of the REST API in this block. I also defined an empty string called owner to use as a placeholder for the owner column in the database. In the next section, I will show you how to obtain the user’s email address and use this to identify the owner.
The first route will insert new events into the database. Paste the following into the body of the createRouter() function.
router.post(‘/event’, (req, res, next) => {

 db.query(

   ‘INSERT INTO events (owner, name, description, date) VALUES (?,?,?,?)’,

   [owner, req.body.name, req.body.description, new Date(req.body.date)],

   (error) => {

     if (error) {

       console.error(error);

       res.status(500).json({status: ‘error’});

     } else {

       res.status(200).json({status: ‘ok’});

     }

   }

 );

});
By using router.post this route will only activate when the server receives an HTTP POST request. The data posted in the request can be obtained through the req.body object. Using the SQL INSERT statement, this code adds a new row into the events table.
To list the events of a single owner, the following route links an HTTP GET request to a MySQL SELECT statement. You can paste this code into the body of the createRouter() function right after the previous route.
router.get(‘/event’, function (req, res, next) {

 db.query(

   ‘SELECT id, name, description, date FROM events WHERE owner=? ORDER BY date LIMIT 10 OFFSET ?’,

   [owner, 10*(req.params.page || 0)],

   (error, results) => {

     if (error) {

       console.log(error);

       res.status(500).json({status: ‘error’});

     } else {

       res.status(200).json(results);

     }

   }

 );

});
You can also modify existing entries in the database with a PUT route, which links an HTTP PUT request to a MySQL UPDATE statement.
router.put(‘/event/:id’, function (req, res, next) {

 db.query(

   ‘UPDATE events SET name=?, description=?, date=? WHERE id=? AND owner=?’,

   [req.body.name, req.body.description, new Date(req.body.date), req.params.id, owner],

   (error) => {

     if (error) {

       res.status(500).json({status: ‘error’});

     } else {

       res.status(200).json({status: ‘ok’});

     }

   }

 );

});
The code obtains the id as a route parameter, from the req.params object.
Finally, you might want to delete an existing event. Do this through an HTTP DELETE request that issues a MySQL DELETE statement.
router.delete(‘/event/:id’, function (req, res, next) {

 db.query(

   ‘DELETE FROM events WHERE id=? AND owner=?’,

   [req.params.id, owner],

   (error) => {

     if (error) {

       res.status(500).json({status: ‘error’});

     } else {

       res.status(200).json({status: ‘ok’});

     }

   }

 );

});
Run Your Express App and Connect to MySQL
The code above implements a fully functioning server. You can run this server by opening the terminal in the project directory and running the following command.
node src/index.js
You might see the following error when you run this command:
Error: ER_NOT_SUPPORTED_AUTH_MODE: Client does not support authentication protocol requested by server; consider upgrading MySQL client
To fix this, log into MySQL and execute the following SQL (where password is the value you used for your password):
ALTER USER ‘timeline’@‘localhost’ IDENTIFIED WITH mysql_native_password BY ‘password’;
Authentication With JWT
In this section, I will show you how to use JWT and Okta to authenticate users to your application. User authentication is an important part of any web app, but developers often underestimate the effort required to safely implement and maintain secure authentication. With Okta, you can offload all the complexity and security considerations to an external provider.
To start, sign up for a free developer account with Okta. After completing your registration you will see your Okta dashboard.
To create a new application, select the Applications link in the top menu and click on the green Add Application button. Next, you will see a screen with several options. Select Single-Page App and click Next.
The next screen lets you edit the application settings. For the client you will use Angular, so make sure that the base URI points to http://localhost:4200/. You will also need to set the Login Redirect URI to http://localhost:4200/implicit/callback, where the user will be redirected after a successful login. After you click the Done button you will see a screen with a client ID you will need below.
To use Okta authentication in your server app, you need to install some additional libraries. In the terminal run the following command:
npm install --save-exact express-bearer-token@2.4.0 @okta/jwt-verifier@1.0.0
Next, create a new file src/auth.js and paste the following code.
const OktaJwtVerifier = require(‘@okta/jwt-verifier’);const oktaJwtVerifier = new OktaJwtVerifier({
clientId: ‘{yourClientId}’,
issuer: ‘https://{yourOktaDomain}/oauth2/default’
});async function oktaAuth(req, res, next) {
try {
const token = req.token;
if (!token) {
return res.status(401).send(‘Not Authorized’);
}
const jwt = await oktaJwtVerifier.verifyAccessToken(token, [‘api://default’]);
req.user = {
uid: jwt.claims.uid,
email: jwt.claims.sub
};
next();
}
catch (err) {
console.log('AUTH ERROR: ', err);
return res.status(401).send(err.message);
}
}module.exports = oktaAuth;
This module defines an Express middleware that reads a token from the request and verifies it using the Okta JWT Verifier. In the code above {yourClientId} is the client ID you obtained from the Okta application settings and {yourOktaDomain} is your Okta domain. When the user authenticates successfully, a user object containing the user ID and email will be added to the request.
Open src/index.js again and add the following require statements to the top of the file.
const bearerToken = require(‘express-bearer-token’);

const oktaAuth = require(‘./auth’);
Now modify the Express application configuration to include the bearerToken and oktaAuth middlewares.
const app = express()

 .use(cors())

 .use(bodyParser.json())

 .use(bearerToken())

 .use(oktaAuth)

 .use(events(connection));
Finally, modify the event route to make use of the user email. In src/events.js, remove the line const owner = ‘’; and add const owner = req.user.email; to the first line in each router block:
router.post(‘/event’, (req, res, next) => {

 const owner = req.user.email;

 // db.query() code

});
router.get(‘/event’, function (req, res, next) {

 const owner = req.user.email;

 // db.query() code

});
router.put(‘/event/:id’, function (req, res, next) {

 const owner = req.user.email;

 // db.query() code

});
router.delete(‘/event/:id’, function (req, res, next) {

 const owner = req.user.email;

 // db.query() code

});
These changes secure your server application. It also stores events for users separately and each user will only see their own events.
The Timeline Angular Client
Now it’s time to implement the client application, based on Angular 8 with the ngx-bootstrap library for responsive layout and standard components. You will also use a free icon set called Line Awesome, a variant of the well known Font Awesome that replaces the standard icon designs with some stylish line icons. You will also use the ngx-timeline library to make it easy to create beautiful vertical timelines.
To start, you will need to install the latest version of the Angular CLI tool. In a terminal, type the following command.
npm install -g @angular/cli@8.1.2
Depending on your system, you might have to run this command using sudo to allow modification of system resources. Next, navigate into a directory of your choice and create a new Angular application.
ng new timeline-client
You will be asked a number of questions about your applications. Make sure that you add the Angular routing module.
? Would you like to add Angular routing? (y/N) Y
When asked which stylesheet format to use, choose the default CSS option. Now change into the new folder timeline-client and install some additional packages. Add Bootstrap with the ng add command.
ng add ngx-bootstrap@5.1.0
To add the timeline library and Okta’s Angular SDK, run the following command:
npm install --save-exact ngx-timeline@5.0.0 @okta/okta-angular@1.2.1
Now start your IDE and open up the file src/index.html. Here, add some external CSS files inside the <head> tags to add styles for Bootstrap and Line Awesome:
<link

href=“https://maxcdn.bootstrapcdn.com/bootstrap/4.0.0/css/bootstrap.min.css”

rel=“stylesheet”>

<link

rel=“stylesheet” href=“https://maxcdn.icons8.com/fonts/line-awesome/1.1/css/line-awesome-font-awesome.min.css”>
Open src/app/app.component.ts and replace the contents with the following code.
import { Component } from ‘@angular/core’;

import { OktaAuthService } from ‘@okta/okta-angular’;
@Component({

 selector: ‘app-root’,

 templateUrl: ‘./app.component.html’,

 styleUrls: [‘./app.component.css’]

})

export class AppComponent {

 title = ‘timeline-client’;

 isAuthenticated: boolean;
 constructor(public oktaAuth: OktaAuthService) {

   this.oktaAuth.$authenticationState.subscribe(

     (isAuthenticated: boolean) => this.isAuthenticated = isAuthenticated

   );

 }
 ngOnInit() {

   this.oktaAuth.isAuthenticated().then((auth) => {this.isAuthenticated = auth});

 }
 login() {

   this.oktaAuth.loginRedirect();

 }
 logout() {

   this.oktaAuth.logout(‘/’);

 }

}
The AppComponent handles the authentication through Okta. OktaAuthService.isAuthenticated() initializes the isAuthenticated field of the component. The field is kept up to date by subscribing to the OktaAuthService.$authenticationState observable. OktaAuthService.loginRedirect() will trigger a browser redirect to the Okta login page and OktaAuthService.logout(‘/’) will log out the user and navigate to the ‘/’ route.
Now open the template of the application component src/app/app.component.html and paste in the following HTML.
<nav class=“navbar navbar-expand navbar-light bg-light”>

 <a class=“navbar-brand” [routerLink]=“[‘’]”>

   <i class=“fa fa-clock-o”></i>

 </a>

 <ul class=“navbar-nav mr-auto”>

   <li class=“nav-item”>

     <a class=“nav-link” [routerLink]=“[‘’]”>

       Home

     </a>

   </li>

   <li class=“nav-item”>

     <a class=“nav-link” [routerLink]=“[‘timeline’]”>

       Timeline

     </a>

   </li>

 </ul>

 <span>

   <button class=“btn btn-primary” *ngIf=“!isAuthenticated” (click)=“login()”> Login </button>

   <button class=“btn btn-primary” *ngIf=“isAuthenticated” (click)=“logout()”> Logout </button>

 </span>

</nav>

<router-outlet></router-outlet>
The bootstrap navigation bar contains a menu with links to the home page and a timeline route. It also contains a login button and a logout button that appear depending on the authentication state.
In the next step, you need to import the component modules into src/app/app.module.ts. It looks like this.
import { BrowserModule } from ‘@angular/platform-browser’;

import { HttpClientModule } from ‘@angular/common/http’;

import { NgModule } from ‘@angular/core’;

import { BsDatepickerModule } from ‘ngx-bootstrap/datepicker’;

import { NgxTimelineModule } from ‘ngx-timeline’;

import { FormsModule, ReactiveFormsModule } from ‘@angular/forms’;
import { AppRoutingModule } from ‘./app-routing.module’;

import { AppComponent } from ‘./app.component’;

import { BrowserAnimationsModule } from ‘@angular/platform-browser/animations’;

import { ModalModule } from ‘ngx-bootstrap/modal’;

import { HomeComponent } from ‘./home/home.component’;

import { TimelineComponent } from ‘./timeline/timeline.component’;
import { OktaAuthModule } from ‘@okta/okta-angular’;
@NgModule({

 declarations: [

   AppComponent,

   HomeComponent,

   TimelineComponent

 ],

 imports: [

   BrowserModule,

   HttpClientModule,

   AppRoutingModule,

   BrowserAnimationsModule,

   FormsModule,

   ReactiveFormsModule,

   BsDatepickerModule.forRoot(),

   NgxTimelineModule,

   ModalModule.forRoot(),

   OktaAuthModule.initAuth({

     issuer: ‘https://{yourOktaDomain}/oauth2/default’,

     redirectUri: ‘http://localhost:4200/implicit/callback’,

     clientId: ‘{yourClientId}’

   })

 ],

 providers: [],

 bootstrap: [AppComponent]

})

export class AppModule { }
Replace{yourClientId} with the client ID from your Okta dashboard and {yourOktaDomain} with your Okta domain. Next, create two components for the home page and the timeline page, as well as a service to connect to the server.
ng generate component home

ng generate component timeline

ng generate service server
The home page will simply contain a heading and no other functionality. Open src/app/home/home.component.html and replace the contents with the following.
<div class=“container”>

 <div class=“row”>

   <div class=“col-sm”>

     <h1>Angular MySQL Timeline</h1>

   </div>

 </div>

</div>
Now open src/app/home/home.component.css and add the following styles.
h1 {

 margin-top: 50px;

 text-align: center;

}
Before you implement the timeline component, let’s take a look at the ServerService first. Open src/app/server.service.ts and replace the contents with the following code.
import { Injectable } from ‘@angular/core’;

import { HttpClient } from ‘@angular/common/http’;

import { OktaAuthService } from ‘@okta/okta-angular’;

import { environment } from ‘…/environments/environment’;
@Injectable({

 providedIn: ‘root’

})

export class ServerService {
   constructor(private http: HttpClient, public oktaAuth: OktaAuthService) {

   }
   private async request(method: string, url: string, data?: any) {

     const token = await this.oktaAuth.getAccessToken();
     const result = this.http.request(method, url, {

       body: data,

       responseType: ‘json’,

       observe: ‘body’,

       headers: {

         Authorization: Bearer ${token}

       }

     });

     return new Promise((resolve, reject) => {

       result.subscribe(resolve, reject);

     });

   }
   getEvents() {

     return this.request(‘GET’, ${environment.serverUrl}/event);

   }
   createEvent(event) {

     return this.request(‘POST’, ${environment.serverUrl}/event, event);

   }
   updateEvent(event) {

     return this.request(‘PUT’, ${environment.serverUrl}/event/${event.id}, event);

   }
   deleteEvent(event) {

     return this.request(‘DELETE’, ${environment.serverUrl}/event/${event.id});

   }

}
The main logic of this component resides in the request method, which sends a request to the server. To identify the user to the server, the request header contains a bearer token obtained from OktaAuthService. The method returns a Promise that resolves once a response from the server has been obtained.
The remainder of the ServerService uses the request method to call the server routes. The server URL is provided through the environment object, which is defined in src/environments/environment.ts.
export const environment = {

 production: false,

 serverUrl: ‘http://localhost:8080’

};
The comments in src/environments/environment.ts provide useful hints about how to use environments in Angular.
Now you are ready to implement the timeline component. Open src/app/timeline/timeline.component.html and edit the contents to match the code below.
<div class=“container page-content”>

 <div class=“row”>

   <div class=“col-sm-12 col-md”>

     <ngx-timeline [events]=“events”>

       <ng-template let-event let-index=“rowIndex” timelineBody>

         <div>{{event.body}}</div>

         <div class=“button-row”>

           <button type=“button” class=“btn btn-primary” (click)=“editEvent(index, eventmodal)”><i class=“fa fa-edit”></i></button>

           <button type=“button” class=“btn btn-danger” (click)=“deleteEvent(index)”><i class=“fa fa-trash”></i></button>

         </div>

       </ng-template>

     </ngx-timeline>

   </div>

   <div class=“col-md-2”>

     <button type=“button” class=“btn btn-primary” (click)=“addEvent(eventmodal)”><i class=“fa fa-plus”></i> Add</button>

   </div>

 </div>

</div>
This template uses the ngx-timeline component to display an array of events in a vertical timeline, with buttons for adding and editing events. Some of these actions will open up a modal window. ngx-bootstrap allows you to simply create a modal window from an ng-template component. Paste the following code into the bottom of the file.
<ng-template #eventmodal>
<div class=“modal-header”>
<h4 class=“modal-title pull-left”>Event</h4>
<button type=“button” class=“close pull-right” aria-label=“Close” (click)=“modalRef.hide()”>
<span aria-hidden=“true”>×</span>
</button>
</div>
<div class=“modal-body”>
<form [formGroup]=“form” (ngSubmit)=“onSubmit()”>
<div class=“form-group full-width-input”>
<label>Name</label>
<input class=“form-control” placeholder=“Event Name” formControlName=“name” required>
</div>
<div class=“form-group full-width-input”>
<label>Description</label>
<input class=“form-control” formControlName=“description”>
</div>
<div class=“form-group full-width-input”>
<label>Date</label>
<input class=“form-control” formControlName=“date” bsDatepicker>
</div>
<div class=“button-row”>
<button type=“button” class=“btn btn-primary” (click)=“modalCallback()”>Submit</button>
<button type=“button” class=“btn btn-light” (click)=“onCancel()”>Cancel</button>
</div>
</form>
</div>
</ng-template>
Only a small amount of styling in src/app/timeline/timeline.component.css rounds off the design.
.page-content {

 margin-top: 2rem;

}
.button-row {

 display: flex;

 justify-content: space-between;

 margin-top: 1rem;

}
The src/app/timeline/timeline.component.ts file contains the bulk of the application logic.
import { Component, OnInit, TemplateRef } from ‘@angular/core’;

import { BsModalService, BsModalRef } from ‘ngx-bootstrap/modal’;

import { FormGroup, FormBuilder, Validators, AbstractControl, ValidatorFn } from ‘@angular/forms’;

import { ServerService } from ‘…/server.service’;
@Component({

 selector: ‘app-timeline’,

 templateUrl: ‘./timeline.component.html’,

 styleUrls: [‘./timeline.component.css’]

})

export class TimelineComponent implements OnInit {

 form: FormGroup;

 modalRef: BsModalRef;
 events: any[] = [];

 currentEvent: any = {id: null, name: ‘’, description: ‘’, date: new Date()};

 modalCallback: () => void;
 constructor(private fb: FormBuilder,

             private modalService: BsModalService,

             private server: ServerService) { }
 ngOnInit() {

   this.form = this.fb.group({

     name: [this.currentEvent.name, Validators.required],

     description: this.currentEvent.description,

     date: [this.currentEvent.date, Validators.required],

   });

   this.getEvents();

 }
 private updateForm() {

   this.form.setValue({

     name: this.currentEvent.name,

     description: this.currentEvent.description,

     date: new Date(this.currentEvent.date)

   });

 }
 private getEvents() {

   this.server.getEvents().then((response: any) => {

     console.log(‘Response’, response);

     this.events = response.map((ev) => {

       ev.body = ev.description;

       ev.header = ev.name;

       ev.icon = ‘fa-clock-o’;

       return ev;

     });

   });

 }
 addEvent(template) {

   this.currentEvent = {id: null, name: ‘’, description: ‘’, date: new Date()};

   this.updateForm();

   this.modalCallback = this.createEvent.bind(this);

   this.modalRef = this.modalService.show(template);

 }
 createEvent() {

   const newEvent = {

     name: this.form.get(‘name’).value,

     description: this.form.get(‘description’).value,

     date: this.form.get(‘date’).value,

   };

   this.modalRef.hide();

   this.server.createEvent(newEvent).then(() => {

     this.getEvents();

   });

 }
 editEvent(index, template) {

   this.currentEvent = this.events[index];

   this.updateForm();

   this.modalCallback = this.updateEvent.bind(this);

   this.modalRef = this.modalService.show(template);

 }
 updateEvent() {

   const eventData = {

     id: this.currentEvent.id,

     name: this.form.get(‘name’).value,

     description: this.form.get(‘description’).value,

     date: this.form.get(‘date’).value,

   };

   this.modalRef.hide();

   this.server.updateEvent(eventData).then(() => {

     this.getEvents();

   });

 }
 deleteEvent(index) {

   this.server.deleteEvent(this.events[index]).then(() => {

     this.getEvents();

   });

 }
 onCancel() {

   this.modalRef.hide();

 }

}
I will not go into every detail of this code. The methods addEvent(), editEvent(), and deleteEvent() are the event handlers for the respective HTML buttons. addEvent() and editEvent() open the modal window and set either createEvent() or updateEvent() as a callback function when the user submits data. These use the ServerService to complete the request.
Finally, link the components to the routes. Open src/app/app-routing.module.ts and add the following import statements to the top of the file.
import { HomeComponent } from ‘./home/home.component’;

import { TimelineComponent } from ‘./timeline/timeline.component’;

import { OktaCallbackComponent, OktaAuthGuard } from ‘@okta/okta-angular’;
Next, replace the routes array with the following.
const routes: Routes = [

 {

   path: ‘’,

   component: HomeComponent

 },

 {

   path: ‘timeline’,

   component: TimelineComponent,

   canActivate: [OktaAuthGuard]

 },

 { path: ‘implicit/callback’, component: OktaCallbackComponent }

];
The first entry sets the base route and links it to the HomeComponent. The second entry links the timeline route to the TimelineComponent and prevents unauthorized access to the route with OktaAuthGuard. When a user authenticates via the Okta service, they will be redirected to the implicit/callback route.
Run Your Angular Client Application
This completes the implementation of the client. You can start the client from the terminal by running this command.
ng serve
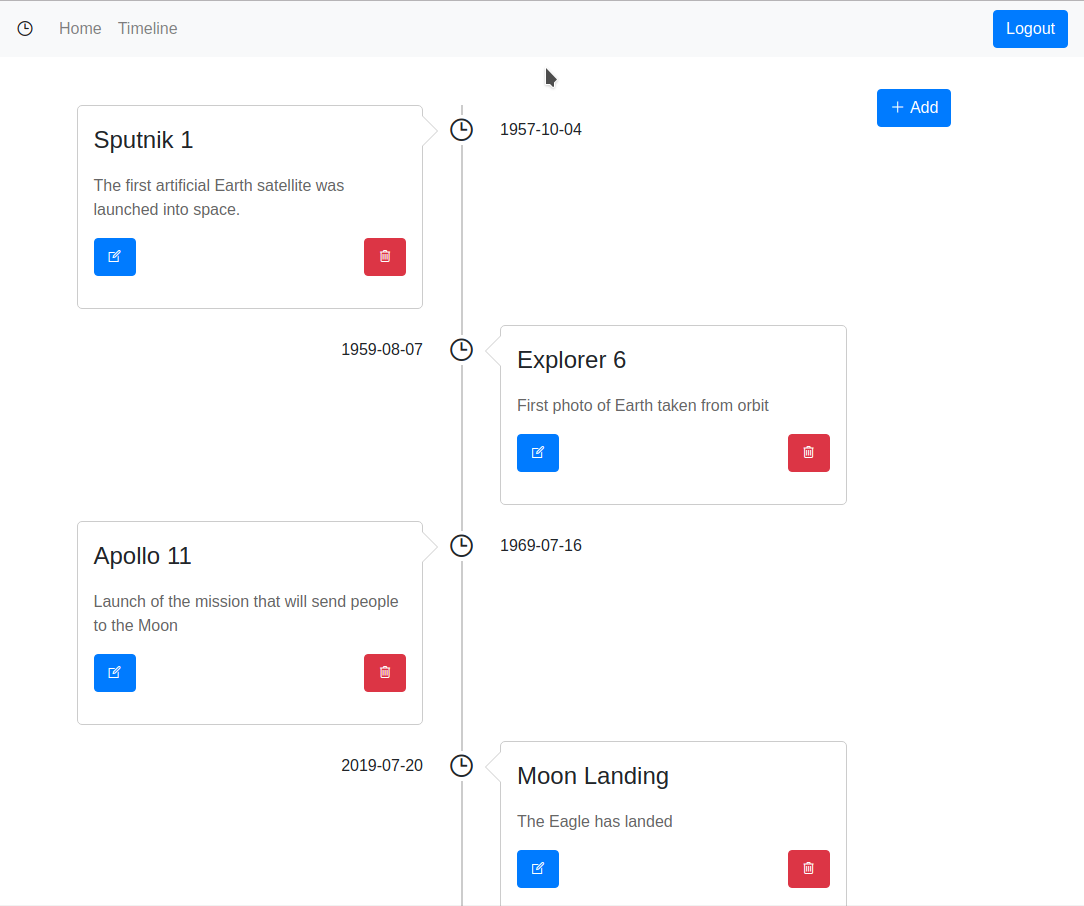
Make sure that you have also started the server as described in the previous section. Open a browser to http://localhost:4200. Log in, click on Timeline in the top menu, and add events to your heart’s content.
I added some of my favorite historical events. You can see how this looks in the screenshot below.
Thanks for reading ❤
If you liked this post, share it with all of your programming buddies!
Follow us on Facebook | Twitter
Further reading about Angular
☞ Angular 8 (formerly Angular 2) - The Complete Guide
☞ Angular & NodeJS - The MEAN Stack Guide
☞ The Complete Node.js Developer Course (3rd Edition)
☞ Best 50 Angular Interview Questions for Frontend Developers in 2019
☞ How to build a CRUD Web App with Angular 8.0
☞ React vs Angular: An In-depth Comparison
☞ React vs Angular vs Vue.js by Example
☞ Microfrontends — Connecting JavaScript frameworks together (React, Angular, Vue etc)
☞ Building CRUD Mobile App using Ionic 4, Angular 8
☞ How to Build Mobile Apps with Angular, Ionic 4, and Spring Boot
☞ Ionic 4 & Angular Tutorial For Beginners - Crash Course
#angular #mysql #data-science #web-development