MongoDB is a leading open-source NoSQL database that is written in C++. This tutorial will give the reader a better understanding of MongoDB concepts needed in integrating MongoDB in your Python applications.
The SQL vs. NoSQL Difference
SQL databases use Structured Query Language(SQL) in defining and manipulating data. When using SQL, we need a Relational Database Management System(RDBMS) server such as SQL Server, MySQL server or MS Access. Data in RDBMS is stored in database objects called tables. A table is a collection of related data entries, and it consists of columns and rows.
A NoSQL database has a dynamic schema for unstructured data. In NoSQL, data is stored in several ways: it can be column-oriented, document-oriented, graph-based or organized as a key-value store. A NoSQL database has the following advantages:
- Documents can be created without having to first define their structure
- Each document can have its own unique structure
- The syntax can vary from database to database
- Large volumes of structured, semi-structured, and unstructured data
- Object-oriented programming that is easy to use and flexible
- It is horizontally scalable
NoSQL Database Types
The following are the different types of NoSQL databases:
- Document databases pair each key with a complex data structure known as a document. A document is a set of key-value pairs. MongoDB is an example of a document store database. A group of MongoDB documents is known as a collection. This is the equivalent of an RDBMS table.
- Graph stores are used to store information about networks of data, for instance, social connections. Graph stores include Neo4J and Giraph.
- Key-value stores databases store every single item in the database as a key together with its value. Examples of key-value stores are Riak and Berkeley DB. Some key-value stores, such as Redis, allow each value to have a type, such as an integer, which adds functionality.
- Wide-column stores such as Cassandra and HBase are optimized for queries over large datasets, and store columns of data together, instead of rows.
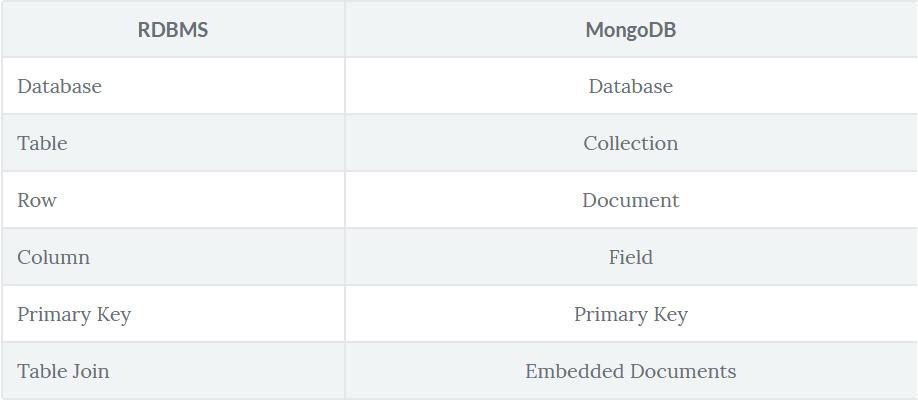
Comparing MongoDB to RDBMS
In order to get a thorough understanding of the terms used in MongoDB, we’ll compare them with the equivalent in RDBMS.
MongoDB and Python
In order to start using MongoDB, we first have to install it. Installation instructions are found at the official MongoDB documentation. To run a quick install on Ubuntu run the commands below:
sudo apt update sudo apt install -y mongodb
Once this is done we’ll check the service and database by running this command on the terminal:
sudo systemctl status mongodb
● mongodb.service - An object/document-oriented database
   Loaded: loaded (/lib/systemd/system/mongodb.service; enabled; vendor preset:
   Active: active (running) since Thu 2018-09-20 13:14:02 EAT; 23h ago
     Docs: man:mongod(1)
 Main PID: 11446 (mongod)
    Tasks: 27 (limit: 4915)
   CGroup: /system.slice/mongodb.service
           └─11446 /usr/bin/mongod --unixSocketPrefix=/run/mongodb --config /etc

Sep 20 13:14:02 derrick systemd[1]: Started An object/document-oriented database
lines 1-10/10 (END)
The message above means that all is well and that we are set to start using MongoDB.
Now that we have MongoDB installed we need a way to interact with it in our Python code. The official Python MongoDB driver is called PyMongo. We can install it using pip as shown below:
pip install pymongo
Its possible for us to interact with MongoDB from the terminal, however for the purposes of this tutorial we’ll run all our code in a Jupyter Notebook.
Making a Connection with MongoClient
The first thing we need to do is import pymongo. The import should run without any errors to signify that we’ve done our installation well.
import pymongo
Establishing a connection in MongoDB requires us to create a MongoClient to the running MongoDB instance.
from pymongo import MongoClient
client = MongoClient()
The above code will connect to the default host and port, but we can specify the host and port as shown below:
client = MongoClient("localhost", 27017)
MongoDB also has a URI format for doing this.
client = MongoClient('mongodb://localhost:27017/')
Creating a Database
To create a database in MongoDB, we use the MongoClient instance and specify a database name. MongoDB will create a database if it doesn’t exist and connect to it.
db = client['datacampdb']
It is important to note that databases and collections are created lazily in MongoDB. This means that the collections and databases are created when the first document is inserted into them.
Data in MongoDB
Data in MongoDB is represented and stored using JSON-Style documents. In PyMongo we use dictionaries to represent documents. Let’s show an example of a PyMongo document below:
 article = {"author": "Derrick Mwiti",
            "about": "Introduction to MongoDB and Python",
            "tags":
                ["mongodb", "python", "pymongo"]}
Inserting a Document
To insert a document into a collection, we use the insert_one() method. As we saw earlier, a collection is similar to a table in RDBMS while a document is similar to a row.
articles = db.articles
result = articles.insert_one(article)
When the document is inserted, a special key _id is generated and its unique to this document. We can print the document ID as shown below:
print("First article key is: {}".format(result.inserted_id))
First article key is: 5ba5c05e2e8ca029163417f8
The articles collection is created after inserting the first document. We can confirm this using the list_collection_names method.
db.list_collection_names()
['articles', 'user']
We can insert multiple documents to a collection using the insert_many() method as shown below.
article1 = {"author": "Emmanuel Kens",
            "about": "Knn and Python",
            "tags":
                ["Knn","pymongo"]}
article2 = {"author": "Daniel Kimeli",
            "about": "Web Development and Python",
            "tags":
                ["web", "design", "HTML"]}
new_articles = articles.insert_many([article1, article2])
print("The new article IDs are {}".format(new_articles.inserted_ids))
The new article IDs are [ObjectId('5ba5c0c52e8ca029163417fa'), ObjectId('5ba5c0c52e8ca029163417fb')]
Retrieving a Single Document with find_one()
find_one() returns a single document matching the query or none if it doesn’t exist. This method returns the first match that it comes across. When we call the method below, we get the first article we inserted into our collection.
print(articles.find_one())
{'_id': ObjectId('5ba5c0b52e8ca029163417f9'), 'author': 'Derrick Mwiti', 'about': 'Introduction to MongoDB and Python', 'tags': ['mongodb', 'python', 'pymongo']}
Finding all Documents in a Collection
MongoDB also allows us to retrieve all documents in a collection using the find method.
for article in articles.find():
  print(article)
{'_id': ObjectId('5ba5c0b52e8ca029163417f9'), 'author': 'Derrick Mwiti', 'about': 'Introduction to MongoDB and Python', 'tags': ['mongodb', 'python', 'pymongo']}
{'_id': ObjectId('5ba5c0c52e8ca029163417fa'), 'author': 'Emmanuel Kens', 'about': 'Knn and Python', 'tags': ['Knn', 'pymongo']}
{'_id': ObjectId('5ba5c0c52e8ca029163417fb'), 'author': 'Daniel Kimeli', 'about': 'Web Development and Python', 'tags': ['web', 'design', 'HTML']}
When building web applications, we usually get document IDs from the URL and try to retrieve them from our MongoDB collection. In order to achieve this, we first have to convert the obtained string ID into an ObjectId.
from bson.objectid import ObjectId
def get(post_id):
    document = client.db.collection.find_one({'_id': ObjectId(post_id)})
Return Some Fields Only
Sometimes we might not want to return all the fields from our documents. Let’s show we’d fetch specific fields. In our case we use 0 to specify that the _id should not be fetched and 1 to specify that author and about should be fetched. MongoDB doesn’t allow us to specify zero twice. For example, specify tags to 0 below will generate an error. We are not allowed to specify both 0 and 1 values in the same object (unless one of the fields is the _id field). When we specify a field with the value 0, all other fields get the value 1.
for article in articles.find({},{ "_id": 0, "author": 1, "about": 1}):
  print(article)
{'author': 'Derrick Mwiti', 'about': 'Introduction to MongoDB and Python'}
{'author': 'Emmanuel Kens', 'about': 'Knn and Python'}
{'author': 'Daniel Kimeli', 'about': 'Web Development and Python'}
Sorting the Results
We can use the sort() method to sort the results in ascending or descending order. The default order is ascending. We use 1 to signify ascending and -1 to signify descending.
doc = articles.find().sort("author", -1)

for x in doc:
  print(x)
{'_id': ObjectId('5ba5c0c52e8ca029163417fa'), 'author': 'Emmanuel Kens', 'about': 'Knn and Python', 'tags': ['Knn', 'pymongo']}
{'_id': ObjectId('5ba5c0b52e8ca029163417f9'), 'author': 'Derrick Mwiti', 'about': 'Introduction to MongoDB and Python', 'tags': ['mongodb', 'python', 'pymongo']}
{'_id': ObjectId('5ba5c0c52e8ca029163417fb'), 'author': 'Daniel Kimeli', 'about': 'Web Development and Python', 'tags': ['web', 'design', 'HTML']}
Updating a Document
We update a document using the update_one() method. The first parameter taken by this function is a query object defining the document to be updated. If the method finds more than one document, it will only update the first one. Let’s update the name of the author in the article written by Derrick.
query = { "author": "Derrick Mwiti" }
new_author = { "$set": { "author": "John David" } }

articles.update_one(query, new_author)

for article in articles.find():
  print(article)
{'_id': ObjectId('5ba5c0b52e8ca029163417f9'), 'author': 'John David', 'about': 'Introduction to MongoDB and Python', 'tags': ['mongodb', 'python', 'pymongo']}
{'_id': ObjectId('5ba5c0c52e8ca029163417fa'), 'author': 'Emmanuel Kens', 'about': 'Knn and Python', 'tags': ['Knn', 'pymongo']}
{'_id': ObjectId('5ba5c0c52e8ca029163417fb'), 'author': 'Daniel Kimeli', 'about': 'Web Development and Python', 'tags': ['web', 'design', 'HTML']}
Limiting the Result
MongoDB enables us to limit the result of our query using the limit method. In our query below we’ll limit the result to one record.
limited_result = articles.find().limit(1)
for x in limited_result:
    print(x)
{'_id': ObjectId('5ba5c0b52e8ca029163417f9'), 'author': 'John David', 'about': 'Introduction to MongoDB and Python', 'tags': ['mongodb', 'python', 'pymongo']}
MongoDB Delete Document
We use the delete_one() method to delete a document in MongoDB. The first parameter for this method is the query object of the document we want to delete. If this method finds more than one document, it deletes only the first one found. Let’s delete the article with the id 5ba4cbe42e8ca029163417ce.
db.articles.delete_one({"_id":ObjectId("5ba4d00e2e8ca029163417d4")})
Deleting Many Documents
In order to delete many documents, we use the delete_many() method. Passing an empty query object will delete all the documents.
delete_articles = articles.delete_many({})
print(delete_articles.deleted_count, " articles deleted.")
3 articles deleted.
Dropping a Collection
In MongoDB, we can delete a collection using the drop() method.
articles.drop()
We can confirm that the collection has been deleted since when we call the list_collection_names, we get an empty list.
db.list_collection_names()
[]
It is impossible for us to go through all the MongoDB methods in this tutorial. I would recommend that the reader visits the official documentation of PyMongo and MongoDB to learn more.
MongoDB object document mapper (ODM)
In SQL we have object relational mapper (ORM) mappers that provides an abstraction when working with SQL. MongoDB has something similar know as object document mapper(ODM). MongoEngine is a library that provides a high-level abstraction on top of PyMongo. Run the command below to install it using pip.
pip install mongoengine
There are quite a number of other MongoDB ODMs that we can experiment with and choose the best option for our use. Examples of other MongoDB ODMs include ming, minimongo and, mongokit.
After we have imported mongoengine, we use the connect function and specify the database, port, and the host in order to establish a connection with the MongoDB instance.
from mongoengine import *
connect('datacampdb', host='localhost', port=27017)
MongoClient(host=['localhost:27017'], document_class=dict, tz_aware=False, connect=True, read_preference=Primary())
Defining our Documents
Let’s assume that we are developing a social site that will allow users to post messages. This means that we need a users and a comments document. Just as if we were using a relational database with an ORM, we define the fields a user will have and the data types. We create the document by sub-classing the Document class from mongoengine. required=True means that we have to specify this field when creating a user. Otherwise, an exception will be thrown.
class User(Document):
    email = StringField(required=True)
    first_name = StringField(max_length=30)
    last_name = StringField(max_length=30)
Now let’s show how we’d create a posts document and reference the users document. The ReferenceField enables us to make reference from one document to another in mongoengine.
class Post(Document):
    title = StringField(max_length=120, required=True)
    author = ReferenceField(User)
Saving Documents
To save the document to the database, call the save() method. If the document does not exist in the database, it will be created. If it does already exist, then changes will be updated atomically.
user = User(email="connect@derrickmwiti.com", first_name="Derrick", last_name="Mwiti")
user.save()
Accessing the just created is very similar to other ORMs
print(user.id, user.email, user.first_name, user.last_name)
5ba5c3bf2e8ca029163417fc connect@derrickmwiti.com Derrick Mwiti
Conclusion
In this tutorial, we have learned how we can use MongoDB in Python. We’ve also introduced mongoengine, an Object Document Mapper that makes it easier for us to interact with MongoDB in Python.
#python #mongodb #database