How to Dockerize a Node.js App from scratch
Originally published at https://www.edureka.co
Every Node.js developer out there always puts in utmost efforts to make his application free any type of environment dependencies. But despite their measures, surprises occur all the time leading to the failure of the application. Well, this is where Docker comes to the rescue. In this Node.js Docker Tutorial, I will be giving you a complete walkthrough of how to Dockerize a Node.js application from scratch.
Below are the topics I will be covering in this Node.js Docker article:
- What is Docker?
- Docker Basics: Dockerfile, Images & Containers
- Why use Node.js with Docker?
- Demo: Node.js Docker Tutorial
Let’s get started with this Node.js Docker Tutorial.
What is Docker?
Docker is a containerization platform which is used for packaging an application and its dependencies together within a Docker container. This ensures the effortless and smooth functioning of our application irrespective of the changes in the environment.
Thus, you can think of Docker as a tool that is designed to make the creation, deployment, and execution of applications using the containers easier and efficient.
Talking about Docker Container it is nothing but a standardized unit that is used to deploy a particular application or environment and can be built dynamically. You can have any container such as Ubuntu, CentOS, etc. based on your requirement with respect to Operating Systems. Moreover, these containers aren’t limited to just OS, you can have application-oriented OS as well. A few examples of such containers are CakePHP container, Tomcat-Ubuntu container, etc.
To understand this better refer to the below diagram:

Now in this diagram, you can see that each and every application is running on a separate container along with its own set of dependencies & libraries. This ensures that each application is independent of others, enabling developers to build applications independently without any interference from other applications. Thus, being a developer you can simply build a container with different applications installed in it and hand it over to the QA team. The QA team then just needs to execute the container for replicating the developer’s environment.
Now, let me now throw some light on the nitty-gritty of Docker which will aid you in understanding the process of Dockerizing your Node.js application better.
Docker Basics: Dockerfile, Images & Containers
The three most important aspects that you must know before you get your feet wet with Docker are:
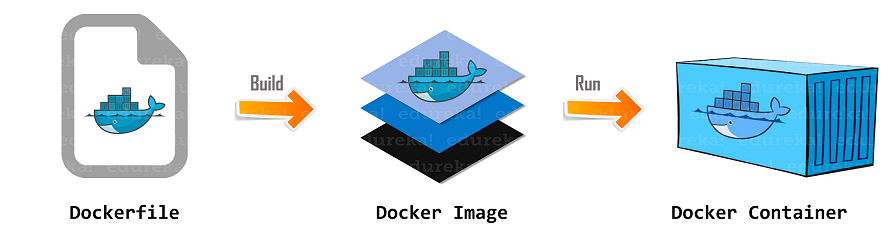
In the above diagram you can see that when a Dockerfile is built, it gives you a Docker Image. Furthermore, when you execute the Docker Image then it finally gives you a Docker Container.
Let’s now understand each of these in detail.
Dockerfile
A Dockerfile is basically a text document that contains the list of commands which can be invoked by a user using the command line in order to assemble an image. Thus, by reading instructions from this Dockerfile, Docker automatically builds images.
For executing multiple command line instructions successively you can create an automated build using the following command:
docker build
Docker Image
A Docker Image can be considered something similar to a template which is typically used to build Docker Containers. In other words, these read-only templates are nothing but the building blocks of a Docker Container. In order to execute an image and build a container you need to use the following command:
docker run
The Docker Images that you create using this command are stored within the Docker Registry. It can be either a user’s local repository or a public repository like a Docker Hub which allows multiple users to collaborate in building an application.
Docker Container
A Docker Container is the running instance of a Docker Image. These containers hold the complete package that is required to execute the application. So, these are basically ready to use applications which are created from Docker Images that is the ultimate utility of Docker.
Why use Docker with Node.js?
Below I have listed down a few of the most intriguing reasons to use Docker with your Node.js application:
- Docker helps in speeding up the application deployment process
- It makes the application portability across other machines easier
- It makes the version control easier and promotes component reuse
- Using Docker, one can easily share the Docker images and Dockerfiles
- Docker has a very lightweight footprint and thus puts minimal overhead on the applications
- It’s easy and simple to use and maintain
I hope this gives you enough reasons to start using Docker right away. So, lets now dive deeper into this Node.js Docker Tutorial and see how exactly Docker can be used with Node.js applications.
Demo: Node.js Docker Tutorial
Before you start using Docker with Node.js, you need to make sure that Docker is already installed in your system and you have the right set of permissions to use it. If not then you can refer to the following articles:
- Installing Docker on Ubuntu/CentOS
- Installing Docker on Windows
Now that installation process is out of the way, let’s now concentrate on Dockerizing a Node.js Application. I am assuming you already have Node.js installed in your system.
In order to Dockerize a Node.js application, you need to go through the following steps:
- Create Node.js Application
- Create a Docker file
- Build Docker Image
- Execute
Create Node.js Application
In order to Dockerize a Node.js Application, the very initial thing you need is the Node.js Application. You can refer to my article on Building REST API with Node.js.
Once you are done developing the application, you need to make sure that the application is executing properly on the assigned port. In my case, I am using port 8080. If the application is working as expected, you can proceed to the next step.
Create a Dockerfile
In this step, we will be creating the Dockerfile which will enable us to recreate and scale our Node.js application as per our requirement. To complete this step, you need to create a new file in the root directory of the project and name it Dockerfile.
Here, I am using a lightweight alpine based image to build our Docker image on it. While creating a Dockerfile our main aim should be to keep the Docker image as small as possible in size all while availing everything that is required to run our application successfully.
Below I have written down the code that needs to add in your Dockerfile:
Dockerfile
FROM node:9-slim

# WORKDIR specifies the application directory
WORKDIR /app

# Copying package.json file to the app directory
COPY package.json /app

# Installing npm for DOCKER
RUN npm install

# Copying rest of the application to app directory
COPY . /app

# Starting the application using npm start
CMD ["npm","start"]
As you can see in the above code that I have used two distinct COPY commands to reduce the application rebuild time. As Docker can implicitly cache the result of each individual command, you don’t need to execute all the commands from the beginning each time you try to create a Docker image.
Now that you have successfully defined your Dockerfile, the next step is to Build a Docker Image. In the next section of this article, I will demonstrate how you can build your Docker image with ease.
Build Docker Image
Building a Docker image is rather easy and can be done using a simple command. Below I have written down the command that you need to type in your terminal and execute it:
docker build -t <docker-image-name> <file path>
Once you execute this command, you will see a 6 step output in your terminal. I have attached a screenshot to my output.
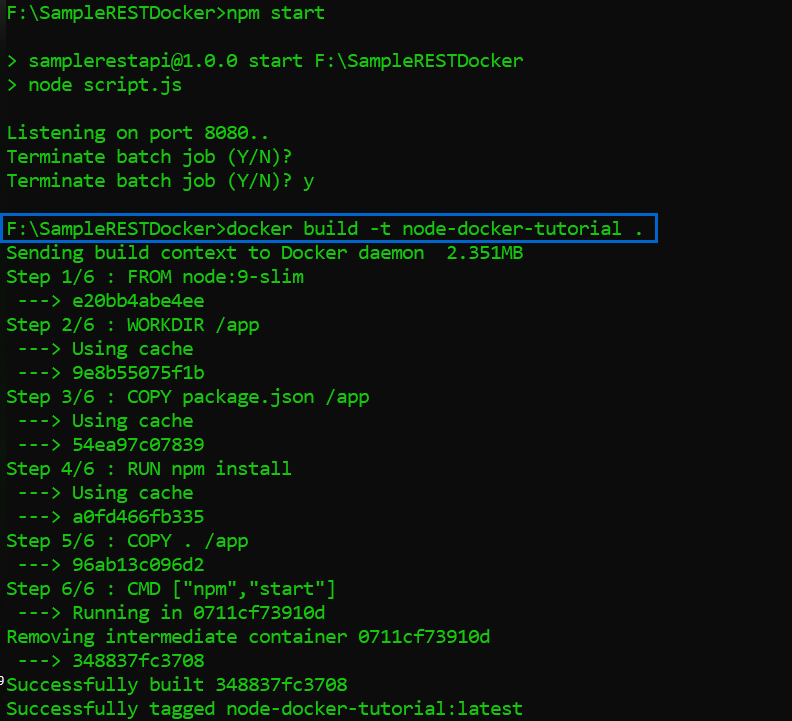
If you are getting an output something similar to the above screenshot, then it means that your application is working fine and the docker image has been successfully created. In the next section of this Node.js Docker article, I will show you how to execute this Docker Image.
Executing the Docker Image
Since you have successfully created your Docker image, now you can run one or more Docker containers on this image using the below-given command:
docker run it -d -p <HOST PORT>:<DOCKER PORT> <docker-image-name>
This command will start your docker container based on your Docker image and expose it on the specified port in your machine. In the above command -d flag indicates that you want to execute your Docker container in a detached mode. In other words, this will enable your Docker container to run in the background of the host machine. While the -p flag specifies which host port will be connected to the docker port.
To check whether your application has been successfully Dockerized or not, you can try launching it on the port you have specified for the host in the above command.
If you want to see the list of images currently running in your system, you can use the below command:
docker ps
Thanks for reading ❤
If you liked this post, share it with all of your programming buddies!
Follow us on Facebook | Twitter
Further reading
☞ Best 50 Nodejs interview questions from Beginners to Advanced in 2019
☞ Tutorial Laravel 6 with Docker and Docker-Compose
☞ Docker for Absolute Beginners
☞ Docker Tutorial From Beginner to Advanced
#node-js #docker #devops