How to build a realtime messaging feature in React app with Chatkit
Originally published by Abati Adewale at https://pusher.com
Let us have a brief overview of Chatkit.
In many apps, realtime messaging is a feature that adds to a great user experience. Whether it is a game, an online shop, or a tool used by many people, the ability to chat and discuss improves the engagement of the users. Building the realtime messaging feature from scratch is a task that many developers find an unnecessary burden. Thanks to Chatkit, it does not have to be that way.
Introduction to Chatkit
Chatkit is designed to make it easy to add chat to your app. It goes beyond the core features of any chat, such as creating rooms, users and messages. It also includes features like:
- Private and public rooms - Control which users have access to a room.
- Presence updates - Get updated when users change their online/offline status.
- Files - Upload and download files from rooms and attach them to your messages.
- Permission system - Flexible control on what users can do and access.
- Typing indicators - Receive events when users start or stop typing in rooms.
- Read cursors - Keep track of the most recently read message ID for each member of a room.
These features make Chatkit an ideal choice for integrating chat in your app.
In this tutorial, we will be doing the following:
- Set up a React app using a boilerplate
- Set up and instantiate Chatkit
- Add a call to action button
- Create a user
- Create a basic user interface for the chat app
- Create a room and subscribe to a room
- Send and receive realtime messages
Prerequisites
To follow along in this tutorial,
- A basic knowledge of JavaScript is important.
- An understanding of React and its component lifecycle methods is necessary.
- You’ll need to have Node >= version 6 and npm >= version 5.2 on your machine.
Let us get started right away.
Set up a React app using the Create React App boilerplate
To focus more on the business of this article, we will be using a boilerplate, the create-react-app boilerplate. It comes with a node server already set up, which is an added advantage. If you have not installed this boilerplate before you will need to install it globally once.
npm install -g create-react-app
When that is done, we can now create React Apps anytime we want. So let us create our chatapp.
create-react-app chatapp
Once that is done, you are all set up to work on your project. Navigate to the root of your project and run the following code and a new window showing your React App will open in your default browser.
npm start
We just created a React app, let us move on to the next step.
Set up Chatkit
To setup Chatkit, you need to create an account. So if you do not have one, go to Pusher and create one. After signing up, the dashboard is the page you will be taken to. Next, on the dashboard we will create an instance of Chatkit that we will name ChatApp. You can give it whatever name you want.
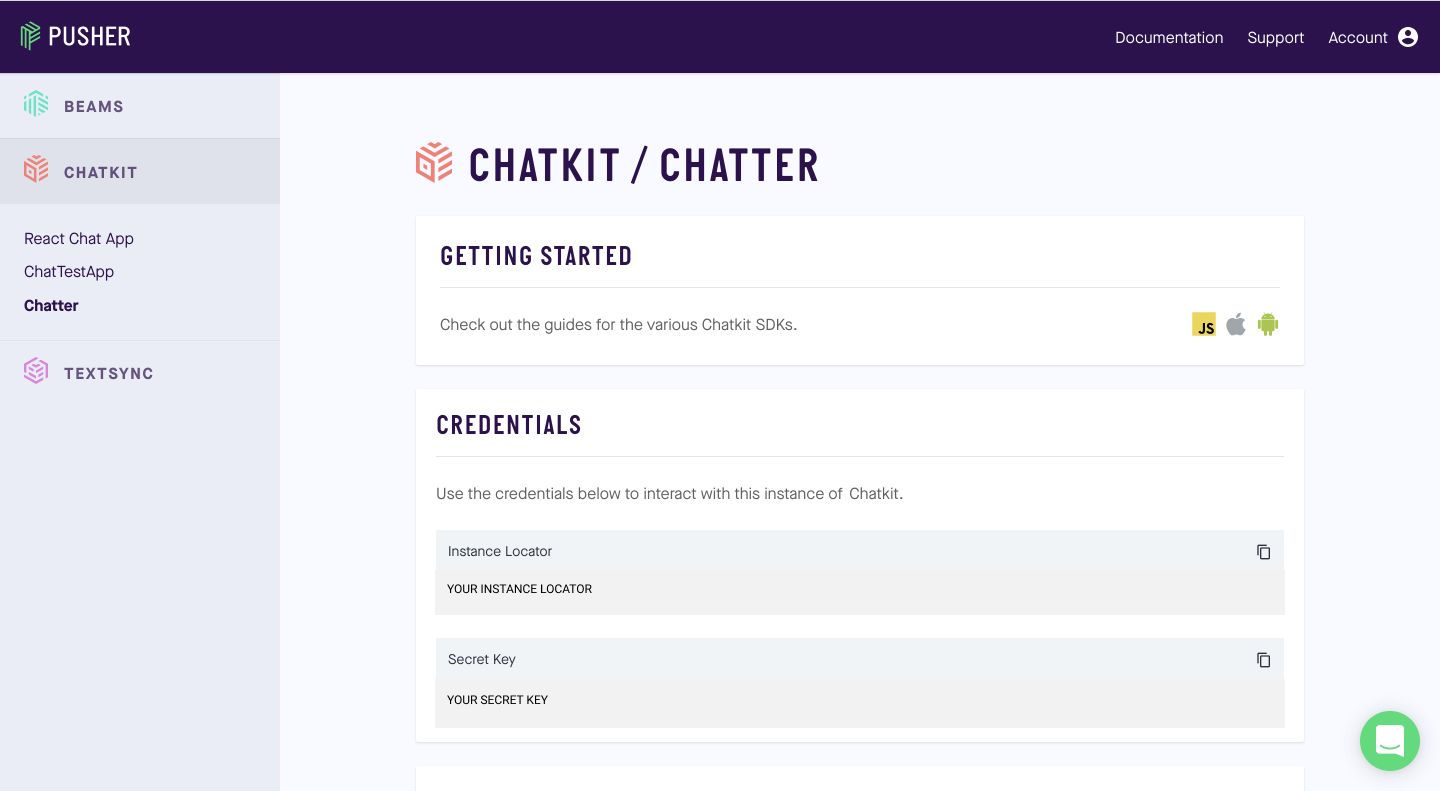
Take note of the Instance Locator and Secret Key, we will be needing them soon.
Next, in your terminal add Chatkit to our app using your favorite package manager.
npm install @pusher/chatkit-client
We also need to add the Chatkit server.
npm install @pusher/chatkit-server
Now we have set up what is necessary, let us start building the app.
Add a call to action button
Since the chat functionality is just a feature in our app, there should be a way for the user to see that it is possible to send messages to other users of the app. This is where the call-to-action button comes in. Since we are using React, we try to separate interests as much as possible, we will be creating a component to handle this.
In the src directory, create a folder named Components. In that folder create a file named ChatMessage.js. In this component, we add the following code.
// src/Components/ChatMessage.jsimport React, { Component } from ‘react’;
class ChatMessage extends Component {
constructor(props) {
super(props);
this.changeView = this.changeView.bind(this);
}
changeView() {
this.props.changeView(‘signup’)
}
render() {
return (
<div>
<button className=“chat-button” onClick={this.changeView}>Send a message</button>
</div>
)
}
}
export default ChatMessage;
Since it is assumed that we already have a basic knowledge of React, we will not be explaining every part of the code. We added a button that tells the user that a messaging feature exists. When the user clicks, it changes the view of the app to signup.
Next, we update the App.js file in the src folder. We will create a state for the current view and add a method to change the view of the app. Replace the content of the file with the following code.
// src/App.jsimport React, { Component } from ‘react’;
import ChatMessage from ‘./Components/ChatMessage’;class App extends Component {
constructor(props) {
super(props);
this.state = {
currentView: ‘ChatMessage’
}
this.changeView = this.changeView.bind(this);
}changeView(view) {
this.setState({
currentView: view
})
}render() {
let view =‘’;
if (this.state.currentView === “ChatMessage”) {
view = <ChatMessage changeView={this.changeView}/>
}
return (
<div className=“App”>
{view}
</div>
);
}
}
export default App;
Let us style the app and position at the right bottom of the page, which is where this feature is positioned in many apps.
To the index.css file, add the following code.
// src/index.cssbody {
margin: 0;
padding: 0;
font-family: sans-serif;
}.chat-button {
position: absolute;
right: 10px;
bottom: 10px;
background: #5E0565;
height: 50px;
font-size: 16px;
color: white;
padding: 10px;
border-radius: 5px;
border: 0;
box-shadow: 1px 1px 4px 1px grey;
cursor: pointer;
}
At this point, you will see the button at the right bottom of your page. Clicking on it returns no view because we have not added the any component the view should change to when the button is clicked. Let us create that view next.
Create a user
There is a need to keep track of people who send messages in our app, so there has to be a form of authentication. We will use email to authenticate users in this tutorial. First, we will need to create a form for users to input their email.
In the Component folder, create a file named Signup.js. In this file add the following code.
// src/Components/Signup.jsimport React, {Component} from ‘react’;
class Signup extends Component {
constructor(props) {
super(props);
this.state = {
username: “”,
}
this.handleChange = this.handleChange.bind(this);
this.handleSubmit = this.handleSubmit.bind(this);
}
handleChange(e) {
this.setState({username: e.target.value});
}
handleSubmit(e) {
e.preventDefault()
this.props.onSubmit(this.state.username);
}
render() {
return(
<div className=“form-container”>
<h1>Let’s Talk</h1>
<form onSubmit={this.handleSubmit} className=“form”>
<label htmlFor=“email”>What is your email?</label>
<input type=“email” name=“username” onChange={this.handleChange} className=“input” />
<button className=“submit”>Submit</button>
</form>
</div>
)
}
}
export default Signup;
This is a basic signup form. The handleSubmit method passes the value of the input as an argument of a method that is passed down from its parent element. Let us make our form more appealing by adding styles to it. In our index.css file, we add styles for our form.
// src/index.css.form-container {
height: 400px;
border: 1px solid #5E0565;
}
.form-container h1 {
padding: 10px;
background-color: #5E0565;
font-size: 20px;
color: white;
margin: 0;
margin-bottom: 10px;
}.form {
padding: 30px;
}.input {
display: block;
width: 100%;
margin: 20px auto;
height: 50px;
font-size: 20px
}.submit {
height: 40px;
padding: 0 20px;
background-color: #5E0565;
color: white;
border-radius: 5px;
font-size: 16px;
cursor: pointer;
}
In the App.js file, which determines what is displayed, we will import the signup form we just created and display it. Remember, we already created a method to update the view of the app when the chat message button is clicked. So the App.js file will be updated as follows:
// src/App.jsimport React, { Component } from ‘react’;
import ChatMessage from ‘./Components/ChatMessage’;
import Signup from ‘./Components/Signup’;
class App extends Component {
constructor(props) {
super(props);
this.state = {
currentView: ‘ChatMessage’
}
this.changeView = this.changeView.bind(this);
}changeView(view) {
this.setState({
currentView: view
})
}render() {
let view =‘’;
if (this.state.currentView === “ChatMessage”) {
view = <ChatMessage changeView={this.changeView}/>
} else if (this.state.currentView === “signup”) {
view = <Signup />
}
return (
<div className=“App”>
{view}
</div>
);
}
}
export default App;
We will also add the following styles for the App to the index.css file.
// src/index.css.App {
position: fixed;
right: 10px;
bottom: 0;
width: 350px;
border: 1px solid #ccc;
}
On your server, when you click on the Send a message button, this is what you should see at the right bottom of your screen.

At this point, entering an email and clicking the submit button will return an error because we have not added a method that will handle user creation. Let us move on to that part.
Adding hooks for users
We will add hooks to create users for the chatapp using Chatkit. First, we need to instantiate Chatkit. In the App.js file, we create an instance by add the following code before the app class.
// src/App.jsimport React, { Component } from ‘react’;
import ChatMessage from ‘./Components/ChatMessage’;
import Signup from ‘./Components/Signup’;import { default as Chatkit } from ‘@pusher/chatkit-server’;
const chatkit = new Chatkit({
instanceLocator: “YOUR INSTANCE LOCATOR”,
key: “YOUR SECRET KEY”
})class App extends Component {
…
Remember to replace the instanceLocator and key with the ones on your dashboard.
Next, up we will create a method that will handle user creation. This method will be passed to the Signup component as a prop. We will also add a state object to hold the values that will be passed when the user is created. Also we need to add a view for when the user is successfully created. So in the App.js file, our app class will be:
// src/App.js…
class App extends Component {
constructor(props) {
super(props);
this.state = {
currentUsername: ‘’,
currentId: ‘’,
currentView: ‘signup’
}
this.changeView = this.changeView.bind(this);
this.createUser = this.createUser.bind(this);
}createUser(username) {
chatkit.createUser({
id: username,
name: username,
})
.then((currentUser) => {
this.setState({
currentUsername: username,
currentId: username,
currentView: ‘chatApp’
})
}).catch((err) => {
if(err.status === 400) {
this.setState({
currentUsername: username,
currentId: username,
currentView: ‘chatApp’
})
} else {
console.log(err.status);
}
});
}changeView(view) {
this.setState({
currentView: view
})
}render() {
let view =‘’;if (this.state.currentView === “ChatMessage”) {
view = <ChatMessage changeView={this.changeView}/>
} else if (this.state.currentView === “signup”) {
view = <Signup onSubmit={this.createUser}/>
} else if (this.state.currentView === “chatApp”) {
view = <h1>The chatapp will go here</h1>
}
return (
<div className=“App”>
{view}
</div>
);
}
}
export default App;
We have done everything needed to successfully create a user. When you enter an email in the signup form, you will get the message “Your Chatapp will go here”.
Next, we will move to creating the chat app.
Create the chat app
In this part, we will create an user interface for our chat app that is going to be pretty basic. The image below is the design for our app. First let us create the user interface for it.
Our interface consists of two major parts, the message list where messages are displayed and the part for sending messages. These parts will form the children components that will make up the Chatapp component.
First, we will create the Chatapp component. Create a file in the Components folder and name it ChatApp``.js. Add the following to the file:
// src/Components/ChatApp.jsimport React, {Component} from ‘react’;
class ChatApp extends Component {
render() {
return (
<div>
<h2 className=“header”>Let’s Talk</h2>
</div>
)
}
}export default ChatApp;
Before we proceed, we need to change the code of App.js to render the chat app instead of the dummy text added. In the App.js, we import the ChatApp component as below:
// src/Components/ChatApp.jsimport React, { Component } from ‘react’;
import ChatMessage from ‘./Components/ChatMessage’;
import Signup from ‘./Components/Signup’;
import ChatApp from ‘./Components/ChatApp’;const Chatkit = require(“@pusher/chatkit-server”);
const chatkit = new Chatkit.default({
…
And then in the render method of the App component, we replace the view to render with our component.
// src/App.jsrender() {
let view =‘’;
if (this.state.currentView === “ChatMessage”) {
view = <ChatMessage changeView={this.changeView}/>
} else if (this.state.currentView === “Signup”) {
view = <Signup onSubmit={this.createUser}/>
} else if (this.state.currentView === “chatApp”) {
view = <ChatApp currentId={this.state.currentId} />
}
return (
<div className=“App”>
{view}
</div>
);
}
If you create a new user, you should see the ChatApp screen with the name of the user you created. We are making progress. Let us create a room for the users next.
Create a room
We will be creating a room called General for chats using the Chatkit dashboard.
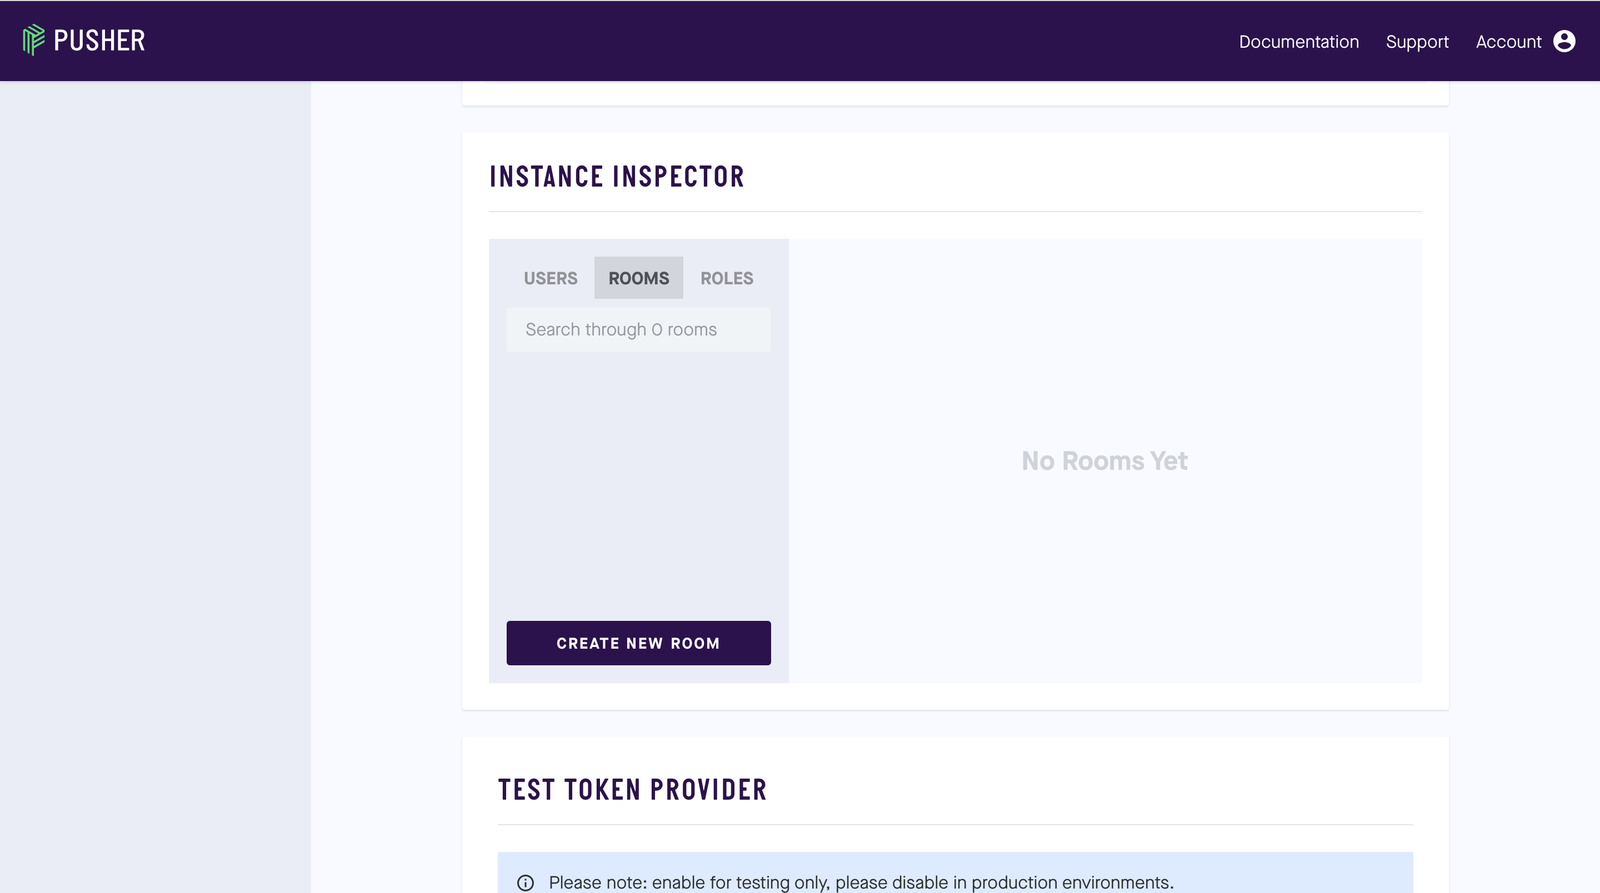
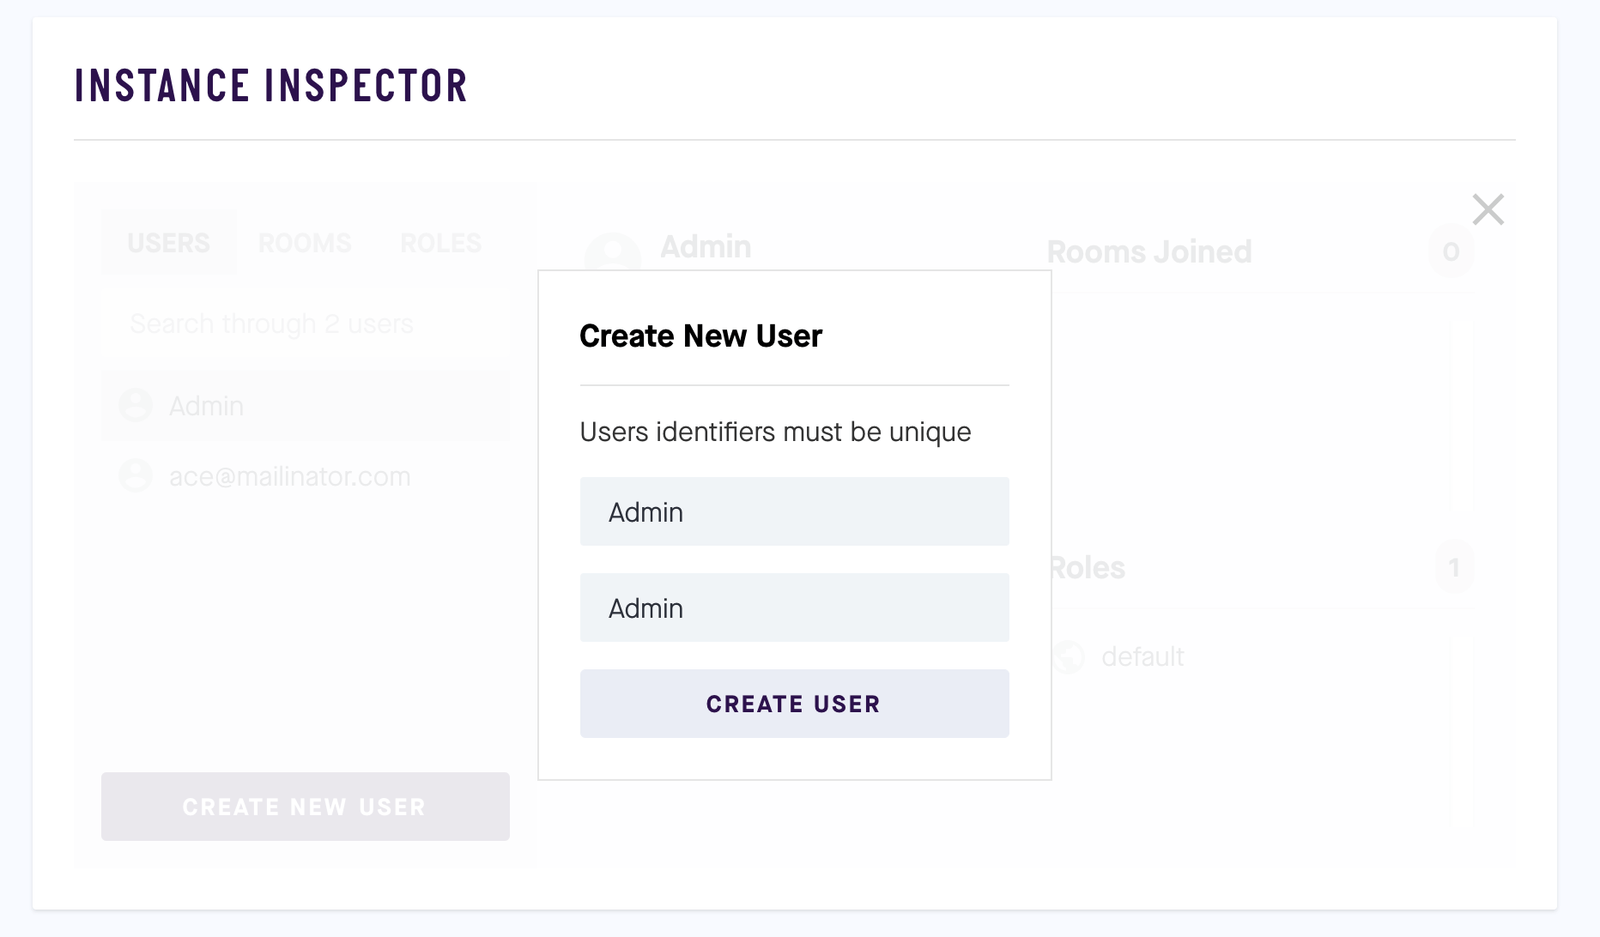
We will first create a user called Admin manually on the dashboard. So click on the USERS tab and add a new user called Admin.
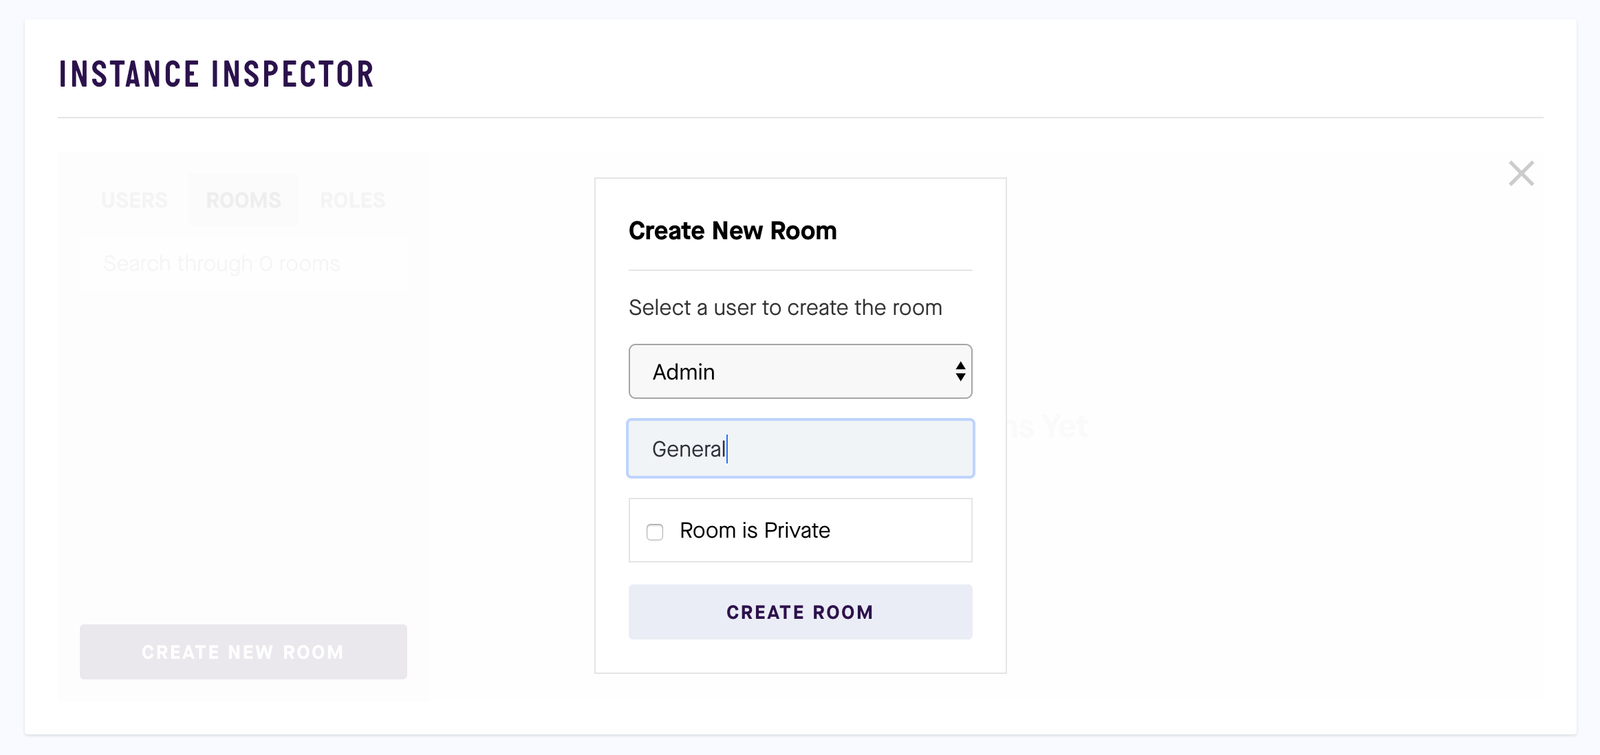
We will then proceed to create the General room. So click on the ROOMS tab and add a new room called General.
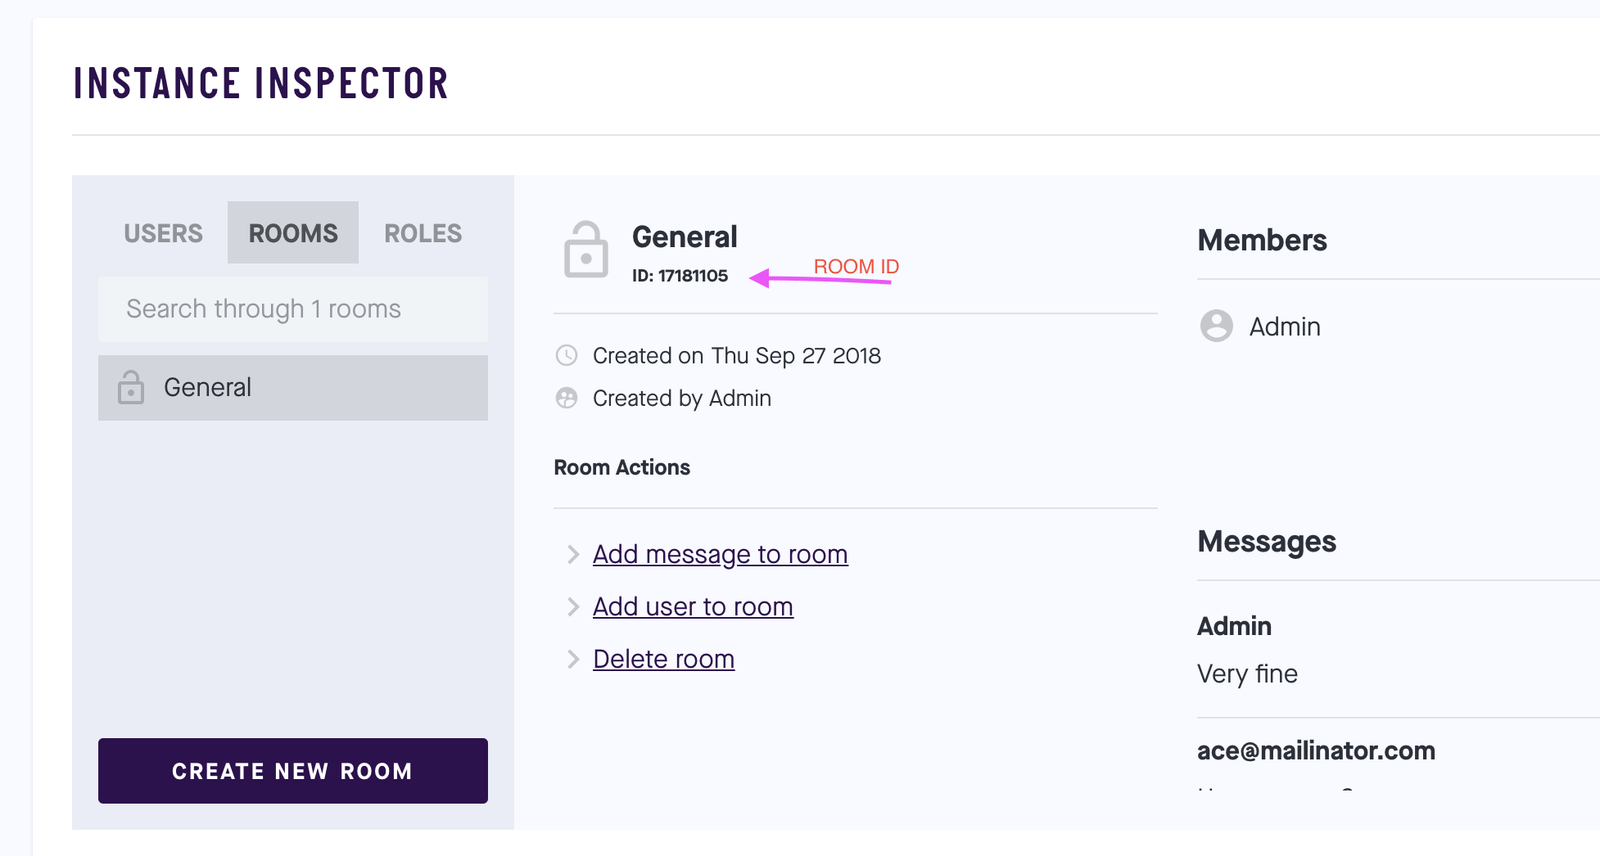
Once done creating our General room, let’s take note of our room’s ID as shown below. We will be using it later on.
Let us head back to our ChatApp.js file. First, we will import ChatManager and TokenProvider from Chatkit.
// src/Components/ChatApp.jsimport React, {Component} from ‘react’;
import { ChatManager, TokenProvider } from ‘@pusher/chatkit-client’;class ChatApp extends Component {
…
Next, we create a state object that will hold values that will be passed down to the children components.
// src/Components/ChatApp.js…
class ChatApp extends Component {
constructor(props) {
super(props);
this.state = {
currentUser: null,
currentRoom: {users:[]},
messages: [],
users: []
}
}
…
Next, we will create a chatManager instance and use it to connect users to the app.
// src/Components/ChatApp.js…
messages: [],
users: []
}
}
componentDidMount() {
const chatManager = new ChatManager({
instanceLocator: “YOUR INSTANCE LOCATOR”,
userId: this.props.currentId,
tokenProvider: new TokenProvider({
url: “YOUR TOKEN PROVIDER”
})
})
}
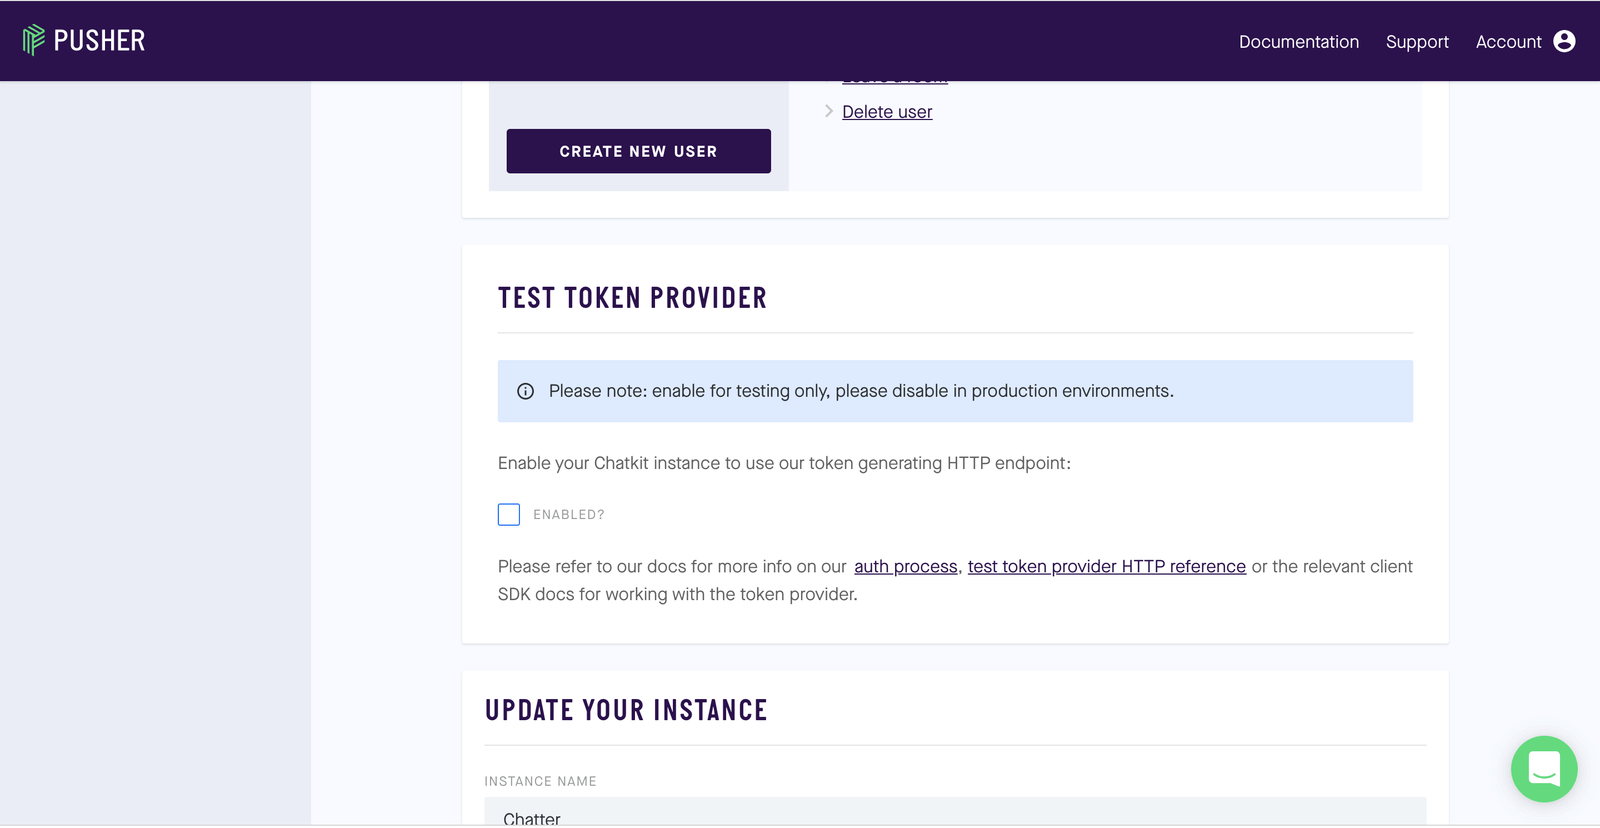
This creates an instance of the chatManager that will be needed to connect to the rooms. You can find your token provider on your dashboard. If it is not already enabled, click on ENABLED to get your test token provider.
Next, we subscribe the users to the room using our room ID from earlier.
// src/Components/ChatApp.jscomponentDidMount() {
const chatManager = new ChatManager({
instanceLocator: “YOUR INSTANCE LOCATOR”,
userId: this.props.currentId,
tokenProvider: new TokenProvider({
url: “YOUR TOKEN PROVIDER”
})
})
chatManager
.connect()
.then(currentUser => {
this.setState({ currentUser: currentUser })
return currentUser.subscribeToRoom({
roomId: “ROOM_ID”,
messageLimit: 100,
hooks: {
onMessage: message => {
this.setState({
messages: […this.state.messages, message],
})
},
}
})
})
.then(currentRoom => {
this.setState({
currentRoom,
users: currentRoom.userIds
})
})
.catch(error => console.log(error))
}
Above, first we connect the chatManager instance we created. Then we subscribed the user to the General room created for all users. We also get to store existing and new messages from teh room to the state by adding hooks to it. If this is successful, we then change the state of the current room and the users.
This is how the ChatApp.js should be now.
// src/Components/ChatApp.jsimport React, {Component} from ‘react’;
import { ChatManager, TokenProvider } from ‘@pusher/chatkit-client’;class ChatApp extends Component {
constructor(props) {
super(props);
this.state = {
currentUser: null,
currentRoom: {users:[]},
messages: [],
users: []
}
}componentDidMount() {
const chatManager = new ChatManager({
instanceLocator: “YOUR INSTANCE LOCATOR”,
userId: this.props.currentId,
tokenProvider: new TokenProvider({
url: “YOUR USER TOKEN”
})
})chatManager
.connect()
.then(currentUser => {
this.setState({ currentUser: currentUser })
return currentUser.subscribeToRoom({
roomId: “ROOM_ID”,
messageLimit: 100,
hooks: {
onMessage: message => {
this.setState({
messages: […this.state.messages, message],
})
},
}
})
})
.then(currentRoom => {
this.setState({
currentRoom,
users: currentRoom.userIds
})
})
.catch(error => console.log(error))
}
render() {
return (
<div className=“chatapp”>
<div>
<h2 className=“header”>Let’s Talk</h2>
</div>
</div>
)
}
}
export default ChatApp;
Send messages
Let us build the input component for sending messages to the room now. Once again, create a file in the Components folder and name it Input.js . This component will be made up of an input and a button just like the Signup component. To the file created, add the following code:
// src/Components/Input.jsimport React, {Component} from ‘react’;
class Input extends Component {
constructor(props) {
super(props);
this.state = {
message: “”
}
this.handleChange = this.handleChange.bind(this);
this.handleSubmit = this.handleSubmit.bind(this);
}
handleChange(e) {
this.setState({
message: e.target.value
})
}
handleSubmit(e) {
e.preventDefault();
this.props.onSubmit(this.state.message);
this.setState({
message: ‘’
})
}
render() {
return (
<form onSubmit={this.handleSubmit} className=“input-field”>
<input className=“message-input” type=“text” onChange={this.handleChange} value={this.state.message}/>
<input className=“message-submit” type=“submit” value=“send” />
</form>
)
}
}
export default Input;
Next, we will add and bind a method AddMessage to ChatApp.js to add the messages to our message list. Also, we need to import the Input component and render it.
// src/Components/ChatApp.jsimport React, {Component} from ‘react’;
import { ChatManager, TokenProvider } from ‘@pusher/chatkit-client’;
import Input from ‘./Input’;class ChatApp extends Component {
constructor(props) {
super(props);
this.state = {
currentUser: null,
currentRoom: { users: [] },
messages: [],
users: []
}
this.addMessage = this.addMessage.bind(this);
}componentDidMount() {
const chatManager = new ChatManager({
…
})
.catch(error => console.log(error))
}
addMessage(text) {
this.state.currentUser.sendMessage({
text,
roomId: this.state.currentRoom.id
})
.catch(error => console.error(‘error’, error));
}
render() {
return (
<div>
<h2 className=“header”>Hi There, Ask us anything</h2>
<Input className=“input-field” onSubmit={this.addMessage} />
</div>
)
}
…
If we go back to our Chatkit dashboard, we will see that whatever message we send via the input component will appear.
Displaying messages
We need to be able to display our messages in a room. We will create another component to display this. Create another file in Components folder and name it MessageList.js. In it add the following code.
// src/Components/MessageList.jsimport React, {Component} from ‘react’;
class MessageList extends Component {
render() {
return(
<ul className=“message-list”>
{this.props.messages.map((message, index) => (
<li key={index}>
<h4 className=“message-sender”>{message.senderId}</h4>
<p className=“message-text”>{message.text}</p>
</li>
))}
<li></li>
</ul>
)
}
}
export default MessageList;
So the component maps through the list and displays all the messages. We need to import the MessageList and render it and pass the messages as a prop to it. For the user to be able to see the messages of the chat, we need to pass on the messages stored in the state as props to the MessageList component. Our ChatApp.js file should contain the following code now.
// src/Components/ChatApp.jsimport React, {Component} from ‘react’;
import { ChatManager, TokenProvider } from ‘@pusher/chatkit-client’;
import MessageList from ‘./MessageList’;
import Input from ‘./Input’;class ChatApp extends Component {
constructor(props) {
super(props);
this.state = {
currentUser: null,
currentRoom: {users:[]},
messages: [],
users: []
}
this.addMessage = this.addMessage.bind(this);
}componentDidMount() {
const chatManager = new ChatManager({
instanceLocator: ‘INSTANCE LOCATOR’,
userId: this.props.currentId,
tokenProvider: new TokenProvider({
url: ‘TOKEN PROVIDER’
})
})
chatManager
.connect()
.then(currentUser => {
this.setState({ currentUser: currentUser })
return currentUser.subscribeToRoom({
roomId: “ROOM_ID”,
messageLimit: 100,
hooks: {
onMessage: message => {
this.setState({
messages: […this.state.messages, message],
})
},
}
})
})
.then(currentRoom => {
this.setState({
currentRoom,
users: currentRoom.userIds
})
})
.catch(error => console.log(error))
}addMessage(text) {
this.state.currentUser.sendMessage({
text,
roomId: this.state.currentRoom.id
})
.catch(error => console.error(‘error’, error));
}
render() {
return (
<div>
<h2 className=“header”>Hi There, Ask us anything</h2>
<MessageList messages={this.state.messages} />
<Input className=“input-field” onSubmit={this.addMessage} />
</div>
)
}
}
export default ChatApp;
If you go to our app, you will notice everything works now. Only one thing though, it is ugly and does not look like what we wanted it to be. Let us change that by adding styles.
Styling the app
To our index.css file we will throw in more styles and our file will become:
// src/index.cssbody {
margin: 0;
padding: 0;
font-family: sans-serif;
}
.chat-button {
position: absolute;
right: 10px;
bottom: 10px;
background: #5E0565;
height: 50px;
font-size: 16px;
color: white;
padding: 10px;
border-radius: 5px;
border: 0;
box-shadow: 1px 1px 4px 1px grey;
cursor: pointer;
}
.form-container {
height: 400px;
border: 1px solid #5E0565;
}
.form-container h1 {
padding: 10px;
background-color: #5E0565;
font-size: 20px;
color: white;
margin: 0;
margin-bottom: 10px;
}
.form {
padding: 30px;
}
.input {
display: block;
width: 100%;
margin: 20px auto;
height: 50px;
font-size: 20px
}
.submit {
height: 40px;
padding: 0 20px;
background-color: #5E0565;
color: white;
border-radius: 5px;
font-size: 16px;
cursor: pointer;
}
.App {
position: fixed;
right: 10px;
bottom: 0;
width: 350px;
border:1px solid #ccc;
}
.form {
padding: 30px;
}
.input {
display: block;
width: 100%;
margin: 20px auto;
height: 50px;
font-size: 20px
}
.submit {
height: 40px;
padding: 0 20px;
background-color: #5E0565;
color: white;
border-radius: 5px;
font-size: 16px;
cursor: pointer;
}
.chatapp {
margin: 0 auto;
height: 80vh;
border: 1px solid #a1a1a4;
}
.header {
padding: 20px;
color: white;
margin-top: 0;
text-align: left;
border-bottom: 1px solid #5E0565;
background-color: #5E0565;
}
.message-list {
list-style-type: none;
padding: 0px 20px;
overflow: scroll;
max-height: calc(100vh - 150px);
margin-bottom: 35px;
}
.message-sender {
font-weight: bold;
font-size: 1em;
margin: 0;
}
.message-text {
margin-bottom: 20px;
margin-top: 5px
}
.message-input {
width: 70%;
height: 50px;
border: 0;
border-top: 1px solid #e0e0e0;
font-size: 18px;
padding-left: 2px
}
.message-submit {
width: 30%;
background-color: #5E0565;
color: white;
font-size: 16px;
cursor: pointer;
}
.input-field {
position: absolute;
bottom: 0;
width: 100%;
display: flex;
}
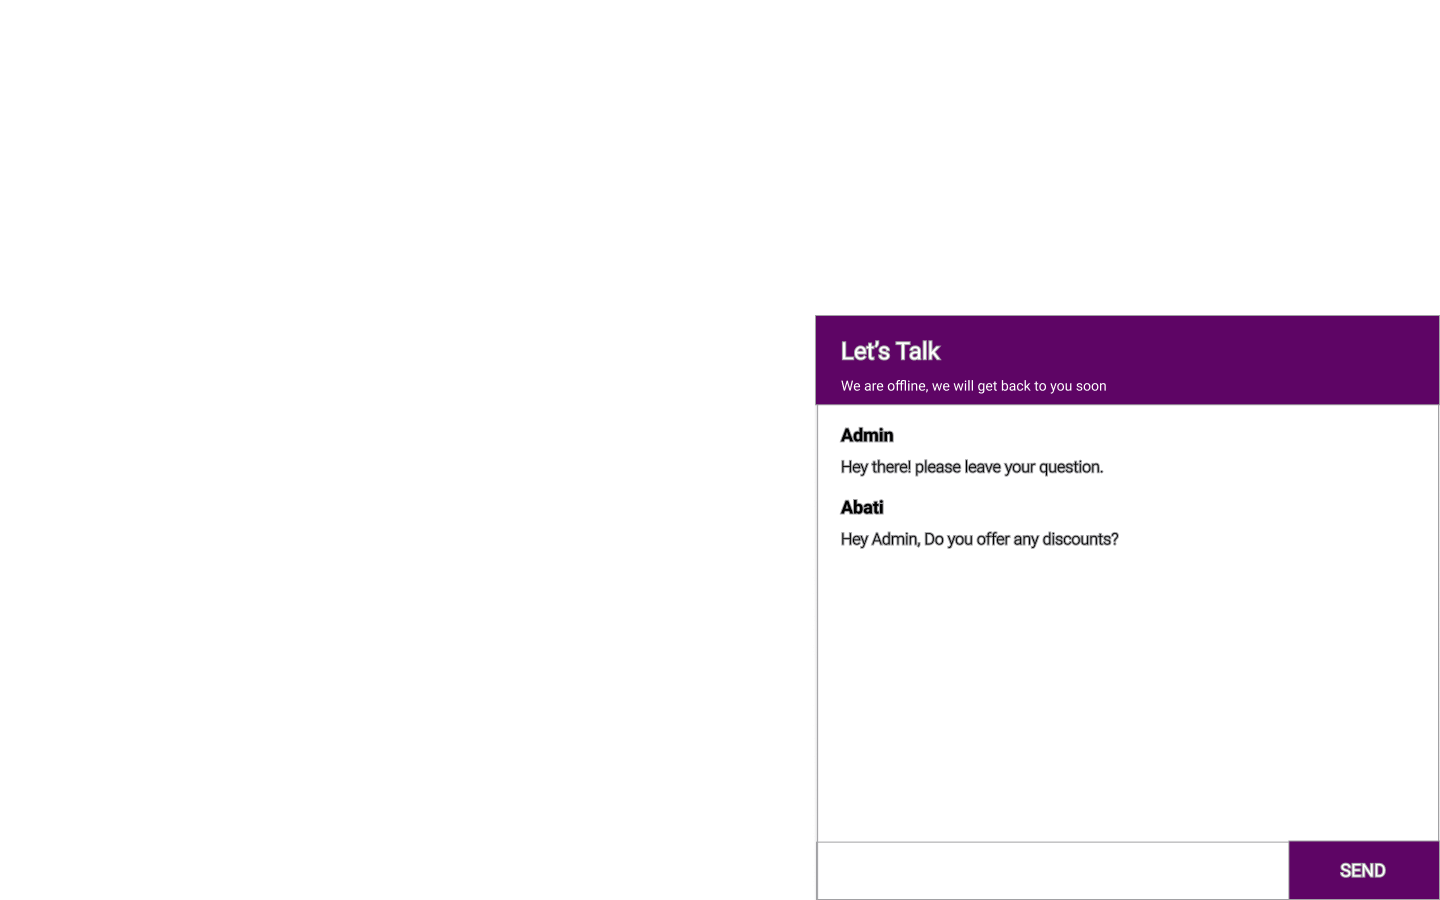
The chat app should look like the following:
Conclusion
In this article, we have seen how we can add a realtime messaging feature to a React app. This is the minimum you can do with Chatkit. But with this knowledge, you can comfortably build on this knowledge and add other features of Chatkit to any React app.
The source code for this tutorial is available on GitHub.
Thanks for reading ❤
If you liked this post, share it with all of your programming buddies!
Follow us on Facebook | Twitter
Further reading about React
☞ React - The Complete Guide (incl Hooks, React Router, Redux)
☞ Modern React with Redux [2019 Update]
☞ Best 50 React Interview Questions for Frontend Developers in 2019
☞ JavaScript Basics Before You Learn React
☞ Microfrontends — Connecting JavaScript frameworks together (React, Angular, Vue etc)
☞ Reactjs vs. Angularjs — Which Is Best For Web Development
☞ React + TypeScript : Why and How
☞ How To Write Better Code in React
☞ React Router: Add the Power of Navigation
☞ Getting started with React Router
☞ Using React Router for optimizing React apps
#reactjs #javascript #node-js #chatbot