Laravel 5.8 Tutorial for Beginners
In this article, I would like to share with you step by step tutorial of Laravel 5.8 application for beginners.
Table of Contents
- Released Laravel 5.8 What’s New Features in Laravel 5.8
- Create REST API using Passport Laravel 5.8 Authentication
- Laravel 5.8 New Login Register System
- Laravel 5.8 New Email Verification
- Laravel 5.8 DataTables Ajax Crud Tutorial
- Laravel 5.8 v2 Google ReCAPTCHA Integration
Released Laravel 5.8 What’s New Features in Laravel 5.8
Laravel** **is most popular php framework in world. Laravel release new in every six month with great new updates. So today Laravel 5.8 released with new features and with new improments.
Laravel 5.x update has been released roughly every six months since then. As 5.7 was released in September 2018. Finally laravel 5.8 released today (26-feb-2019) with amazing new features.
If you work with new laravel 5.8 framework. Read new released latest features of laravel 5.8.
In this laravel 5.8 article post we will take a quick look at some new features or important changes that you should be aware of whether creating a new project from scratch or updating an existing one.
Important updates coming to Laravel 5.8.
Email validation
Laravel’s built in validation rule for email in 5.8 will now allow for international characters in email addresses.
If you have the following validation code below :
$request->validate([

'email' => 'email',

]);
We have to validate an email address such as [email protected] in 5.7, it will fail. However it will pass validation in 5.8.
dotenv 3.0
Laravel 5.8 will support the relatively new dotenv 3.0 to manage your project’s .env environment file.
The key new features in dotenv 3.0 are support for multiline strings and white space at the end of strings in your environment file, for example, something like:
DEVELOPMENT_APP_KEY="specialstringfor
thisapp"
Will only return specialstringfor, whereas in 5.8 the whole specialstringfor thisapp will be parsed. It will also respect any spaces at the end of the string, which were previously stripped from the environment variables.
Mailables directory name change
This is less of a new feature but an important element you will need to be aware of when upgrading a project.
If you have mailables in your project and you have customised the components using the php artisan vendor:publish command, the folder names have changed slightly, namely the /resources/views/vendor/mail/markdown directory is now named /resources/views/vendor/mail/text. This is because both folders can contain markdown code for making good looking responsive html templates with plain text fallbacks. It’s more logical to call the markdown folder text
New error page templates
Laravel 5.8 provide new error page templates (blade view). We can use this template for default 404 page.
Array and String helper functions are deprecated
All array_* and str_* global helpers have been deprecated and will be removed in Laravel 5.9
Carbon 2.0 Support
Laravel 5.8 provides support for the ~2.0 release of the Carbon date manipulation library.
Pheanstalk 4.0 Support
Laravel 5.8 provides support for the ~4.0 release of the Pheanstalk queue library. If you are using Pheanstalk library in your application, please upgrade your library to the ~4.0 release via Composer.
Caching — ttl now in seconds instead of minutes:
If you are using Laravel’s caching functions take note that if you are passing an integer to the cache function in 5.8 it will apply the time to live in seconds and not minutes as it currently is in 5.7, so this command:
Cache::put('foo', 'bar', 30);
Will store the item for 30 minutes in Laravel 5.7 and 30 seconds in Laravel 5.8. A simple but important difference!
Create REST API using Passport Laravel 5.8 Authentication
In this Laravel 5.8 rest authentication api example, we would love to share with you how to create rest full api in laravel 5.8 using passport. Step by Step guide to build rest api in laravel application using passport authentication in Laravel applications. Laravel passport authenticate users and do not maintain session.
Today, first of all we will install laravel new setup and second install laravel passport package for creating a rest full api and using the api we will authentication users in laravel based app.
Contents
- Released Laravel 5.8 What’s New Features in Laravel 5.8
- Create REST API using Passport Laravel 5.8 Authentication
- Laravel 5.8 New Login Register System
- Laravel 5.8 New Email Verification
- Laravel 5.8 DataTables Ajax Crud Tutorial
- Laravel 5.8 v2 Google ReCAPTCHA Integration
Download Fresh Laravel 5.8 Setup
Download Laravel fresh setup using below command, Open command prompt and Type the below command:
composer create-project --prefer-dist laravel/laravel larapassport
Install Passport Package In Laravel
In this step run the below command and install passport package :
composer require laravel/passport
After successfully install laravel passport, register providers. Open config/app.php . and put the bellow code :
  // config/app.php

'providers' =>[
 Laravel\Passport\PassportServiceProvider::class,
 ],
Before you run migration command , go to the app/providers/AppServiceProvider.php and put the two line of code inside a boot method :
 Use Schema;
 public function boot() {
 Schema::defaultStringLength(191);
 }
Run Migration and Install Laravel Passport
We need to do migration using bellow command. This command create tables in database :
php artisan migrate
We need to install laravel generate passport encrption keys. This command will create the encryption keys needed to generate secure access tokens . like secret key and secret id.
php artisan passport:install
Laravel Passport Configuration
Configuration some file . Next open App/User.php file and put the below code on App/User.php File
use Laravel\Passport\HasApiTokens;

use HasApiTokens,
App/User.php
<?php
namespace App;
use Laravel\Passport\HasApiTokens;
use Illuminate\Notifications\Notifiable;
use Illuminate\Foundation\Auth\User as Authenticatable;
class User extends Authenticatable
use HasApiTokens, Notifiable;
/**
The attributes that are mass assignable.
*
@var array
/protected $fillable = ['name', 'email', 'password',];/*
The attributes that should be hidden for arrays.
*
@var array
*/
protected $hidden = [
'password', 'remember_token',
];
}
Next Register passport routes in App/Providers/AuthServiceProvider.php, Go to App/Providers/AuthServiceProvider.php and put this => Register Passport::routes(); inside of boot method :
<?php
namespace App\Providers;
use Laravel\Passport\Passport;
use Illuminate\Support\Facades\Gate;
use Illuminate\Foundation\Support\Providers\AuthServiceProvider as ServiceProvider;
class AuthServiceProvider extends ServiceProvider
{
    /**
     * The policy mappings for the application.
     *
     * @var array
     */
    protected $policies = [
        'App\Model' => 'App\Policies\ModelPolicy',
    ];
/**
     * Register any authentication / authorization services.
     *
     * @return void
     */
    public function boot()
    {
        $this->registerPolicies();
        Passport::routes();
    }
}
config/auth.php
Next go ot config/auth.php and Change the api driver to session to passport . Put this code ‘driver’ => ‘passport’, in api :
 [
         'web' => [
             'driver' => 'session',
             'provider' => 'users',
         ],
         'api' => [
             'driver' => 'passport',
             'provider' => 'users',
         ],
     ],
Create API Route
In this step,we will create api routes, go to api.php inside route folder and create below routes here :
 Route::prefix('v1')->group(function(){
 Route::post('login', 'Api\AuthController@login');
 Route::post('register', 'Api\AuthController @register');
 Route::group(['middleware' => 'auth:api'], function(){
  Route::post('getUser', 'Api\AuthController@getUser');
 });
 });
Create Controller
Now will create a controller name AuthController. Use the below command and create controller :
php artisan make:controller Api\AuthController
After that we will create some methods in authController :
<?php
namespace App\Http\Controllers\Api;
use Illuminate\Http\Request;
use App\Http\Controllers\Controller;
use App\User;
use Illuminate\Support\Facades\Auth;
use Validator;
class AuthController extends Controller
{
 public $successStatus = 200;

 public function register(Request $request) {
 $validator = Validator::make($request->all(), [
              'name' => 'required',
              'email' => 'required|email',
              'password' => 'required',
              'c_password' => 'required|same:password',
    ]);
 if ($validator->fails()) {
       return response()->json(['error'=>$validator->errors()], 401);                        }
 $input = $request->all();
 $input['password'] = bcrypt($input['password']);
 $user = User::create($input);
 $success['token'] =  $user->createToken('AppName')->accessToken;
 return response()->json(['success'=>$success], $this->successStatus);
}


public function login(){
if(Auth::attempt(['email' => request('email'), 'password' => request('password')])){
   $user = Auth::user();
   $success['token'] =  $user->createToken('AppName')-> accessToken;
    return response()->json(['success' => $success], $this-> successStatus);
  } else{
   return response()->json(['error'=>'Unauthorised'], 401);
   }
}

public function getUser() {
 $user = Auth::user();
 return response()->json(['success' => $user], $this->successStatus);
 }
}
 Lets got terminal & run the command :
 php artisan serve
 or
 http://localhost/blog/public/Api/v1/(here route)
Now Test Rest Api in Postman
Laravel Register Api :
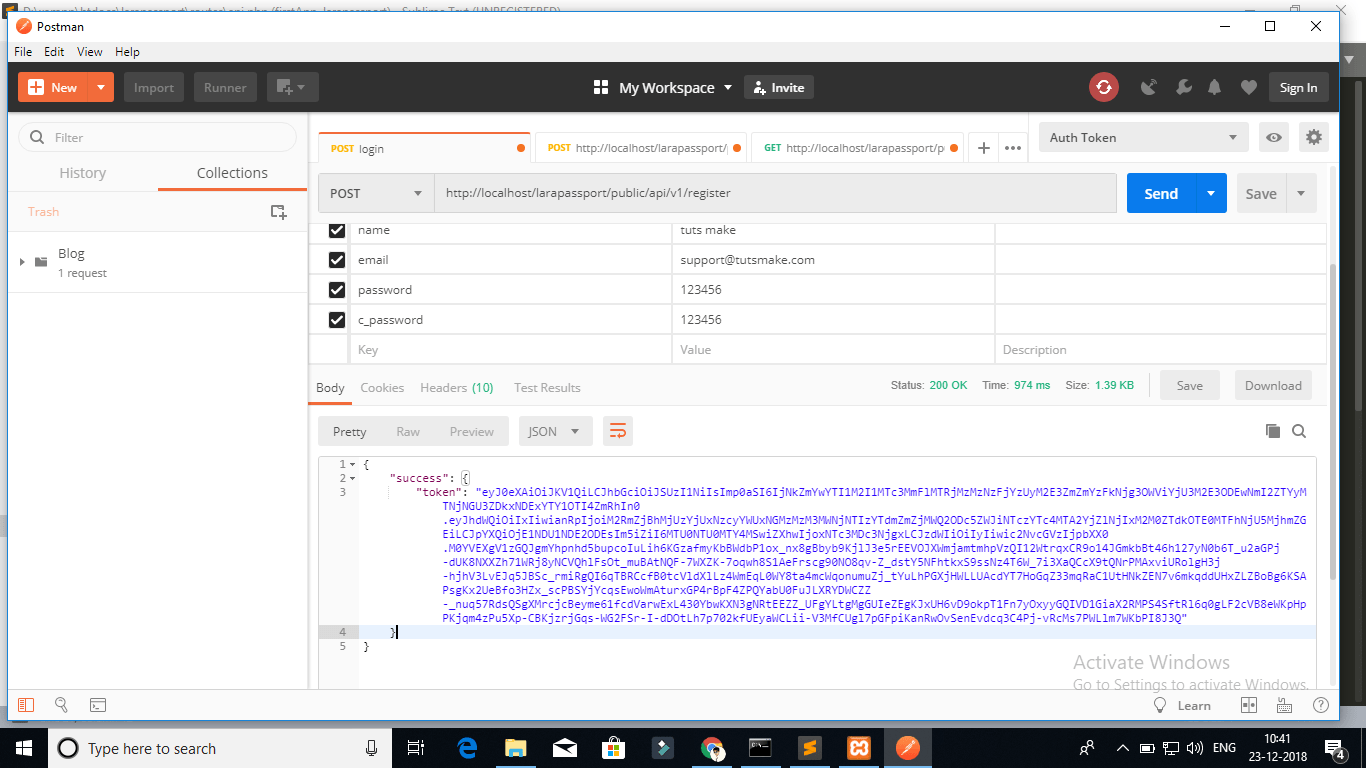
laravel register api
Login Api :
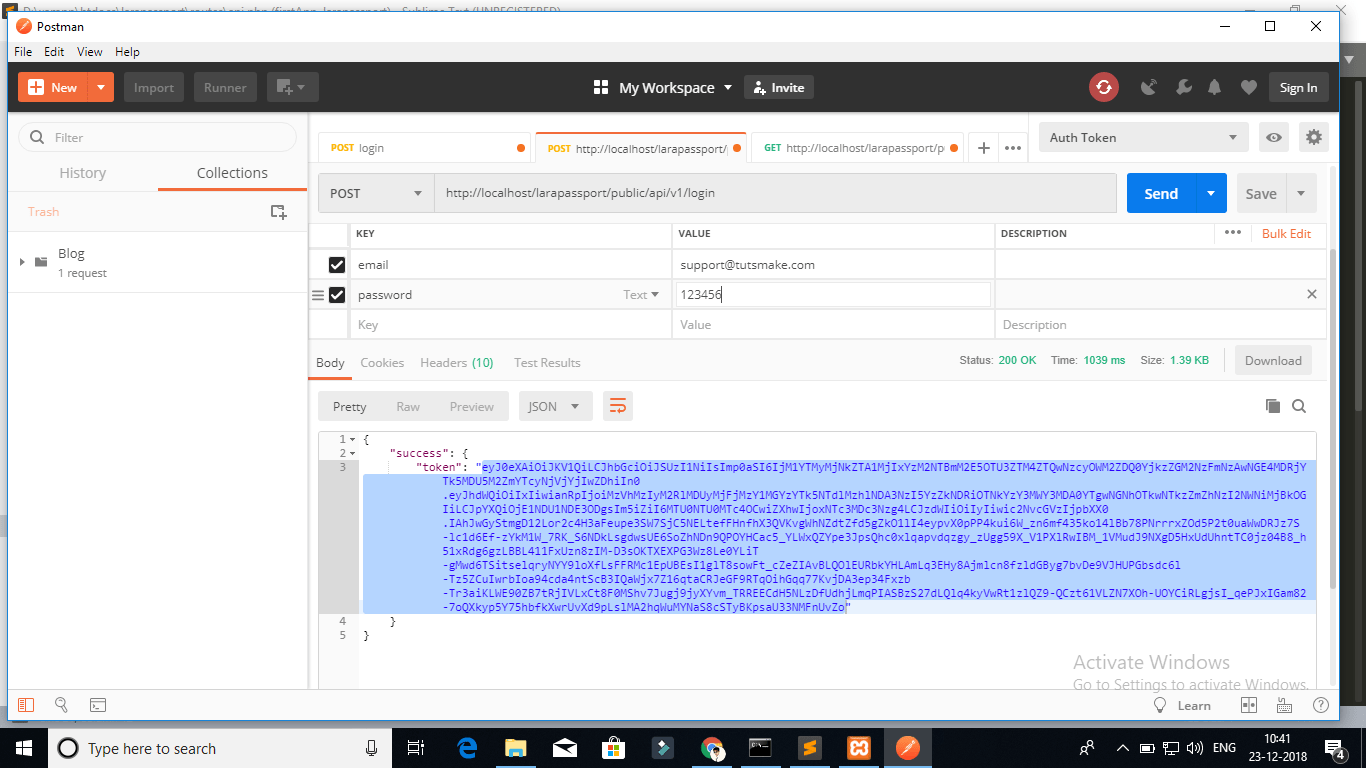
laravel passport login api
Next Step , we will call getUser api, In this api you have to set two header followning :
 Call login or register apis put $accessToken.

 ‘headers’ => [
 ‘Accept’ => ‘application/json’,
 ‘Authorization’ => ‘Bearer ‘.$accessToken,

 ]
Pass header in login / register rest api. it is neccessary to passport authentication in laravel app
Conclusion
Laravel passport – We have successfully install laravel passport package and also configuration passport package in laravel application. Using the laravel passport package we have successfully create rest authentication login api, register api and get user info api.
If you have any questions or thoughts to share, use the comment form below to reach us.
Laravel 5.8 New Login Register System
Laravel login authentication register with example. In this laravel 5.8 default login authentication system, we will study about how to create laravel login authentication and register with example .Step by Step Guide to Building Your First laravel login authentication and register Laravel 5.8 Application. A complete step by step complete guide.
Laravel 5.8 is recently release with great new features and improvents. We are going to show you how to create login and register auth system using one command name php artisan make:auth. This command will create some default views blade, controllers and routes. that is help to login and register a users.
Contents
- Released Laravel 5.8 What’s New Features in Laravel 5.8
- Create REST API using Passport Laravel 5.8 Authentication
- Laravel 5.8 New Login Register System
- Laravel 5.8 New Email Verification
- Laravel 5.8 DataTables Ajax Crud Tutorial
- Laravel 5.8 v2 Google ReCAPTCHA Integration
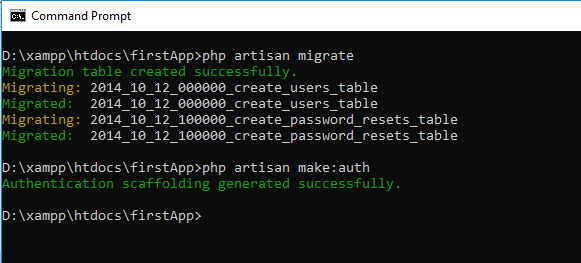
1. First Install Laravel Fresh Project
First we have install laravel new setup in our system . where we installed php. open your terminal and type the below command :
composer create-project --prefer-dist laravel/laravel firstApp
Note : In this command **firstApp **is project folder name
If your using ubuntu machine. open your terminal and go to your project root directory and type the command in command prompt :
sudo chmod  -R 777 storage

sudo chmod  -R 777 bootstrap
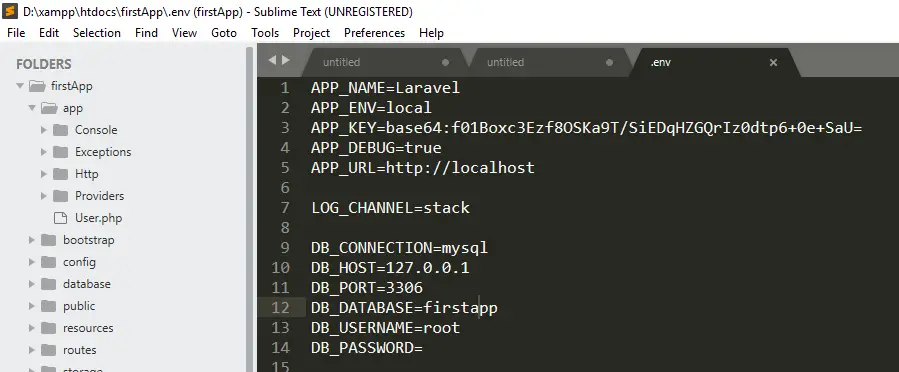
2. Configuration changes in .env file
After successfully installed the laravel application, in the next step is configuration .evn file. Let’s open .env file and setup database credential like database name , database user name , databasse password and host.
3. Generate Laravel Application Key
Configuration compeleted successfully of .evn file , Let’s open the command prompt and generate laravel application key using this given below command.
php artisan key:generate
4. Database Migration
Before you run php artisan migrate command.
Go to the app/providers/AppServiceProvider.php and put the two line of code inside a boot method
Use Schema;

public function boot() {

 Schema::defaultStringLength(191);

 }
Use this below command , it will automatic created tables in your database. A new migration file is created by you. You update the code in that migration, run php artisan migrate again, and you have a new column in your table.
php artisan migrate
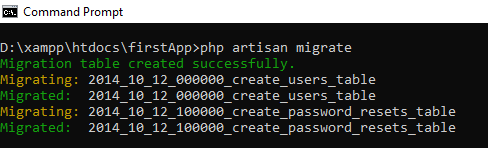
php artisan migrate
**5. **Laravel Authentication
This command will create routes , controllers and views files for Laravel Login Authentication and registration. It means provide a basic laravel login authentication and registration Complete system. Let’s open the command propmt and type the below command.
php artisan make:auth
php artisan make auth
6. Now run the created project
In this step to use the php artisan serve command .it will start your server locally
php artisan serve

If you want to run the project diffrent port so use this command

php artisan serve --port=8080
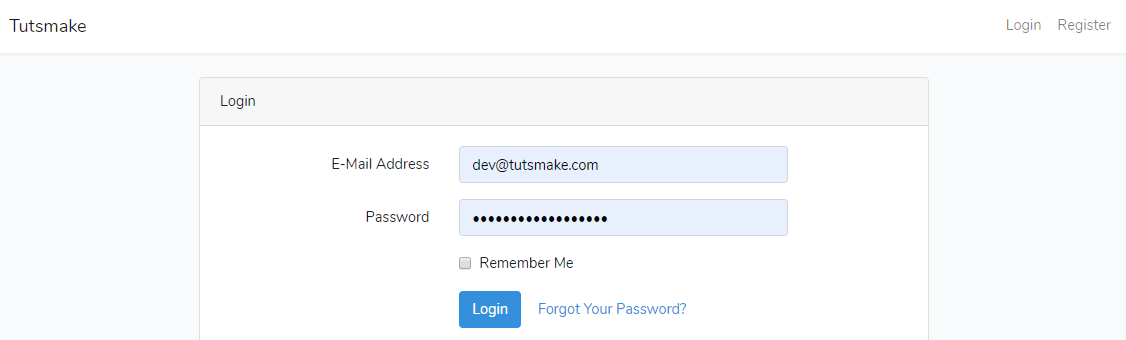
laravel authentication is successfully completed, Now Go to the browser and hit the
If your using ubuntu machine. open your terminal and go to your project root directory and type the command in command prompt :
If you not run php artisan server command , direct go to your browser and type the url
If your using ubuntu machine. open your terminal and go to your project root directory and type the command in command prompt :
On your browser see this :
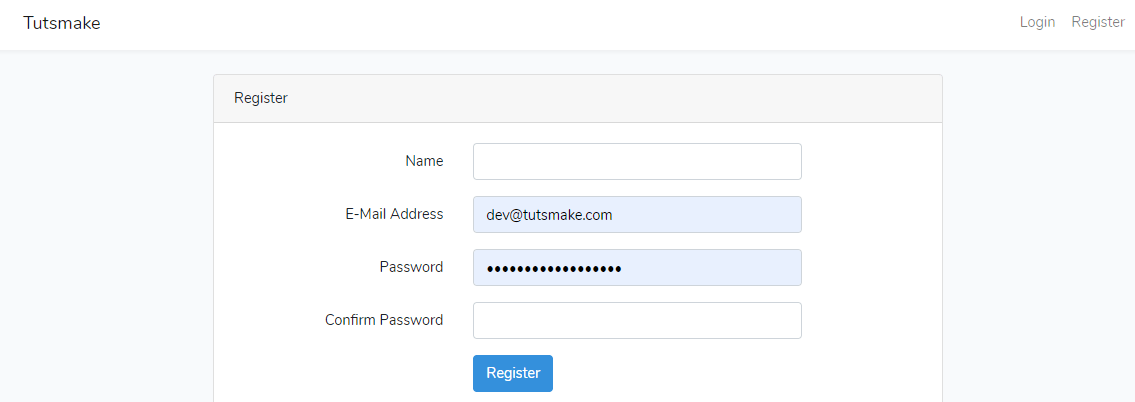
Laravel 5.8 Register Screen :
7. Conclusion
We have successfully install laravel 5.8 fresh new application and also created laravel login authentication.
I hope you like it, If you have any questions or thoughts to share, use the comment form below to reach us.
Laravel 5.8 New Email Verification
In this simple laravel 5.8 email verification exmaple, we would like to share with you how to verify email after user registration in laravel app. We will use laravel new feature MustEmailVerify Contracts and after user successfully verify email that time we will authenticate and redirect to user dashboard. We will show you each thing step by step.
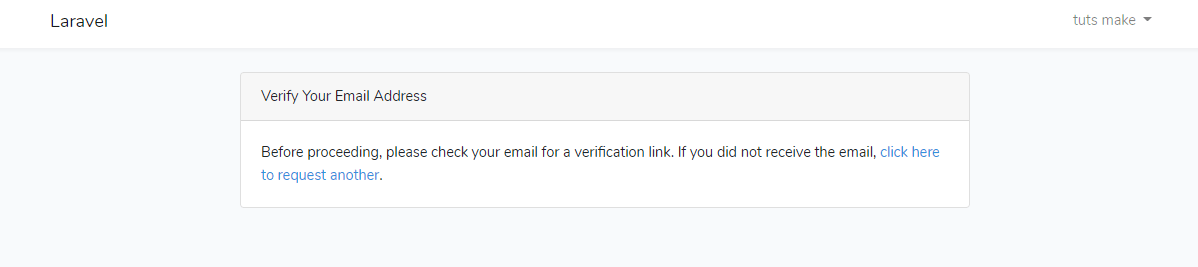
If the user registers with us, but does not verification of email in laravel project. User can not access the dashboard in Laravel 5.8 based project. The user can show the message “Before proceeding, please check your email for verification link. If you have not received the email, then click to request another.”
Laravel default email verification process is very simple and easy. We can also modify default email template and create new custom email template of email verification, password reset, forgot password and replace to default templates .Laravel email verification feature has reduce most time of developement.
Contents
- Released Laravel 5.8 What’s New Features in Laravel 5.8
- Create REST API using Passport Laravel 5.8 Authentication
- Laravel 5.8 New Login Register System
- Laravel 5.8 New Email Verification
- Laravel 5.8 DataTables Ajax Crud Tutorial
- Laravel 5.8 v2 Google ReCAPTCHA Integration
Install Laravel 5.8 App
First of we need to download laravel 5.8 fresh setup. Use the below command and download fresh new laravel setup :
composer create-project --prefer-dist laravel/laravel Email-Verification
Setup Database
After successfully download laravel 5.8 Application, Go to your project .env file and set up database credential and move next step :
 DB_CONNECTION=mysql
 DB_HOST=127.0.0.1
 DB_PORT=3306
 DB_DATABASE=here your database name here
 DB_USERNAME=here database username here
 DB_PASSWORD=here database password here
After successfully set database credential, Now setup smtp credential in .env. We have used mailtrap smtp credential in this example.
 MAIL_DRIVER=smtp
 MAIL_HOST=smtp.mailtrap.io
 MAIL_PORT=2525
 MAIL_USERNAME=your_mailtrap_user_name
 MAIL_PASSWORD=your_mailtrap_user_password
 MAIL_ENCRYPTION=tls
The smtp service you want can be used for email verification in the Laravel project. Like Gmail SMTP , Yahoo SMTP, Melgun SMTP etc
Create Auth Scaffolding
In this step, we will run the below command. It will create a default views, controllers, routes for default laravel 5.8 complete login registration system :
php artisan make:auth
Migrate Database
Before we run php artisan migrate command go to app/providers/AppServiceProvider.php and put the below code :
 use Illuminate\Support\Facades\Schema;

 function boot()
 {
     Schema::defaultStringLength(191);
 }
Now we will run the below command. It will create some tables in our database, Use the below command :
php artisan migrate
After migrate the database tables we need to add the MustVerifyEmail Contracts in App/User.php. Open the App/User.php file add the constructor like :
<?php

namespace App;

use Illuminate\Notifications\Notifiable;
use Illuminate\Contracts\Auth\MustVerifyEmail;
use Illuminate\Foundation\Auth\User as Authenticatable;

class User extends Authenticatable implements MustVerifyEmail
{
    use Notifiable;

    /**
     * The attributes that are mass assignable.
     *
     * @var array
     */
    protected $fillable = [
        'name', 'email', 'password',
    ];

    /**
     * The attributes that should be hidden for arrays.
     *
     * @var array
     */
    protected $hidden = [
        'password', 'remember_token',
    ];
}
Add Route
We will create one routes in web.php file for email verification in laravel 5.8 App. Go to app/routes/web.php file and create one below routes here :
 Route::get('/', function () {
     return view('welcome');
 });

 //first
 Auth::routes();

 //after
 Auth::routes(['verify' => true]);
Add Middleware In Controller
We need to add Middleware in controller constructor. Go to app/controllers/HomeController
and put this line $this->middleware([‘auth’, ‘verified’]); inside of constructor :
<?php

namespace App\Http\Controllers;

use Illuminate\Http\Request;

class HomeController extends Controller
{
    /**
     * Create a new controller instance.
     *
     * @return void
     */
    public function __construct()
    {
        $this->middleware(['auth', 'verified']);
    }

    /**
     * Show the application dashboard.
     *
     * @return \Illuminate\Http\Response
     */
    public function index()
    {
        return view('home');
    }
}
when user try to access the dashboard our laravel 5.8 app without email verification. User can not access without verify email in laravel app, We have added the line of code inside the controller constructor. It will check the user’s email verification whether email is verification or not in laravel project.
Start Development Server
We need to start development server. Use the php artisan serve command and start your server :
 php artisan serve
 If you want to run the project diffrent port so use this below command
 php artisan serve --port=8080
Now we are ready to run our example so run bellow command to quick run.
 http://localhost:8000/
 Or direct hit in your browser
 http://localhost/Email-Verification/public
Conclusion
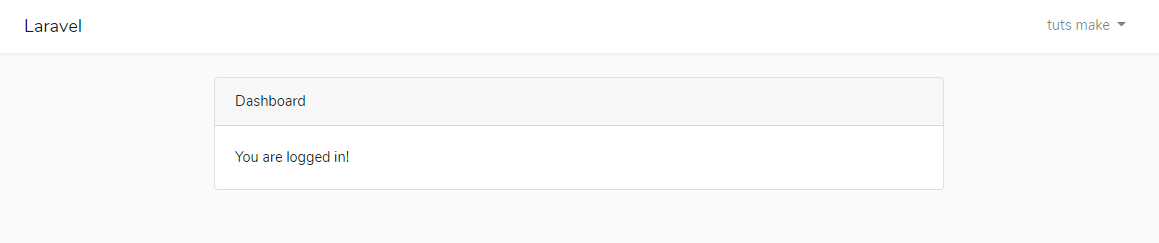
In this laravel 5.8 tutorial for email verification, We have successfully verify email address after user registration. If user is not verify his/her email. User can not login with our laravel 5.8 Based Project. our examples run quickly.
Laravel 5.8 tutorial for email verification example look like this :
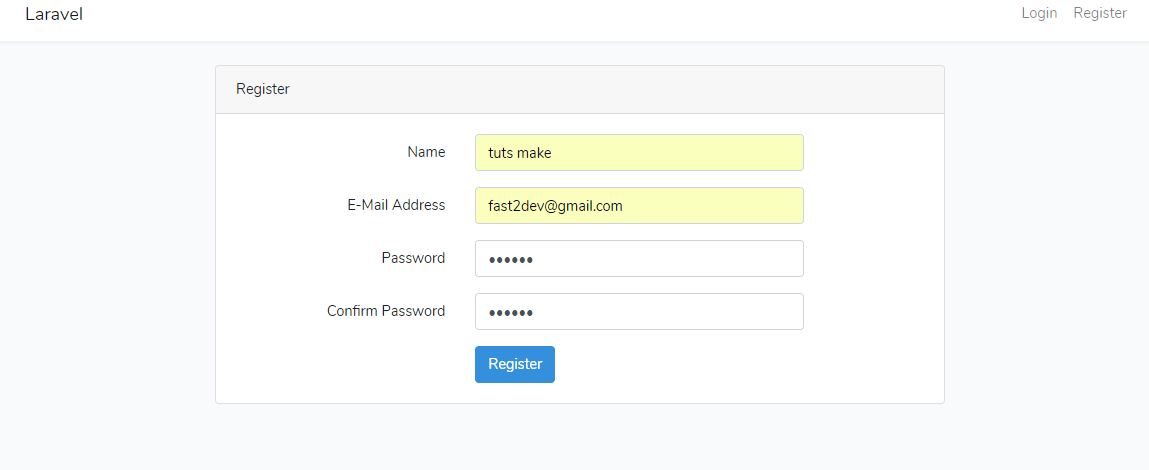
Laravel 5.8 Based Project – Registration Display
After registration we got the email for verification (laravel project). Check the email and verify email address.
Email Verification – After Login Display, If user does not verify it’s email :
Laravel 5.8 Based Project – Successfully Verify email address :
If you have any questions or thoughts to share, use the comment form below to reach us.
Laravel 5.8 DataTables Ajax Crud Tutorial

Laravel 5.8 DataTables Ajax Crud – Today we will discuss how to create crud operation using the dataTable. We are going to show you how to create users list, create users, edit users and delete users with dataTable.
Today we are going to create users management using the yajra dataTables in laravel application. We will create easy crud operation using ajax.
Today we are create add, edit and delete using ajax without refresh (reload) a page. We will use yajra dataTables Draw function to displaying the list without refresh.
Contents
- Released Laravel 5.8 What’s New Features in Laravel 5.8
- Create REST API using Passport Laravel 5.8 Authentication
- Laravel 5.8 New Login Register System
- Laravel 5.8 New Email Verification
- Laravel 5.8 DataTables Ajax Crud Tutorial
- Laravel 5.8 v2 Google ReCAPTCHA Integration
Install Laravel 5.8
First We need Download fresh Laravel 5.8 setup. Use the below command to download the laravel 5.8 fresh setup on your system.
composer create-project --prefer-dist laravel/laravel LaravelDemo
Setup Database
After successfully download laravel 5.8 Application, Go to your project .env file and set up database credential and move next step :
 DB_CONNECTION=mysql
 DB_HOST=127.0.0.1
 DB_PORT=3306
 DB_DATABASE=here your database name here
 DB_USERNAME=here database username here
 DB_PASSWORD=here database password here
Database Migration
We need to do database migration of tables using below command:
php artisan migrate
This command will create neccessary tables in our database.
Install Yajra Datatables Package in Laravel
Now We will Install Yajra Datatables Packages in your laravel 5.8 application. Use the below command and install yajra packages in your laravel application.
composer require yajra/laravel-datatables-oracle
After successfully Install Yajra Datatables Packages, open config/app.php file and add service provider and alias.
 config/app.php


 'providers' => [


 Yajra\Datatables\DatatablesServiceProvider::class,
 ],


 'aliases' => [


 'Datatables' => Yajra\Datatables\Facades\Datatables::class,
 ]
After set providers and aliases then publish vendor run by following command.
php artisan vendor:publish
Add Fake Records
We need to add some fake records in database. Use the below command for add fake records in your database.
php artisan tinker
After run the php artisan tinker. Use the below command. This command will add 150 fake records in your database
If your using ubuntu machine. open your terminal and go to your project root directory and type the command in command prompt :#### Create Route, Controller & Blade View
Add Route
Now we will add routes in web.php file as like below.
Open routes/web.php file
 Route::resource('ajax-crud-list', 'UsersController');
 Route::post('ajax-crud-list/store', 'UsersController@store');
 Route::get('ajax-crud-list/delete/{id}', 'UsersController@destroy');
Create Controller
We need to create new controller UsersController that will manage two method. lets use this below command and create Controller.
php artisan make:controller UsersController
Now open the controller let’s go to the => app/Http/Controllers/UsersController.php. Now create some methods for add user, edit user and delete user.
<?php

namespace App\Http\Controllers;

use App\User;
use Illuminate\Http\Request;
use Redirect,Response;

class UsersController extends Controller
{
/**
 * Display a listing of the resource.
 *
 * @return \Illuminate\Http\Response
 */
public function index()
{
    if(request()->ajax()) {
        return datatables()->of(User::select('*'))
        ->addColumn('action', 'DataTables.action')
        ->rawColumns(['action'])
        ->addIndexColumn()
        ->make(true);
    }
    return view('list');
}


/**
 * Store a newly created resource in storage.
 *
 * @param  \Illuminate\Http\Request  $request
 * @return \Illuminate\Http\Response
 */
public function store(Request $request)
{
    $userId = $request->user_id;
    $user   =   User::updateOrCreate(['id' => $userId],
                ['name' => $request->name, 'email' => $request->email]);
    return Response::json($user);
}


/**
 * Show the form for editing the specified resource.
 *
 * @param  \App\Product  $product
 * @return \Illuminate\Http\Response
 */
public function edit($id)
{
    $where = array('id' => $id);
    $user  = User::where($where)->first();

    return Response::json($user);
}


/**
 * Remove the specified resource from storage.
 *
 * @param  \App\Product  $product
 * @return \Illuminate\Http\Response
 */
public function destroy($id)
{
    $user = User::where('id',$id)->delete();

    return Response::json($user);
}
}
Create Blade View
First Create Button view
We need to create action.blade.php file. This file contain two button name edit and delete.
<a href="javascript:void(0)" data-toggle="tooltip"  data-id="{{ $id }}" data-original-title="Edit" class="edit btn btn-success edit-user">
    Edit
</a>
<a href="javascript:void(0);" id="delete-user" data-toggle="tooltip" data-original-title="Delete" data-id="{{ $id }}" class="delete btn btn-danger">
    Delete
</a>
Next, create list.blade.php file in resources/views/ folder and copy past following code.
<!DOCTYPE html>

<html lang="en">
<head>
<!-- CSRF Token -->
<meta name="csrf-token" content="{{ csrf_token() }}">
<title>Laravel DataTable Ajax Crud Tutorial - Tuts Make</title>
<link rel="stylesheet" href="https://cdnjs.cloudflare.com/ajax/libs/twitter-bootstrap/4.1.3/css/bootstrap.min.css" />
<link  href="https://cdn.datatables.net/1.10.16/css/jquery.dataTables.min.css" rel="stylesheet">
<script src="https://ajax.googleapis.com/ajax/libs/jquery/1.9.1/jquery.js"></script>
<script src="https://cdnjs.cloudflare.com/ajax/libs/jquery-validate/1.19.0/jquery.validate.js"></script>
<script src="https://cdn.datatables.net/1.10.16/js/jquery.dataTables.min.js"></script>
<script src="https://stackpath.bootstrapcdn.com/bootstrap/4.1.3/js/bootstrap.min.js"></script>
</head>
<body>

<div class="container">
<h2>Laravel DataTable Ajax Crud Tutorial - <a href="https://www.tutsmake.com" target="_blank">TutsMake</a></h2>
<br>
<a href="https://www.tutsmake.com/how-to-install-yajra-datatables-in-laravel/" class="btn btn-secondary">Back to Post</a>
<a href="javascript:void(0)" class="btn btn-info ml-3" id="create-new-user">Add New</a>
<br><br>

<table class="table table-bordered table-striped" id="laravel_datatable">
   <thead>
      <tr>
         <th>ID</th>
         <th>S. No</th>
         <th>Name</th>
         <th>Email</th>
         <th>Created at</th>
         <th>Action</th>
      </tr>
   </thead>
</table>
</div>

<div class="modal fade" id="ajax-crud-modal" aria-hidden="true">
<div class="modal-dialog">
<div class="modal-content">
    <div class="modal-header">
        <h4 class="modal-title" id="userCrudModal"></h4>
    </div>
    <div class="modal-body">
        <form id="userForm" name="userForm" class="form-horizontal">
           <input type="hidden" name="user_id" id="user_id">
            <div class="form-group">
                <label for="name" class="col-sm-2 control-label">Name</label>
                <div class="col-sm-12">
                    <input type="text" class="form-control" id="name" name="name" placeholder="Enter Name" value="" maxlength="50" required="">
                </div>
            </div>

            <div class="form-group">
                <label class="col-sm-2 control-label">Email</label>
                <div class="col-sm-12">
                    <input type="email" class="form-control" id="email" name="email" placeholder="Enter Email" value="" required="">
                </div>
            </div>
            <div class="col-sm-offset-2 col-sm-10">
             <button type="submit" class="btn btn-primary" id="btn-save" value="create">Save changes
             </button>
            </div>
        </form>
    </div>
    <div class="modal-footer">

    </div>
</div>
</div>
</div>
</body>
</html>
Script logic
Next we will create script tag and write some code for showing list, create user, edit user and delete user. In this script, put the below of after closing of body tag.
<script>
 $(document).ready( function () {
   $.ajaxSetup({
      headers: {
          'X-CSRF-TOKEN': $('meta[name="csrf-token"]').attr('content')
      }
  });
  $('#laravel_datatable').DataTable({
         processing: true,
         serverSide: true,
         ajax: {
          url: SITEURL + "ajax-crud-list",
          type: 'GET',
         },
         columns: [
                  {data: 'id', name: 'id', 'visible': false},
                  {data: 'DT_RowIndex', name: 'DT_RowIndex', orderable: false,searchable: false},
                  { data: 'name', name: 'name' },
                  { data: 'email', name: 'email' },
                  { data: 'created_at', name: 'created_at' },
                  {data: 'action', name: 'action', orderable: false},
               ],
        order: [[0, 'desc']]
      });
 /*  When user click add user button */
    $('#create-new-user').click(function () {
        $('#btn-save').val("create-user");
        $('#user_id').val('');
        $('#userForm').trigger("reset");
        $('#userCrudModal').html("Add New User");
        $('#ajax-crud-modal').modal('show');
    });

   /* When click edit user */
    $('body').on('click', '.edit-user', function () {
      var user_id = $(this).data('id');
      $.get('ajax-crud-list/' + user_id +'/edit', function (data) {
         $('#name-error').hide();
         $('#email-error').hide();
         $('#userCrudModal').html("Edit User");
          $('#btn-save').val("edit-user");
          $('#ajax-crud-modal').modal('show');
          $('#user_id').val(data.id);
          $('#name').val(data.name);
          $('#email').val(data.email);
      })
   });
    $('body').on('click', '#delete-user', function () {

        var user_id = $(this).data("id");
        confirm("Are You sure want to delete !");

        $.ajax({
            type: "get",
            url: SITEURL + "ajax-crud-list/delete/"+user_id,
            success: function (data) {
            var oTable = $('#laravel_datatable').dataTable();
            oTable.fnDraw(false);
            },
            error: function (data) {
                console.log('Error:', data);
            }
        });
    });
   });

if ($("#userForm").length > 0) {
      $("#userForm").validate({

     submitHandler: function(form) {

      var actionType = $('#btn-save').val();
      $('#btn-save').html('Sending..');

      $.ajax({
          data: $('#userForm').serialize(),
          url: SITEURL + "ajax-crud-list/store",
          type: "POST",
          dataType: 'json',
          success: function (data) {

              $('#userForm').trigger("reset");
              $('#ajax-crud-modal').modal('hide');
              $('#btn-save').html('Save Changes');
              var oTable = $('#laravel_datatable').dataTable();
              oTable.fnDraw(false);

          },
          error: function (data) {
              console.log('Error:', data);
              $('#btn-save').html('Save Changes');
          }
      });
    }
  })
}
</script>
Start Development Server
We need to start development server. Use the php artisan serve command and start your server :
 php artisan serve
 If you want to run the project diffrent port so use this below command
 php artisan serve --port=8080
Now we are ready to run our example so run bellow command to quick run.
 http://localhost:8000/
 Or direct hit in your browser
 http://localhost/LaravelDemo/public
Conclusion
In this laravel datatables ajax crud tutorial , We have successfully create a list using yajra datatables and also created add, edit, delete functionality without reloading the page.
If you have any questions or thoughts to share, use the comment form below to reach us.
Laravel 5.8 v2 Google ReCAPTCHA Integration
Laravel Google Recaptcha – Today we will discuss how to use google rechaptch in laravel application. Basically google recaptch is used to verify the user is human or robots.
Today we will integrate google recaptcha in laravel 5.8 application. We will create a one form using google recaptcha and before store data into database, we will verify the form data using laravel validations.
In this google recaptcha tutorial, we will complete all steps and after that we will provide a live demo button. Click the live demo button and test this laravel google recaptcha integration.
Contents
- Released Laravel 5.8 What’s New Features in Laravel 5.8
- Create REST API using Passport Laravel 5.8 Authentication
- Laravel 5.8 New Login Register System
- Laravel 5.8 New Email Verification
- Laravel 5.8 DataTables Ajax Crud Tutorial
- Laravel 5.8 v2 Google ReCAPTCHA Integration
Download Laravel 5.8 Setup
First We need Download fresh Laravel 5.8 setup. Use the below command to download the laravel 5.8 fresh setup on your system.
composer create-project --prefer-dist laravel/laravel LaravelCaptcha
Setup Database Crendentials
After successfully download laravel 5.8 Application, Go to your project .env file and set up database credential and move next step :
  DB_CONNECTION=mysql
  DB_HOST=127.0.0.1
  DB_PORT=3306
  DB_DATABASE=here your database name here
  DB_USERNAME=here database username here
  DB_PASSWORD=here database password here
Install Google Captcha Package
Now We will Install Google Captcha Package in your laravel 5.8 application. Use the below command and install this package in your laravel application.
composer require anhskohbo/no-captcha
After successfully Install Google Captcha Packages, open config/app.php file and add service provider and alias.
 config/app.php


 'providers' => [


 Anhskohbo\NoCaptcha\NoCaptchaServiceProvider::class


 ],


 'aliases' => [


 'NoCaptcha' => Anhskohbo\NoCaptcha\Facades\NoCaptcha::class,


 ]
Get Google Captcha Secrets
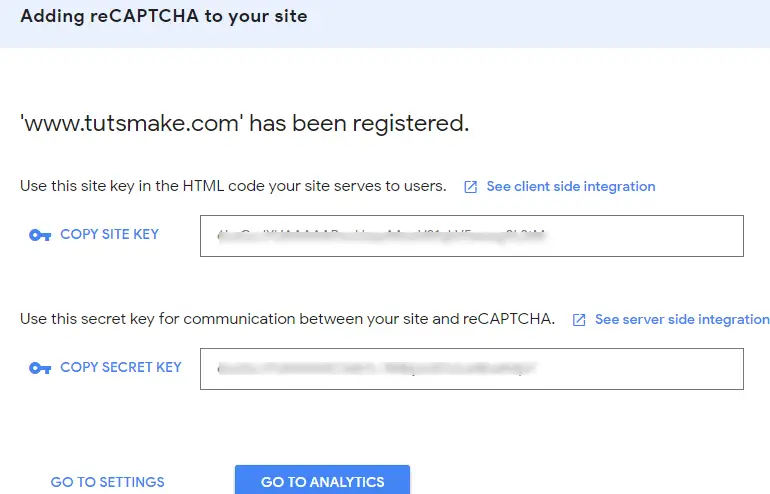
Now will create google recaptcha site_key and secret_key for showing the recaptcha in laravel application. If you have already site_key and secret_key, so you need to put the .env file. If you don’t know where we will got secret_key and secret_site click below the link and create your own secret crendentials. Recaptcha new site registration
When you click this link Recaptcha new site registration you will be see the form look like. Here fill all the details and submit form.
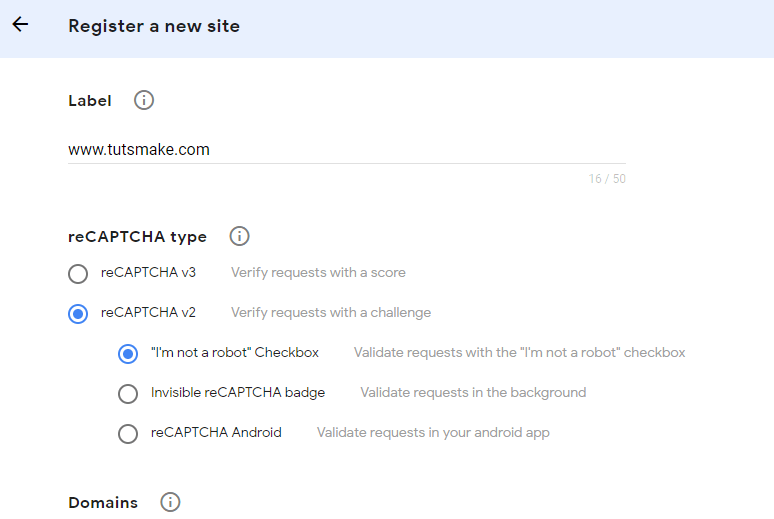
You will submit the above form after that you will be see your secret_site and secret_key, Copy your credentials here and put your .env file
After that, we will set the google captcha secret in .env files, let’s open .env file and add this crendential here :
 NOCAPTCHA_SITEKEY=secret_site_key
 NOCAPTCHA_SECRET=secret_key
Create Route
Now We will add two routes in web.php file as like below. First is showing form and second is store form data into datatabase.
Open routes/web.php file
 Route::get('captcha-form', 'CaptchaController@captchForm');
 Route::post('store-captcha-form', 'CaptchaController@storeCaptchaForm');
Create Controller
We need to create new controller CaptchaController that will manage two method. lets use this below command and create Controller.
php artisan make:controller CaptchaController
Now open the controller let’s go to the => app/Http/Controllers/CaptchaController.php. Now create some methods for showing and storing data into database.
<?php

namespace App\Http\Controllers;

use Illuminate\Http\Request;
use Validator,Redirect,Response;
use App\User;

class CaptchaController extends Controller
{
    public function captchaForm()
    {
       return view('captchaform');
    }
    public function storeCaptchaForm(Request $request)
    {
        request()->validate([
        'name' => 'required',
        'email' => 'required',
        'mobile_number' => 'required',
        'g-recaptcha-response' => 'required|captcha',
        ]);

        dd('successfully validate');
    }
}
Create Blade View
Next, create captchaform.blade.php file in resources/views/ folder and copy past following code.
<!doctype html>
<html lang="en">
  <head>
  <meta charset="utf-8">
  <meta name="viewport" content="width=device-width, initial-scale=1, shrink-to-fit=no">
  <meta name="csrf-token" content="{{ csrf_token() }}">
  <title>Laravel 5.8 Google Recatpcha Verification - Tutsmake.com</title>
  <link rel="stylesheet" href="https://cdnjs.cloudflare.com/ajax/libs/twitter-bootstrap/4.1.3/css/bootstrap.min.css" />
  <script src="http://ajax.googleapis.com/ajax/libs/jquery/1.9.1/jquery.js"></script>
  <script src="https://cdnjs.cloudflare.com/ajax/libs/jquery-validate/1.19.0/jquery.validate.js"></script>
  <script src="https://cdnjs.cloudflare.com/ajax/libs/jquery-validate/1.19.0/additional-methods.min.js"></script>
  <style>
   .error{ color:red; }
  </style>
</head>

<body>

<div class="container">
    <h2 style="margin-top: 10px;" class="text-center">Laravel 5.8 Google Recatpcha Verification - <a href="https://www.tutsmake.com" target="_blank">TutsMake</a></h2>
    <br><br><br>
    <div class="row justify-content-center">
    <div class="col-md-8">
    <a href="https://www.tutsmake.com/laravel-5-8-v2-google-recaptcha-integration" class="btn btn-secondary">Back to Post</a>
    <br><br>

    @if ($message = Session::get('success'))
    <div class="alert alert-success alert-block">
        <button type="button" class="close" data-dismiss="alert">×</button>
          <strong>{{ $message }}</strong>
    </div>
    <br>
    @endif

    <form id="captcha-form" method="post" action="{{url('store-captcha-form')}}">
      @csrf
      <div class="form-group">
        <label for="formGroupExampleInput">Name</label>
        <input type="text" name="name" class="form-control" id="formGroupExampleInput" placeholder="Please enter name">
        <span class="text-danger">{{ $errors->first('name') }}</span>
      </div>
      <div class="form-group">
        <label for="email">Email Id</label>
        <input type="text" name="email" class="form-control" id="email" placeholder="Please enter email id">
        <span class="text-danger">{{ $errors->first('email') }}</span>
      </div>
      <div class="form-group">
        <label for="mobile_number">Mobile Number</label>
        <input type="text" name="mobile_number" class="form-control" id="mobile_number" placeholder="Please enter mobile number">
        <span class="text-danger">{{ $errors->first('mobile_number') }}</span>
      </div>
      <div class="form-group">
        <label for="captcha">Captcha</label>
          {!! NoCaptcha::renderJs() !!}
          {!! NoCaptcha::display() !!}
        <span class="text-danger">{{ $errors->first('g-recaptcha-response') }}</span>
      </div>
      <div class="form-group">
       <button type="submit" class="btn btn-success">Submit</button>
      </div>
    </form>
</div>
</div>
</div>

</body>
</html>
Start Development Server
We need to start development server. Use the php artisan serve command and start your server :
 php artisan serve
 If you want to run the project diffrent port so use this below command
 php artisan serve --port=8080
Now we are ready to run our example so run bellow command to quick run.
 http://localhost:8000/
 Or direct hit in your browser
 http://localhost/LaravelCaptcha/public/captcha-form
Conclusion
In this laravel google recaptcha tutorial , We have successfully created google recaptcha credentials (secret_site and secret_key). After that we have successfully integrate google recaptcha in laravel based application.
If you have any questions or thoughts to share, use the comment form below to reach us.
*Originally published at *https://www.tutsmake.com
=========================
Thanks for reading ❤
If you liked this post, share it with all of your programming buddies!
Follow me on Facebook | Twitter
Further reading
☞ PHP with Laravel for beginners - Become a Master in Laravel
☞ Projects in Laravel: Learn Laravel Building 10 Projects
☞ Laravel for RESTful: Build Your RESTful API with Laravel
☞ Fullstack Web Development With Laravel and Vue.js
☞ Laravel 5.8 Ajax CRUD tutorial using Datatable JS
☞ Laravel 5.8 Tutorial from Scratch for Beginners
☞ Build RESTful API In Laravel 5.8 Example
☞ Login with Google in Laravel 5.8 App using Socialite Package
☞ Laravel PHP Framework Tutorial - Full Course for Beginners (2019)
#laravel #php #web-development