MERN Stack Tutorial - Build a MERN App From Scratch ❤
❤ This article on “MERN Stack Tutorial” will help you to create a Full Stack MERN Application from scratch. Each section of code has been explained to provide a better understanding ❤
You will learn about following technologies while going through this article:
When I wanted to upgrade from being a Front End Developer to a Full Stack Developer, I had trouble finding an article that encompassed the concepts of all the different skills I needed to learn in able to become one.
Knowledge of databases, familiarity with a back-end language and how to integrate the back-end with my front-end app were skills that I didn’t know yet. That is what pushed me to create this article: to solve that in order to help myself and for my fellow software engineers out there.
I’ve included the git repository link of the whole code at the end of the article but I suggest that you take this article step-by-step before checking the repo out. It will help you understand the tutorial better. :)
“What will we build”
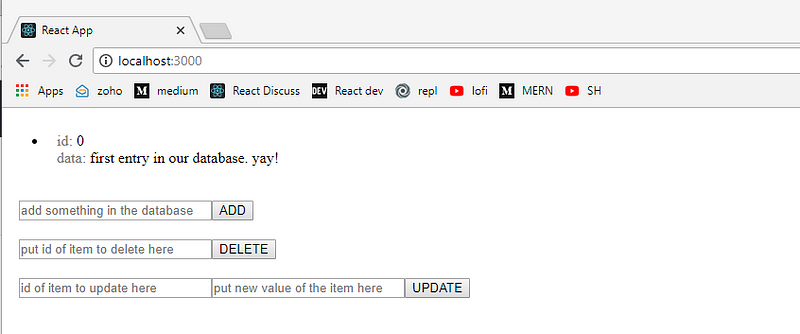
Here is what our app will look like once we’ve finished building it.
The front end allows us to view the current information inside our database. It also allows us to add new data into it, delete a present data and update an already existing one.
We will build it from nothing. We will setup our own database, create the back end from the ground up and bootstrap our front end with the bare minimum.
So, get yourselves strapped in and get your coding fingers ready!
First Things First
Let’s create our project’s main directory. This will hold both the code for the front and back end of our app.
mkdir fullstack_app && cd fullstack_app
Then, let’s start off with our front end. We will use create-react-app to bootstrap our front end, which means that we will not have to worry about setting up Webpack or Babel (as create-react-app sorts this all out by default). If you don’t have create-react-app globally installed yet, fret not, installing it is easy, just type this into our project’s main directory command line.
npm i -g create-react-app
After this, we can now create our react app with create-react-app (pun intended). To do this, just type this in the command line.
create-react-app client && cd client
We will also need Axios in order to make get/post requests with ajax. So let’s install that now:
npm i -S axios
Wait for it to finish and then let’s proceed in organizing the front end so it will be easy to incorporate our back end later.
For PC users:
del src\App.css src\App.test.js src\index.css src\logo.svg\
For MAC users:
rm src/App.css src/App.test.js src/index.css src/logo.svg
Then, let’s edit our App.js file inside the client folder and let it just render something simple. We will further edit this file later on when we have our back end ready.
// client/src/App.js
import React, { Component } from "react";

class App extends Component {
  render() {
    return <div>I'M READY TO USE THE BACK END APIS! :-)</div>;
  }
}

export default App;
“React app ready”
We also have to edit our index.js and remove one line of code from there. We just have to remove the *import ‘./index.css’; part of the code and we can now start our react app
// client/src/index.js

import React from 'react';
import ReactDOM from 'react-dom';
import App from './App';
import registerServiceWorker from './registerServiceWorker';

ReactDOM.render(<App />, document.getElementById('root'));
registerServiceWorker();
“index.js”
In order to start our front end, just type this in the command line.
<em>npm start</em>
and go to your browser and type http://localhost:3000/*. *You can now see that our front end is up and running.
Back It Up Just a Tad
Time to set-up our back end. Go back to our main directory and let’s create our back end directory from there. We will also initialize this directory so that we’ll have our package.json ready for building. Your terminal will prompt you to enter some details for the package.json, just keep pressing enter until it is done.
mkdir backend && cd backend
npm init
Create a new file that will serve as our main code for the back end and name it server.js. Then, type the following into it. This back end code is pretty blunt and basic, I have only created it so that beginners won’t have to think much of the complexity of the code rather than they would think about the code’s intent. Then, they could easy manipulate it afterwards once they wrapped their heads around it. I’ve put comments beside every method for ease of understanding.
const mongoose = require('mongoose');
const express = require('express');
var cors = require('cors');
const bodyParser = require('body-parser');
const logger = require('morgan');
const Data = require('./data');

const API_PORT = 3001;
const app = express();
app.use(cors());
const router = express.Router();

// this is our MongoDB database
const dbRoute =
  'mongodb://jelo:password1@ds249583.mlab.com:49583/fullstack_app';

// connects our back end code with the database
mongoose.connect(dbRoute, { useNewUrlParser: true });

let db = mongoose.connection;

db.once('open', () => console.log('connected to the database'));

// checks if connection with the database is successful
db.on('error', console.error.bind(console, 'MongoDB connection error:'));

// (optional) only made for logging and
// bodyParser, parses the request body to be a readable json format
app.use(bodyParser.urlencoded({ extended: false }));
app.use(bodyParser.json());
app.use(logger('dev'));

// this is our get method
// this method fetches all available data in our database
router.get('/getData', (req, res) => {
  Data.find((err, data) => {
    if (err) return res.json({ success: false, error: err });
    return res.json({ success: true, data: data });
  });
});

// this is our update method
// this method overwrites existing data in our database
router.post('/updateData', (req, res) => {
  const { id, update } = req.body;
  Data.findByIdAndUpdate(id, update, (err) => {
    if (err) return res.json({ success: false, error: err });
    return res.json({ success: true });
  });
});

// this is our delete method
// this method removes existing data in our database
router.delete('/deleteData', (req, res) => {
  const { id } = req.body;
  Data.findByIdAndRemove(id, (err) => {
    if (err) return res.send(err);
    return res.json({ success: true });
  });
});

// this is our create methid
// this method adds new data in our database
router.post('/putData', (req, res) => {
  let data = new Data();

  const { id, message } = req.body;

  if ((!id && id !== 0) || !message) {
    return res.json({
      success: false,
      error: 'INVALID INPUTS',
    });
  }
  data.message = message;
  data.id = id;
  data.save((err) => {
    if (err) return res.json({ success: false, error: err });
    return res.json({ success: true });
  });
});

// append /api for our http requests
app.use('/api', router);

// launch our backend into a port
app.listen(API_PORT, () => console.log(`LISTENING ON PORT ${API_PORT}`));
“Spine of every web app”
You might have noticed that a database link is already used in our back end code. Don’t worry, that’s the next step in our article. Setting it up will also be as easy as the past few steps. First, head on to mlab and create an account there. Mlab will let us use a free 500 MB of MongoDB database and use it remotely. It is also hosted in the cloud. This is the current trend of our industry and acquiring skills that enables us to use cloud database is a real asset nowadays.
After setting up your account, log into your account. Click the Create new button as shown below.
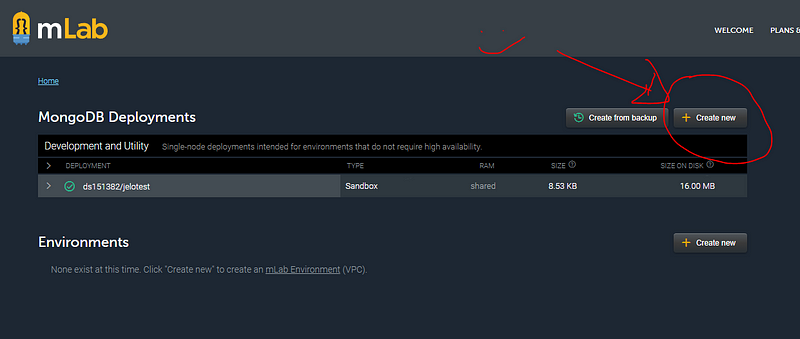
Then, Click on Amazon Web Services as the cloud provider then sandbox as plan type. DON’T WORRY ALL OF THIS IS FOR FREE. ;). Click any **AWS Region then click continue. Input the name of your database then click submit order.
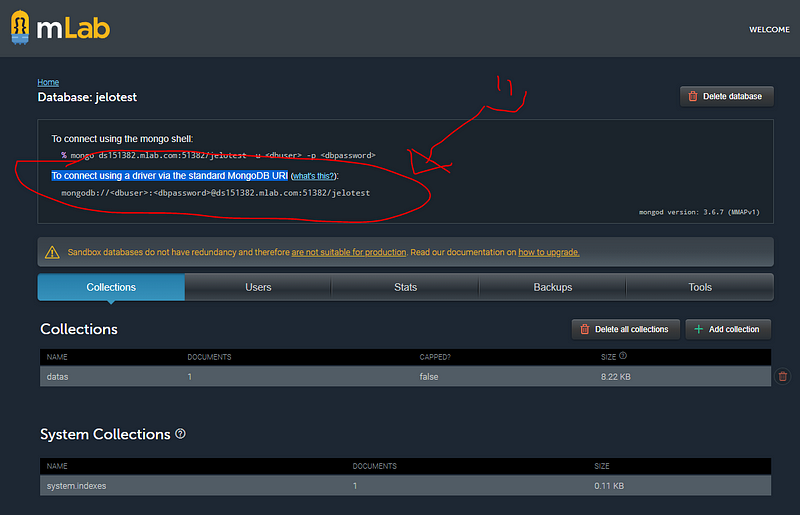
This will redirect you to your mlab homepage, from here, click your newly acquired database then copy the To connect using a driver via the standard MongoDB URI link as shown below. Do not forget to create a user for your database, we will use the created user’s credentials for our mLab link. To do this, just click on the ‘Users’ tab and click create user.
“Call me AWS Certified”
This will be the link to our database. The provided link should be considered as classified and you should not expose this in the front end in real world practices. Jot that down on your notebook, if you will. Paste this link in your server.js file. Find the *dbRoute *variable and put the link with your credentials there as a string.
Now, back to our back end source code. We will now configure our database, in order to do so, create a file named *data.js. *It should have the following code inside it.
// /backend/data.js
const mongoose = require("mongoose");
const Schema = mongoose.Schema;

// this will be our data base's data structure
const DataSchema = new Schema(
  {
    id: Number,
    message: String
  },
  { timestamps: true }
);

// export the new Schema so we could modify it using Node.js
module.exports = mongoose.model("Data", DataSchema);
“MongoDB, Baby”
We are almost DONE! Let’s just install our back end’s package and modules and we are good to go. Just pass this line on your command line.
npm i -S mongoose express body-parser morgan cors
Now, if we launch our back end using
node server.js
We can see in our console that it is ready and is listening on port 3001. Let’s go back to our front end and start creating the UIs needed to dispatch actions unto our MongoDB + Node.JS + Express.JS system.
Aww, yeah!!!
Go back to /client/src/App.js and apply the following changes.
// /client/App.js
import React, { Component } from 'react';
import axios from 'axios';

class App extends Component {
  // initialize our state
  state = {
    data: [],
    id: 0,
    message: null,
    intervalIsSet: false,
    idToDelete: null,
    idToUpdate: null,
    objectToUpdate: null,
  };

  // when component mounts, first thing it does is fetch all existing data in our db
  // then we incorporate a polling logic so that we can easily see if our db has
  // changed and implement those changes into our UI
  componentDidMount() {
    this.getDataFromDb();
    if (!this.state.intervalIsSet) {
      let interval = setInterval(this.getDataFromDb, 1000);
      this.setState({ intervalIsSet: interval });
    }
  }

  // never let a process live forever
  // always kill a process everytime we are done using it
  componentWillUnmount() {
    if (this.state.intervalIsSet) {
      clearInterval(this.state.intervalIsSet);
      this.setState({ intervalIsSet: null });
    }
  }

  // just a note, here, in the front end, we use the id key of our data object
  // in order to identify which we want to Update or delete.
  // for our back end, we use the object id assigned by MongoDB to modify
  // data base entries

  // our first get method that uses our backend api to
  // fetch data from our data base
  getDataFromDb = () => {
    fetch('http://localhost:3001/api/getData')
      .then((data) => data.json())
      .then((res) => this.setState({ data: res.data }));
  };

  // our put method that uses our backend api
  // to create new query into our data base
  putDataToDB = (message) => {
    let currentIds = this.state.data.map((data) => data.id);
    let idToBeAdded = 0;
    while (currentIds.includes(idToBeAdded)) {
      ++idToBeAdded;
    }

    axios.post('http://localhost:3001/api/putData', {
      id: idToBeAdded,
      message: message,
    });
  };

  // our delete method that uses our backend api
  // to remove existing database information
  deleteFromDB = (idTodelete) => {
    parseInt(idTodelete);
    let objIdToDelete = null;
    this.state.data.forEach((dat) => {
      if (dat.id == idTodelete) {
        objIdToDelete = dat._id;
      }
    });

    axios.delete('http://localhost:3001/api/deleteData', {
      data: {
        id: objIdToDelete,
      },
    });
  };

  // our update method that uses our backend api
  // to overwrite existing data base information
  updateDB = (idToUpdate, updateToApply) => {
    let objIdToUpdate = null;
    parseInt(idToUpdate);
    this.state.data.forEach((dat) => {
      if (dat.id == idToUpdate) {
        objIdToUpdate = dat._id;
      }
    });

    axios.post('http://localhost:3001/api/updateData', {
      id: objIdToUpdate,
      update: { message: updateToApply },
    });
  };

  // here is our UI
  // it is easy to understand their functions when you
  // see them render into our screen
  render() {
    const { data } = this.state;
    return (
      <div>
        <ul>
          {data.length <= 0
            ? 'NO DB ENTRIES YET'
            : data.map((dat) => (
                <li style={{ padding: '10px' }} key={data.message}>
                  <span style={{ color: 'gray' }}> id: </span> {dat.id} <br />
                  <span style={{ color: 'gray' }}> data: </span>
                  {dat.message}
                </li>
              ))}
        </ul>
        <div style={{ padding: '10px' }}>
          <input
            type="text"
            onChange={(e) => this.setState({ message: e.target.value })}
            placeholder="add something in the database"
            style={{ width: '200px' }}
          />
          <button onClick={() => this.putDataToDB(this.state.message)}>
            ADD
          </button>
        </div>
        <div style={{ padding: '10px' }}>
          <input
            type="text"
            style={{ width: '200px' }}
            onChange={(e) => this.setState({ idToDelete: e.target.value })}
            placeholder="put id of item to delete here"
          />
          <button onClick={() => this.deleteFromDB(this.state.idToDelete)}>
            DELETE
          </button>
        </div>
        <div style={{ padding: '10px' }}>
          <input
            type="text"
            style={{ width: '200px' }}
            onChange={(e) => this.setState({ idToUpdate: e.target.value })}
            placeholder="id of item to update here"
          />
          <input
            type="text"
            style={{ width: '200px' }}
            onChange={(e) => this.setState({ updateToApply: e.target.value })}
            placeholder="put new value of the item here"
          />
          <button
            onClick={() =>
              this.updateDB(this.state.idToUpdate, this.state.updateToApply)
            }
          >
            UPDATE
          </button>
        </div>
      </div>
    );
  }
}

export default App;
“React Rocks”
Lastly, we edit our front end’s package.json and add a proxy there to point to the port where our back end is deployed.
{
  "name": "client",
  "version": "0.1.0",
  "private": true,
  "dependencies": {
    "axios": "^0.18.0",
    "react": "^16.5.0",
    "react-dom": "^16.5.0",
    "react-scripts": "1.1.5"
  },
  "scripts": {
    "start": "react-scripts start",
    "build": "react-scripts build",
    "test": "react-scripts test --env=jsdom",
    "eject": "react-scripts eject"
  },
  "proxy": "http://localhost:3001"
}
Remember, this is our front end’s package.json so this is included inside the client directory. Edit that there.
There, all that’s left to do is to make it so that we can launch our back end then our front end at the same time.
In order to do that go back to the main directory of our project and type the following:
npm init -y
npm i -S concurrently
Edit the package.json of our main project’s directory. Change it as follows.
{
  "name": "fullstack_app",
  "version": "1.0.0",
  "description": "",
  "main": "index.js",
  "scripts": {
    "start": "concurrently \"cd backend && node server.js\" \"cd client && npm start\""
  },
  "keywords": [],
  "author": "",
  "license": "ISC",
  "dependencies": {
    "concurrently": "^4.0.1"
  }
}
Here, you can see under the *“scripts” key, the “start” *key makes use of the package we just installed, the concurrently package. That package enables us to run the back end code using:
node server.js
And the front end code using:
npm start
There’s a lot happening under the hood in able to do this, but for now, we will just leave it be and be happy that it works! Now, to start our app just go to the main directory of our project then type:
npm start
A browser will open that contains our app and voila! We have made our own MERN (FULL STACK) app from scratch! Feel free to play around with it. Use it as a sand box to grasp the different concepts of both ends here.
Oh, and one more thing. Make sure to enable CORS on your browser since we are calling our own APIs via our own machine. Here is a great plug-in to do just that. 😬
As promise, here is the git repo.
That’s All Folks, cheers!
I hope that I have provided clear instructions and that I was able to transfer as much knowledge as I can, to you, the reader.
#mongodb #express #reactjs #node-js #web-development