How to create a NPM package for React.js using Travis and Heroku
Introduction
We will create the simplest package — Hello World. This article serves to demonstrate how to publish your NPM package, write tests and configure CI/CD more than how to write code for your package.
Starting a project
The first thing we need to do is to create a project. For this we will use create-react-app. This is the best way to start applications based on React library. According to the documentation create-react-app uses Webpack, Babel, EsLint and other projects under the hood. You don’t need to learn and configure many build tools. You can create your own React application using just one command, but if you want an advanced configuration, you can eject from Create React App and edit their config files directly.
Before creating the package let’s open the terminal and go to the folder where we will store it. Then let’s create our NPM package:
npx create-react-app react-salute
cd react-salute
npm start
Then we open http://localhost:3000/ to see our app.
Running these commands will create a React application called react-salute in which will be generated the initial project structure and installed the transitive dependencies:
react-salute
├── README.md
├── node_modules
├── package.json
├── .gitignore
├── public
│   ├── favicon.ico
│   ├── index.html
│   └── manifest.json
└── src
    ├── App.css
    ├── App.js
    ├── App.test.js
    ├── index.css
    ├── index.js
    ├── logo.svg
    └── serviceWorker.js
No configuration or complicated folder structures. Everything is quite simple.
Building a library
We will use a src folder as the main folder in our package. We will use it to store our source code, examples and tests.
Firstly, let’s create a folder src/lib and inside the folder we create index.js file with the following content:
import React from 'react'; import PropTypes from 'prop-types';const ReactSalute = ({ name }) => {
return <h1>Salute {name}!</h1>;
};ReactSalute.propTypes = {
name: PropTypes.string.isRequired,
};ReactSalute.defaultProps = {
name: ‘React’,
};export default ReactSalute;
Despite theexamplesandtestsfolders,libfolder will be used to upload to NPM.
Great job! Now we have created a component which tells us Salute React! , where we can change React word by passing to the component the name parameter. This code will be compiled and published to NPM.
Then we need some ways to check our component locally. For that let’s create a folder /src/examples and there index.js file with the following content:
import React from ‘react’;
import ReactSalute from ‘…/lib’;const Examples = () => {
return (
<section>
<ReactSalute />
<ReactSalute name=“Foo” />
</section>
);
};export default Examples;
It’s quite simple. We import our library and create two examples of its use.
Now, in order to make things work for us, let’s fix our /src/index.js file:
import React from ‘react’;
import ReactDOM from ‘react-dom’;
import Examples from ‘./examples’;ReactDOM.render(<Examples />, document.getElementById(‘root’));
To see the result of our work, let’s run npm run and open browser by link http://localhost:3000/.
It’s working. Great!
We can deleteApp.css, App.js, App.test.js, index.css, logo.svg, serviceWorker.jsfrom the/srcdirectory.
Let’s move on to the next step and create some tests for our package.
Testing
In this chapter we will follow the create-react-app testing documentation.
To test our package, we will use Jest + Enzyme.
Enzyme supports full rendering with mount(), and you can also use it for testing state changes and component lifecycle.Let’s install enzyme :
npm install --save-dev enzyme enzyme-adapter-react-16
As of Enzyme 3, you will need to install Enzyme along with an Adapter corresponding to the version of React you are using.
Create React App uses Jest as its test runner and so it is already installed.
The adapter will also need to be configured in our global setup file. To do so, we create an src/setupTests.js file and place the following:
import { configure } from ‘enzyme’;

import Adapter from ‘enzyme-adapter-react-16’;
configure({ adapter: new Adapter() });
When we run the npm test command Jest will look for test files with any of the following popular naming conventions:
- Files with
.jssuffix intestsfolders. - Files with
.test.jssuffix. - Files with
.spec.jssuffix.
The .test.js / .spec.js files (or the tests folders) can be located at any depth under the srctop level folder.
Now we can write our tests. Put the index.js file into src/tests folder with the following content:
import React from ‘react’;
import { shallow, mount } from ‘enzyme’;import ReactSalute from ‘…/lib’;
describe(‘<ReactSalute />’, () => {
it(‘Check default message’, () => {
const wrapper = shallow(<ReactSalute />);expect(wrapper.text()).toBe('Salute React!');});
it(‘Check message passed through props’, () => {
const name = ‘Foo’;
const wrapper = shallow(<ReactSalute name={name} />);expect(wrapper.text()).toBe(`Salute ${name}!`);});
it(‘Check reset props’, () => {
const name = ‘Foo’;
const newName = ‘Bar’;
const wrapper = mount(<ReactSalute name={name} />);expect(wrapper.props().name).toBe(name); wrapper.setProps({ name: newName }); expect(wrapper.props().name).toBe(newName);});
});
We have created 3 test’s cases. The first case checks the default messageSalute React!. The second one checks message with passedname. And the final one checksnameparameter change.
Our tests are ready, let’s run them:
npm test
After running the tests, we should see something like the following result in the console:
PASS  src/tests/index.js

<ReactSalute />

✓ Check default message (7ms)

✓ Check message passed through props (1ms)

✓ Check reset props (32ms)Test Suites: 1 passed, 1 total

Tests:       3 passed, 3 total

Snapshots:   0 total

Time:        2.598s

Ran all test suites.Watch Usage: Press w to show more.
Our tests are passed and we can move on to the next chapter.
Publishing
The first thing we need to do is to prepare our NPM package and to be exact to compile it. For this, let’s install babel-cli to be able to compile our project using the CLI:
npm install --save-dev @babel/cli
Since we use create-react-app, all other dependencies for babel are already installed and we don’t need to worry about them.Now we need to tell babel how to process our code correctly. For that we will use presets . Let’s create a .babelrc file with the following content:
{ “presets”: [“react-app”] }
As you can see, we have specified only one preset, react-app . It’s required when developing react applications.
Then, we add the following command to the scripts section in the package.json :
“scripts”: {

…

“prepublishOnly”: “NODE_ENV=production babel src/lib --out-dir dist”

},
prepublishOnly — run before the package is prepared and packed, only on npm publish . In our case, we specified telling babel to compile the code into a dist folder, that will be pushed to NPM.
Let’s customize our package.json:
“name”: “react-salute”,

“version”: “0.0.1”,

“main”: “./dist/index.js”,

“keywords”: [

“react”,

“salute”,

“react-salute”,

“hello”,

“world”,

“prop-types”

],

“repository”: {

“type”: “git”,

“url”: “https://github.com/fedoryakubovich/react-salute”

},

“author”: {

“name”: “Fedor Yakubovich”,

“url”: “https://github.com/fedoryakubovich”

},

“bugs”: {

“url”: “https://github.com/fedoryakubovich/react-salute/issues”

},

“files”: [

“dist/index.js”,

“README.md”,

“LICENSE”,

“package.json”

],

“license”: “MIT”

…
Let’s figure out how it works:
name — name of our package. Required field, when publish to npm. In our case it’s react-salute.
version — version of our package. Required field, when publish to npm . Every time we publish our package, the version must be different from the previous one, otherwise there will be an error.
main — the main field is a module ID that is the primary entry point to your program. In our case it’s /dist/index.js.
keywords — it’s an array of strings which helps people to discover your package as it’s listed in npm search.
repository — link to the source code.
author —link to the author profile.
bugs —the url to your project’s issue tracker and / or the email address to which issues should be reported.
files — some special files and directories are also included or excluded regardless of whether they exist in the files array.
license — license for our package.
You can see the advanced settings package.json on the available below link: https://docs.npmjs.com/files/package.json.Next we need to publish our package to NPM. We need to be registered on the website https://www.npmjs.com/. So, if you haven’t registered already, let’s do it.
Once you have registered, enter the following command and then fill in the data from your account that you will be asked:
npm login
This command is required to let the installed npm on your PC know who you are and on which behalf you will publish your package.
Finally, we can publish our package by running the following command:
npm publish
Wonderful, we have published our package.
Configuring Travis CI
In this Chapter, we will not stop on the concept of Continuous Integration. If someone is not familiar with this concept, and in particular with Travis CI, you can read them on the link Core Concepts. It does not take a lot of time.
Firstly, we have to register on https://travis-ci.com/. All we need is to link our GitHub account to Travis CI.
We will use GitHub to store our package, as only GitHub is integrated with Travis CI.
Once we have registered, we need to add configuration file of Travis into the root of our project. Let’s create .travis.yml file with the following content:
language: node_js

node_js:
- ‘10’
script: - npm test
In this file we have described which Travis environment should be used in our project and which command to run. The npm test command is specified in package.json , if we wanted to use a different command for testing, we would have to change our .travis.yml .
Then we need to push our changes to GitHub. After we have pushed them, the task should have started in our Travis. If it does not happen we can go to our Dashboard, find our react-salute repository and Trigger a build using the drop-down list on the right.

Travis — Trigger a build
After the build, we should see something like the following result:
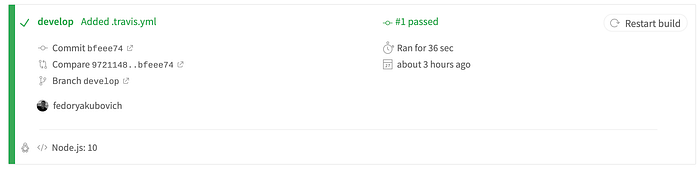
Travis — build results
It means that our tests are passed. And we, in turn, can move on to the final Chapter.
Configuring Heroku
Heroku is a cloud platform which helps to build, deliver, monitor and scale apps. As they call themselves: We’re the fastest way to go from idea to URL. We will use Heroku as a free hosting for our examples.
Firstly we need to register on Heroku. We can do this by following the link https://signup.heroku.com/. Then we have to create a project. To create one, we need to go to the Dashboard and click New->Create new app . Next, we need to enter the name of the project, in our case it is react-salute, and select the region where the server with our application will be located. Choose the region Europe.
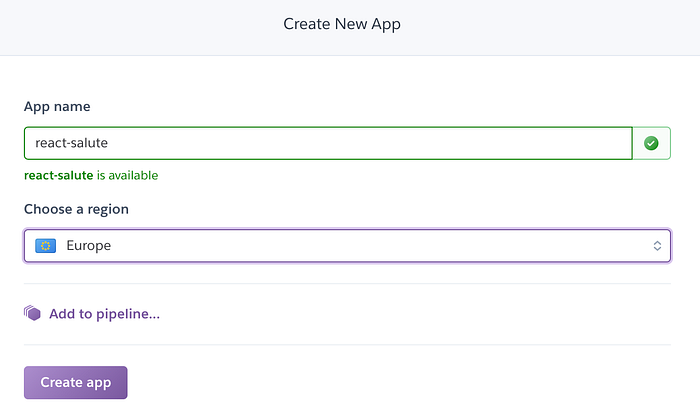
Heroku — Create new app
After submitting the Create app button, we will be redirected to the project deployment settings page. In the Deployment method setup, choose GitHub.
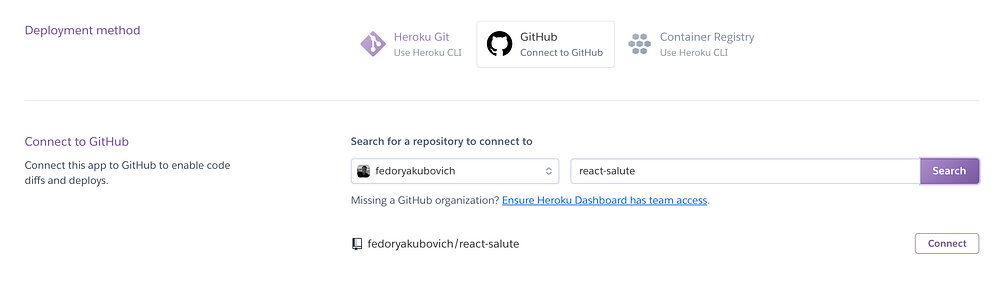
Heroku — Deployment method (step 1)
Then in the Connected to GitHub setup we will be offered to choose the project that we want to link to Heroku project. We need to choose react-salute .
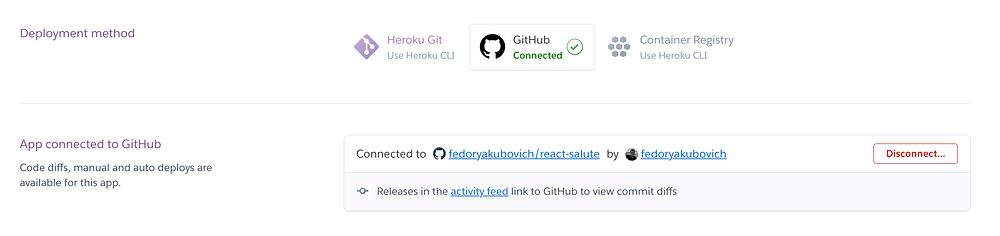
Heroku — Deployment method (step 2)
Next, let’s go to setting up Automatic deploys. Here we will be asked to select the branch which will occur the automatic deployment. We need to choose master branch.
Also, let’s select Wait for CI to pass before deploy checkbox. It means that Heroku will wait for Travis CI to work successfully.
Finally, let’s Enable Automatic Deploys.
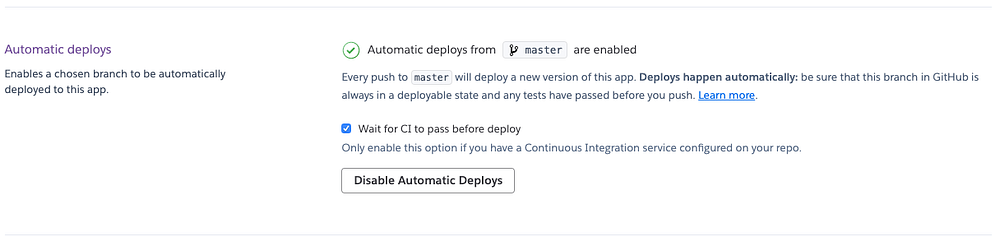
Heroku — Automatic deploys
Now let’s move from the Deploy tab to the Settings tab. In the buildpacks configuration, click the Add buildpack button. In the modal window that opens, in the Buildpack URL field, enter the following address: https://github.com/mars/create-react-app-buildpack, and then we save our changes.

Heroku — Adding buildpack
The create-react-app-buildpack is heroku buildpack, that deploys React.js web apps generated with create-react-app. The buildpack automates deployment with the built-in bundler and serves it up via Nginx.
After we have configured Heroku, we need to go to our Github account, and merge our working branch(develop) to master. After merge, Travis CI will start and run our tests. After the tests are successfully passed, Heroku will start build. After successful completion of the build we will be able to enjoy our result. The URL of our package we can look in the Settings tab in the Domains and certificates setup.

Heroku — Domains and certificates
Let’s open https://react-salute.herokuapp.com/.
In this article we have created the simplest NPM package, written the tests for it, configured Travis CI and Heroku for continuous delivery. Using this article, you can create more complex and useful NPM packages and host their live examples for free.
You can check out the GitHub repo here.
Thanks for reading ❤
If you liked this post, share it with all of your programming buddies!
Follow us on Facebook | Twitter
Further reading
☞ The Complete Node.js Developer Course (3rd Edition)
☞ Angular & NodeJS - The MEAN Stack Guide
☞ NodeJS - The Complete Guide (incl. MVC, REST APIs, GraphQL)
☞ Best 50 Nodejs interview questions from Beginners to Advanced in 2019
☞ Node.js 12: The future of server-side JavaScript
☞ Creating your first npm package
☞ Top 10 npm Security Best Practices
☞ How to publish a React Native component to NPM
☞ npm and the Future of JavaScript
☞ A Beginner’s Guide to npm — the Node Package Manager
☞ Step by step: Building and publishing an NPM Package.
☞ A Beginner’s Guide to npm: The Node Package Manager
#npm #node-js #reactjs
