22 Miraculous Tools for React Developers in 2020
React, as we know it, is a JavaScript library to build amazing user interfaces. However, not everyone is using the same tools or knows the great ones out there that help make the React development experience more fun and proactive.
If you haven’t used React, or have friends that might be interested in using it, what do you say when they ask you why they should use the library?
Besides telling them how great the library is (which should be the first thing), I also like to mention that the tools created by the open-source community help bring the experience to a whole new level of excitement.
Here are 22 tools you can use to build your React apps in 2020 (This list is not in order of their importance)
1. Webpack Bundle Analyzer
Ever wondered which packages or parts of your app are taking up all the space? Well, you can find out with the Webpack Bundle Analyzer. This package will help you identify output files that take up the most space.
It will create a live server and present you with an interactive treemap visualization of the contents of your bundles. With this in your toolkit, you’re able to see where the presented files are located, their gzip size, parsed size, and their parents/children.
The benefits? Well, you can optimize your React app based on what you see!
Here is a screenshot of what this looks like:

You can clearly see that the pdf packages take up the most space in the app. But it also takes the most space on the screen. That’s very useful.
However, the screenshot is minimal. You can also pass in useful options to see it in more detail, such as generateStatsFile: true, and also choose to generate a static HTML file that you can save somewhere outside of your development environment for later use.
2. React-Proto
React-Proto is a prototyping tool for developers and designers. It’s desktop software, so you’d have to download and install the software before using.
Here’s an example of this software in use:

The app lets you declare props and their types, view your components in a tree, import a background image, define them as stateful or stateless, define what their parent components will be, zoom in/out, and export your prototype into a new or existing project.
The app seems more tailored for Mac users, however, but it still works fine for Windows users.
When you’re done mapping out your user interfaces, you can choose to export to either an existing project or a new project. If you choose to export to an existing project and choose your root directory, it will export them to ./src/components, like this:

And here is an example of one of the components we had in the example:

React-Proto acquired over 2,000 stars on GitHub.
Personally though, I think this app needs an update and more work, especially with the release of React Hooks.
It also doesn’t zoom out unless you have a background image visible. In other words, if you import a background image, zoom out, then proceed to delete the background image, you won’t be able to zoom back in because the buttons are greyed out.
The only way to zoom back in is to import the background image back in, then remove it after you zoom back in. That flaw changed my view of this app, but it makes it to this list because we don’t see this open-sourced anywhere else.
And, being open-sourced is the good thing about this app as it gives it the possibility to make the trending open-sourced repositories list in the future. (Their features are important, but they seem to be lacking manpower.)
3. Why Did You Render
The Why Did You Render monkey patches React to notify you about avoidable re-renders.
This is incredibly useful, not only in guiding you to performance fixes for your projects but also to help you understand how React works. And, when you have a better understanding of how React works, it makes you a better React developer.
You can attach a listener to any custom component by declaring an extra static property whyDidYouRender with its value to true:
import React from 'react'
import Button from '@material-ui/core/Button'

const Child = (props) => <div {...props} />

const Child2 = ({ children, ...props }) => (
  <div {...props}>
    {children} <Child />
  </div>
)

Child2.whyDidYouRender = true

const App = () => {
  const [state, setState] = React.useState({})

  return (
    <div>
      <Child>{JSON.stringify(state, null, 2)}</Child>
      <div>
        <Button type="button" onClick={() => setState({ hello: 'hi' })}>
          Submit
        </Button>
      </div>
      <Child2>Child #2</Child2>
    </div>
  )
}

export default App
Only after doing so will your console be put on blast with incredibly annoying warnings:

Don’t take it the wrong way. Take it as a good thing. Leverage those annoying messages so you can fix those wasteful re-renders and those annoying messages will finally leave you alone!
4. Create React App
Everybody knows that Create React App is the quickest way to start developing a React project (with modern features included out of the box).
What could possibly be easier than npx create-react-app <name>?
All of my tutorials on Medium build React interfaces with create-react-app, simply because it’s quick and easy.
What some of us might not know is how to create a TypeScript project using CRA. All you have to do is is add --typescript at the end: npx create-react-app <name> — typescript
That will save you the trouble of manually adding TypeScript to your CRA projects.
5. React Lifecycle Visualizer
React Lifecycle Visualizer is an npm package for tracing and visualizing lifecycle methods of arbitrary React components.
Similar to Why Did You Render, you can enable any component(s) of your choice to bring out the lifecycle visualizer:
import React from 'react'
import {
  Log,
  VisualizerProvider,
  traceLifecycle,
} from 'react-lifecycle-visualizer'

class TracedComponent extends React.Component {
  state = {
    loaded: false,
  }

  componentDidMount() {
    this.props.onMount()
  }

  render() {
    return <h2>Traced Component</h2>
  }
}

const EnhancedTracedComponent = traceLifecycle(TracedComponent)

const App = () => (
  <VisualizerProvider>
    <EnhancedTracedComponent />
    <Log />
  </VisualizerProvider>
)
This will present the visualizer as shown below:

However, one downside to this is that it currently only works for class components, so Hooks aren’t yet supported. (The question is can they be, as this is about lifecycles?)
6. Guppy
Guppy is a friendly and free application manager and task runner for React, which runs on the desktop.
They seem to prioritize people who are newer to developing in React. However, it might also be useful for advanced developers.
It provides a friendly graphical user interface for many typical tasks that React developers face regularly, such as creating new projects, executing tasks, and managing dependencies.
Windows support was added in August 2018, so you can be assured that it’s cross-platform.
Here’s what Guppy looks like:

7. react-testing-library
I’ve always loved react-testing-library because it just feels right when you’re writing your unit tests. This package provides React DOM testing utilities that encourage good testing practices.
This solution aims to solve the problem of testing your implementation details and instead test the input/output of your React components, just like the user would see them.
Testing implementation details is not an effective way of ensuring that your app works as expected.
Sure, you’ll be able to have more confidence in how you’re getting the data your components need, which sort method to use, etc. However, if you have to change the way you implemented that to point to a different database, your unit tests would fail because they are implementation details that are coupled logic.
That’s an issue that react-testing-library solves because, ideally, you just want your user interface to work and for it to be presented correctly in the end.
How you get data to those components doesn’t really matter, as long as they still give the expected output.
Here’s an example code of how you would place tests using this library:
// Hoist helper functions (but not vars) to reuse between test cases
const renderComponent = ({ count }) =>
  render(
    <StateMock state={{ count }}>
      <StatefulCounter />
    </StateMock>,
  )

it('renders initial count', async () => {
  // Render new instance in every test to prevent leaking state
  const { getByText } = renderComponent({ count: 5 })

  await waitForElement(() => getByText(/clicked 5 times/i))
})

it('increments count', async () => {
  // Render new instance in every test to prevent leaking state
  const { getByText } = renderComponent({ count: 5 })

  fireEvent.click(getByText('+1'))
  await waitForElement(() => getByText(/clicked 6 times/i))
})
8. React Developer Tools
React Developer Tools is an extension that allows inspection of React’s component hierarchy in Chrome and Firefox Developer Tools.
This is the most commonly known extension in this list and continues to be one of the most helpful tools that React developers can use to debug their apps.
9. Bit
A good alternative to using component libraries, such as Material-UI or Semantic UI React, is Bit.
Bit lets you explore thousands of open-sourced components and lets you use them to build your projects.
There are so many different React components available for anyone to use, including tabs, buttons, charts, tables, navbars, dropdowns, loading spinners, date pickers, breadcrumbs, icons, layouts, etc.
These are uploaded by other React developers, just like you and I.
But, there are useful utilities available as well, such as formatting distances between dates.
10. Storybook
If you don’t know about Storybook yet, I highly recommend you start using it if you want an easier experience building UI components.
This tool starts up a live development server with hot reloading supported out-of-the-box, where you can develop your React components in real-time, in isolation.
Another great thing about this is that you can use currently existing add-ons that are open-sourced to bring your development experience to a whole new level.
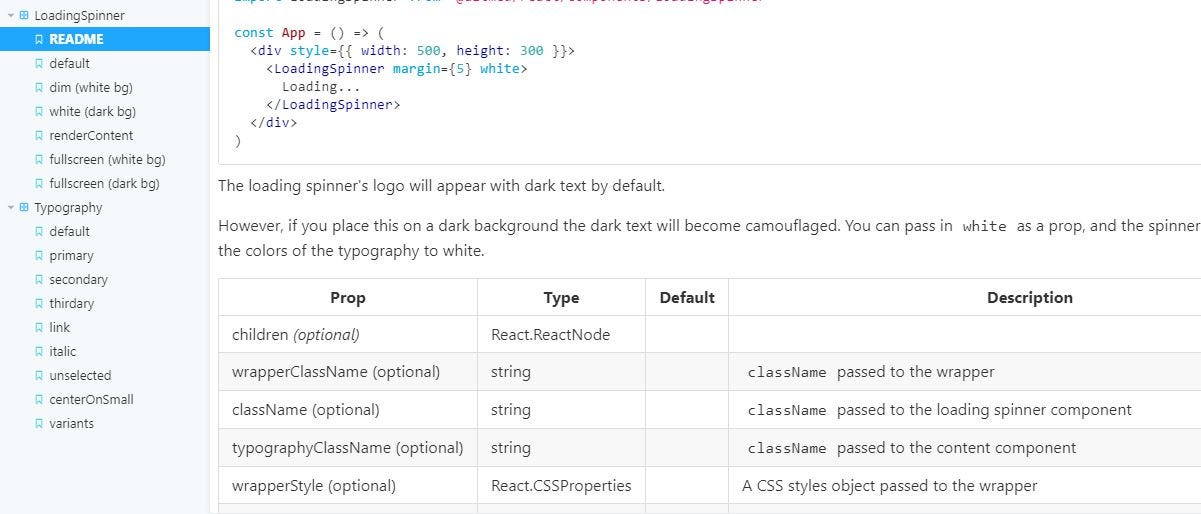
For example, with the Storybook README package, you can create README documentation while developing the React components for production use right on the same page.
This is sufficient to serve as normal documentation pages would:
11. React Sight
Have you ever wondered what your app may look like in a flow chart? Well, React Sight lets you visualize your React apps by presenting you with a live component hierarchy tree of your entire app.
It also supports react-router, Redux, as well as React Fiber.
With this tool, you hover over nodes, which are the links to components that directly relate to them in the tree.
If you’re having trouble seeing results, you may want to type chrome:extensions in your address bar, look for the React Sight box, and click the Allow access to file URLs switch, as shown below:

12. React Cosmos
React Cosmos is a development tool for creating reusable React components.
It scans your project for components and enables you to:
- Render components with any combination of props, context, and state.
- Mock every external dependency (eg. API responses,
localStorage, etc). - See the app state evolve in real-time while interacting with running instances.
13. CodeSandbox
This is hands-down one of the best tools available to get your hands dirty with React faster than the speed of a blink (Ok, maybe not that fast).
This tool, called CodeSandbox, is an online editor that lets you create web applications from prototype to deployment — all from the website!
CodeSandbox originally only supported React in the earlier stages but they’ve now expanded to additional starter templates for libraries such as Vue and Angular.
They also support kickstarting your next React web project by creating projects with common static site generators such as Gatsby or Next.js.
There are so many great things to talk about when it comes to CodeSandbox. For one, it’s incredibly active.
If you need to explore some projects that people are building for your convenience, it’s easy to click explore and get access to a bunch of code examples to help renovate your next project:

Once you start editing a project, you’ll start to realize that what you’re about to use is actually the VS Code editor, which is powerful.
I’d love to write a whole article about all of the features you can use at CodeSandbox today, but it seems like the work has already been done.
14. React Bits
React Bits is a collection of React patterns, techniques, tips, and tricks, all written in an online document-like format where you can quickly access different design patterns and techniques, anti-patterns, styling, UX variations, and other helpful React-related material, all on the same tab.
They have a GitHub repo, currently at 9,923 stars.
Some examples include concepts like props proxying, compositions to handle various UXs in different scenarios, and even exposes some gotchas that every React developer should be aware of.
This is what it’s like to be on their page. As you can see on the side menu to the left, there’s plenty of information:

15. folderize
folderize is a VS Code extension that was released less than seven days ago. It lets you turn a component file into a component folder structure. Your React component will still be a component, it’s just converted into a directory now.
For example, let’s say you were creating a React component that takes files as props to display useful information like their metadata.
The logic for the metadata component takes up plenty of lines, so you decide to split this up into a separate file. But, when you decide to do that, now you have two files that relate to each other.
So, if you have a directory that looks like this:

You might want to abstract out the FileView.js and FileMetadata.js into a directory structure, just like Apples — especially if you’re thinking of adding more components related to files like FileScanner.js.
That’s what folderize does for you so that they can come out with a structure similar to this:

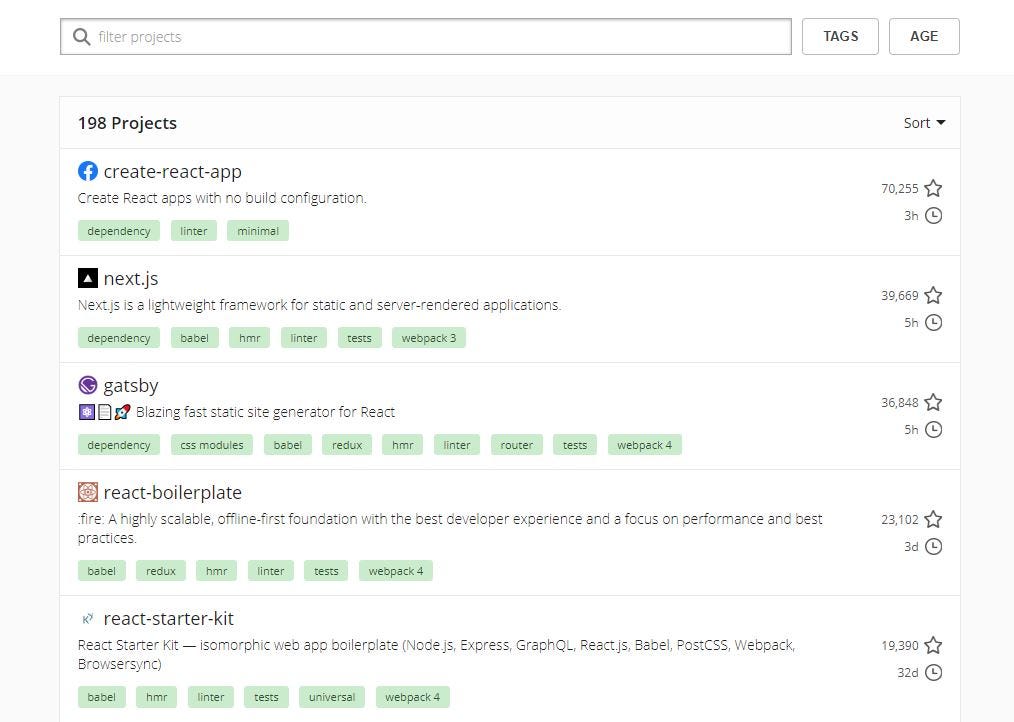
16. React Starter Projects
Here is a great list of React starter projects that you can see all on one page. So, if you’re the type of person who finds it useful to be presented with a huge list of options to choose from at the same time, then this one’s for you.
Once you see a starter project you like, you can simply clone the repository and make your own modifications tailored to your upcoming app.
However, not all of them are intended to be used by cloning the repository because some of them are to be installed instead, which becomes a dependency of your project.
This makes it easier to get updates and keep your project cleaner.
Here is what the page looks like:
17. Highlight Updates
This is arguably the most important tool anyone could ever have in their development toolkit. Highlight Updates is a feature of the React DevTools extension and makes it possible to see which components in your pages are re-rendering unnecessarily:

It helps you spot bottlenecks while developing your pages and makes it even easier because they colorize severe re-rendering issues with orange or red.
Unless you’re aiming to build a mediocre app, why would you not want this beautiful thing on your side?
18. React Diff Viewer
React Diff Viewer is a simple and beautiful text diff viewer made with Diff and React. This supports features like split view, inline view, word diff, line highlight, etc.
This can be useful if you were trying to embed this feature into your notes (like Boostnote) and customize it to be more tailored for your app (theme colors, documentation combination with storybook presentations, etc.)

19. JS.coach
The site I use the most to look for React-related material is JS.coach. Now, I’m not sure why I don’t see many mentions of this gem, but I’ve found just about anything I needed from this page alone.
It’s quick, easy, constantly updated, and never fails to give me the results I need for all of my projects.
They recently added the React VR tab, which is wonderful!
20. Awesome React
The GitHub Awesome React open-sourced repository is a list of awesome things related to React.
I could probably forget about other websites and learn React from this link alone. You’ll find batches of useful resources that will surely help you build great React apps!
21. Proton Native
Proton Native gives you a React environment to build cross-platform native desktop apps.
It’s an alternative to Electron and has some neat features, including:
- Same syntax as React Native.
- Works with existing React libraries, such as Redux.
- Cross-platform.
- Native components. No more Electron.
- Compatible with all normal Node.js packages.
Interested in learning more? Read their documentation.
22. Devhints React.js Cheatsheet
A pretty good cheat sheet for React, although it is missing React Hooks. Not to worry, I will be creating a cheat sheet for React v16.8+, so stay tuned for that.
Conclusion
And that concludes this post! I hope you have found valuable information here and look out for more from me in the future.
Thanks for reading ❤
If you liked this post, share it with all of your programming buddies!
Follow us on Facebook | Twitter
Further reading about React
☞ React - The Complete Guide (incl Hooks, React Router, Redux)
☞ Modern React with Redux [2019 Update]
☞ Best 50 React Interview Questions for Frontend Developers in 2019
☞ JavaScript Basics Before You Learn React
☞ Microfrontends — Connecting JavaScript frameworks together (React, Angular, Vue etc)
☞ Reactjs vs. Angularjs — Which Is Best For Web Development
☞ React + TypeScript : Why and How
☞ How To Write Better Code in React
☞ React Router: Add the Power of Navigation
☞ Getting started with React Router
☞ Using React Router for optimizing React apps
#javascript #reactjs #web-development